Nodes Browser
ComfyDeploy: How Semantic-SAM works in ComfyUI?
What is Semantic-SAM?
Segment and Recognize Anything at Any Granularity.
How to install it in ComfyDeploy?
Head over to the machine page
- Click on the "Create a new machine" button
- Select the
Editbuild steps - Add a new step -> Custom Node
- Search for
Semantic-SAMand select it - Close the build step dialig and then click on the "Save" button to rebuild the machine
ComfyUI_SemanticSAM
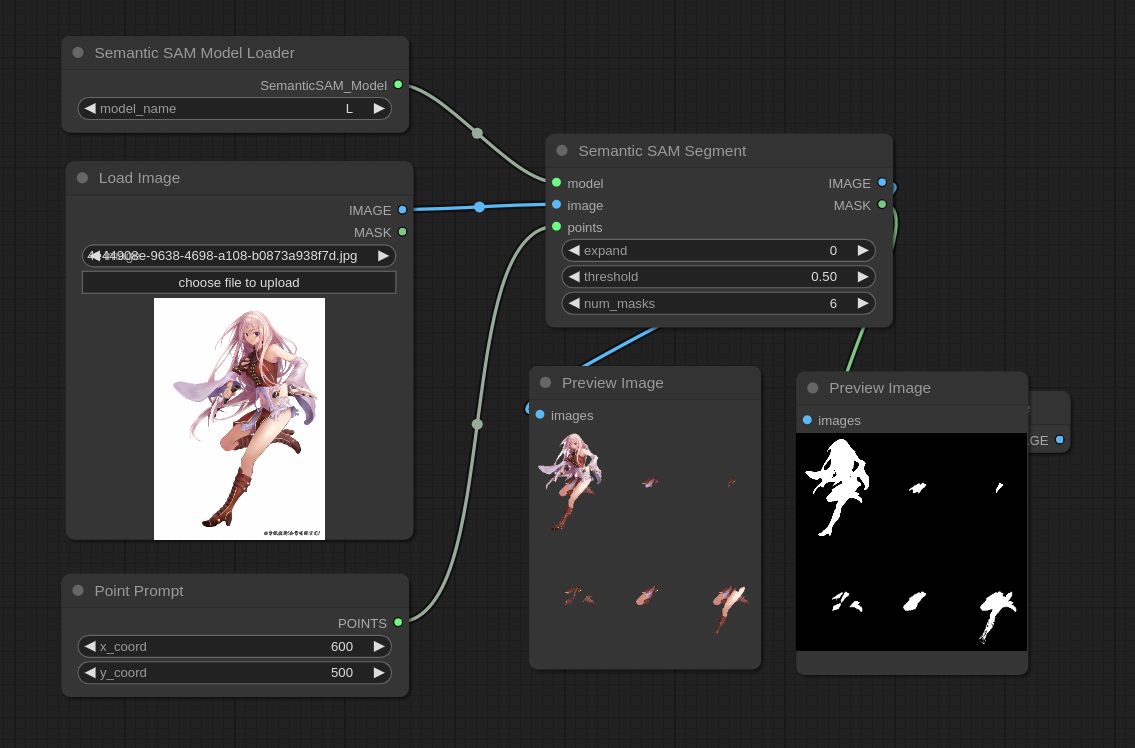
This is a ComfyUI node based-on Semantic-SAM official implementation. We provide a workflow node for one-click segment. Compared with SAM, Semantic-SAM has better fine-grained capabilities and more candidate masks. Users can take this node as the pre-node for inpainting to obtain the mask region.
This node have been valided on Ubuntu-20.04 & CUDA-11.8. Due to detectron2, this node is currently not supported on Windows (unless the compatibility of Detectron2 on Windows is addressed)
Get Start
1. Prepare repo
cd ComfyUI/custom
git clone https://github.com/eastoc/ComfyUI_SemanticSAM
cd ComfyUI_SemanticSAM
git clone https://github.com/facebookresearch/detectron2
git clone https://github.com/facebookresearch/Mask2Former
Because detectron2 has not been updated, if the CUDA=11.8, you can
git clone https://github.com/johnnynunez/detectron2
or you can try other 3rd detectron2 implementation.
2. Download models
download Semantic-SAM model to "ComfyUI_SemanticSAM/ckpt"
<table><tbody> <!-- START TABLE --> <!-- TABLE HEADER --> <th valign="bottom">Name</th> <th valign="bottom">Training Dataset</th> <th valign="bottom">Backbone</th> <th valign="bottom">1-IoU@Multi-Granularity</th> <th valign="bottom">1-IoU@COCO(Max|Oracle)</th> <th valign="bottom">download</th> <tr><td align="left">Semantic-SAM | <a href="configs/semantic_sam_only_sa-1b_swinT.yaml">config</a></td> <td align="center">SA-1B</td> <td align="center">SwinT</td> <td align="center">88.1</td> <td align="center">54.5|73.8</td> <td align="center"><a href="https://github.com/UX-Decoder/Semantic-SAM/releases/download/checkpoint/swint_only_sam_many2many.pth">model</a></td> <tr><td align="left">Semantic-SAM | <a href="configs/semantic_sam_only_sa-1b_swinL.yaml">config</a></td> <td align="center">SA-1B</td> <td align="center">SwinL</td> <td align="center">89.0</td> <td align="center">55.1|74.1</td> <td align="center"><a href="https://github.com/UX-Decoder/Semantic-SAM/releases/download/checkpoint/swinl_only_sam_many2many.pth">model</a></td> </tbody></table>3. Install environment
Install PyTorch & torchvision through the official method. We have been valid that from pytorch 1.13.0 to 2.3.0.
Install Semantic-SAM dependencies
pip install -r requirements.txt
Install detectron2
cd detectron2
pip install -e .
cd ..
Install Mask2Former
cd Mask2Former/mask2former/modeling/pixel_decoder/ops
sh make.sh
Workflow
one-click segment workflow is in "./workflow/workflow.json"