Nodes Browser
ComfyDeploy: How Bjornulf_custom_nodes works in ComfyUI?
What is Bjornulf_custom_nodes?
Nodes: Ollama, Green Screen to Transparency, Save image for Bjornulf LobeChat, Text with random Seed, Random line from input, Combine images (Background+Overlay alpha), Image to grayscale (black & white), Remove image Transparency (alpha), Resize Image, ...
How to install it in ComfyDeploy?
Head over to the machine page
- Click on the "Create a new machine" button
- Select the
Editbuild steps - Add a new step -> Custom Node
- Search for
Bjornulf_custom_nodesand select it - Close the build step dialig and then click on the "Save" button to rebuild the machine
🔗 Comfyui : Bjornulf_custom_nodes v0.78 🔗
A list of 162 custom nodes for Comfyui : Display, manipulate, create and edit text, images, videos, loras, generate characters and more.
You can manage looping operations, generate randomized content, trigger logical conditions, pause and manually control your workflows and even work with external AI tools, like Ollama or Text To Speech.
⚠️ Warning : Very active development. Work in progress. 🏗
Last update video :
Watch Video (Quick overview 28 minutes) + Updates in video playlist :

Coffee : ☕☕☕☕☕ 5/5
Very active development, new nodes, new features, new ideas, new possibilities...
Let me know if you have any issues, they must be solved for everyone !
Support me, this project and my other AI exciting projects : ❤️❤️❤️ https://ko-fi.com/bjornulf ❤️❤️❤️
☘ This project is part of my AI trio. ☘
1 - 📝 Text/Chat AI generation : Bjornulf Lobe Chat Fork
2 - 🔊 Speech AI generation : Bjornulf Text To Speech
<u>3 - 🎨 Image AI generation : Bjornulf Comfyui custom nodes (you are here)</u>
📋 Nodes menu by category
👁 Display and Show 👁
1. 👁 Show (Text, Int, Float)
49. 📹👁 Video Preview
68. 🔢 Add line numbers
71. 👁 Show (Int)
72. 👁 Show (Float)
73. 👁 Show (String/Text)
74. 👁 Show (JSON)
126. 📒 Note
127. 🖼📒 Image Note (Load image)
128. 🖼👁 Preview (first) image
130. 📥🖼📒 Image Note (Load image)
133. 🖼👁 Preview 1-4 images (compare)
✒ Text ✒
2. ✒ Write Text
3. ✒🗔🅰️ Advanced Write Text (+ 🎲 random option)
4. 🔗 Combine Texts
15. 💾 Save Text
26. 🎲 Random line from input
28. 🔢🎲 Text with random Seed
32. 🧑📝 Character Description Generator
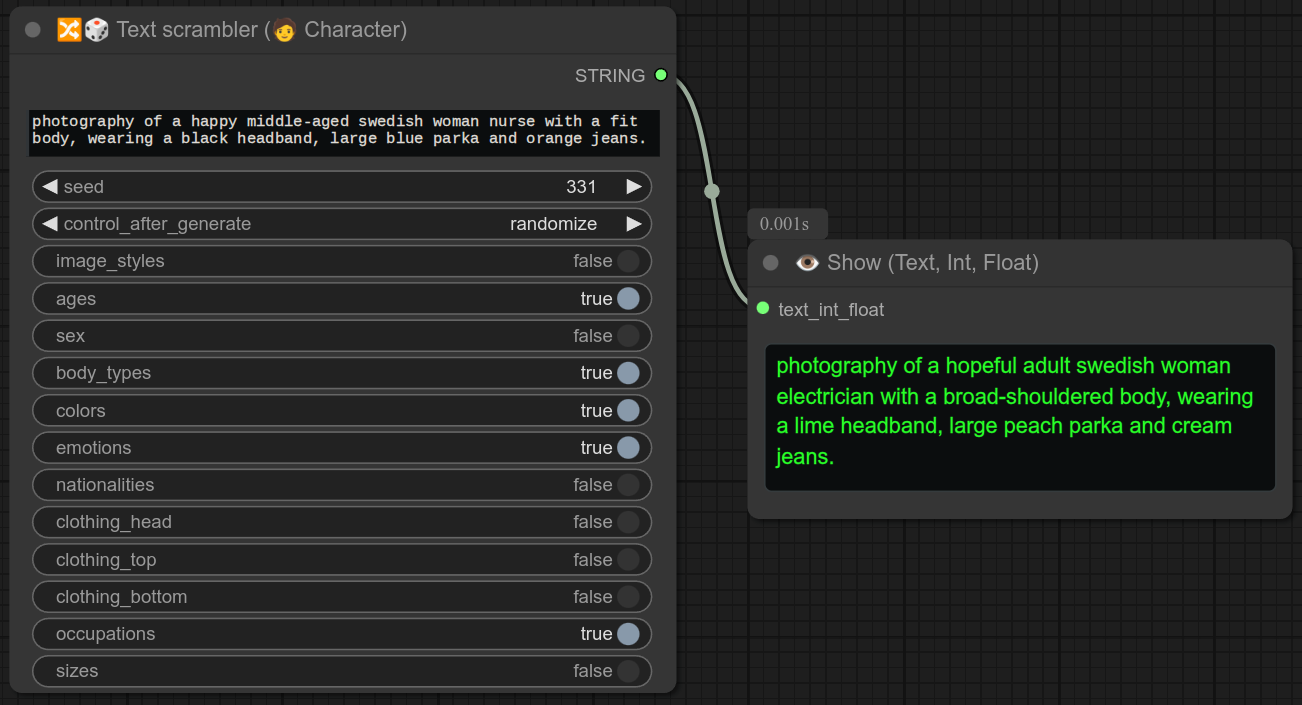
48. 🔀🎲 Text scrambler (🧑 Character)
67. 📝➜✨ Text to Anything
68. ✨➜📝 Anything to Text
75. 📝➜📝 Replace text
15. 💾 Save Text
111. ✨➜🔢 Anything to Int
112. ✨➜🔢 Anything to Float
113. 📝🔪 Text split in 5
132. 📝🔪 Text split in 10
115. 📥 Load Text From Bjornulf Folder
116. 📥 Load Text From Path
117. 📝👈🅰️ Line selector (🎲 or ♻ or ♻📑)
131. ✒👉 Write Pick Me Chain
136. 🔛📝 Text Switch On/Off
138. 📑👈 Select from List
141. 🌎✒👉 Global Write Pick Me
142. 🌎📥 Load Global Pick Me
144 📊🔍 Text Analyzer
🔥 Text Generator 🔥
81. 🔥📝🖼 Image Text Generator 🖼📝🔥
82. 👩🦰📝 Text Generator (Character Female)
83. 👨🦰📝 Text Generator (Character Male)
84. 👾📝 Text Generator (Character Creature)
85. 💃🕺📝 Text Generator (Character Pose)
86. 🔧👨🔧📝 Text Generator (Object for Character)
87. 🌄📝 Text Generator (Scene)
88. 🎨📝 Text Generator (Style)
89. 👗 Text Generator (Outfit Female)
90. 👚 Text Generator (Outfit Male)
91. ♻🔥📝 List Looper (Text Generator)
92. ♻🌄📝 List Looper (Text Generator Scenes)
93. ♻🎨📝 List Looper (Text Generator Styles)
94. ♻💃🕺📝 List Looper (Text Generator Poses)
95. ♻👨🦰👩🦰👾 List Looper (Text Generator Characters)
96. ♻👚 List Looper (Text Generator Outfits Male)
97. ♻👗 List Looper (Text Generator Outfits Female)
♻ Loop ♻
6. ♻ Loop
7. ♻ Loop Texts
8. ♻ Loop Integer
9. ♻ Loop Float
10. ♻ Loop All Samplers
11. ♻ Loop All Schedulers
12. ♻ Loop Combos
27. ♻ Loop (All Lines from input)
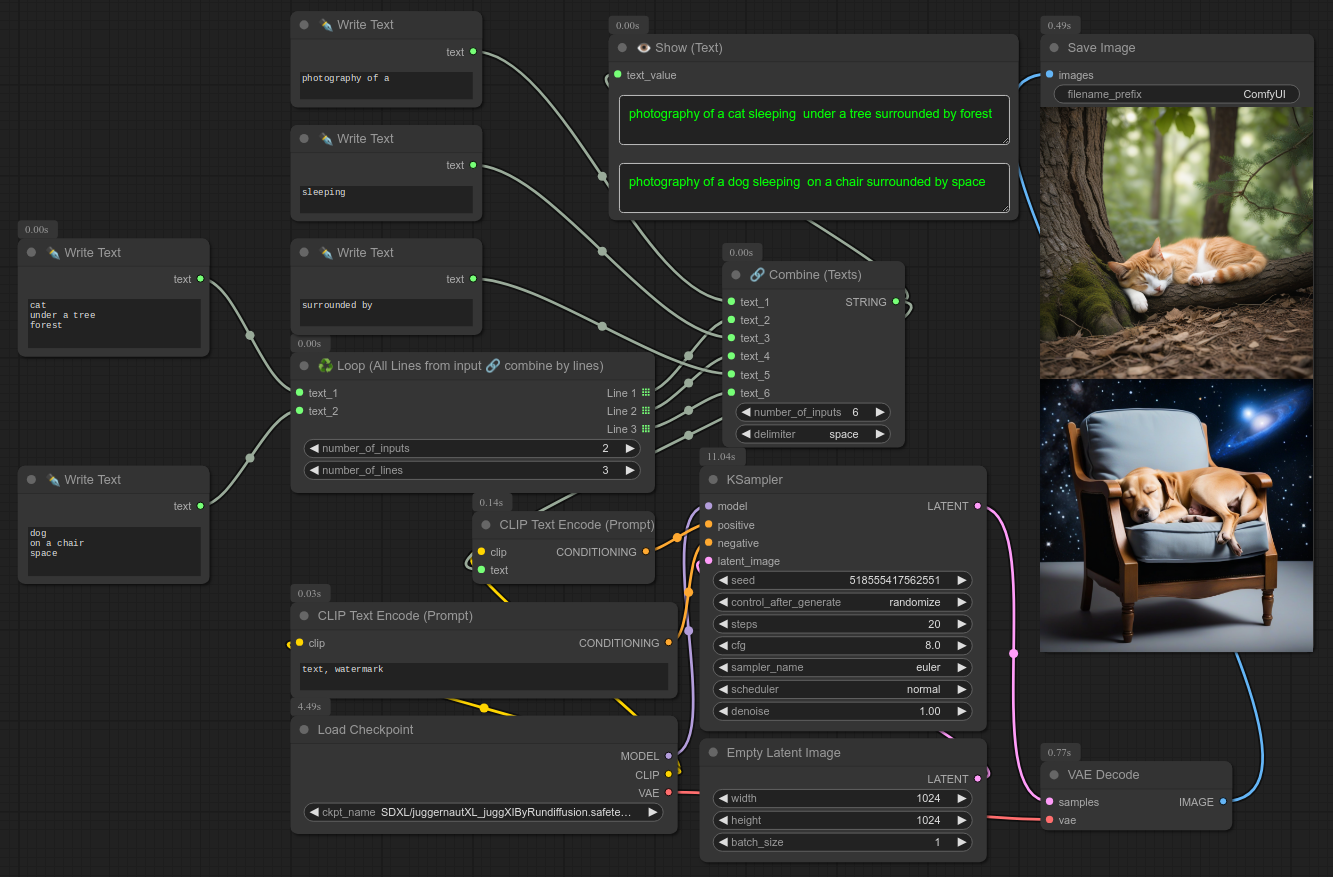
33. ♻ Loop (All Lines from input 🔗 combine by lines)
38. ♻🖼 Loop (Images)
39. ♻ Loop (✒🗔🅰️ Advanced Write Text)
42. ♻ Loop (Model+Clip+Vae) - aka Checkpoint / Model
53. ♻ Loop Load checkpoint (Model Selector)
54. ♻👑 Loop Lora Selector
56. ♻📑 Loop Sequential (Integer)
57. ♻📑 Loop Sequential (input Lines)
90. ♻🔥📝 List Looper (Text Generator)
91. ♻🌄📝 List Looper (Text Generator Scenes)
92. ♻🎨📝 List Looper (Text Generator Styles)
93. ♻💃🕺📝 List Looper (Text Generator Poses)
94. ♻👨🦰👩🦰📝 List Looper (Text Generator Characters)
95. ♻👚 List Looper (Text Generator Outfits Male)
96. ♻👗 List Looper (Text Generator Outfits Female)
🎲 Randomization 🎲
3. ✒🗔🅰️ Advanced Write Text (+ 🎲 random option)
5. 🎲 Random (Texts)
26. 🎲 Random line from input
28. 🔢🎲 Text with random Seed
37. 🎲🖼 Random Image
40. 🎲 Random (Model+Clip+Vae) - aka Checkpoint / Model
41. 🎲 Random Load checkpoint (Model Selector)
48. 🔀🎲 Text scrambler (🧑 Character)
55. 🎲👑 Random Lora Selector
117. 📝👈🅰️ Line selector (🎲 or ♻ or ♻📑)
139. 🎲 Random Integer
140. 🎲 Random Float
🖼💾 Save Image / Text 💾🖼
16. 💾🖼💬 Save image for Bjornulf LobeChat
17. 💾🖼 Save image as tmp_api.png Temporary API
18. 💾🖼📁 Save image to a chosen folder name
14. 💾🖼 Save Exact name
123. 💾🅰️ Save Global Variables
🖼📥 Load Image / Text 📥🖼
29. 📥🖼 Load Image with Transparency ▢
43. 📥🖼📂 Load Images from output folder
124. 📥🅰️ Load Global Variables
🖼 Image - others 🖼
13. 📏 Resize Image
22. 🔲 Remove image Transparency (alpha)
23. 🔲 Image to grayscale (black & white)
24. 🖼+🖼 Stack two images (Background + Overlay)
25. 🟩➜▢ Green Screen to Transparency
29. ⬇️🖼 Load Image with Transparency ▢
30. 🖼✂ Cut image with a mask
37. 🎲🖼 Random Image
38. ♻🖼 Loop (Images)
43. ⬇️📂🖼 Load Images from output folder
44. 🖼👈 Select an Image, Pick
46. 🖼🔍 Image Details
47. 🖼 Combine Images
60. 🖼🖼 Merge Images/Videos 📹📹 (Horizontally)
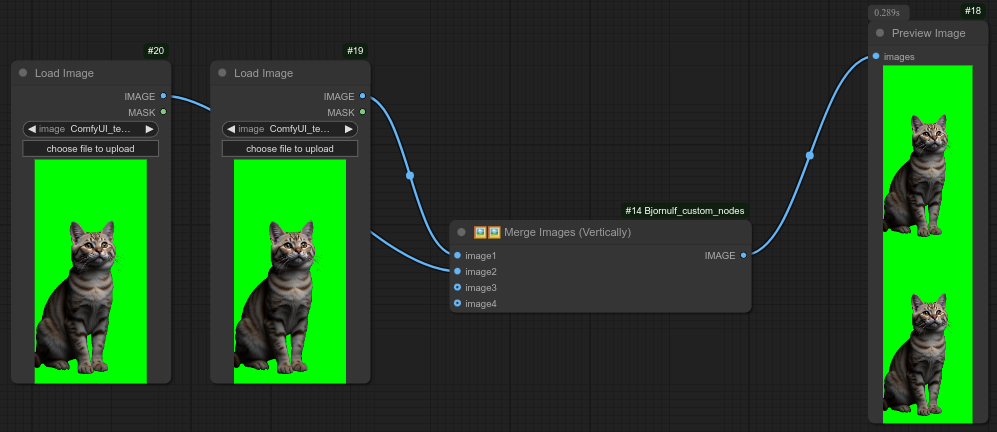
61. 🖼🖼 Merge Images/Videos 📹📹 (Vertically)
62. 🦙👁 Ollama Vision
70. 📏 Resize Image Percentage
80. 🩷 Empty Latent Selector
146 🖼📹🔪 Split Image/Video Grid
147 🖼📹🔨 Reassemble Image/Video Grid
160. 🦙👁 Ollama Vision Prompt Selector
🅰️ Variables 🅰️
3. ✒🗔🅰️ Advanced Write Text (+ 🎲 random option)
117. 📝👈🅰️ Line selector (🎲 or ♻ or ♻📑)
123. 💾🅰️ Save Global Variables
124. 📥🅰️ Load Global Variables
129. 📌🅰️ Set Variable from Text
🚀 Load checkpoints 🚀
40. 🎲 Random (Model+Clip+Vae) - aka Checkpoint / Model
41. 🎲 Random Load checkpoint (Model Selector)
42. ♻ Loop (Model+Clip+Vae) - aka Checkpoint / Model
53. ♻ Loop Load checkpoint (Model Selector)
125. 📝👈 Model-Clip-Vae selector (🎲 or ♻ or ♻📑)
🚀 Load loras 🚀
54. ♻ Loop Lora Selector
55. 🎲 Random Lora@ Selector
114. 📥👑 Load Lora with Path
122. 👑 Combine Loras, Lora stack
☁ Image Creation : API / cloud / remote ☁
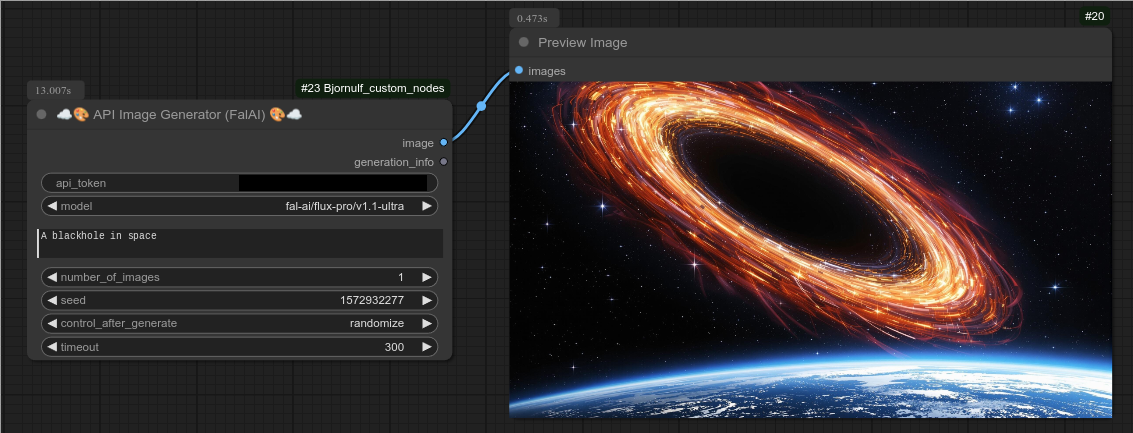
106. ☁🎨 API Image Generator (FalAI) ☁
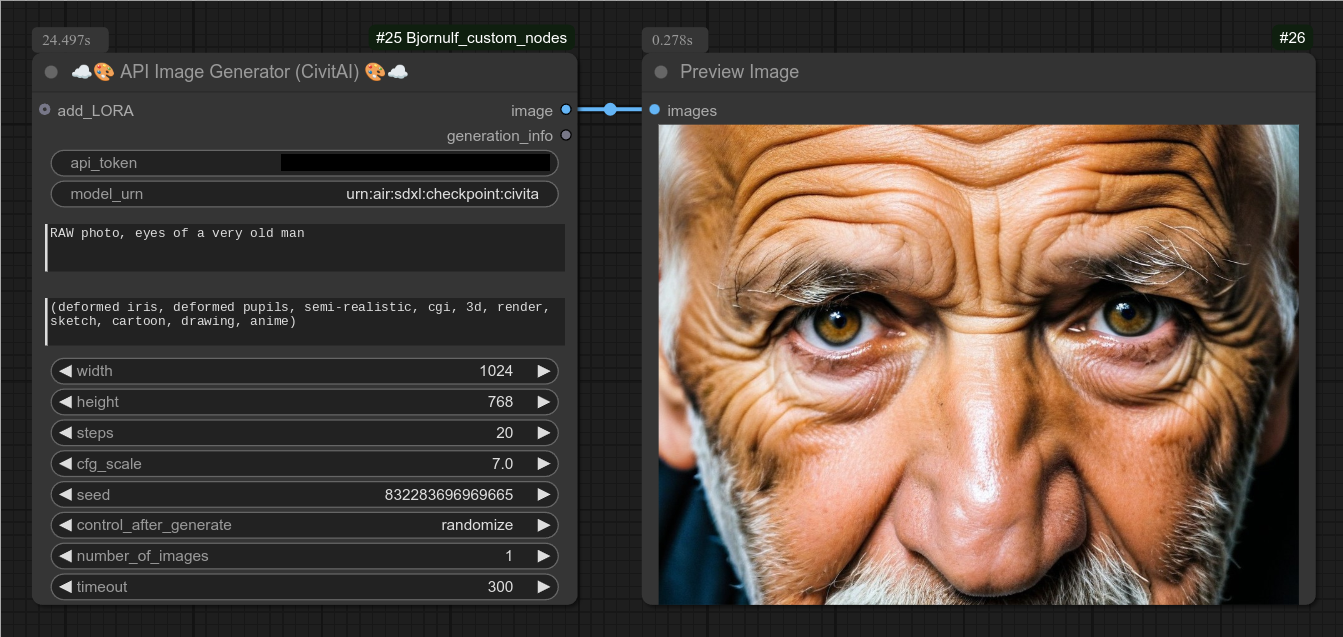
107. ☁🎨 API Image Generator (CivitAI) ☁
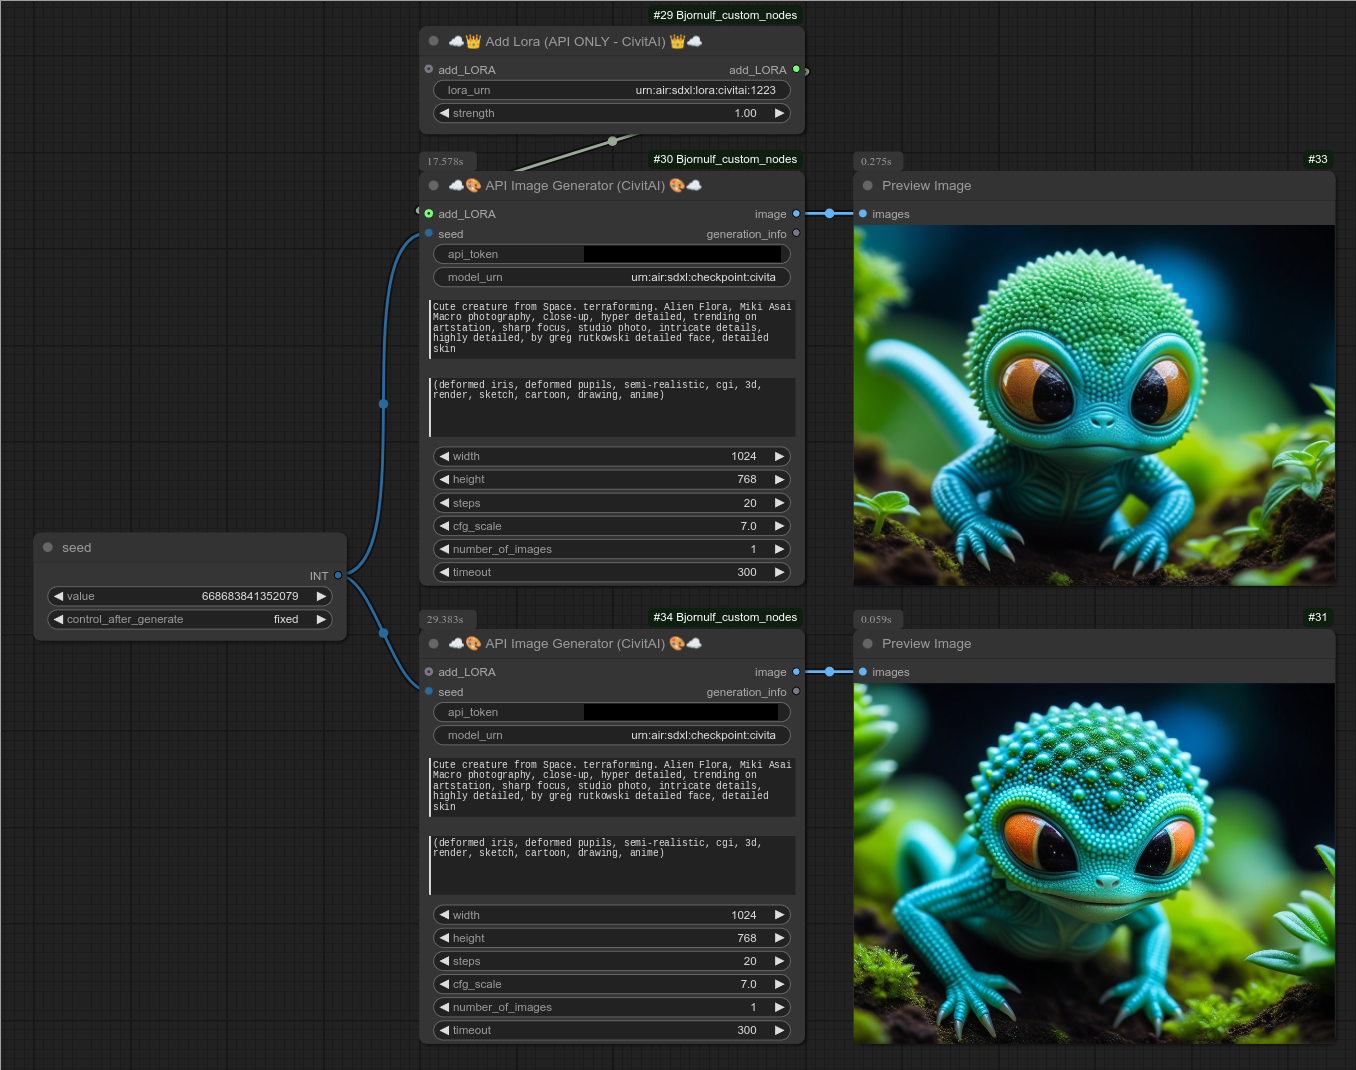
108. ☁👑 Add Lora (API ONLY - CivitAI) 👑☁
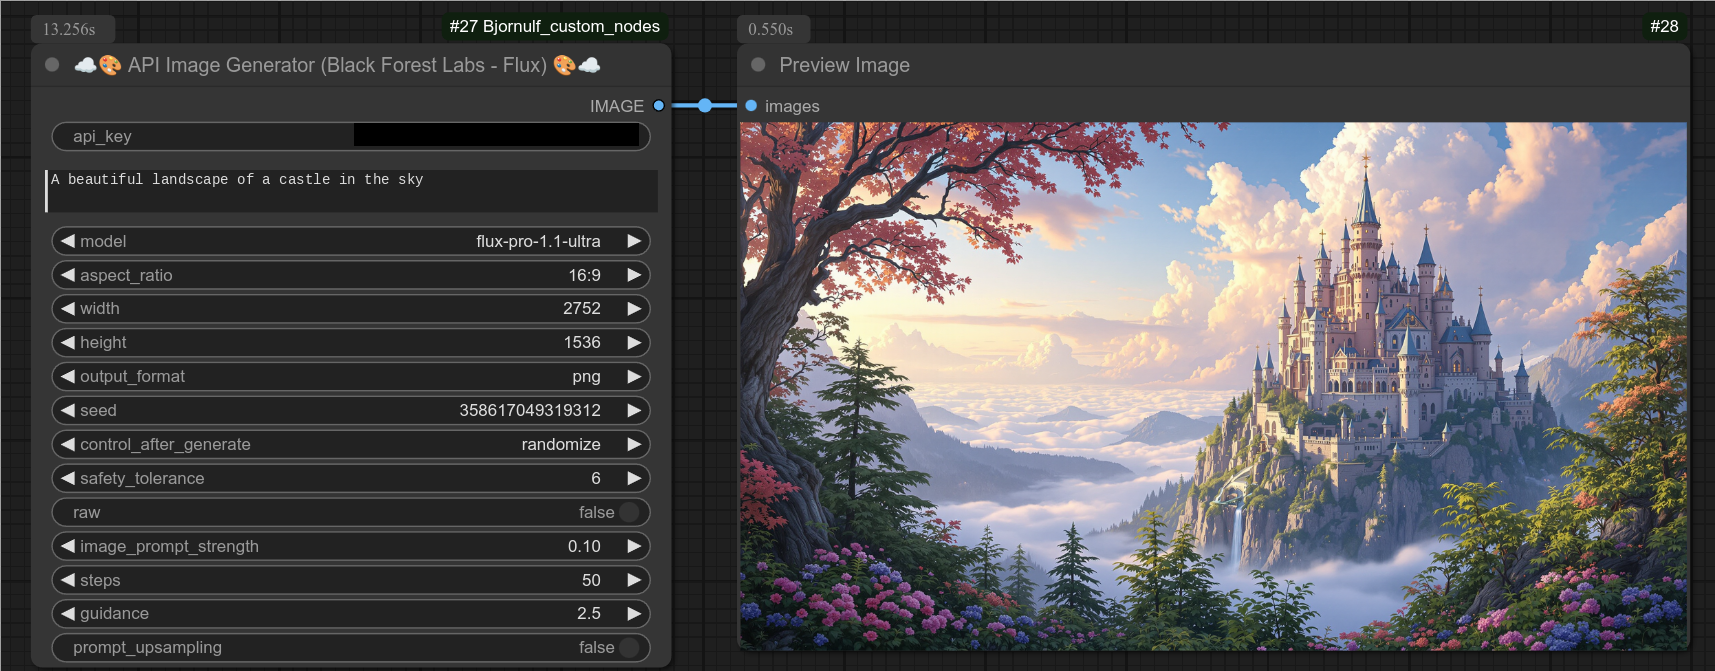
109. ☁🎨 API Image Generator (Black Forest Labs - Flux) ☁
110. ☁🎨 API Image Generator (Stability - Stable Diffusion) ☁
151 📥🕑🤖 Load CivitAI Links
📥 Take from CivitAI / Hugginface 📥
98. 📥 Load checkpoint SD1.5 (+Download from CivitAi)
99. 📥 Load checkpoint SDXL (+Download from CivitAi)
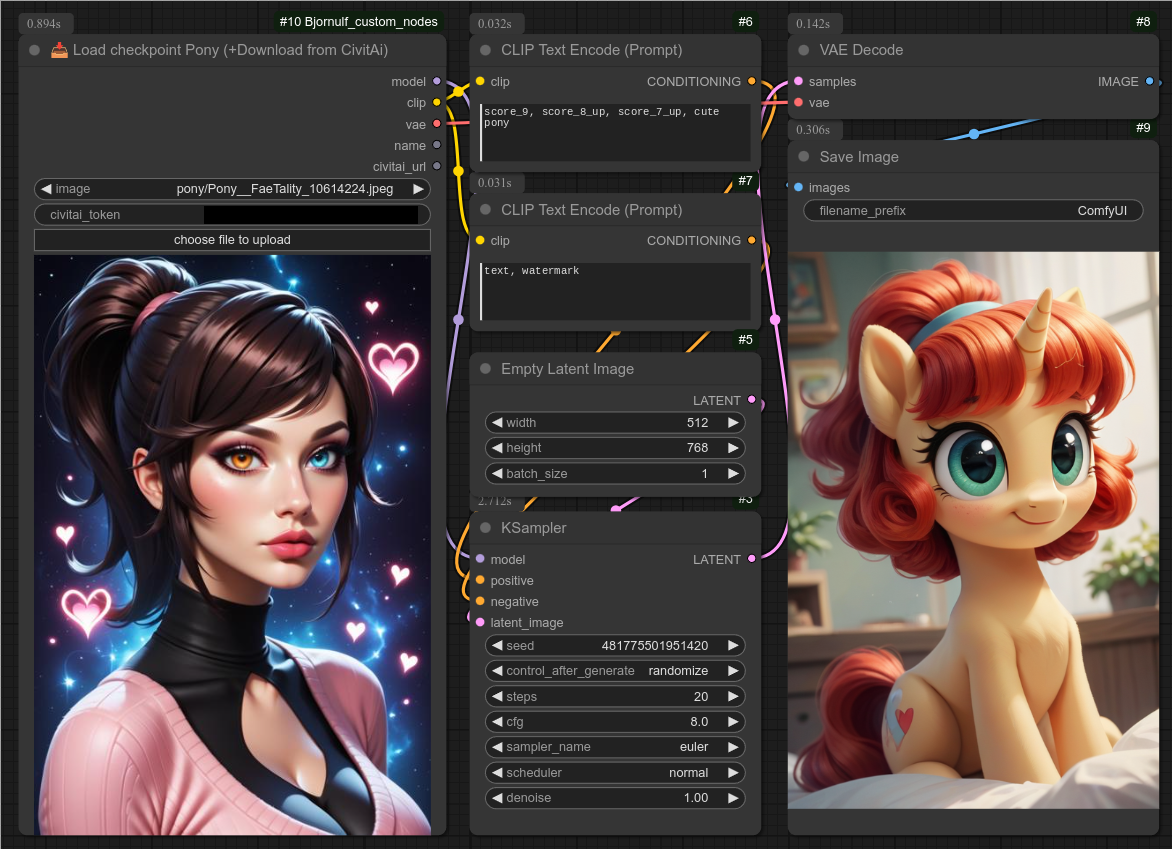
100. 📥 Load checkpoint Pony (+Download from CivitAi)
101. 📥 Load checkpoint FLUX Dev (+Download from CivitAi)
102. 📥 Load checkpoint FLUX Schnell (+Download from CivitAi)
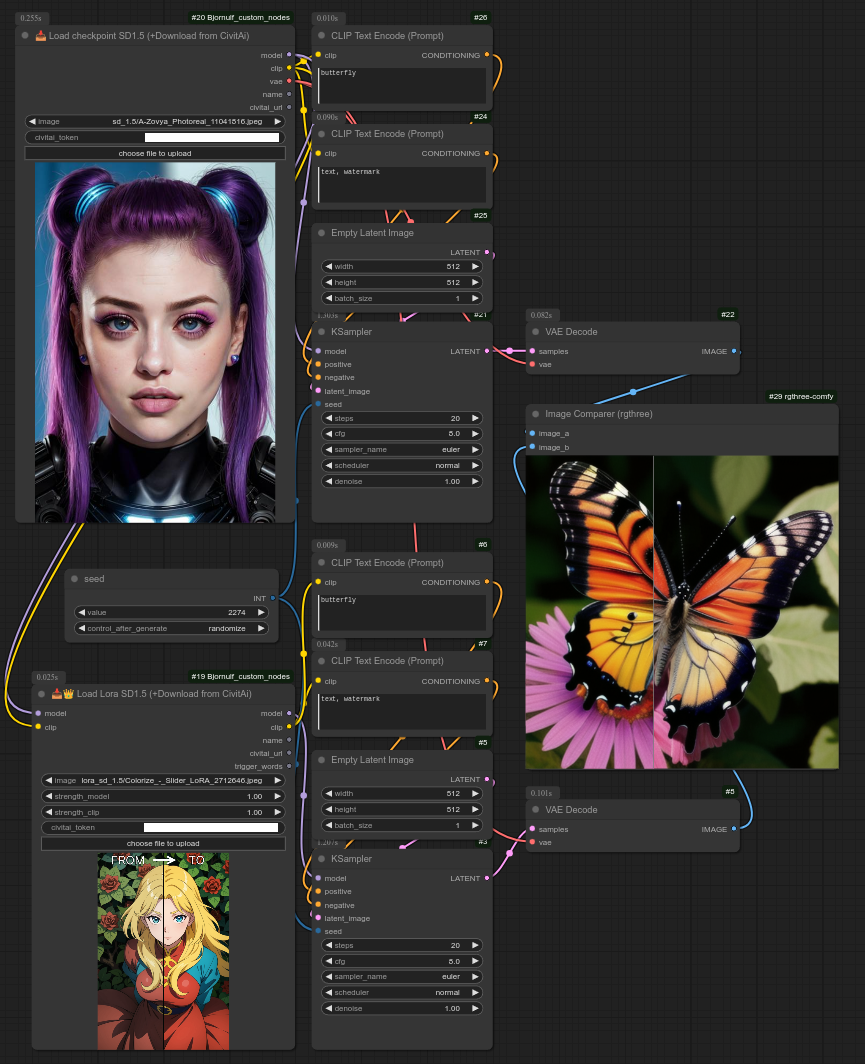
103. 📥👑 Load Lora SD1.5 (+Download from CivitAi)
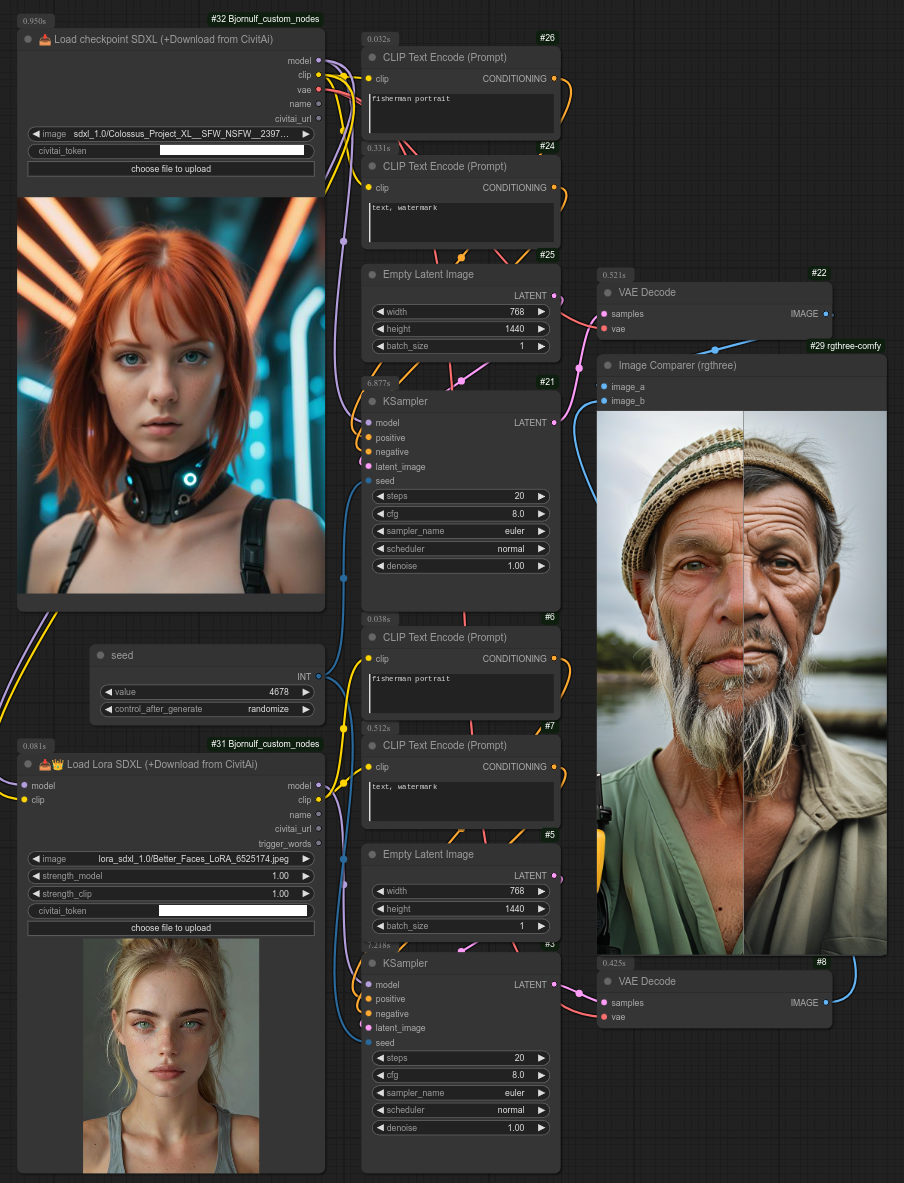
104. 📥👑 Load Lora SDXL (+Download from CivitAi)
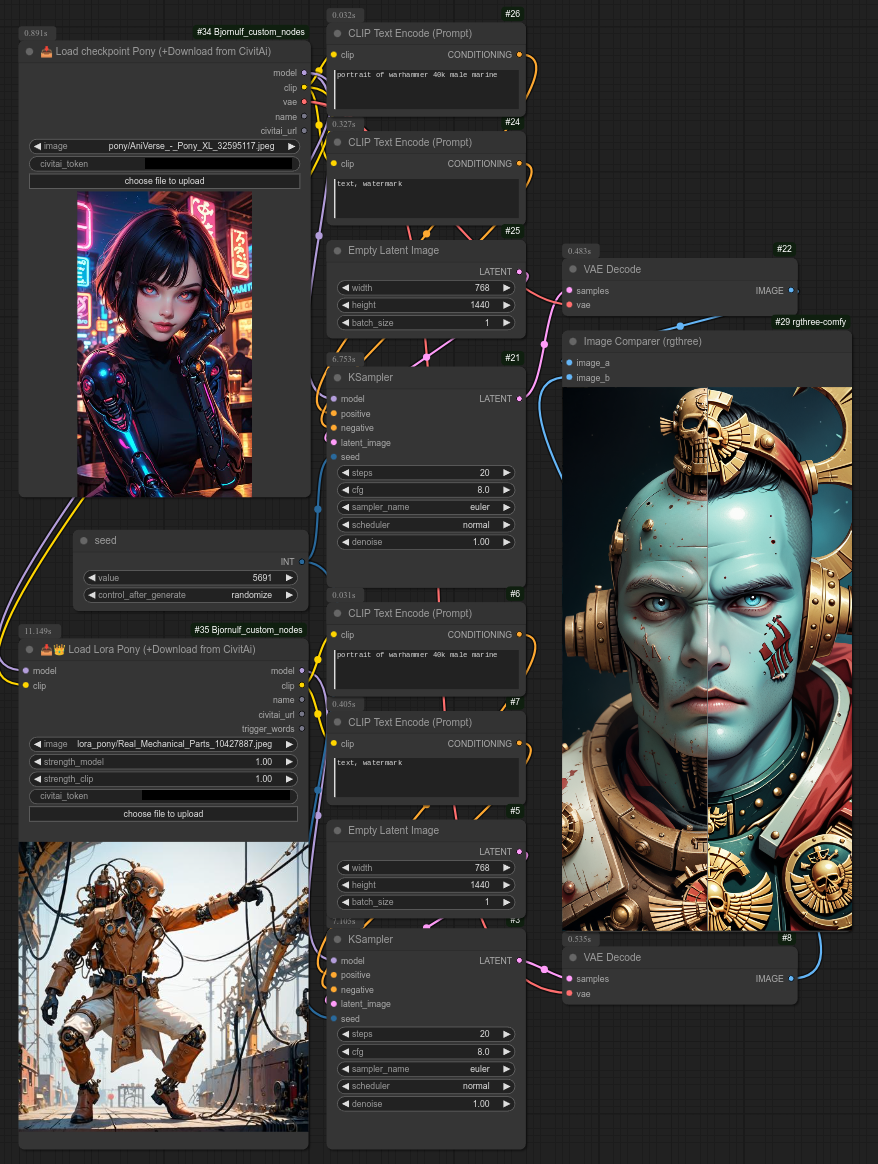
105. 📥👑 Load Lora Pony (+Download from CivitAi)
119. 📥👑📹 Load Lora Hunyuan Video (+Download from CivitAi)
121. 💾 Huggingface Downloader
📹 Video 📹
20. 📹 Video Ping Pong
21. 🖼➜📹 Images to Video (FFmpeg Save Video)
49. 📹👁 Video Preview
50. 🖼➜📹 Images to Video path (tmp video)
51. 📹➜🖼 Video Path to Images
52. 🔊📹 Audio Video Sync
58. 📹🔗 Concat Videos
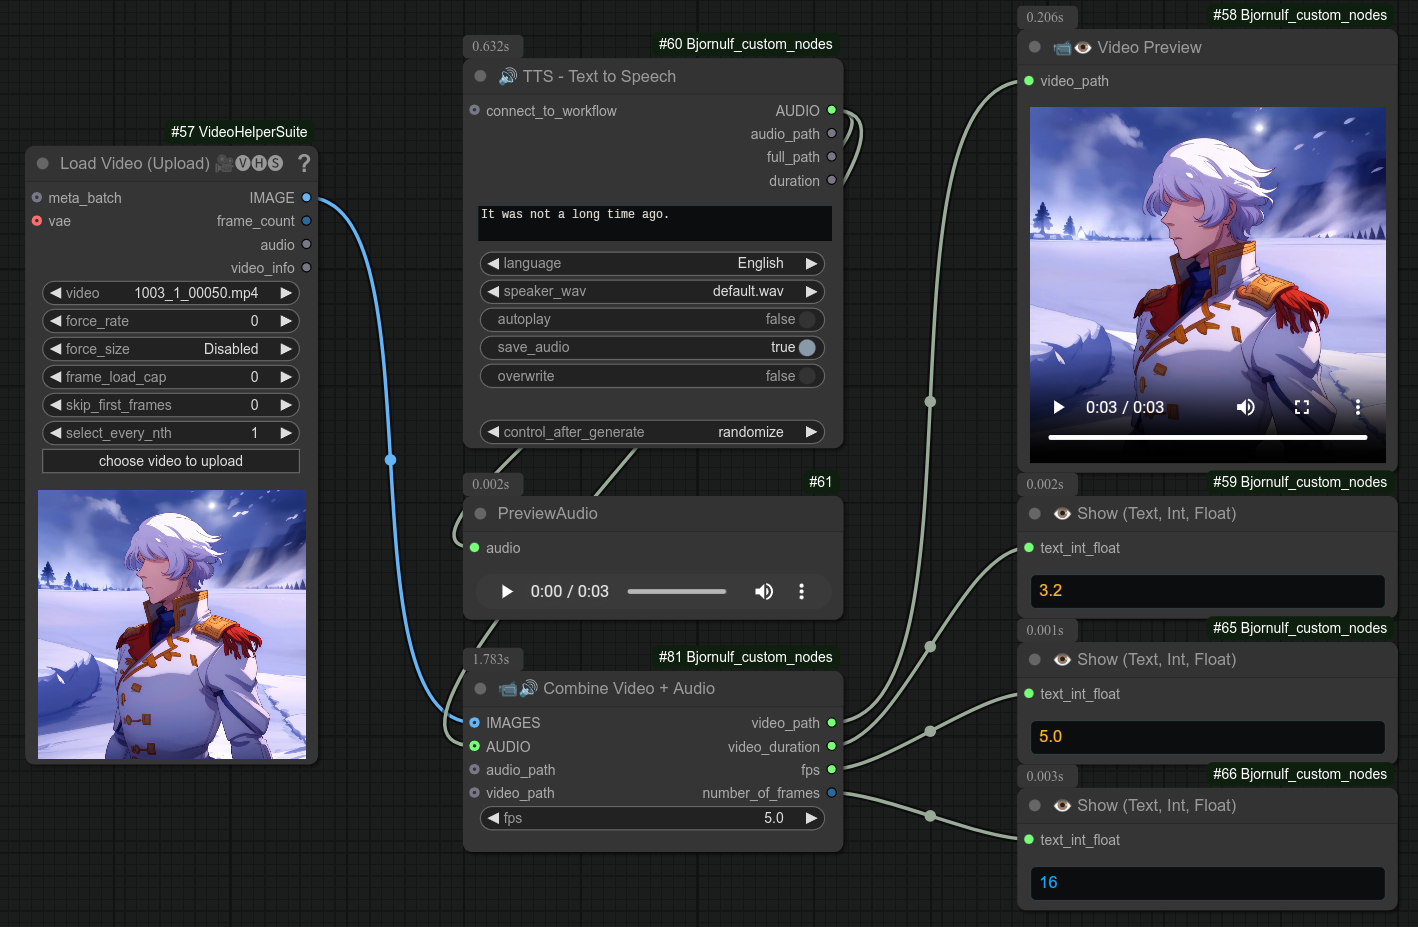
59. 📹🔊 Combine Video + Audio
60. 🖼🖼 Merge Images/Videos 📹📹 (Horizontally)
61. 🖼🖼 Merge Images/Videos 📹📹 (Vertically)
76. ⚙📹 FFmpeg Configuration 📹⚙
77. 📹🔍 Video details ⚙
78. 📹➜📹 Convert Video
79. 📹🔗 Concat Videos from list
119. 📥👑📹 Load Lora Hunyuan Video (+Download from CivitAi)
146 🖼📹🔪 Split Image/Video Grid
147 🖼📹🔨 Reassemble Image/Video Grid
149 💾📹 Save Video (tmp_api.mp4/mkv/webm) ⚠️💣
🤖 AI 🤖
19. 🦙💬 Ollama Talk
31. 📝➜🔊 TTS - Text to Speech
62. 🦙👁 Ollama Vision
63. 🦙 Ollama Configuration ⚙
64. 🦙 Ollama Job Selector 💼
65. 🦙 Ollama Persona Selector 🧑
66. 🔊➜📝 STT - Speech to Text
118. 🔊 TTS Configuration ⚙
160. 🦙👁 Ollama Vision Prompt Selector
🔊 Audio 🔊
31. 📝➜🔊 TTS - Text to Speech
52. 🔊📹 Audio Video Sync
59. 📹🔊 Combine Video + Audio
66. 🔊➜📝 STT - Speech to Text
118. 🔊 TTS Configuration ⚙
120. 📝➜🔊 Kokoro - Text to Speech
134. 134 - 🔊▶ Play Audio
145 🔊▶ Audio Preview (Audio player)
148 💾🔊 Save Audio (tmp_api.wav/mp3) ⚠️💣
💻 General / System 💻
34. 🧹 Free VRAM hack
137. 🌎🎲 Global Seed Manager
143 🧮 Basic Math
🧍 Manual user Control 🧍
35. ⏸️ Paused. Resume or Stop, Pick 👇
36. ⏸️ Paused. Select input, Pick 👇
117. 📝👈🅰️ Line selector (🎲 or ♻ or ♻📑)
135. 🔛✨ Anything Switch On/Off
136. 🔛📝 Text Switch On/Off
🧠 Logic / Conditional Operations 🧠
45. 🔀 If-Else (input / compare_with)
[Coming soon] - not sorted in the categories above yet...
150 [Coming soon] 🎨📜 Style Selector (🎲 or ♻ or ♻📑) + Civitai urn
152 [Coming soon] 💾 Save Tensors (tmp_api.pt) ⚠️💣
153 [Coming soon] 📥 Load Tensor (tmp_api.pt)
154 [Coming soon] 🔮 Remote VAE Decoder
155 [Coming soon] 🔮 Remote VAE Decoder (Tiled)
156 [Coming soon] 📥🔮 Load from Base64
157 [Coming soon] 🔮⚡ Execute Workflow
158 [Coming soon] 📥🔮📝 Text Manager Api (Execute Workflow)
159 [Coming soon] 🔥📝📹 Video Text Generator 📹📝🔥
161 [Coming soon] 🔧🧑 Fix Face
162 [Coming soon] 🧑 Face Settings [Fix Face] ⚙
☁ Usage in cloud :
Comfyui is great for local usage, but I sometimes need more power than what I have...
I have a computer with a 4070 super with 12GB and flux fp8 simple wokflow take about ~40 seconds. With a 4090 in the cloud I can run flux fp16 in ~12 seconds. (There are of course also some workflow that I can't even run locally.)
My referal link for Runpod : https://runpod.io?ref=tkowk7g5 (If you use that i will have a commission, at no extra cost for you.)
If you want to use my nodes and comfyui in the cloud (and can install more stuff), I'm managing an optimized ready-to-use template on runpod : https://runpod.io/console/deploy?template=r32dtr35u1&ref=tkowk7g5
Template name : bjornulf-comfyui-allin-workspace, can be operational in ~3 minutes. (Depending on your pod, setup and download of extra models or whatever not included.)
You need to create and select a network volume before using that, size is up to you, i have 50Gb Storage because i use cloud only for Flux or lora training on a 4090. (~0.7$/hour)
⚠️ When pod is ready, you need to open a terminal in browser (After clicking on connect from your pod) and use this to launch ComfyUI manually : cd /workspace/ComfyUI && python main.py --listen 0.0.0.0 --port 3000 or the alias start_comfy (Much better to control it with a terminal, check logs, etc...)
After that you can just click on the Connect to port 3000 button.
As file manager, you can use the included JupyterLab on port 8888.
If you have any issues with it, please let me know.
It will manage everything in Runpod network storage (/workspace/ComfyUI), so you can stop and start the cloud GPU without losing anything, change GPU or whatever.
Zone : I recommend EU-RO-1, but up to you.
Top-up your Runpod account with minimum 10$ to start.
⚠️ Warning, you will pay by the minute, so not recommended for testing or learning comfyui. Do that locally !!!
Run cloud GPU only when you already have your workflow ready to run.
Advice : take a cheap GPU for testing, downloading models or settings things up.
To download checkpoint or anything else, you need to use the terminal.
For downloading from Huggingface (get token here https://huggingface.co/settings/tokens).
Here is example for everything you need for flux dev :
huggingface-cli login --token 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
huggingface-cli download black-forest-labs/FLUX.1-dev flux1-dev.safetensors --local-dir /workspace/ComfyUI/models/unet
huggingface-cli download comfyanonymous/flux_text_encoders clip_l.safetensors --local-dir /workspace/ComfyUI/models/clip
huggingface-cli download comfyanonymous/flux_text_encoders t5xxl_fp16.safetensors --local-dir /workspace/ComfyUI/models/clip
huggingface-cli download black-forest-labs/FLUX.1-dev ae.safetensors --local-dir /workspace/ComfyUI/models/vae
To use Flux you can just drag and drop in your browser comfyui interface the .json from my github repo : workflows/FLUX_dev_troll.json, direct link : https://github.com/justUmen/ComfyUI-BjornulfNodes/blob/main/workflows/FLUX_dev_troll.json.
For downloading from civitai (get token here https://civitai.com/user/account), just copy/paste the link of checkpoint you want to download and use something like that, with your token in URL :
CIVITAI="8b275fada679ba5812b3da2bf35016f6"
wget --content-disposition -P /workspace/ComfyUI/models/checkpoints "https://civitai.com/api/download/models/272376?type=Model&format=SafeTensor&size=pruned&fp=fp16&token=$CIVITAI"
If you want to download for example the entire output folder, you can just compress it :
cd /workspace/ComfyUI/output && tar -czvf /workspace/output.tar.gz .
Then you can download it from the file manager JupyterLab.
If you have any issues with this template from Runpod, please let me know, I'm here to help. 😊
🏗 Dependencies (nothing to do for my runpod ☁)
Check requirements.txt for the latest dependencies.
🪟🐍 Windows : Install dependencies on windows with embedded python (portable version)
First you need to find this python_embedded python.exe, then you can right click or shift + right click inside the folder in your file manager to open a terminal there.
This is where I have it, with the command you need :
H:\ComfyUI_windows_portable\python_embeded> .\python.exe -m pip install ollama pydub opencv-python ffmpeg-python civitai-py fal_client sounddevice langdetect spacy textblob dill
When you have to install something else, you can retake the same code and install the dependency you want :
.\python.exe -m pip install whateveryouwant
You can then run comfyui.
🐧🐍 Linux : Install dependencies (without venv, not recommended)
Move to the custom_node folder and do : pip install -r requirements.txt
OR
pip install ollama(you can also install ollama if you want : https://ollama.com/download) - You don't need to really install it if you don't want to use my ollama node. (BUT you need to runpip install ollama)pip install pydub(for TTS node)pip install opencv-python- etc...
🐧🐍 Linux : Install dependencies with python virtual environment (venv)
If you want to use a python virtual environment only for comfyUI, which I recommended, you can do that for example (also pre-install pip) :
sudo apt-get install python3-venv python3-pip
python3 -m venv /the/path/you/want/venv/bjornulf_comfyui
Once you have your environment in this new folder, you can activate it with and install dependencies inside :
source /the/path/you/want/venv/bjornulf_comfyui/bin/activate
cd custom_nodes/Bjornulf_custom_nodes
pip install -r requirements.txt
Then you can start comfyui with this environment (notice that you need to re-activate it each time you want to launch comfyui) :
cd /where/you/installed/ComfyUI && python main.py
📝 Changelog
- v0.2: Improve ollama node with system prompt + model selection.
- v0.3: Add a new node : Save image to a chosen folder.
- v0.3: Add comfyui Metadata / workflow to all my image-related nodes.
- v0.4: Support transparency option with webm format, options encoders. As well as input for audio stream.
- v0.5: New node : Remove image transparency (alpha) - Fill alpha channel with solid color.
- v0.5: New node : Image to grayscale (black & white) - Convert an image to grayscale.
- v0.6: New node : Combine images (Background + Overlay) - Combine two images into a single image.
- v0.7: Replace Save API node with Save Bjornulf Lobechat node. (For my custom lobe-chat)
- v0.8: Combine images : add an option to put image top, bottom or center.
- v0.8: Combine texts : add option for slashes /
- v0.8: Add basic node to transform greenscreen in to transparency.
- v0.9: Add a new node : Return one random line from input.
- v0.10: Add a new node : Loop (All Lines from input) - Iterate over all lines from an input text.
- v0.11: Add a new node : Text with random Seed - Generate a random seed, along with text.
- v0.12: Combine images : Add option to move vertically and horizontally. (from -50% to 150%)
- v0.13: Add a new node: Load image with transparency (alpha) - Load an image with transparency.
- v0.14: Add a new node: Cut image from a mask
- v0.15: Add two new nodes: TTS - Text to Speech and Character Description Generator
- v0.16: Big changes on Character Description Generator
- v0.17: New loop node, combine by lines.
- v0.18: New loop node, Free VRAM hack
- v0.19: Changes for save to folder node : ignore missing images filenames, will use the highest number found + 1.
- v0.20: Changes for lobechat save image : include the code of free VRAM hack + ignore missing images filenames
- v0.21: Add a new write text node that also display the text in the comfyui console (good for debugging)
- v0.22: Allow write text node to use random selection like this {hood|helmet} will randomly choose between hood or helmet.
- v0.23: Add a new node: Pause, resume or stop workflow.
- v0.24: Add a new node: Pause, select input, pick one.
- v0.25: Two new nodes: Loop Images and Random image.
- v0.26: New node : Loop write Text. Also increase nb of inputs allowed for most nodes. (+ update some breaking changes)
- v0.27: Two new nodes : Loop (Model+Clip+Vae) and Random (Model+Clip+Vae) - aka Checkpoint / Model
- v0.28: Fix random texts and add a lot of screenshots examples for several nodes.
- v0.29: Fix floating points issues with loop float node.
- v0.30: Update the basic Loop node with optional input.
- v0.31: ❗Sorry, Breaking changes for Write/Show text nodes, cleaner system : 1 simple write text and the other is 1 advanced with console and special syntax. Also Show can now manage INT, FLOAT, TEXT.
- v0.32: Quick rename to avoid breaking loop_text node.
- v0.33: Control random on paused nodes, fix pydub sound bug permissions on Windows.
- v0.34: Two new nodes : Load Images from output folder and Select an Image, Pick.
- v0.35: Great improvements of the TTS node 31. It will also save the audio file in the "ComfyUI/Bjornulf_TTS/" folder. - Not tested on windows yet -
- v0.36: Fix random model.
- v0.37: New node : Random Load checkpoint (Model Selector). Alternative to the random checkpoint node. (Not preloading all checkpoints in memory, slower to switch between checkpoints, but more outputs to decide where to store your results.)
- v0.38: New node : If-Else logic. (input == compare_with), examples with different latent space size. +fix some deserialization issues.
- v0.39: Add variables management to Advanced Write Text node.
- v0.40: Add variables management to Loop Advanced Write Text node. Add menu for all nodes to the README.
- v0.41: Two new nodes : image details and combine images. Also ❗ Big changes to the If-Else node. (+many minor changes)
- v0.42: Better README with category nodes, changes some node titles
- v0.43: Add control_after_generate to Ollama and allow to keep in VRAM for 1 minute if needed. (For chaining quick generations.) Add fallback to 0.0.0.0
- v0.44: Allow ollama to have a custom url in the file
ollama_ip.txtin the comfyui custom nodes folder. Minor changes, add details/updates to README. - v0.45: Add a new node : Text scrambler (Character), change text randomly using the file
scrambler/scrambler_character.jsonin the comfyui custom nodes folder. - v0.46: ❗ A lot of changes to Video nodes. Save to video is now using FLOAT for fps, not INT. (A lot of other custom nodes do that as well...) Add node to preview video, add node to convert a video path to a list of images. add node to convert a list of images to a temporary video + video_path. add node to synchronize duration of audio with video. (useful for MuseTalk) change TTS node with many new outputs ("audio_path", "full_path", "duration") to reuse with other nodes like MuseTalk, also TTS rename input to "connect_to_workflow", to avoid mistakes sending text to it.
- v0.47: New node : Loop Load checkpoint (Model Selector).
- v0.48: Two new nodes for loras : Random Lora Selector and Loop Lora Selector.
- v0.49: New node : Loop Sequential (Integer) - Loop through a range of integer values. (But once per workflow run), audio sync is smarter and adapt the video duration to the audio duration.
- v0.50: allow audio in Images to Video path (tmp video). Add three new nodes : Concat Videos, combine video/audio and Loop Sequential (input Lines). save text changes to write inside Comfyui folder. Fix random line from input outputing LIST. ❗ Breaking change to audio/video sync node, allowing different types as input.
- v0.51: Fix some issues with audio/video sync node. Add two new nodes : merge images/videos vertical and horizontal. add requirements.txt and ollama_ip.txt
- v0.52-53: Revert name git to Bjornulf_custom_nodes, match registry comfy
- v0.54-55: add opencv-python to requirements.txt
- 0.56: ❗Breaking changes : ollama node simplified, no ollama_ip.txt needed, waiting for collection ollama nodes to be ready.
- 0.57: ❗❗Huge changes, new Ollama node "Ollama Chat" with real functionalities. 5 Ollama nodes total. (Model selector + Job selector + Persona selector + Ollama vision + Ollama Talk) Ollama talk use context and can use context file. Add number of lines / current counter + next to sequential nodes. Add new node STT. (+ faster_whisper dep) better management of empty loras/checkpoints on selectors. (list preset) Add "default_for_language" for TTS node, taking the default voice for a language (ex: fr/default.wav) Otherwise take the first wav with the selected language.
- 0.58: small fix in model selector default value. (Set to None by default)
- 0.59: A lot of Javascript fixing to avoid resizing and better properties mangement / recoveries
- 0.60: Revert changes from ollama_talk (implement _user mode later / another node)
- 0.61: Add/modify a bunch of Ffmpeg / video nodes. With a global configuration system and toggle python-ffmpeg / system.
- 0.62: MASSIVE update, Text Generator nodes. (15 nodes), API nodes generate (civitai / black forest labs / fal.ai), API civit ai download models nodes, lora
- 0.63: delete long file, useless
- 0.64: remove "import wget", added some keywords to text generators.
- 0.65: ❗Breaking changes : Combine Text inputs are now all optional (PLease remake your nodes, sorry.) Add 6 new nodes : any2int, any2float, load text from folder, load text from path, load lora from path. Also upgraded the Save text node.
- 0.66: Add lora hunyuan CIVIT ai + download, add TTS configuration node, edit requirements.txt
- 0.67: Add kokoro TTS node.
- 0.68: Update kokoro TTS node with connect_to_workflow and same outputs as XTTS.
- 0.69: Small fixes
- 0.70: ❗Breaking changes : "Line Selector Node" is now a "universal node" : manual selection, random, and LOOP + Sequential.
Text replace now have multine option for regex. (https://github.com/justUmen/Bjornulf_custom_nodes/issues/17) - can remove <think> tag from ollama.
8 new nodes : "🖼👁 Preview (first) image", "💾 Huggingface Downloader", "👑 Combine Loras, Lora stack", "📥 Load Global Variables", "💾 Save Global Variables", "📝👈 Model-Clip-Vae selector (🎲 or ♻ or ♻📑)", "📒 Note", "🖼📒 Image Note". Fix a lot of code everywhere, a little better logging system, etc...
WIP : Rewrite of all my ffmpeg nodes. (Still need improvements and fixes, will do that in 0.71?) Maybe don't use them yet... - 0.71: ❗Breaking changes for Global variable nodes. (add to global variable system a "filename", which is a a separate global variable file.) bug fix speech to text node, 5 new nodes 129-133. combine text limit raised to 100. improve Save image in folder node.
- 0.71-0.75: Many bug fixing. Civitai nodes are working on windows. (encoding, links problem are solved ? - at least on my machines...)
- 0.76: Removed kokoro_onnx from requirements.txt due to some conflict with other nodes, like Impact-Pack, with old version of numpy... (kokoro_onnx need to be installed manually if you want to use this node.)
New syntaxes for advanced text/line selector, ex: {left|right|middle|group=LMR}+{left|right|middle|group=LMR}+{left|right|middle|group=LMR} and {A(80%)|B(15%)|C(5%)}
2 new nodes switch : 🔛✨ Anything Switch On/Off (compatible with combine images) AND 🔛📝 Text Switch On/Off (Compatible with combine texts)
2 new pick Me global nodes, using an identifier instead of chain : 🌎✒👉 Global Write Pick Me AND 🌎📥 Load Global Pick Me
3 random nodes : 🌎🎲 Global Random Seed, 🎲 Random Integer, 🎲 Random Float (Each return their value but also TEXT version of it.) "Seed node" more advanced.
1 new node to quickly select element from list : 📑👈 Select from List
1 new audio node : 🔊▶ Play Audio (Just play an audio file, will default to bell.m4a if none provided.) Can take AUDIO format or audio_path.
❗Breaking changes. Large rewrite for all FFMPEG related nodes. With options for video preview. (Still have few changes to make, next version.) - 0.77: Add Refresh button to Load image from folder.
Add new syntax for advanced write / line selector : 2 {apple|orange|banana|static_group=FRUIT}s, one {apple|orange|banana|static_group=FRUIT} on the left, one {apple|orange|banana|static_group=FRUIT} on the right.
TTS fix request voices.
❗Breaking changes. New vision model for Ollama.
20 new nodes (143 - 162), Text Analyzer, basic math, audio preview, etc..... (10 not realesed yet, but included as a public "roadmap".)
Remove faster-whisper from requirements.txt for people using python 3.13. (Need to install manually.)
Fix preview image node for the new comfyui layout.
Rewrite of FFMPEG nodes, COnfiguration and Video preview.
Many other bug fixes and improvements on many nodes, thx for the reports. - 0.78: Fix Line selector Reset button javascript. (not showing on refresh)
📝 Nodes descriptions
1 - 👁 Show (Text, Int, Float)
Description:
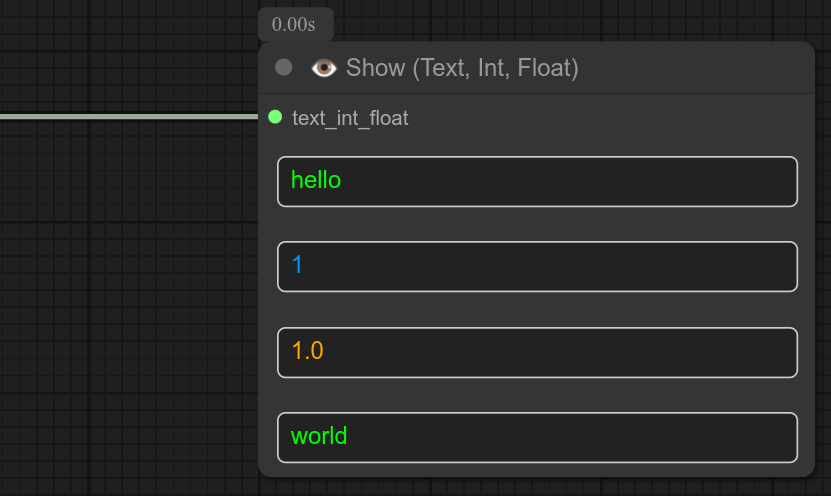
The show node will only display text, or a list of several texts. (read only node)
3 types are managed : Green is for STRING type, Orange is for FLOAT type and blue is for INT type. I put colors so I/you don't try to edit them. 🤣
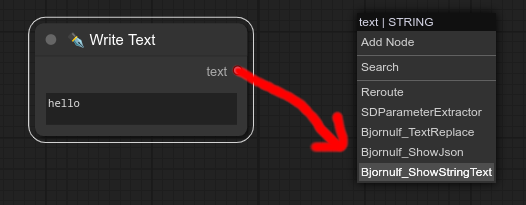
Update 0.61 : You now also have 4 other nodes to display format specific values : INT, FLOAT, STRING and JSON (STRING)
These are convenient because these are automatically recommended on drag and drop.
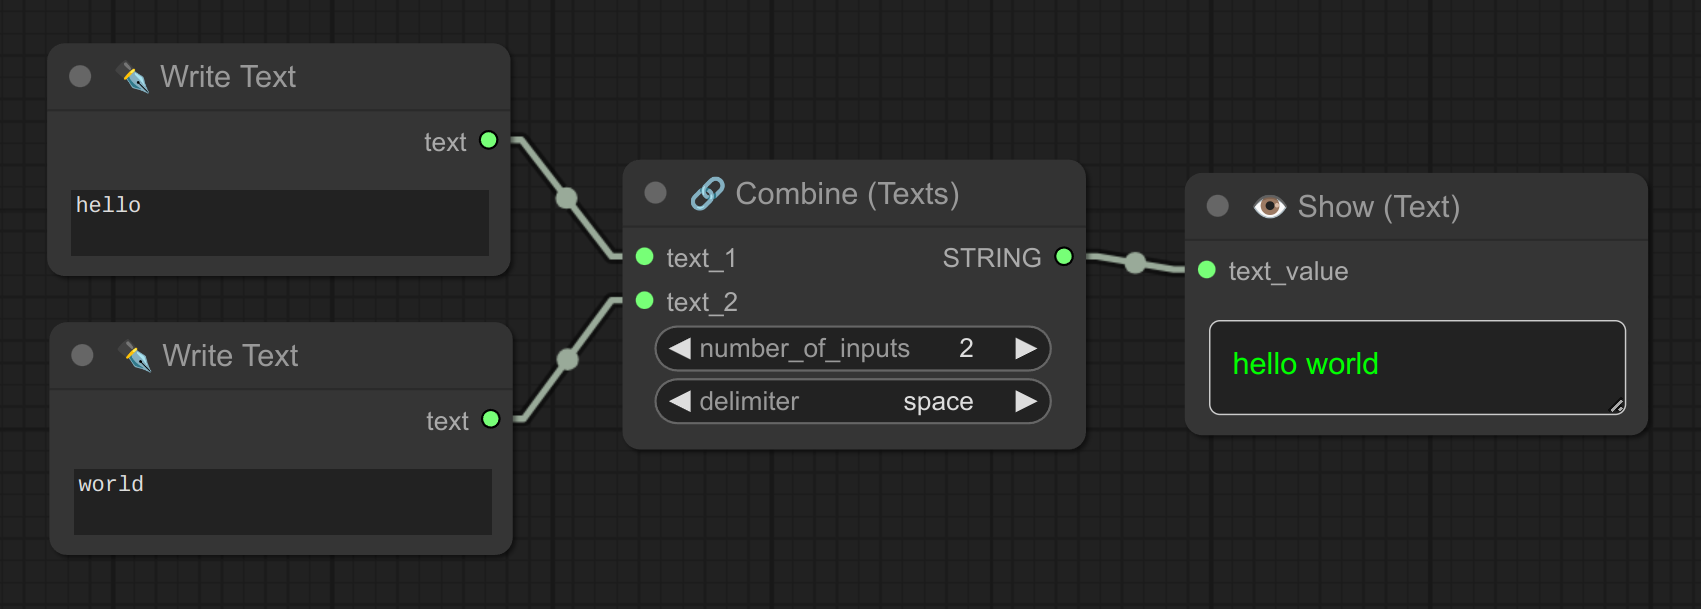
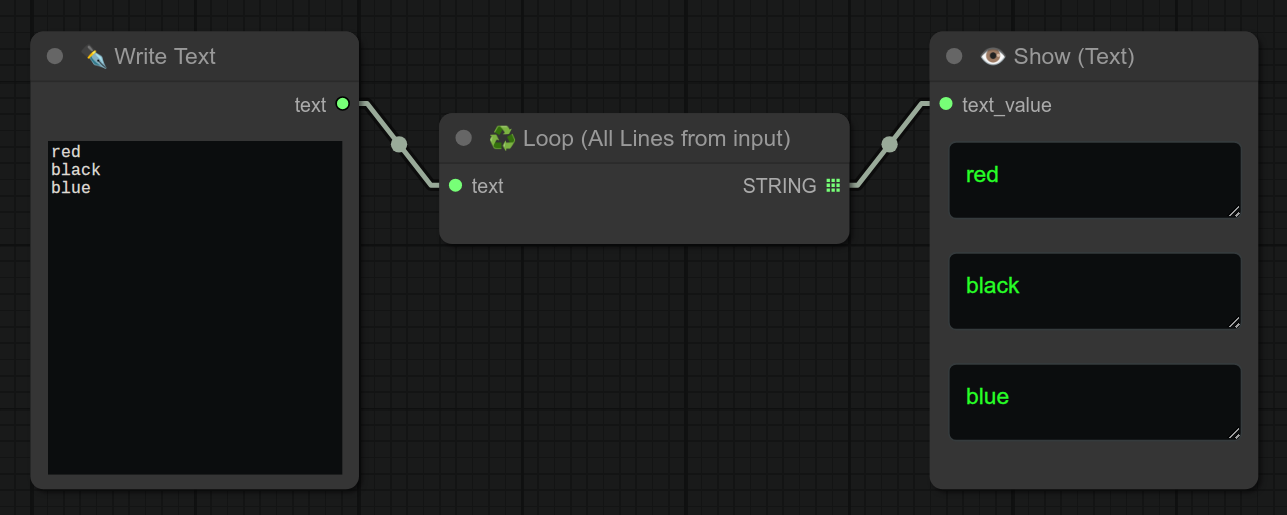
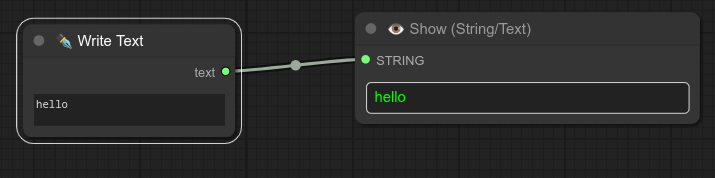
2 - ✒ Write Text
Description:
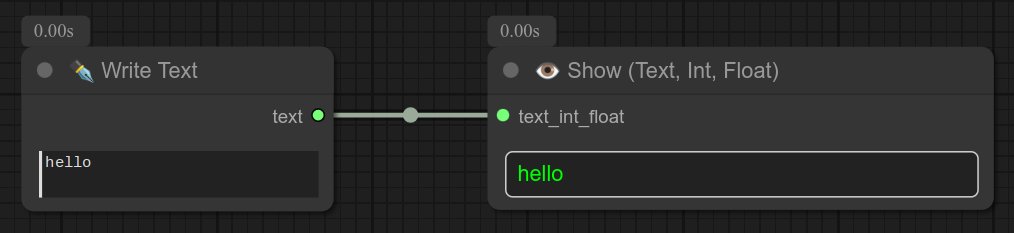
Simple node to write text / send text to another node.
Below is a simple example of how to use the write text node with a show node :
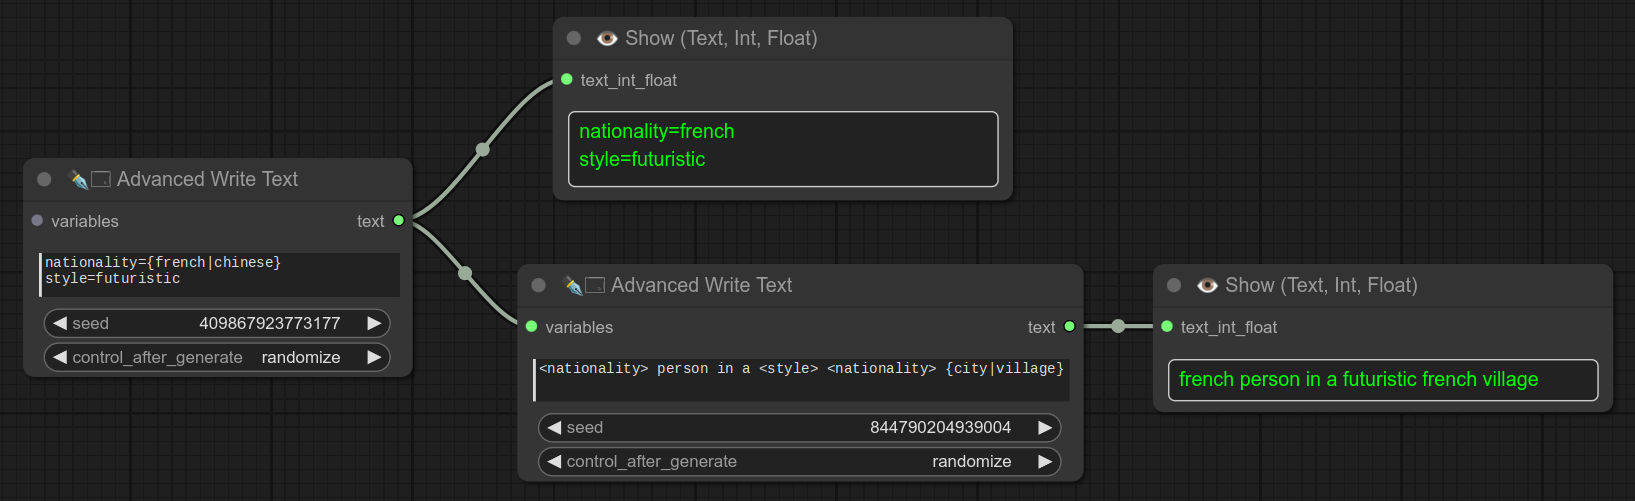
3 - ✒🗔🅰️ Advanced Write Text (+ 🎲 random option)
Description:
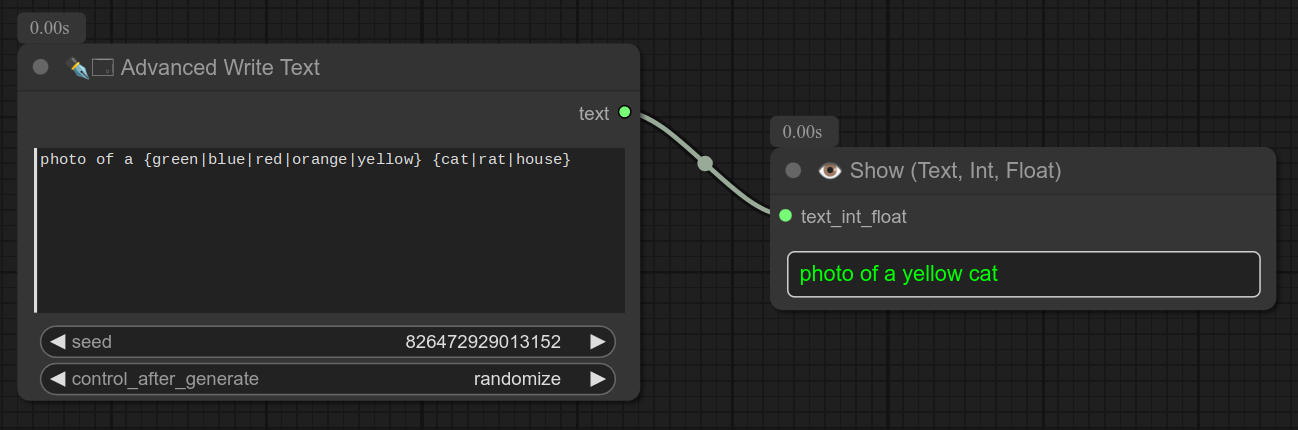
Advanced Write Text node allows for special syntax to accept random variants, like {hood|helmet} will randomly choose between hood or helmet.
You also have seed and control_after_generate to manage the randomness.
It is also displaying the text in the comfyui console. (Useful for debugging)
Example of console logs :
Raw text: photo of a {green|blue|red|orange|yellow} {cat|rat|house}
Picked text: photo of a green house
You can also create and reuse variables with this syntax : <name>.
Usage example :
❗ 0.76 - New syntax available :
Groups, with no duplicate, example : {left|right|middle|group=LMR}+{left|right|middle|group=LMR}+{left|right|middle|group=LMR}
Random based on percentage : {A(80%)|B(15%)|C(5%)}
❗ 0.77 - New syntax available :
2 {apple|orange|banana|static_group=FRUIT}s, one {apple|orange|banana|static_group=FRUIT} on the left, one {apple|orange|banana|static_group=FRUIT} on the right
4 - 🔗 Combine Texts
Description:
Combine multiple text inputs into a single output. (can have separation with : comma, space, new line or nothing.)
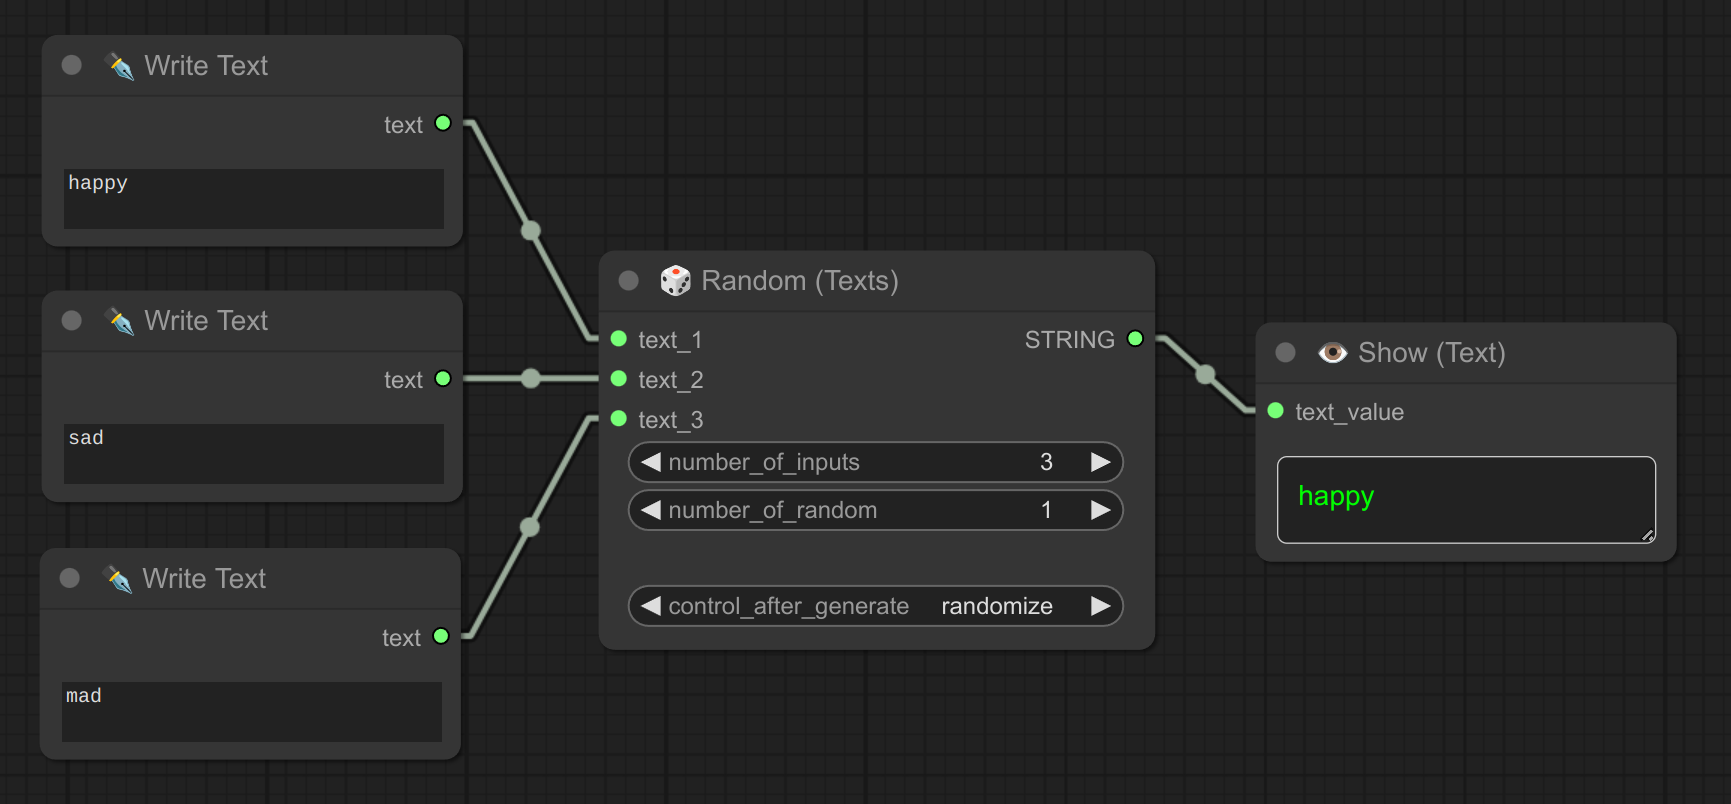
5 - 🎲 Random (Texts)
Description:
Generate and display random text from a predefined list. Great for creating random prompts.
You also have control_after_generate to manage the randomness.
6 - ♻ Loop
Description:
⚠️ Warning : DEPRECATED, this node doesn't work anymore.
Latest comfyui version just refuse to output 2 times the same value.
General-purpose loop node, you can connect that in between anything.
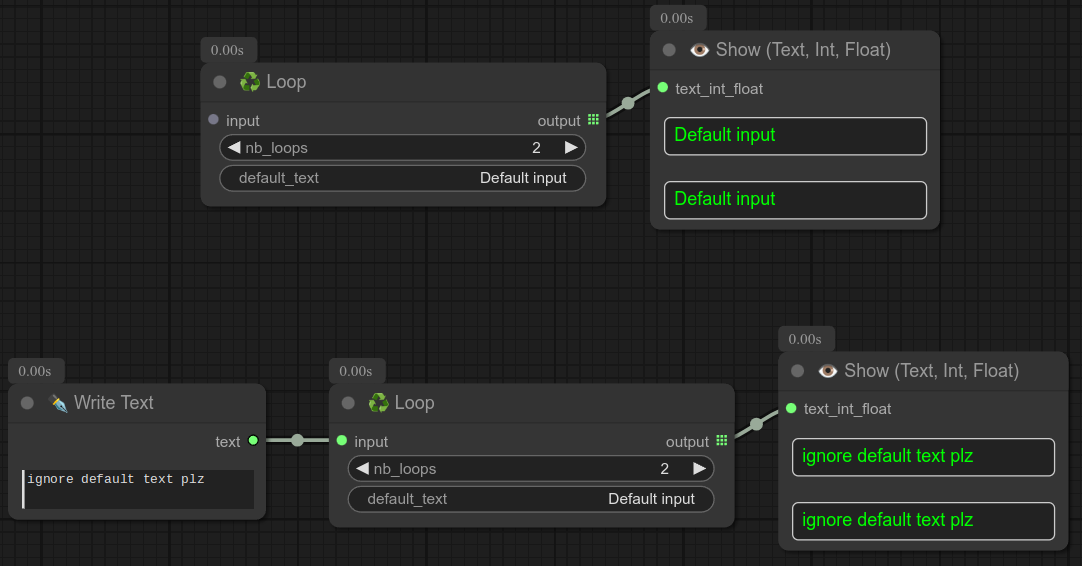
It has an optional input, if no input is given, it will loop over the value of the STRING "if_no_input" (take you can edit).
❗ Careful this node accept everything as input and output, so you can use it with texts, integers, images, mask, segs etc... but be consistent with your inputs/outputs.
Do not use this Loop if you can do otherwise.
This is an example together with my node 28, to force a different seed for each iteration :

7 - ♻ Loop Texts
Description:
Cycle through a list of text inputs.
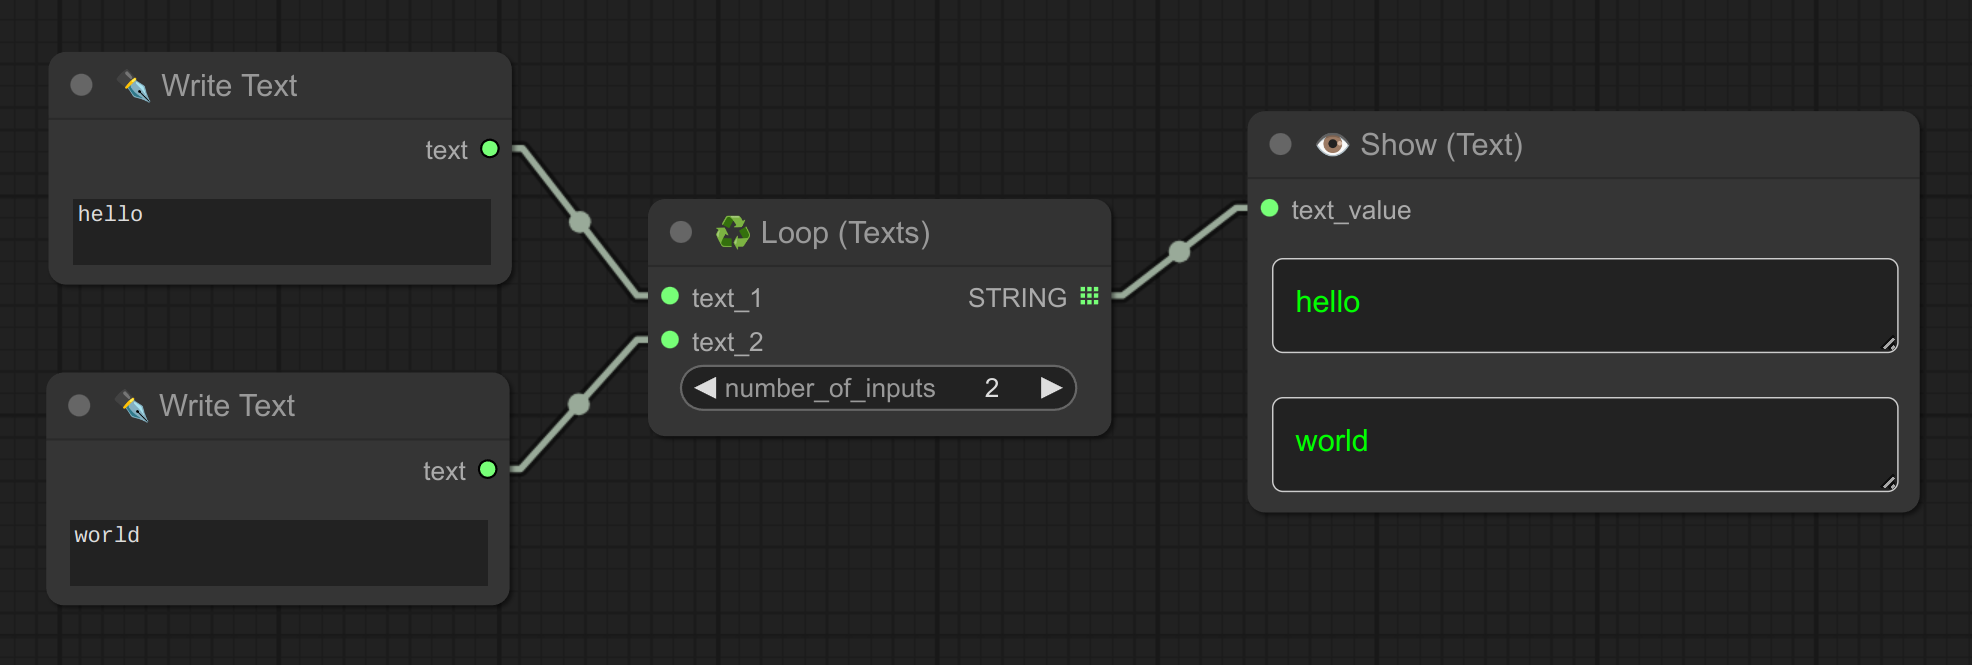
Here is an example of usage with combine texts and flux :
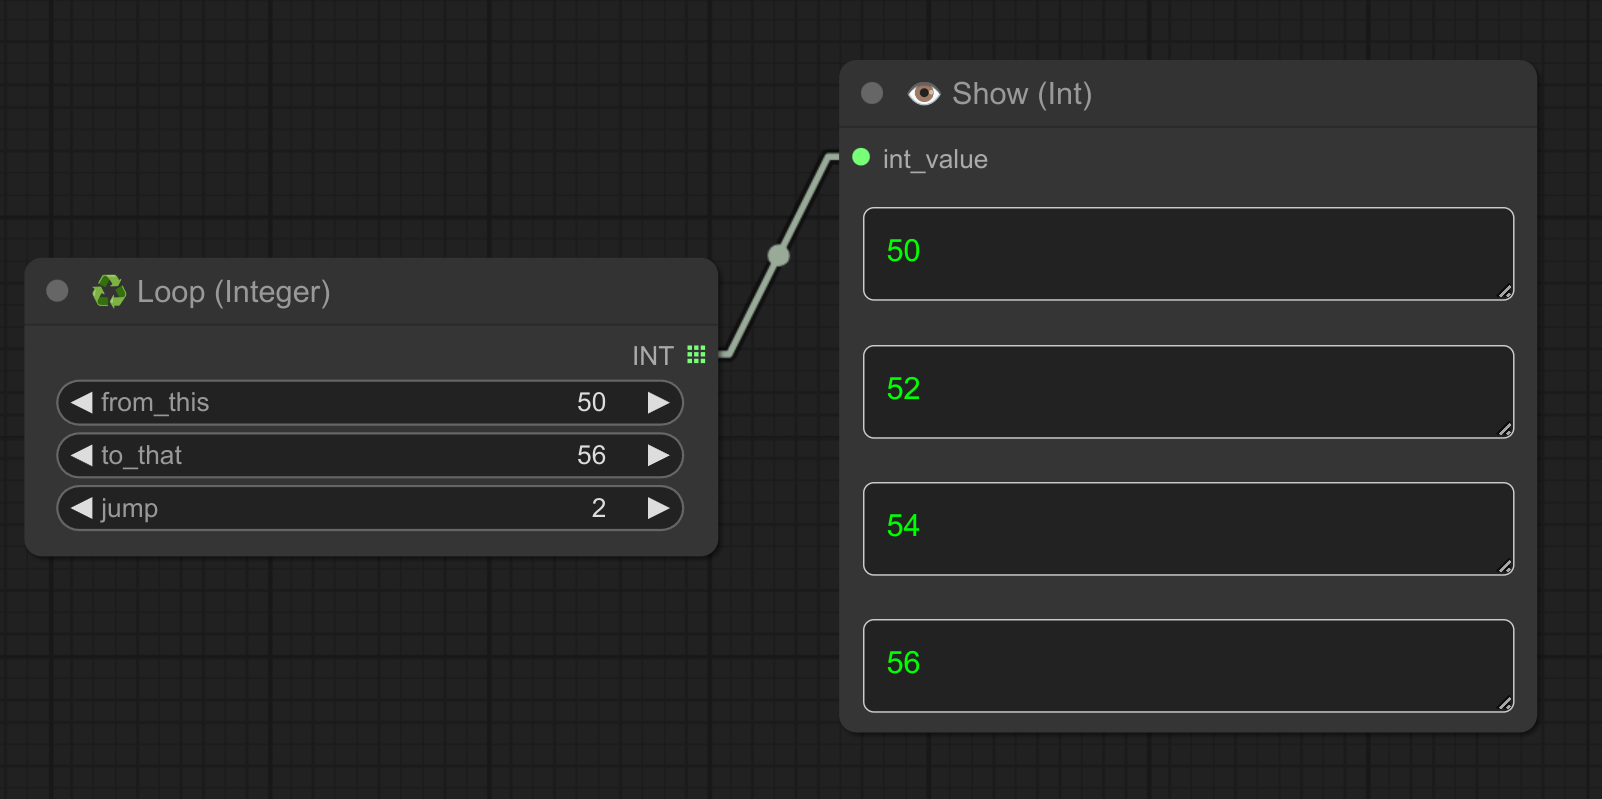
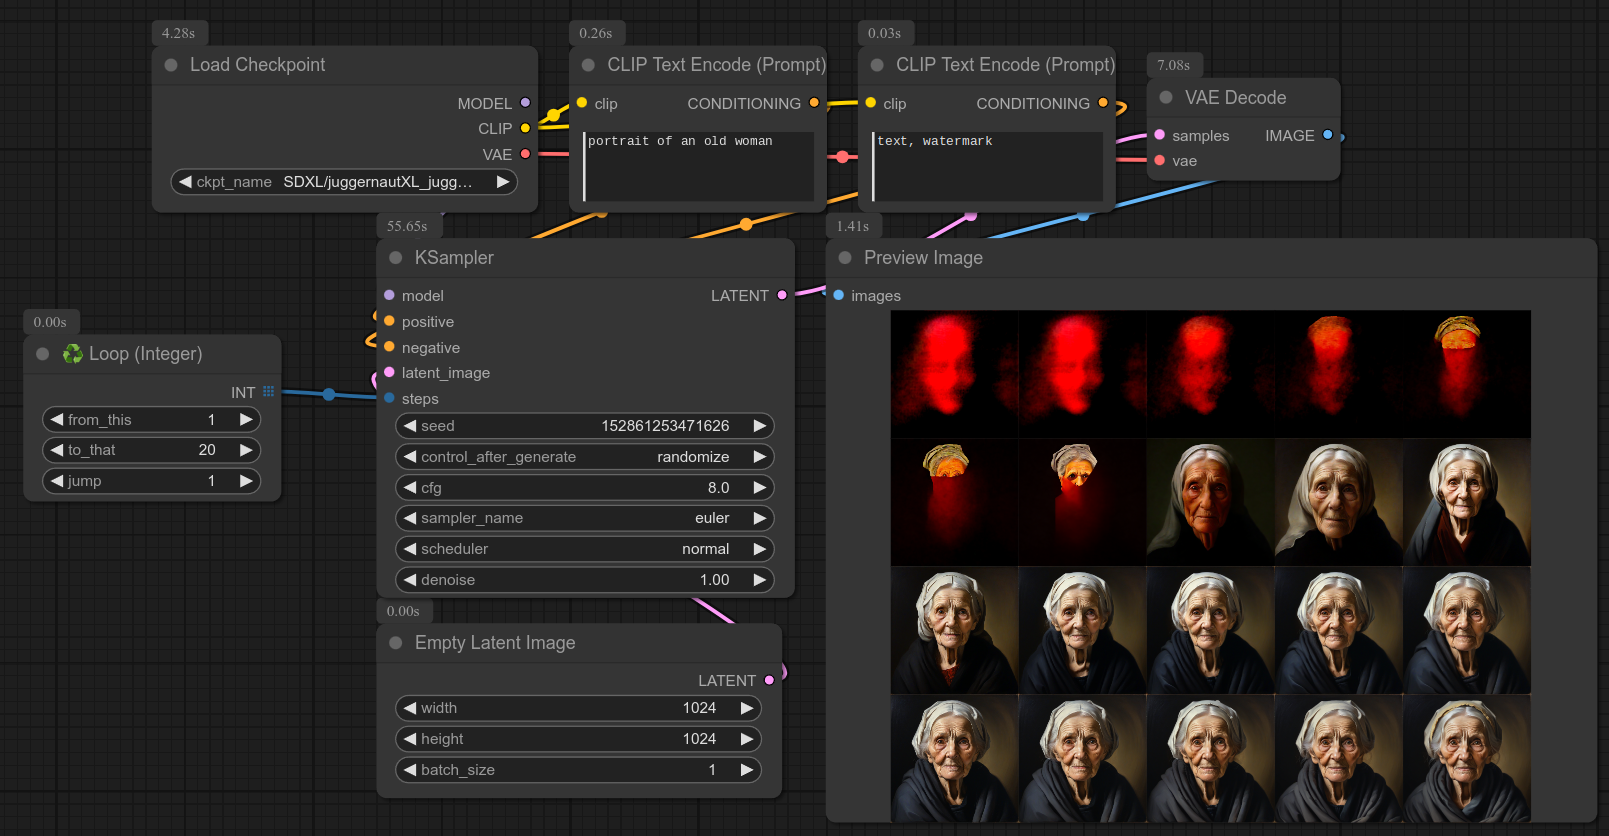
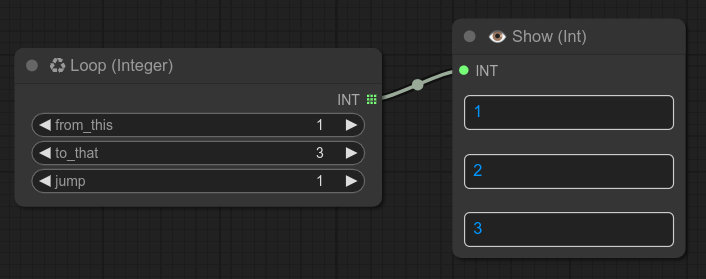
8 - ♻ Loop Integer
Description:
Iterate through a range of integer values, good for steps in ksampler, etc...
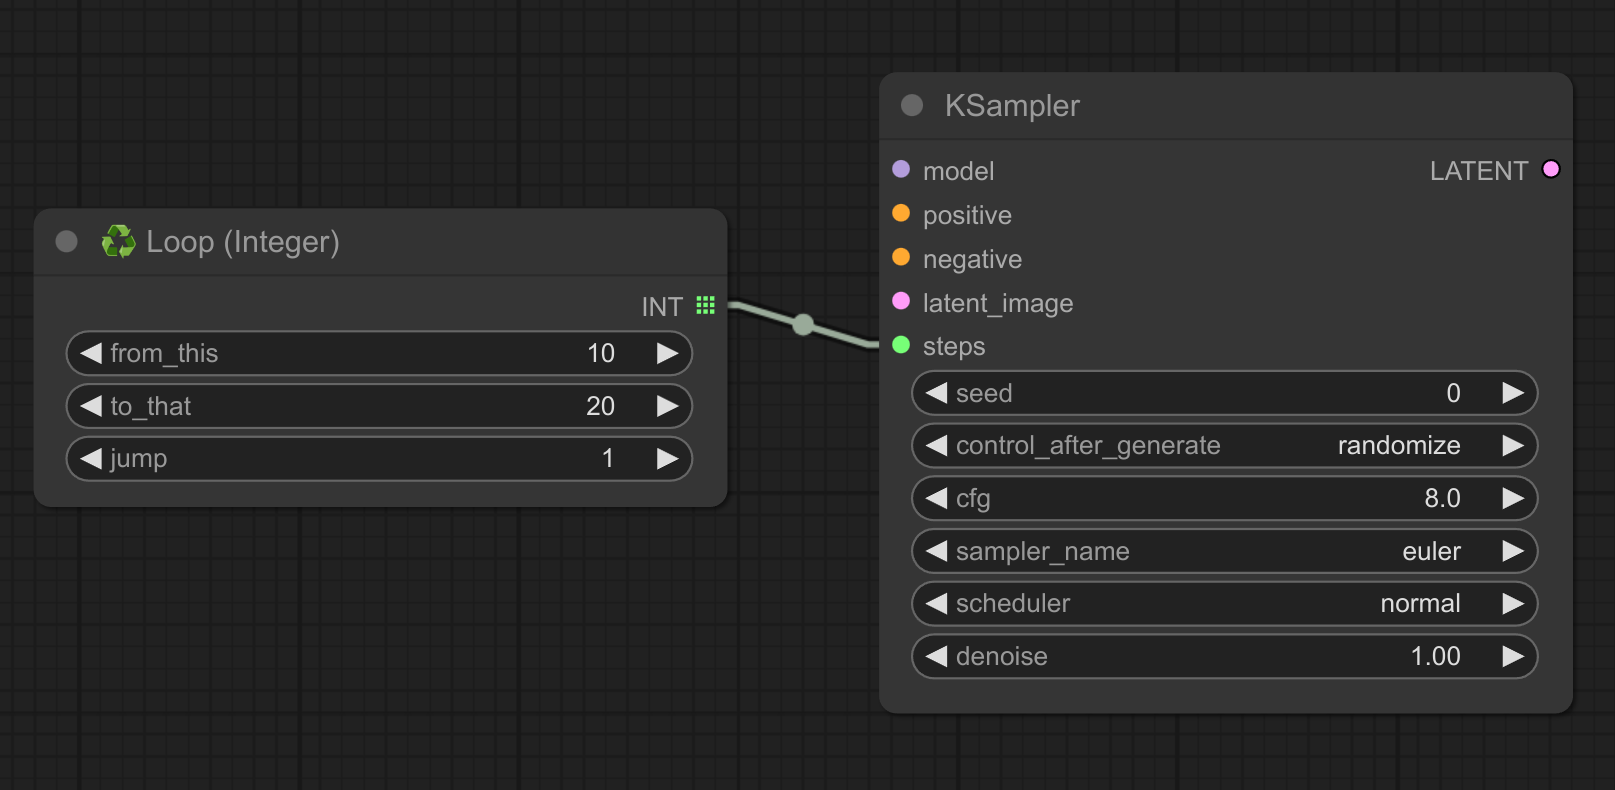
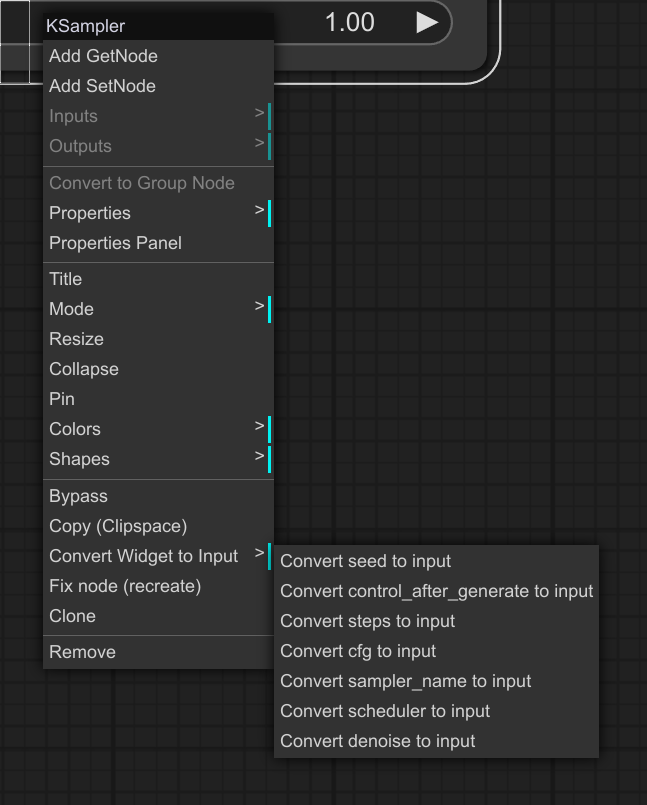
❗ Don't forget that you can convert ksampler widgets to input by right-clicking the ksampler node :
Here is an example of usage with ksampler (Notice that with "steps" this node isn't optimized, but good enough for quick testing.) :
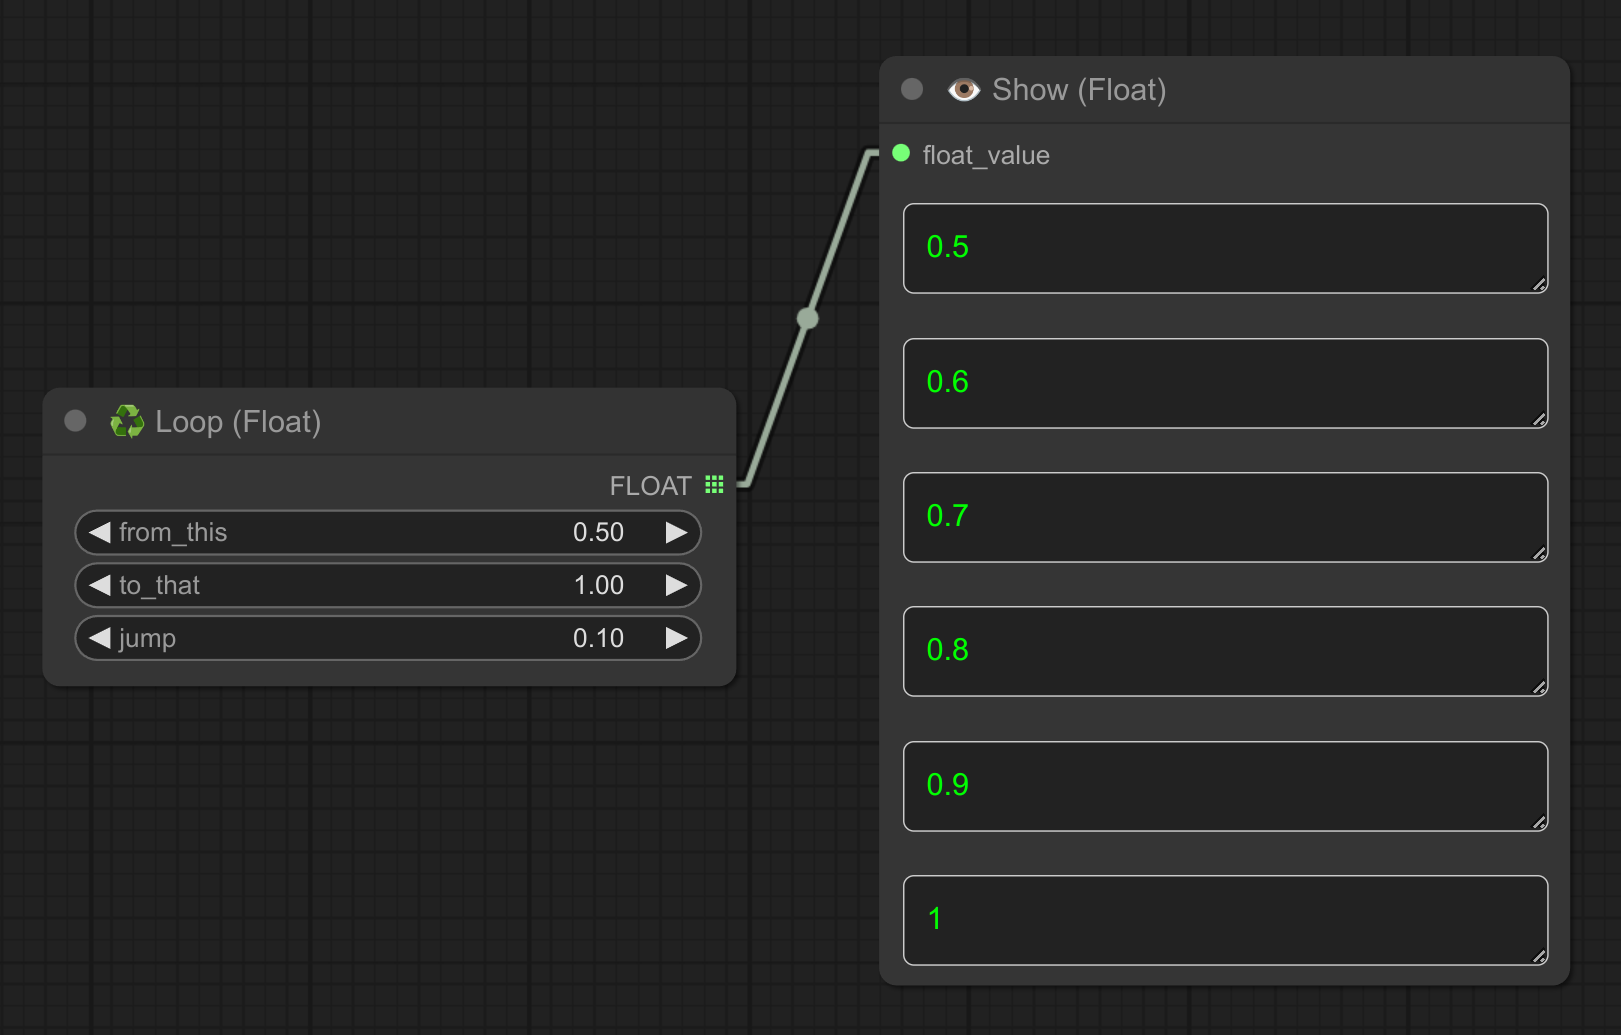
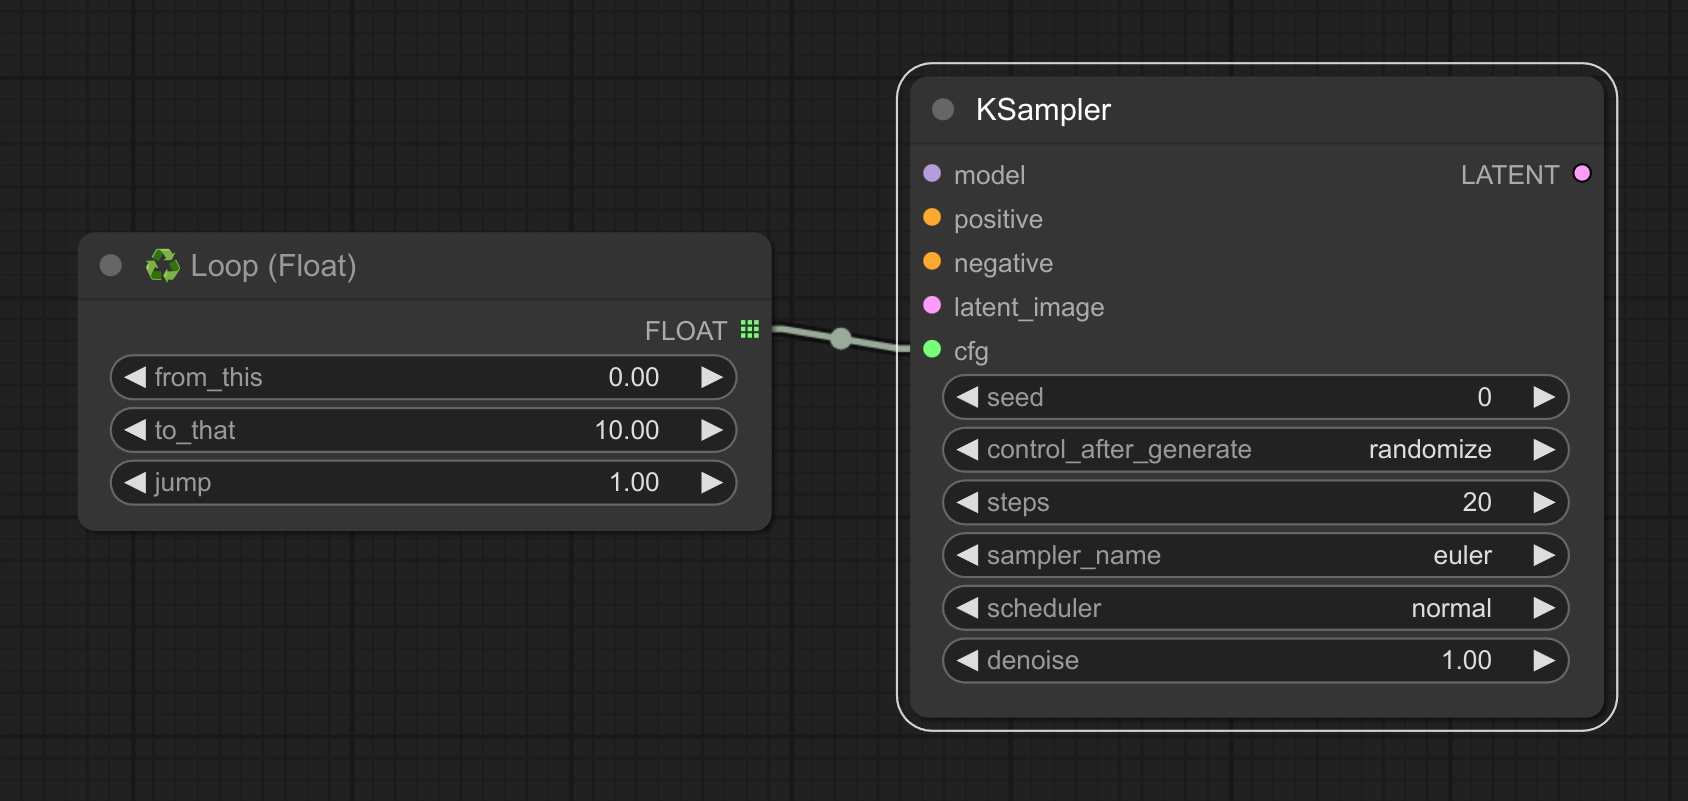
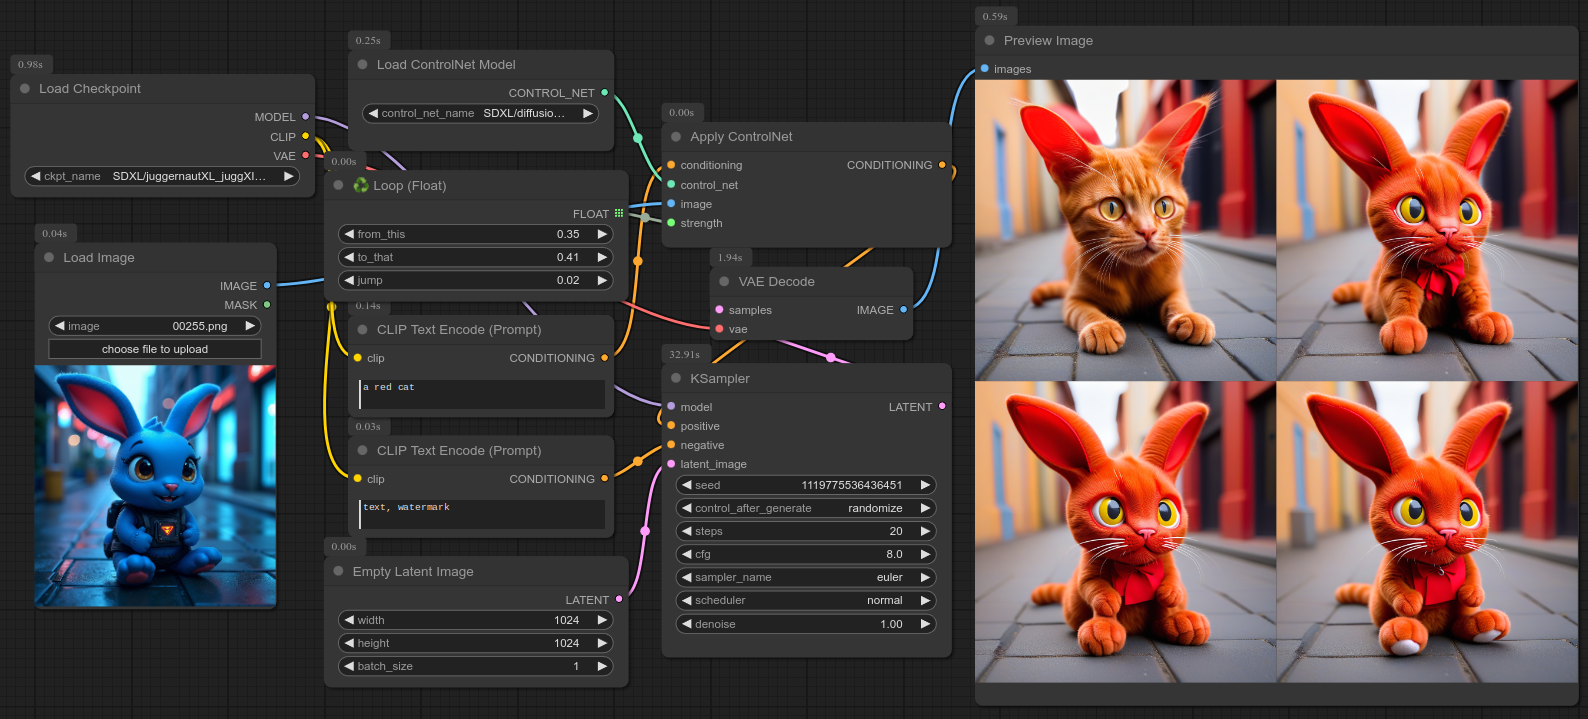
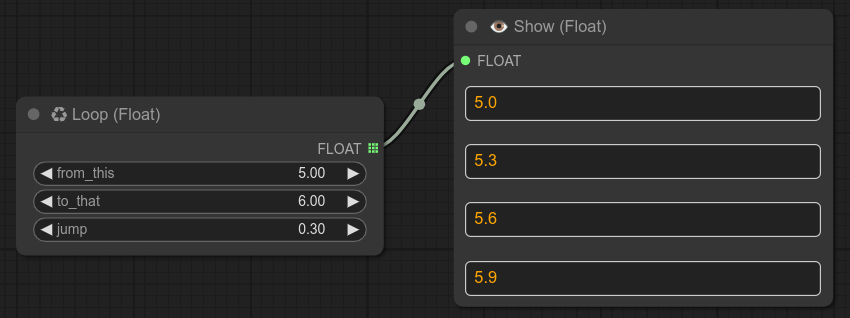
9 - ♻ Loop Float
Description:
Loop through a range of floating-point numbers, good for cfg, denoise, etc...
Here is an example with controlnet, trying to make a red cat based on a blue rabbit :
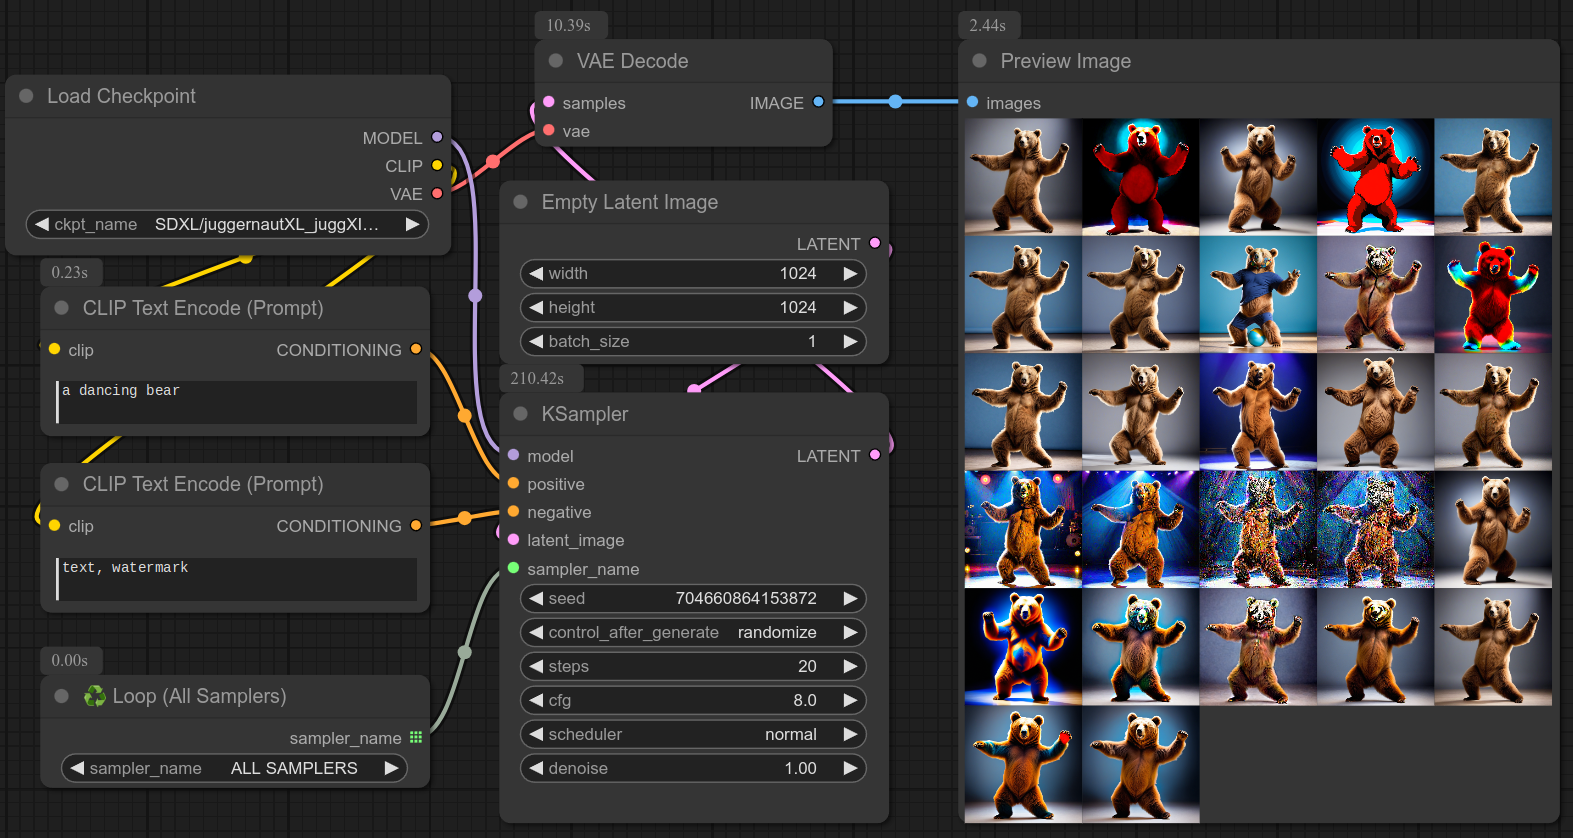
10 - ♻ Loop All Samplers
Description:
Iterate over all available samplers to apply them one by one. Ideal for testing.
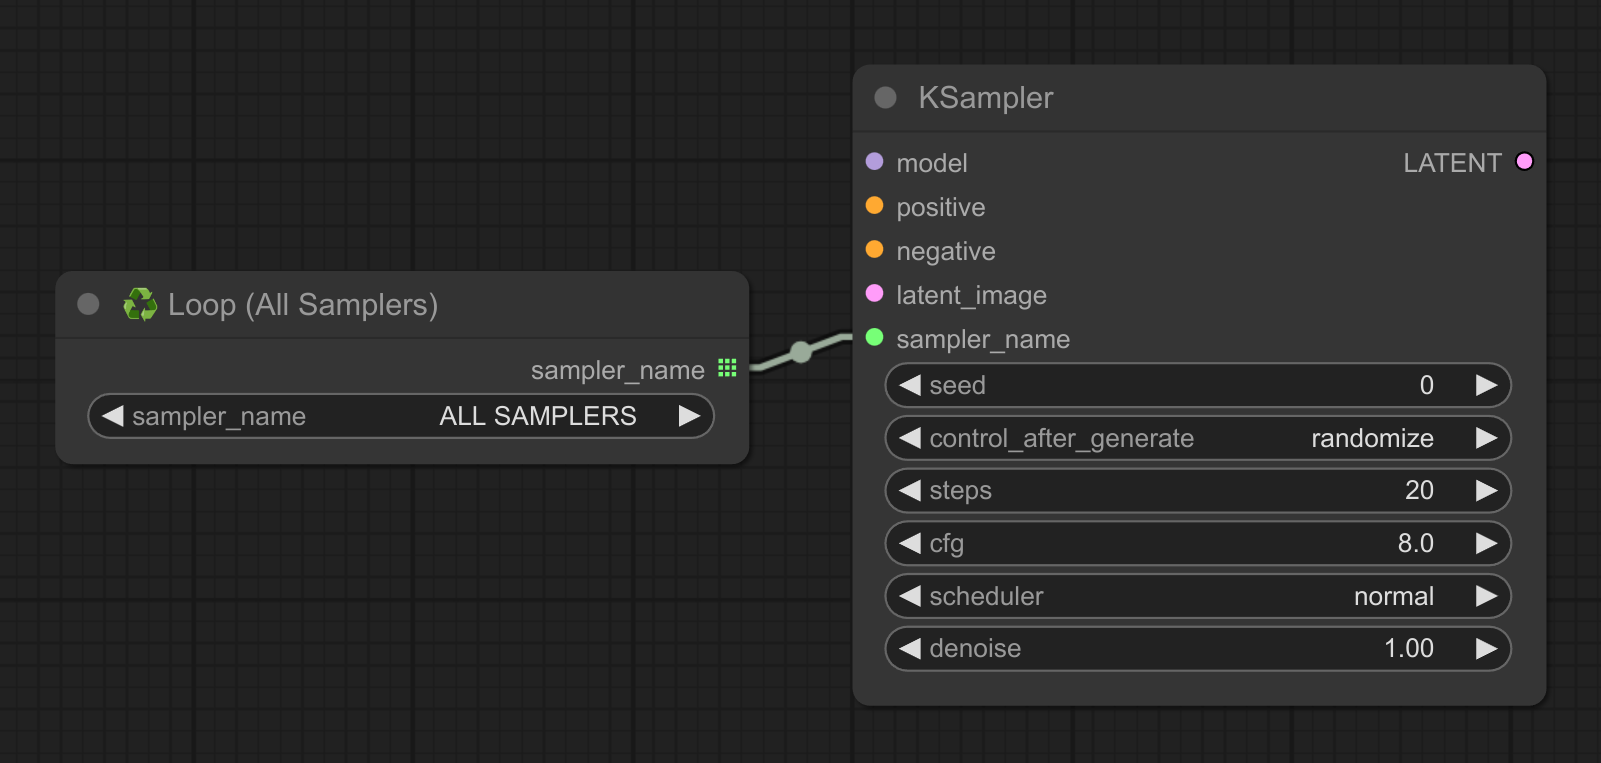
Here is an example of looping over all the samplers with the normal scheduler :
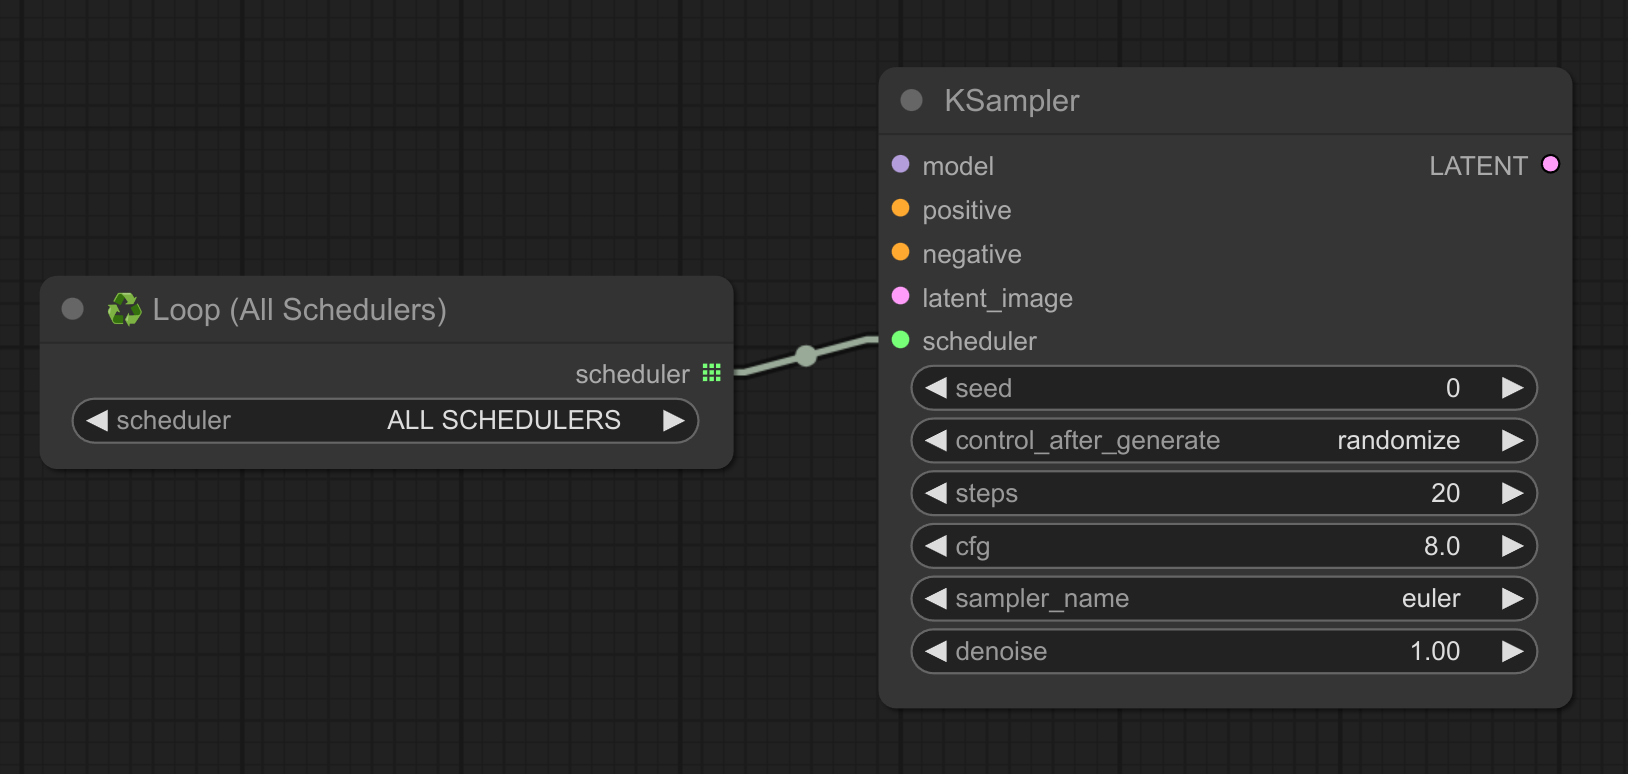
11 - ♻ Loop All Schedulers
Description:
Iterate over all available schedulers to apply them one by one. Ideal for testing. (same idea as sampler above, but for schedulers)
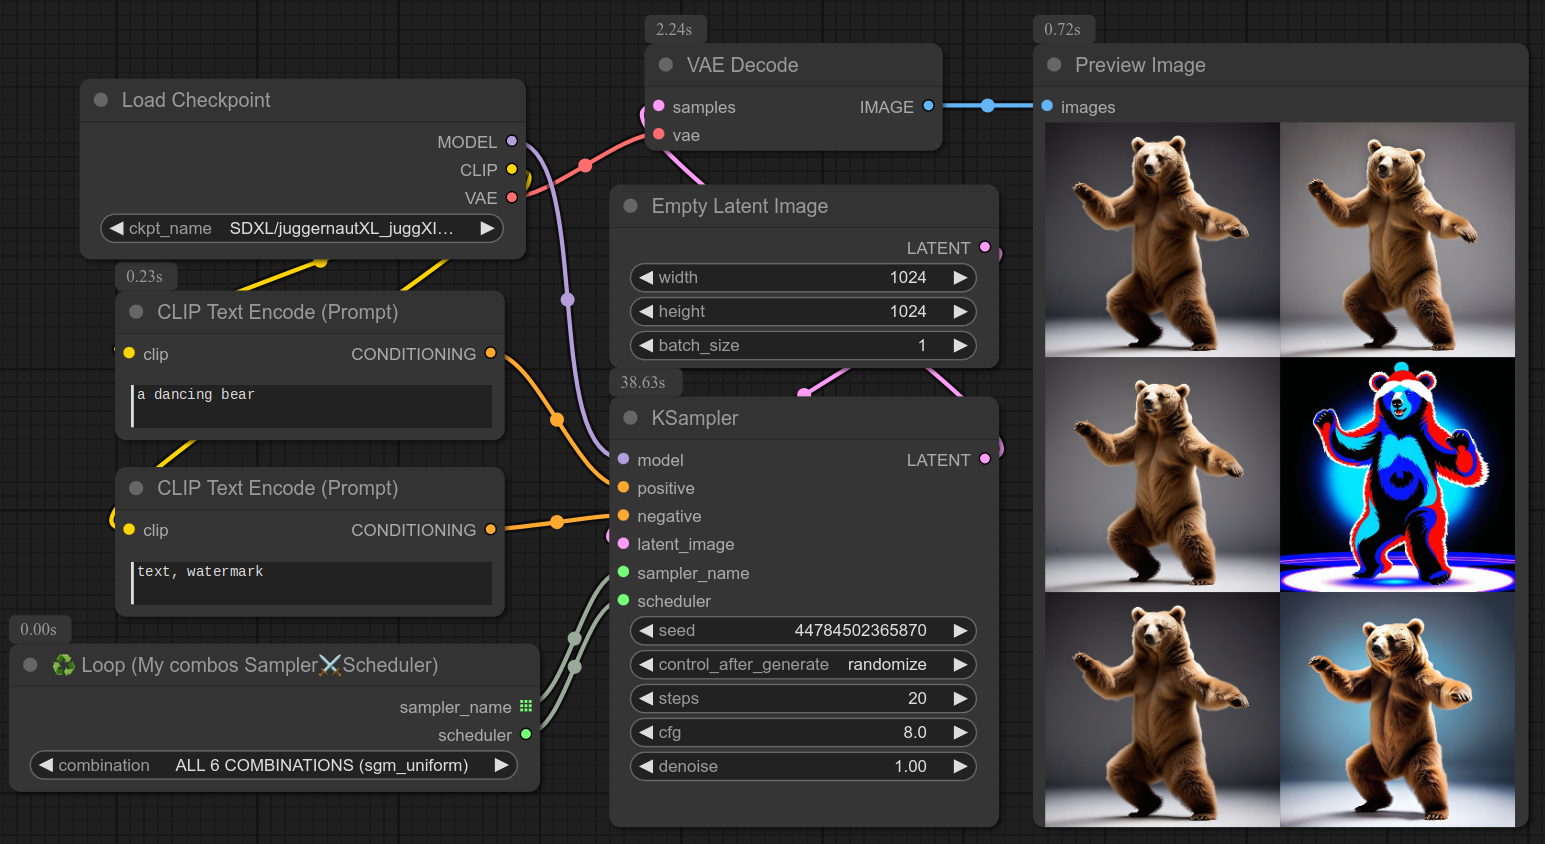
12 - ♻ Loop Combos
Description:
Generate a loop from a list of my own custom combinations (scheduler+sampler), or select one combo manually.
Good for testing.
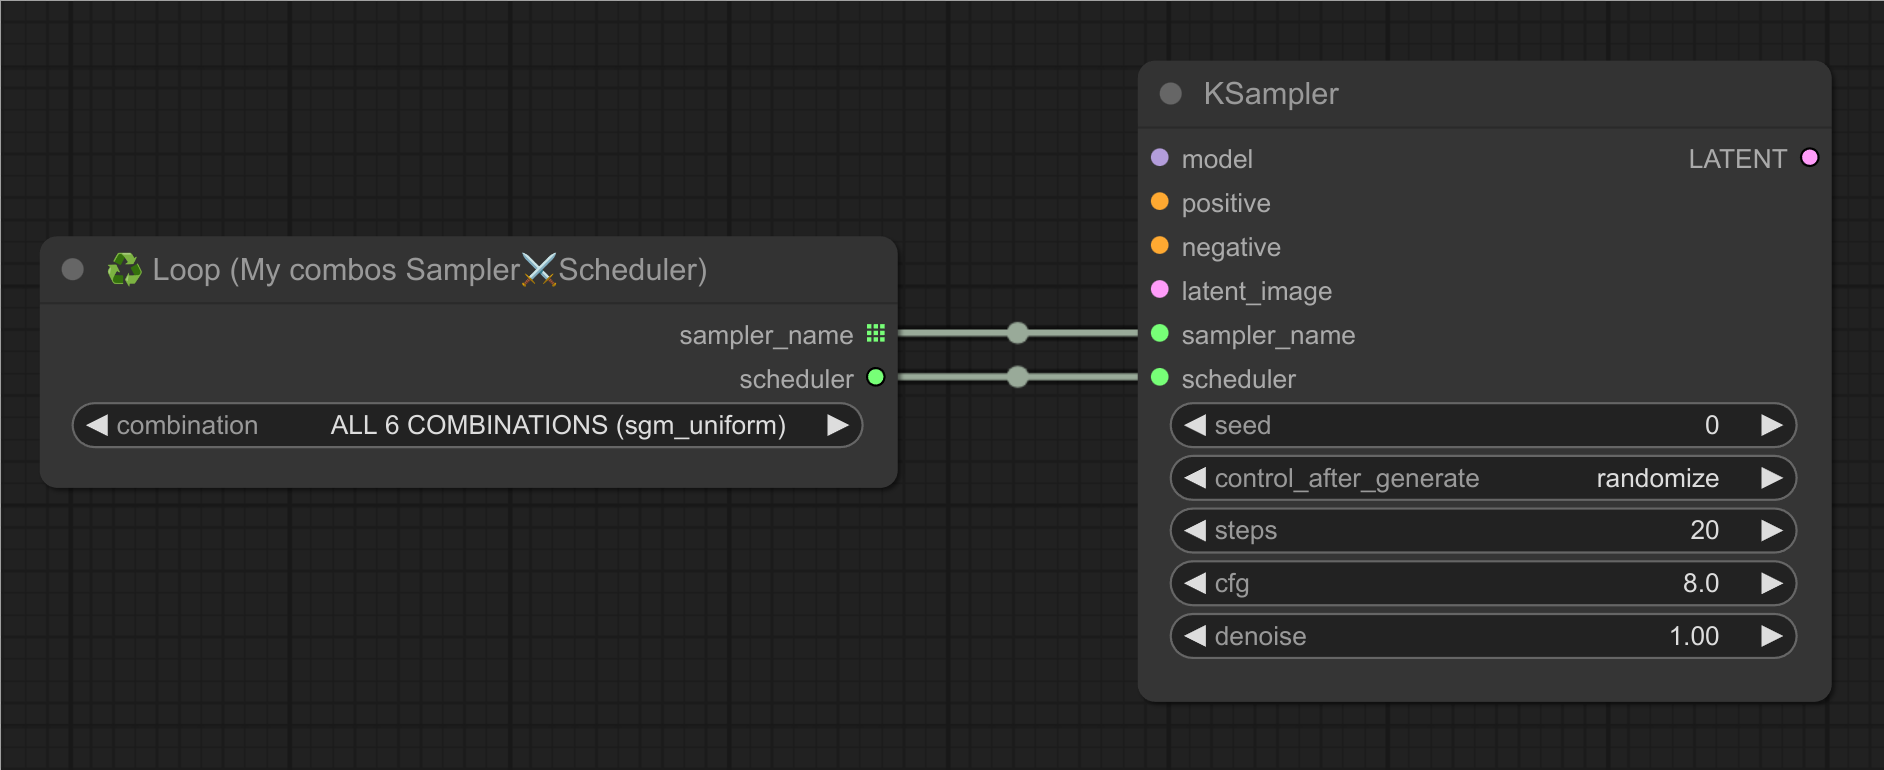
Example of usage to see the differences between different combinations :
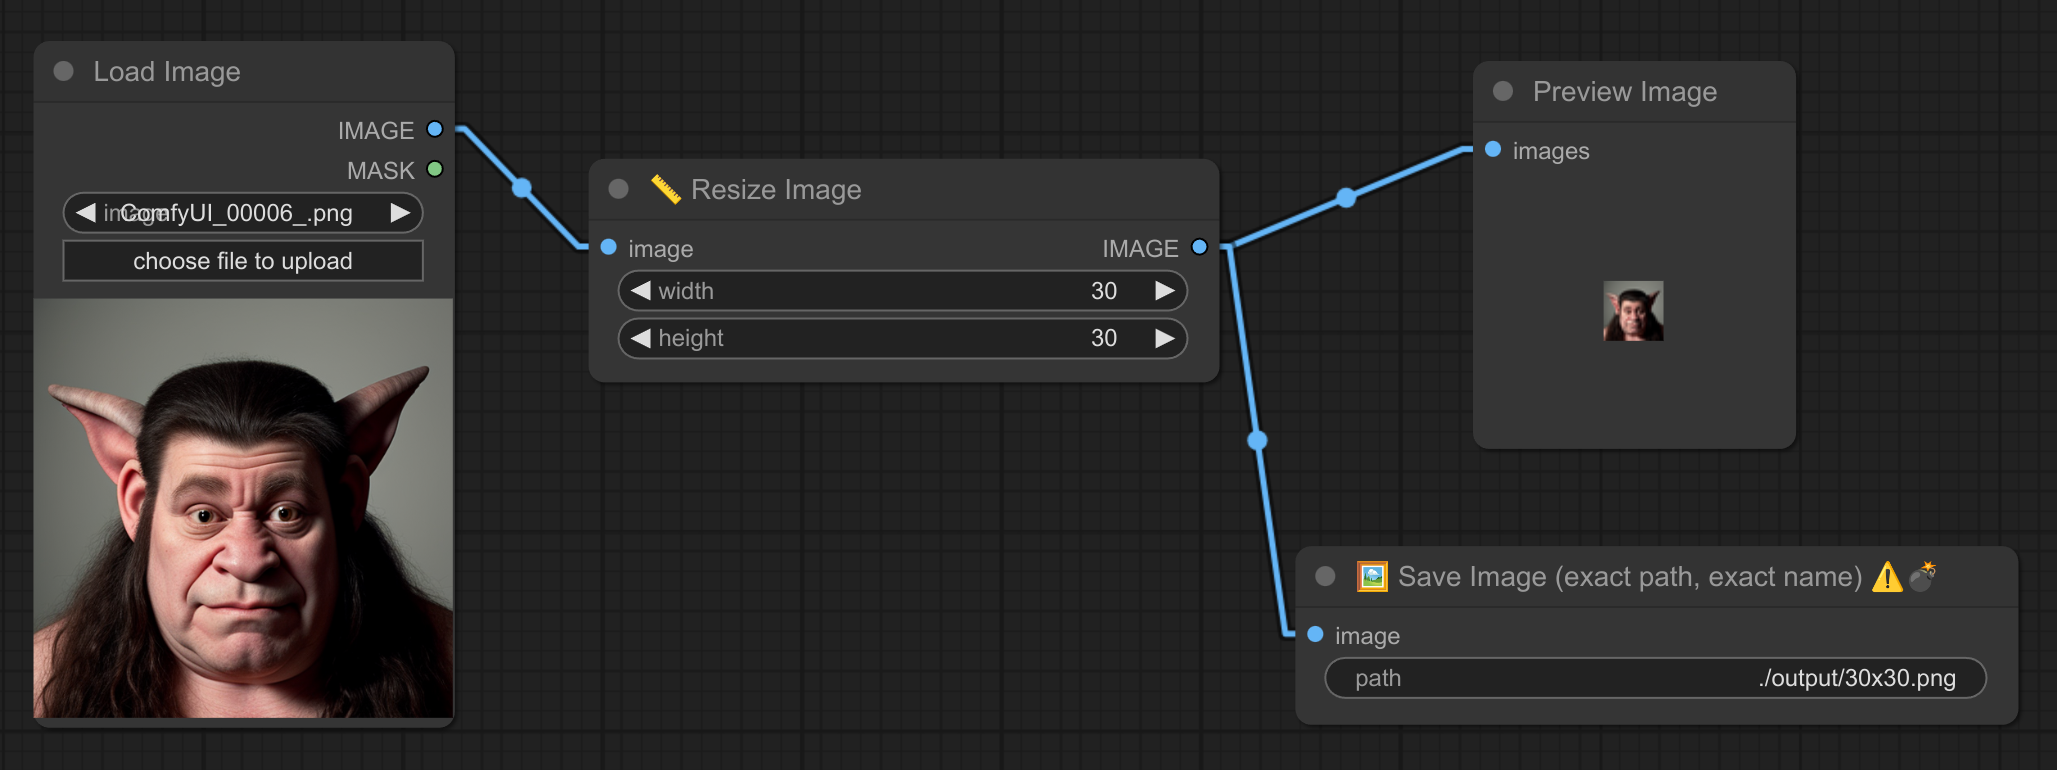
13/14 - 📏 + 🖼 Resize and Save Exact name ⚠️💣
Description:
Resize an image to exact dimensions. If height or width is set to 0, it will keep the aspect ratio.
The other node will save the image to the exact path.
⚠️💣 Warning : The image will be overwritten if it already exists.
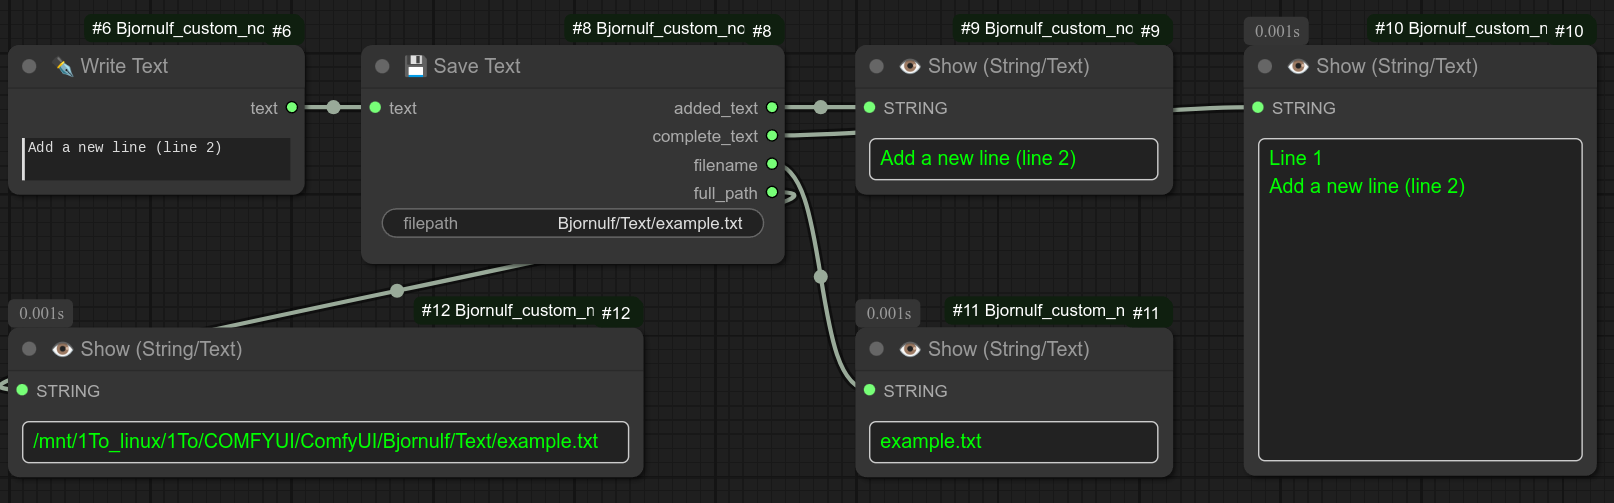
15 - 💾 Save Text
Description:
Save the given text input to a file. Useful for logging and storing text data.
If the file already exist, it will add the text at the end of the file.
I recommend you to keep saving them in "Bjornulf/Text" (Which is in the Comfyui folder, next to output), this is where the node 116 Load text from folder is looking for text files.
16 - 💾🖼💬 Save image for Bjornulf LobeChat (❗For my custom lobe-chat❗)
Description:
❓ I made that node for my custom lobe-chat to send+receive images from Comfyui API : lobe-chat
It will save the image in the folder output/BJORNULF_LOBECHAT/.
The name will start at api_00001.png, then api_00002.png, etc...
It will also create a link to the last generated image at the location output/BJORNULF_API_LAST_IMAGE.png.
This link will be used by my custom lobe-chat to copy the image inside the lobe-chat project.

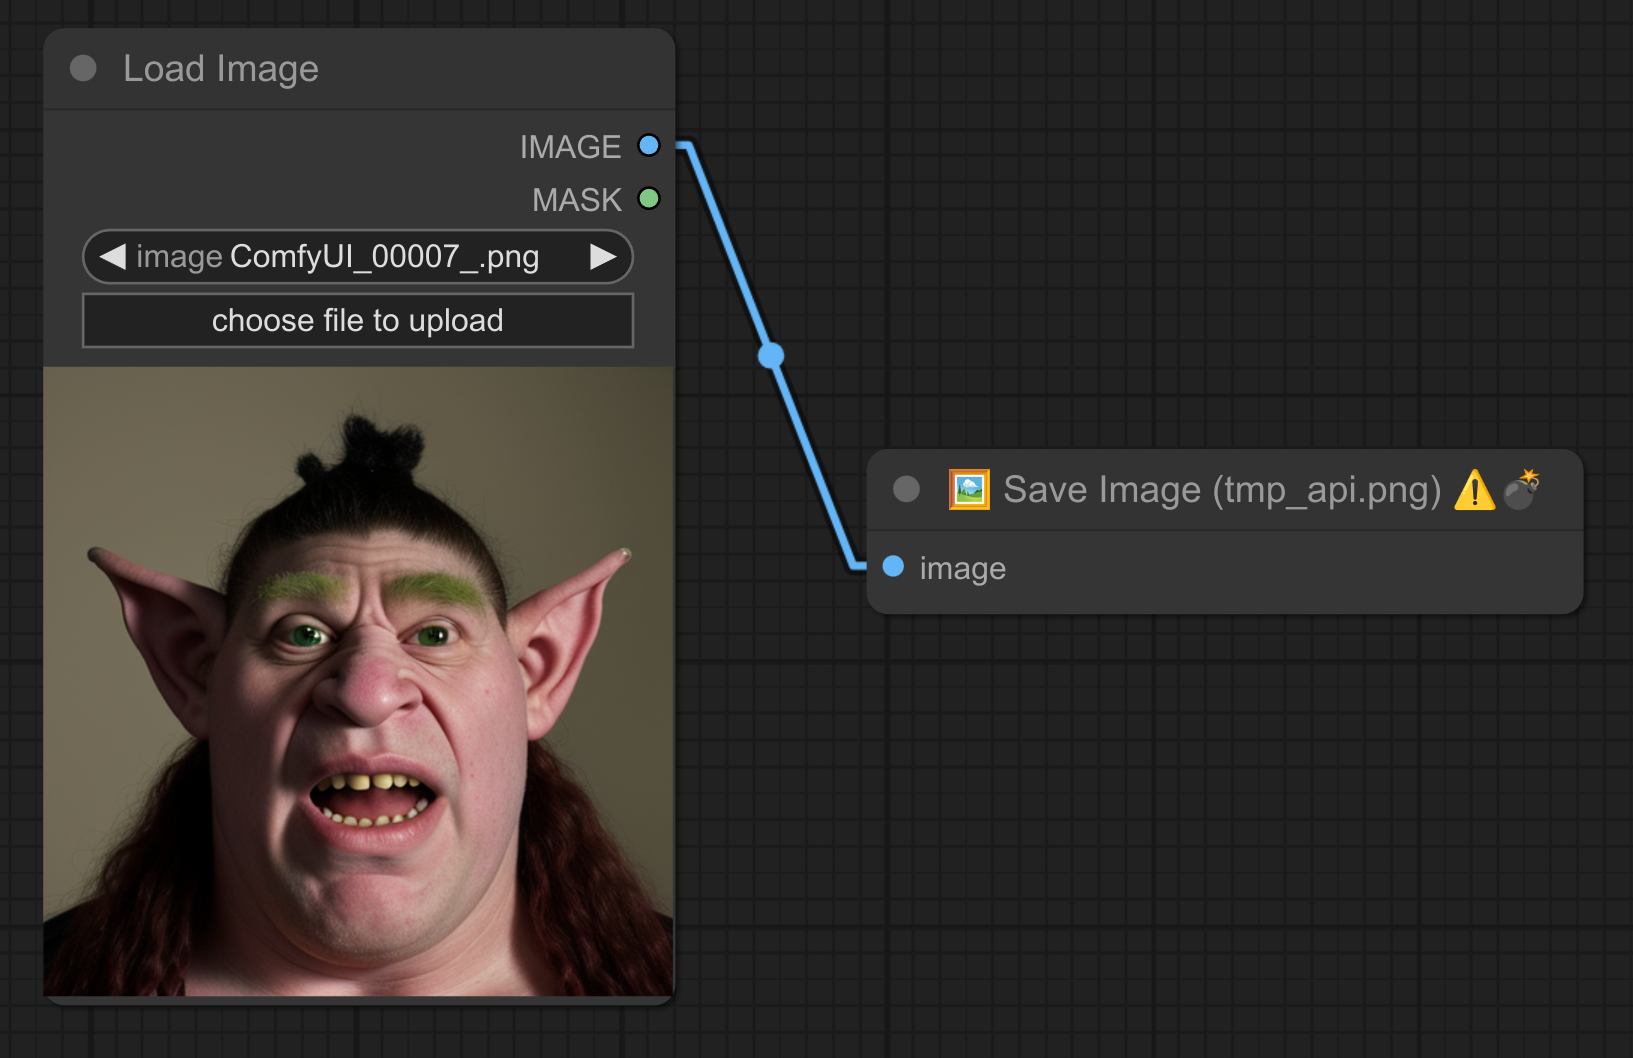
17 - 💾🖼 Save image as tmp_api.png Temporary API ⚠️💣
Description:
Save image for short-term use : ./output/tmp_api.png ⚠️💣
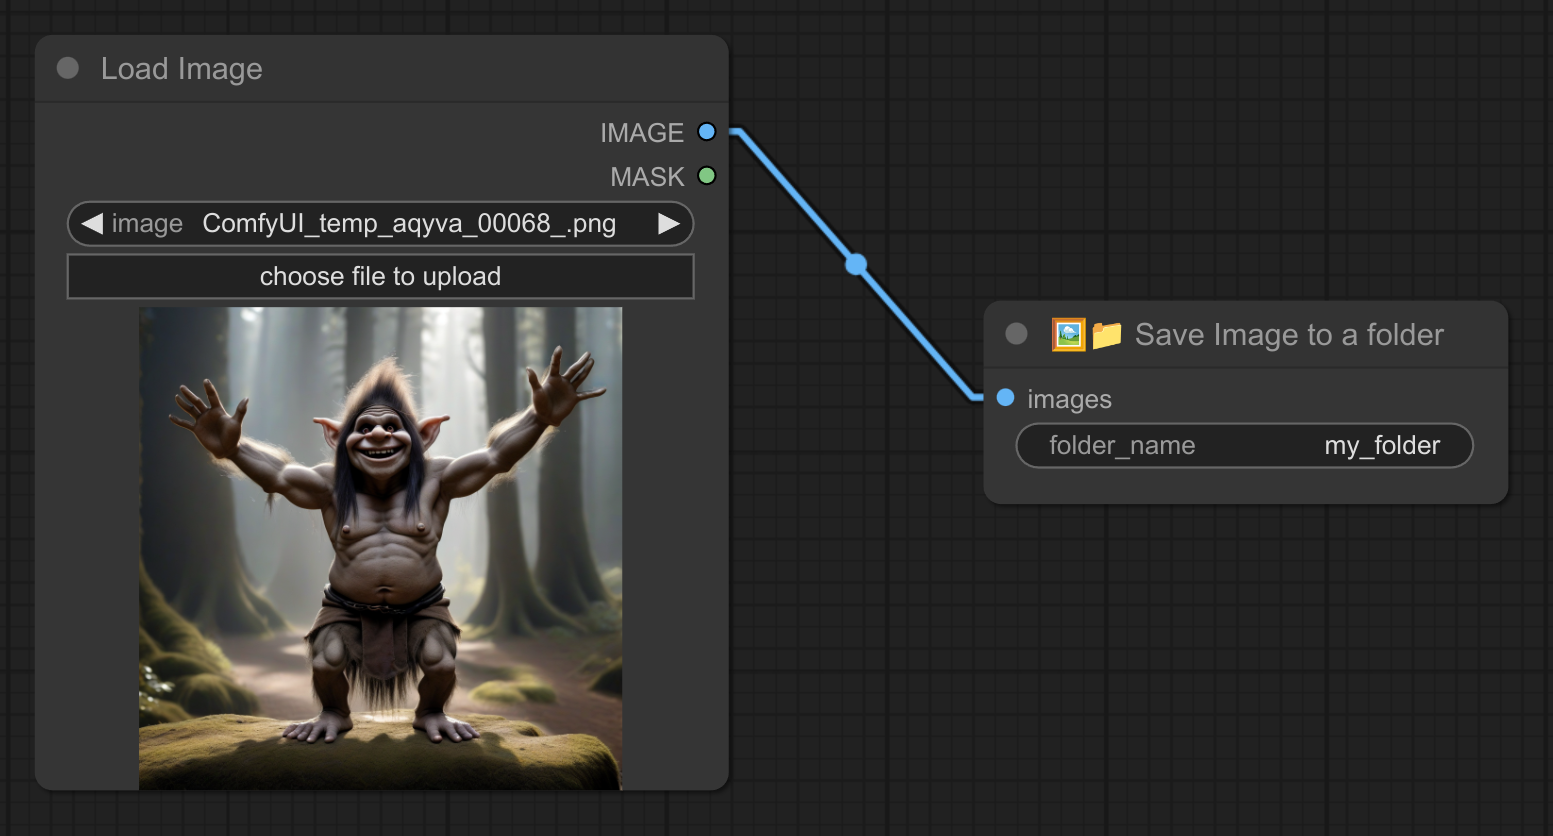
18 - 💾🖼📁 Save image to a chosen folder name
Description:
Save image in a specific folder : my_folder/00001.png, my_folder/00002.png, etc...
Also allow multiple nested folders, like for example : animal/dog/small.
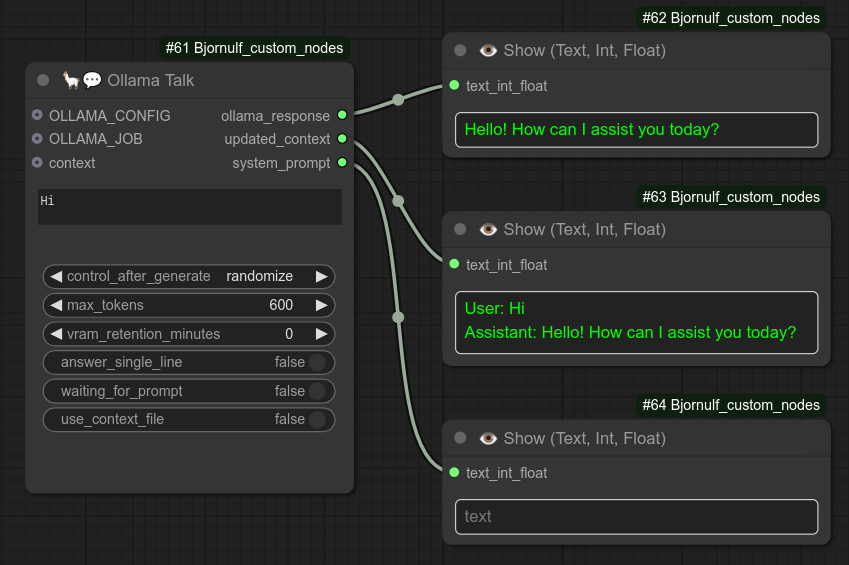
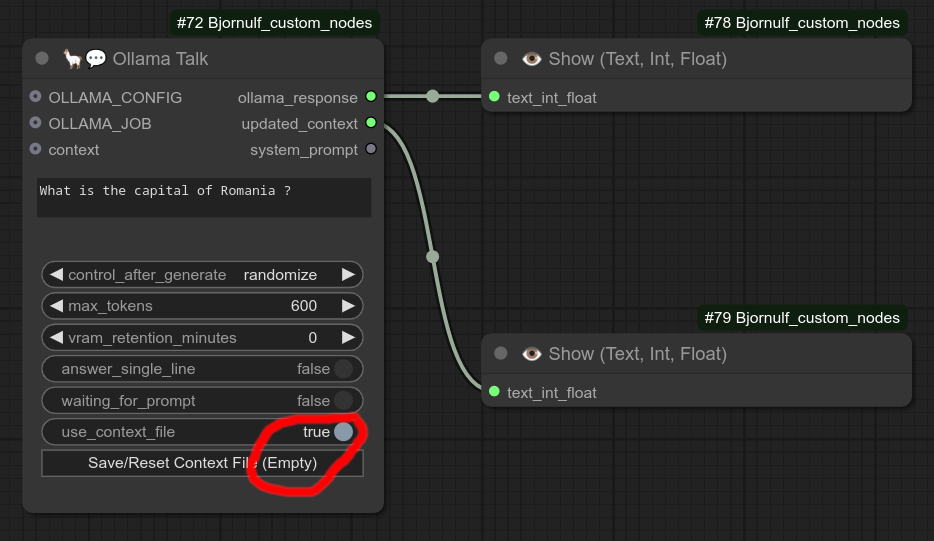
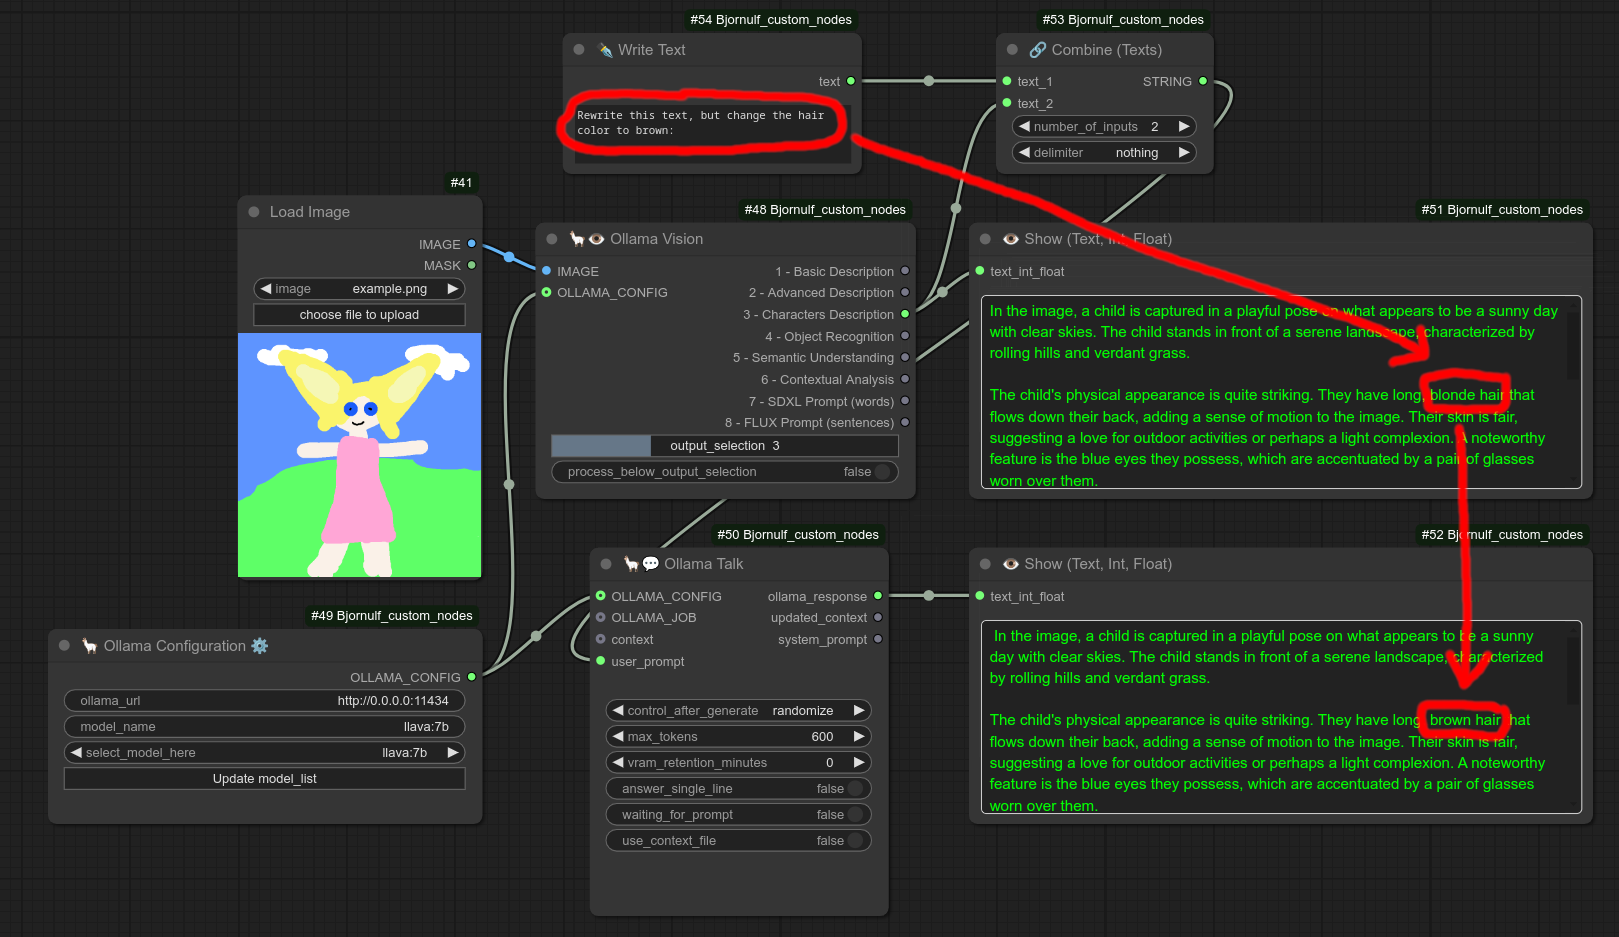
19 - 🦙💬 Ollama Talk
Description:
Use Ollama inside Comfyui. (Require the backend Ollama to be installed and currently running.)
Use by default the model llama3.2:3b and the URL http://0.0.0.0:11434. (For custom configuration, use node 63)
Example of basic usage :
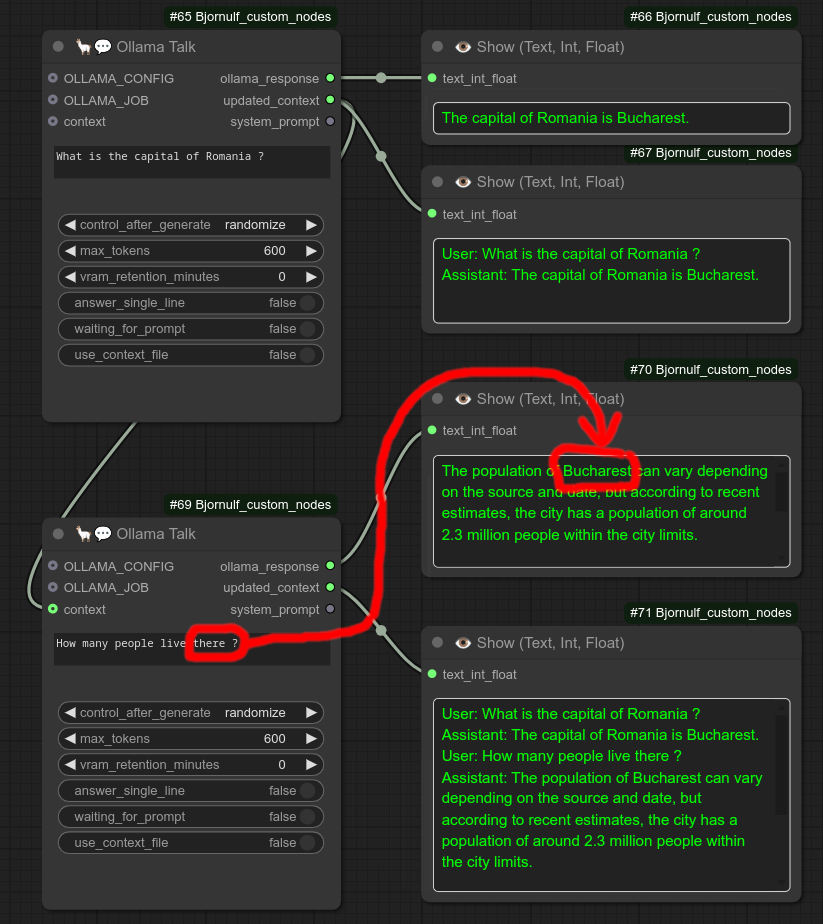
Example of usage with context, notice that with context you can follow up a conversation, "there" is clearly understood as "Bucharest" :
You can also use use_context_file (set to True), this will save the context in a file : ComfyUI/Bjornulf/ollama_context.txt.
This way you can keep using the context without having to connect many nodes connected to each other, just run the same workflow several times.
Example in 3 steps of context file conversation
Step 1 : Notice that for now context is empty, so it will be the first message in ComfyUI/Bjornulf/ollama_context.txt :
Step 2 : Notice that now the number of lines in context file has changed (These are the same as the updated_context):
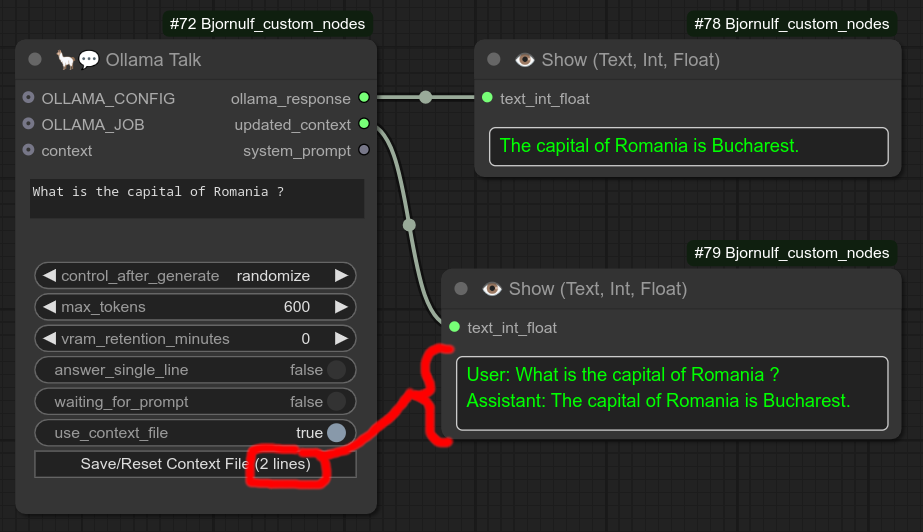
Step 3 : Notice that the number of lines keep incrementing.
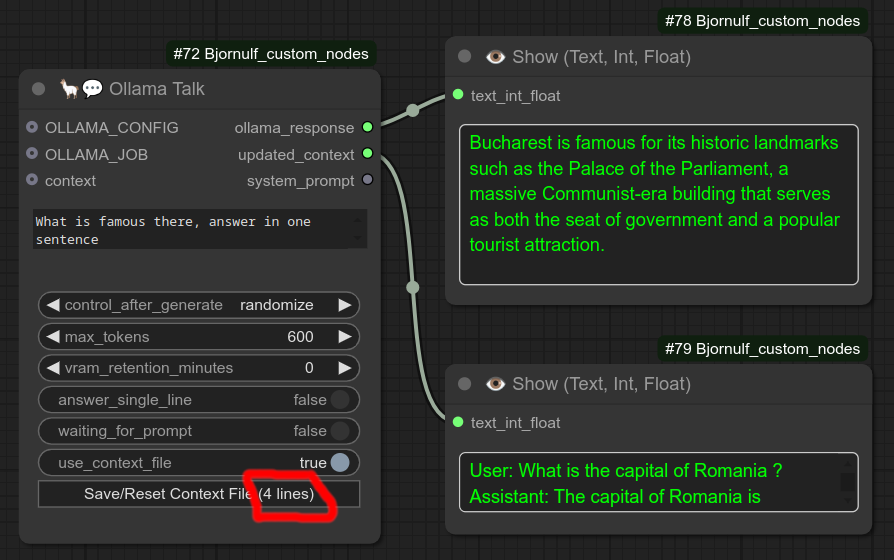
When clicking the reset Button, it will also save the context in : ComfyUI/Bjornulf/ollama_context_001.txt, ComfyUI/Bjornulf/ollama_context_002.txt, etc...
⚠️ If you want to have an "interactive" conversation, you can enable the option waiting_for_prompt.
When set to True, it will create a Resume button, use this to unpause the node and process the prompt.
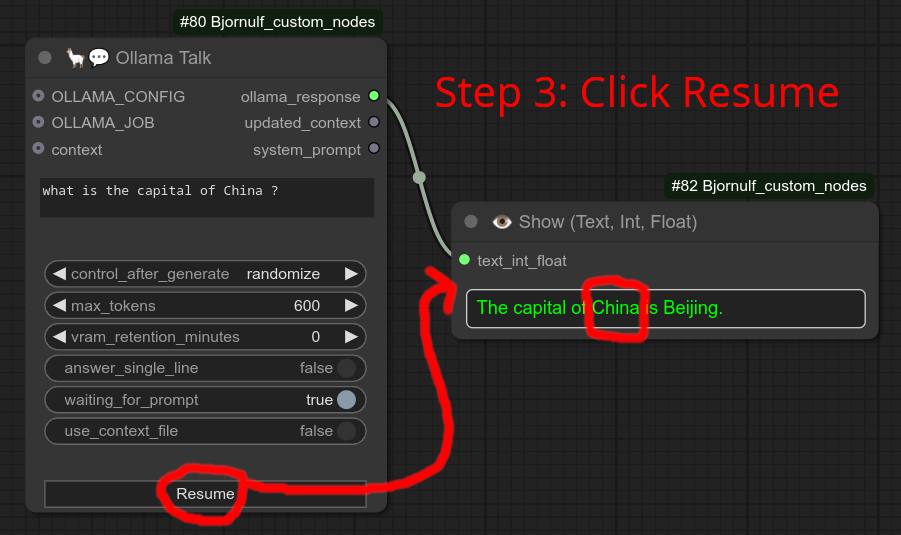
Example in 3 steps of waiting_for_prompt interactive conversation
Step 1: I run the workflow, notice that Show node is empty, the node is pausing the workflow and is waiting for you to edit the prompt. (Notice that at this moment, it is asking for the capital of France.)
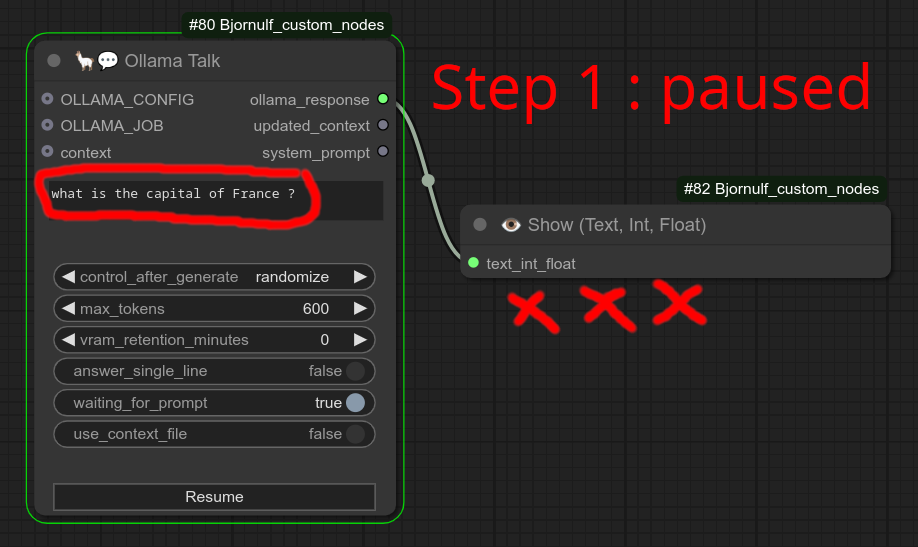
Step 2: I edit the prompt to change France into China, but the node won't process the request until you click on Resume.
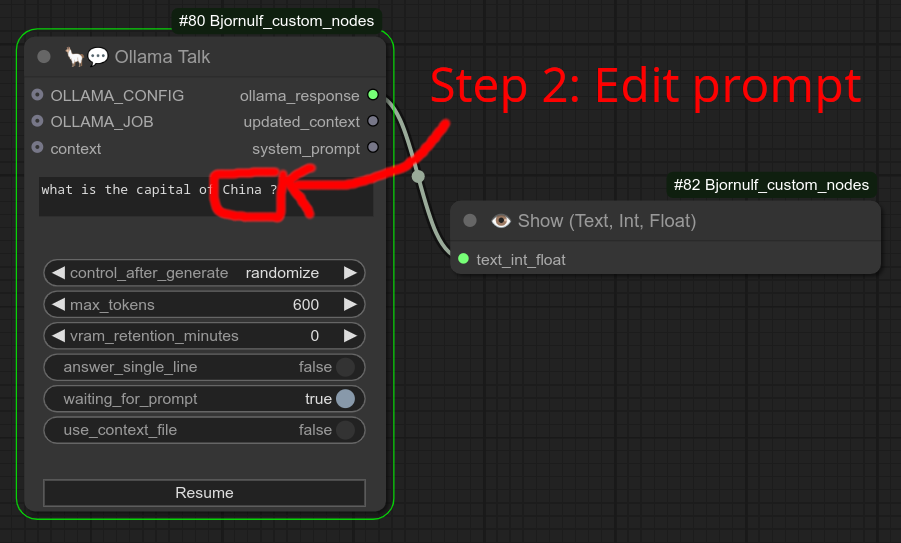
Step 3: I click on Resume button, this is when the request is done. Notice that it used China and not France.
Other options :
- You also have
control_after_generateto force the node to rerun for every workflow run. (Even if there is no modification of the node or its inputs.) - You can set
max_tokensto reduce the size of the answer, a token is about 3 english characters. - You can force the answer to be on a single line, can be useful.
- You have the option to keep the mode in VRAM. (If you plan having to generate many times with the same prompt) - Each run will be significantly faster, but not free your VRAM for something else.
⚠️ Warning : Using vram_retention_minutes might be a bit heavy on your VRAM. Think about if you really need it or not. Most of the time, when using vram_retention_minutes, you don't want to have also a generation of image or anything else in the same time.
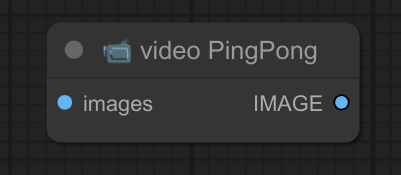
20 - 📹 Video Ping Pong
Description:
Create a ping-pong effect from a list of images (from a video) by reversing the playback direction when reaching the last frame. Good for an "infinity loop" effect.
21 - 🖼➜📹 Images to Video (FFMPEG Save Video)
Description:
Combine a sequence of images into a video file.
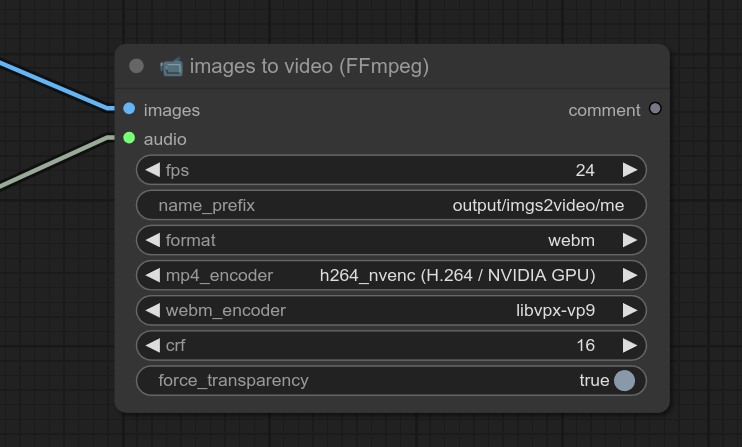
❓ I made this node because it supports transparency with webm format. (Needed for rembg)
Temporary images are stored in the folder ComfyUI/temp_images_imgs2video/ as well as the wav audio file.
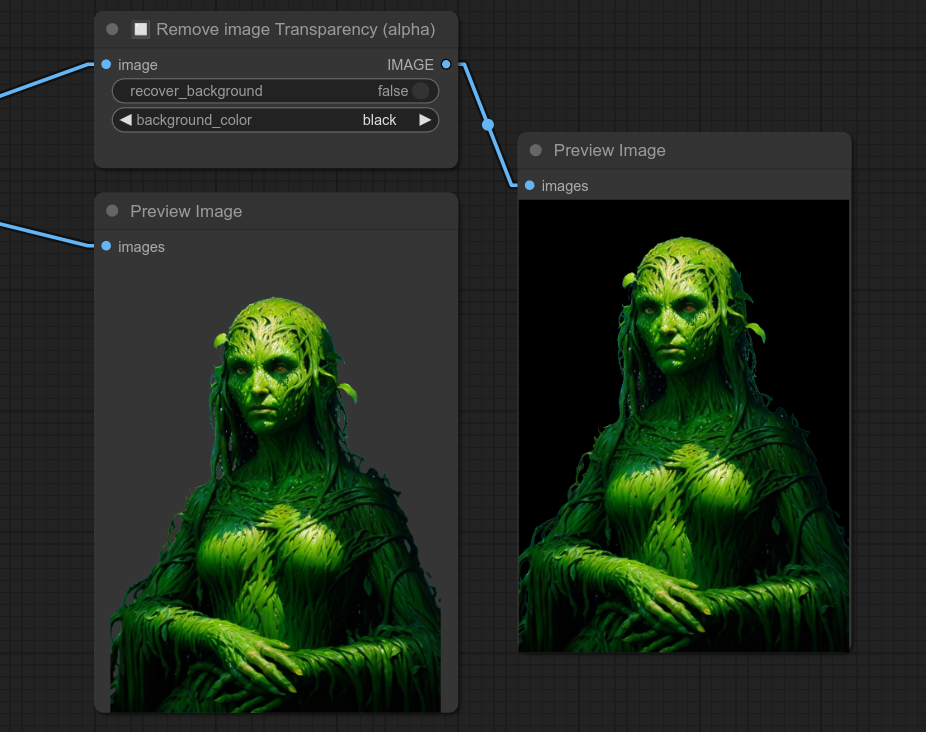
22 - 🔲 Remove image Transparency (alpha)
Description:
Remove transparency from an image by filling the alpha channel with a solid color. (black, white or greenscreen)
Of course it takes in an image with transparency, like from rembg nodes.
Necessary for some nodes that don't support transparency.
23 - 🔲 Image to grayscale (black & white)
Description:
Convert an image to grayscale (black & white)
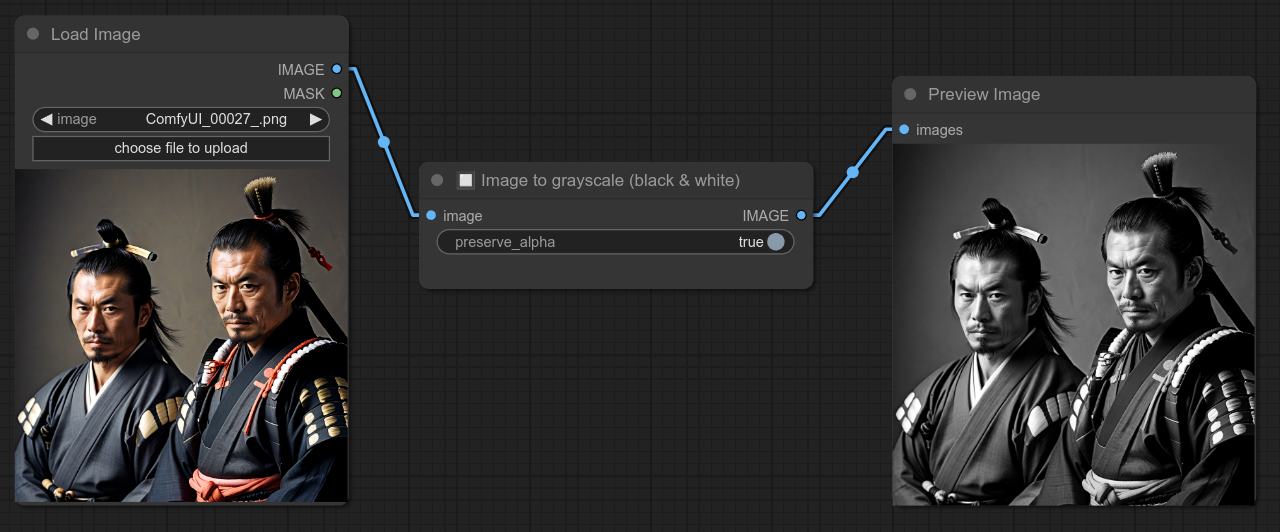
Example : I sometimes use it with Ipadapter to disable color influence.
But you can sometimes also want a black and white image...
24 - 🖼+🖼 Stack two images (Background + Overlay)
Description:
Stack two images into a single image : a background and one (or several) transparent overlay. (allow to have a video there, just send all the frames and recombine them after.)
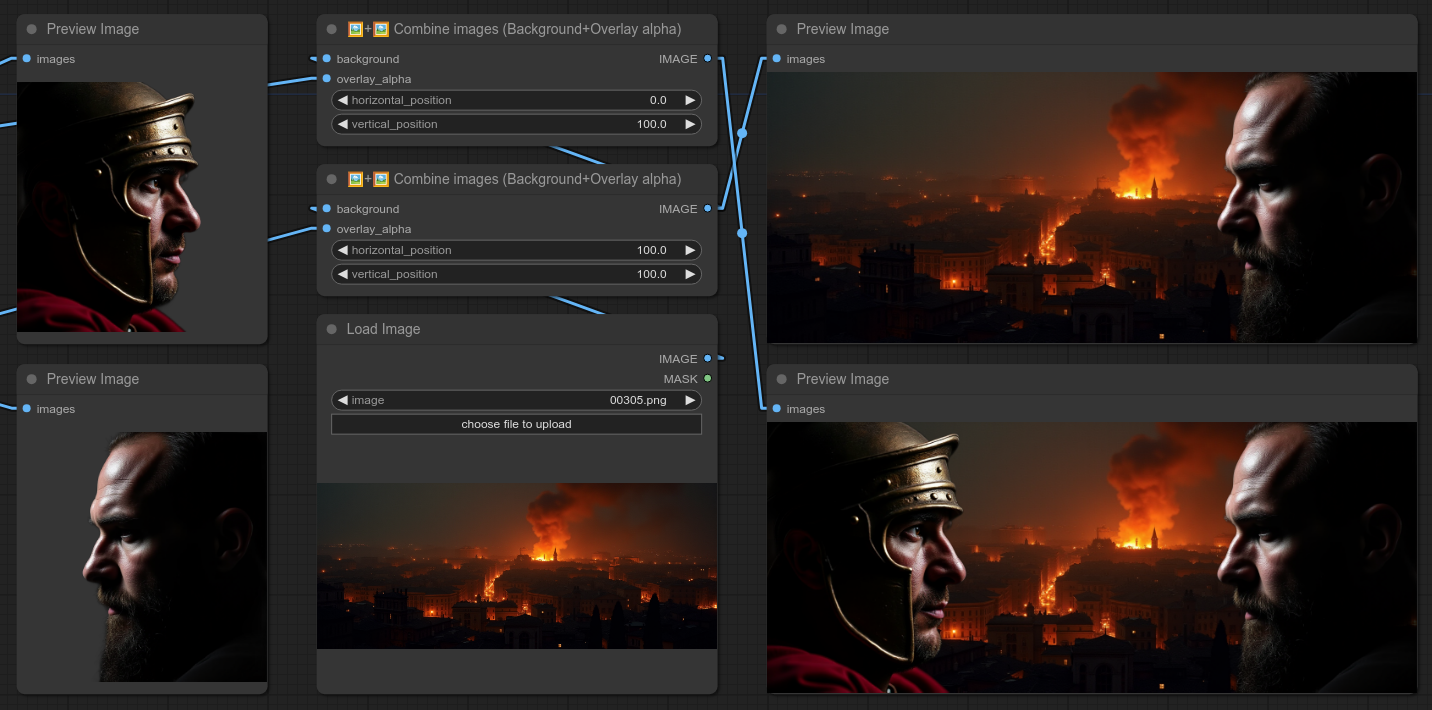
Update 0.11 : Add option to move vertically and horizontally. (from -50% to 150%)
❗ Warning : For now, background is a static image. (I will allow video there later too.)
⚠️ Warning : If you want to directly load the image with transparency, use my node 🖼 Load Image with Transparency ▢ instead of the Load Image node.
25 - 🟩➜▢ Green Screen to Transparency
Description:
Transform greenscreen into transparency.
Need clean greenscreen ofc. (Can adjust threshold but very basic node.)

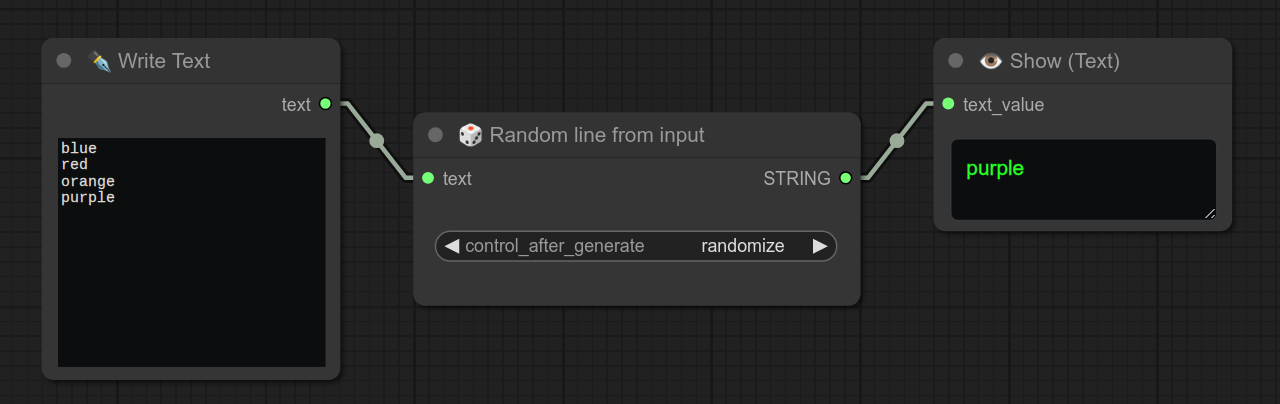
26 - 🎲 Random line from input
Description:
Take a random line from an input text. (When using multiple "Write Text" nodes is annoying for example, you can use that and just copy/paste a list from outside.)
You can change fixed/randomize for control_after_generate to have a different text each time you run the workflow. (or not)
27 - ♻ Loop (All Lines from input)
Description:
Iterate over all lines from an input text. (Good for testing multiple lines of text.)
28 - 🔢 Text with random Seed
Description:
❗ This node is used to force to generate a random seed, along with text.
But what does that mean ???
When you use a loop (♻), the loop will use the same seed for each iteration. (That is the point, it will keep the same seed to compare results.)
Even with randomize for control_after_generate, it is still using the same seed for every loop, it will change it only when the workflow is done.
Simple example without using random seed node : (Both images have different prompt, but same seed)
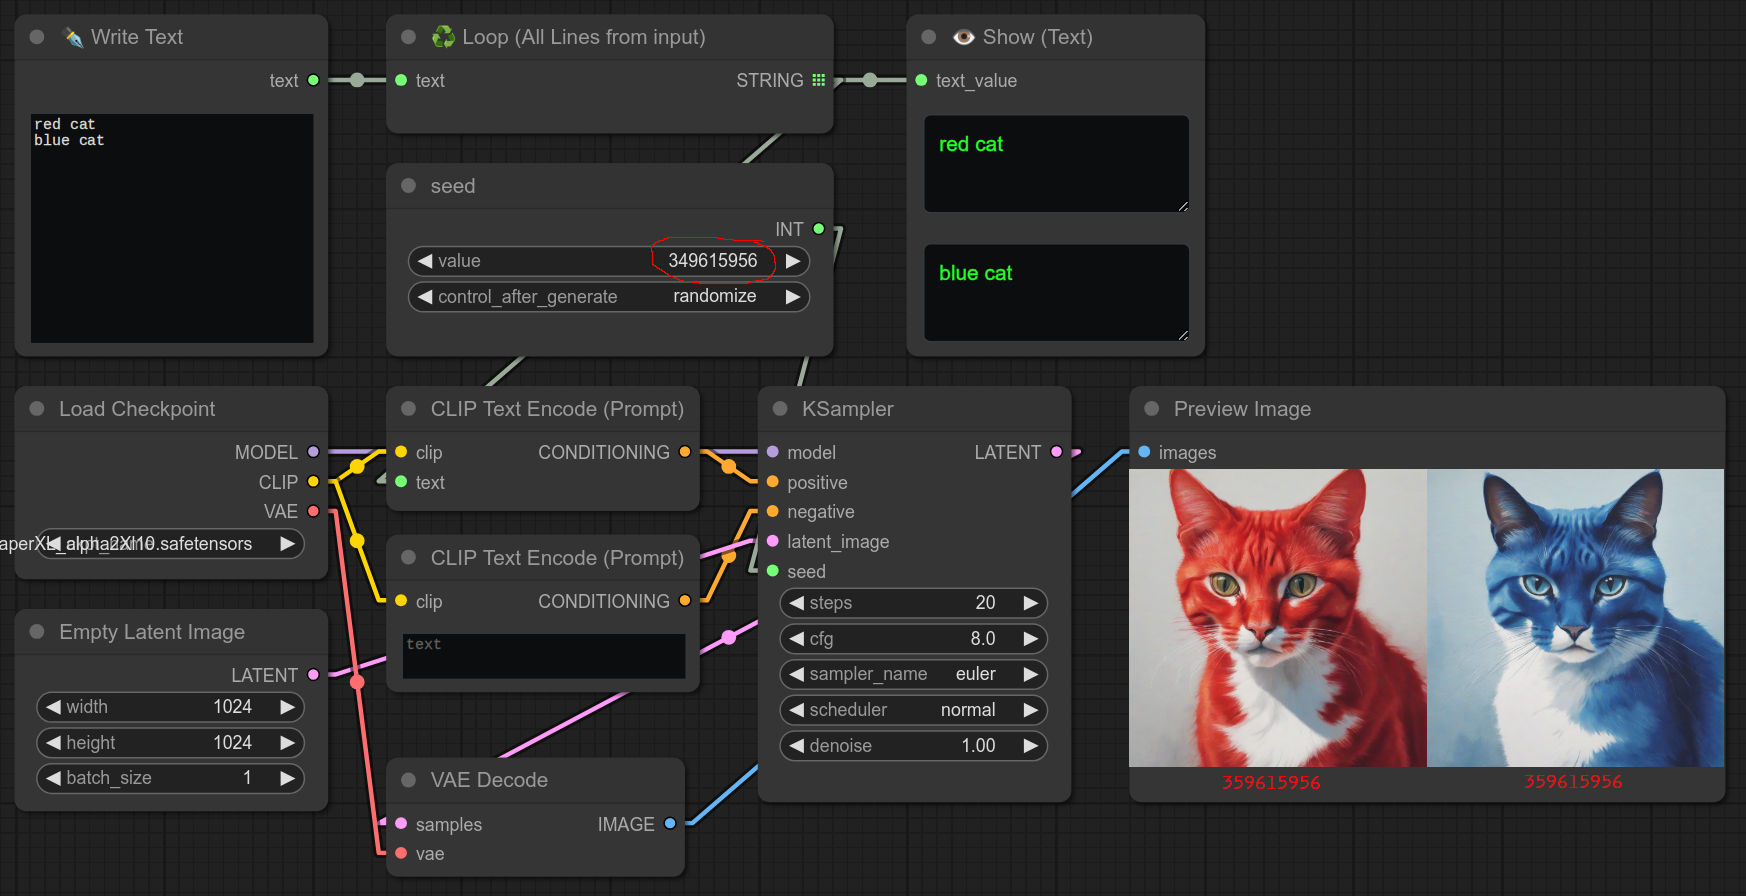
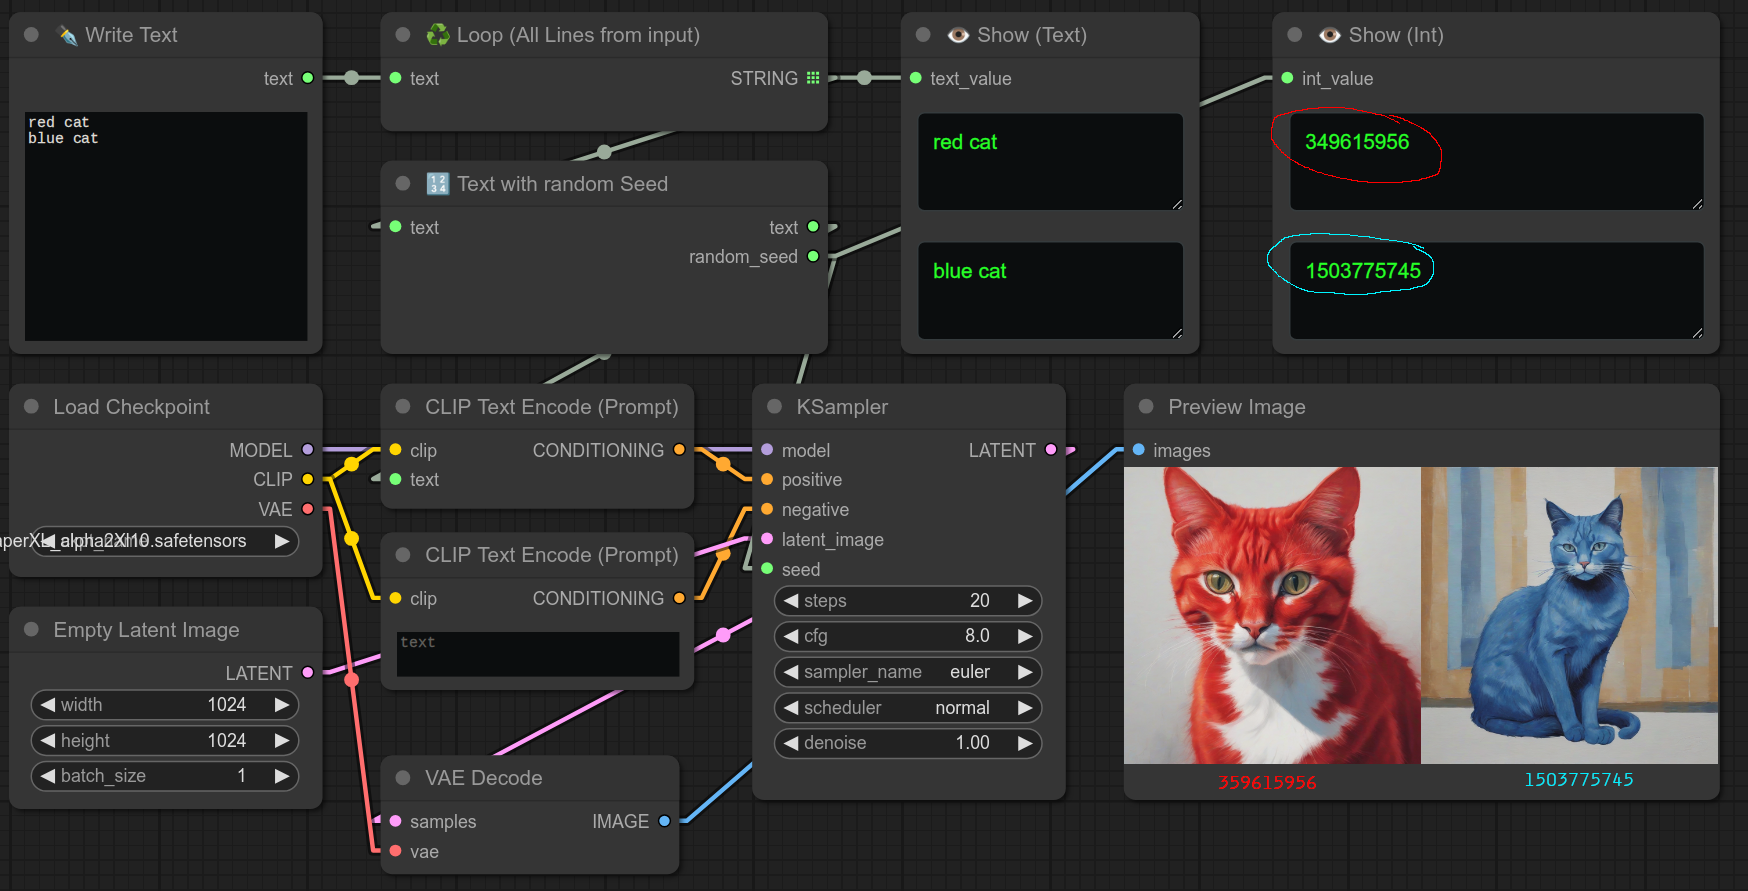
So if you want to force using another seed for each iteration, you can use this node in the middle.
For example, if you want to generate a different image every time. (aka : You use loop nodes not to compare or test results but to generate multiple images.)
Use it like that for example : (Both images have different prompt AND different seed)
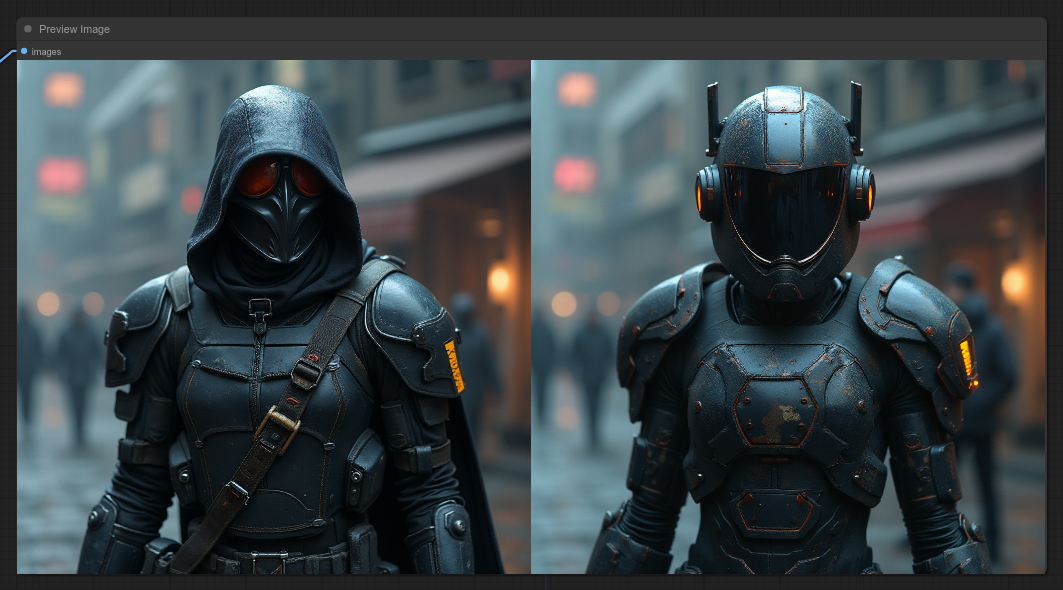
Here is an example of the similarities that you want to avoid with FLUX with different prompt (hood/helmet) but same seed :
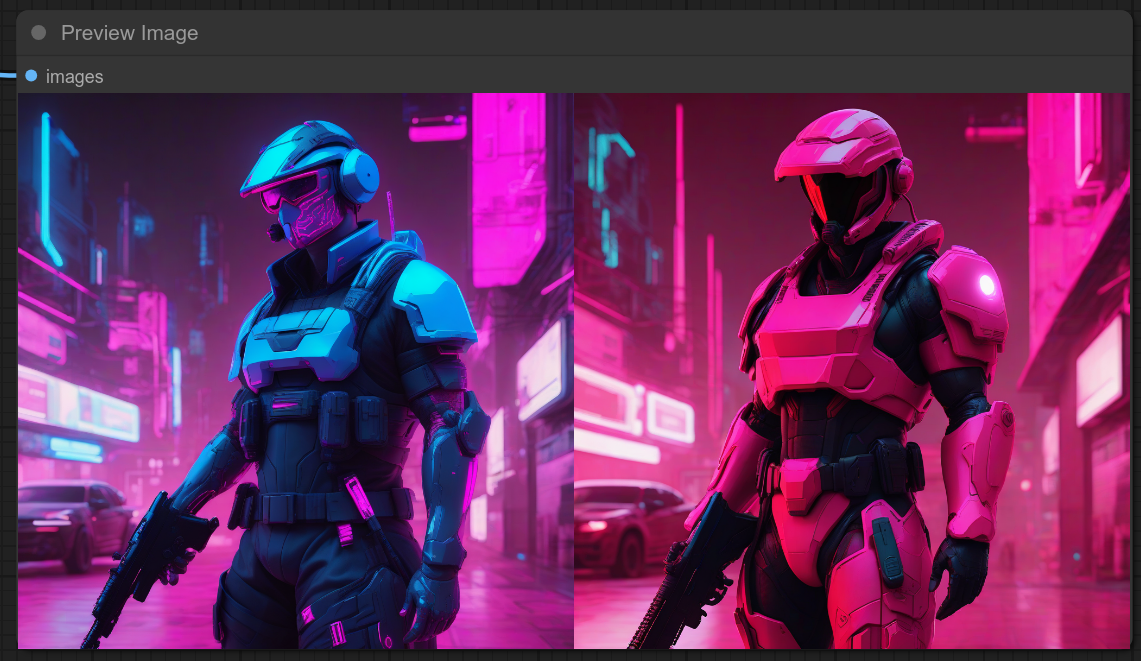
Here is an example of the similarities that you want to avoid with SDXL with different prompt (blue/red) but same seed :
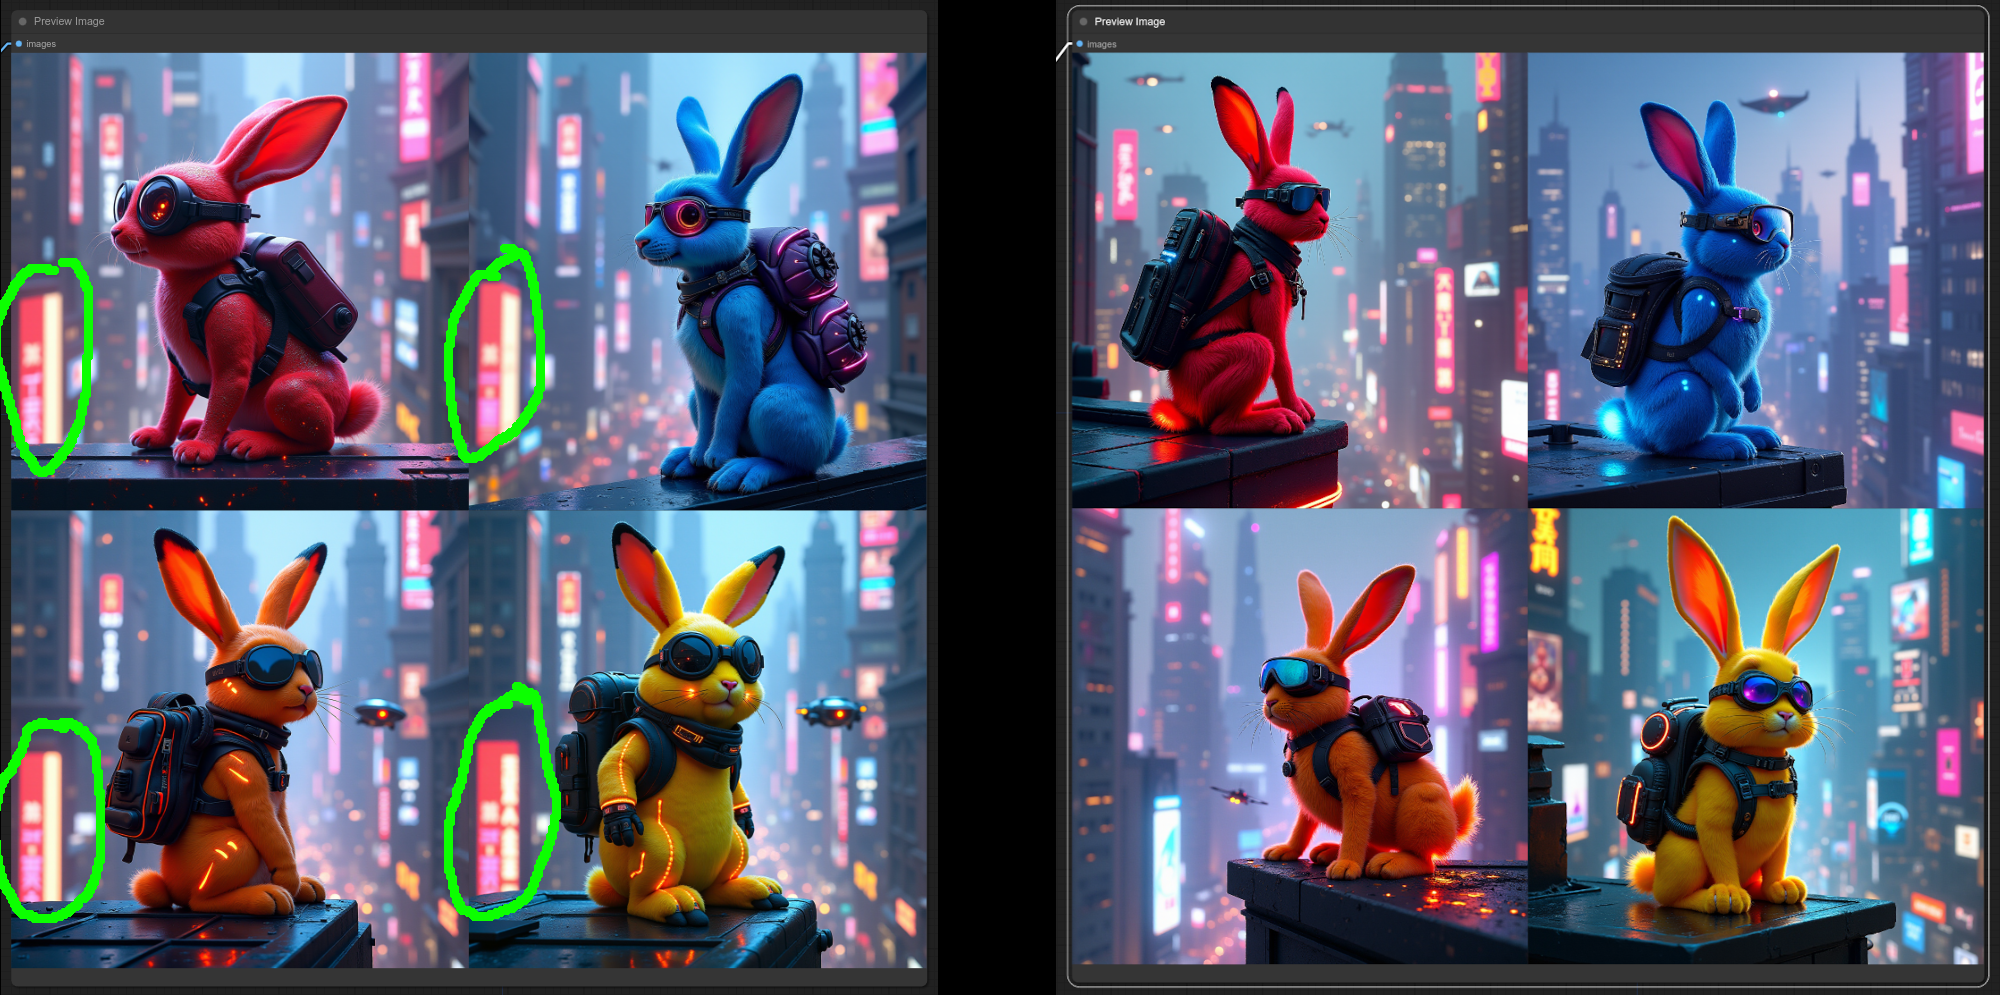
FLUX : Here is an example of 4 images without Random Seed node on the left, and on the right 4 images with Random Seed node :
29 - 🖼 Load Image with Transparency ▢
Description:
Load an image with transparency.
The default Load Image node will not load the transparency.

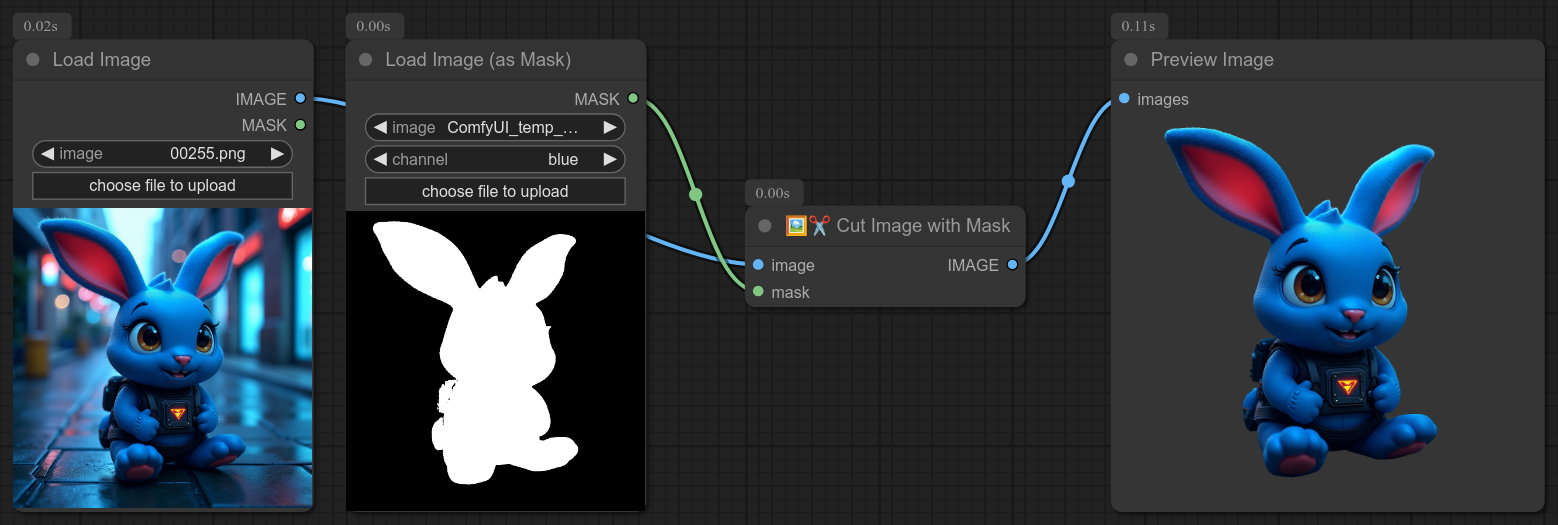
30 - 🖼✂ Cut image with a mask
Description:
Cut an image from a mask.
31 - 🔊 TTS - Text to Speech (100% local, any voice you want, any language)
Description:
Use my TTS server to generate high quality speech from text, with any voice you want, any language.
Listen to the audio example
❗ Node never tested on windows, only on linux for now. ❗
Use my TTS server to generate speech from text, based on XTTS v2.
❗ Of course to use this comfyui node (frontend) you need to use my TTS server (backend) : https://github.com/justUmen/Bjornulf_XTTS
I made this backend for https://github.com/justUmen/Bjornulf_lobe-chat, but you can use it with comfyui too with this node.
After having Bjornulf_XTTS installed, you NEED to create a link in my Comfyui custom node folder called speakers : ComfyUI/custom_nodes/Bjornulf_custom_nodes/speakers
That link must be a link to the folder where you installed/stored the voice samples you use for my TTS, like default.wav.
If my TTS server is running on port 8020 (You can test in browser with the link http://localhost:8020/tts_stream?language=en&speaker_wav=default&text=Hello) and voice samples are good, you can use this node to generate speech from text.
Details
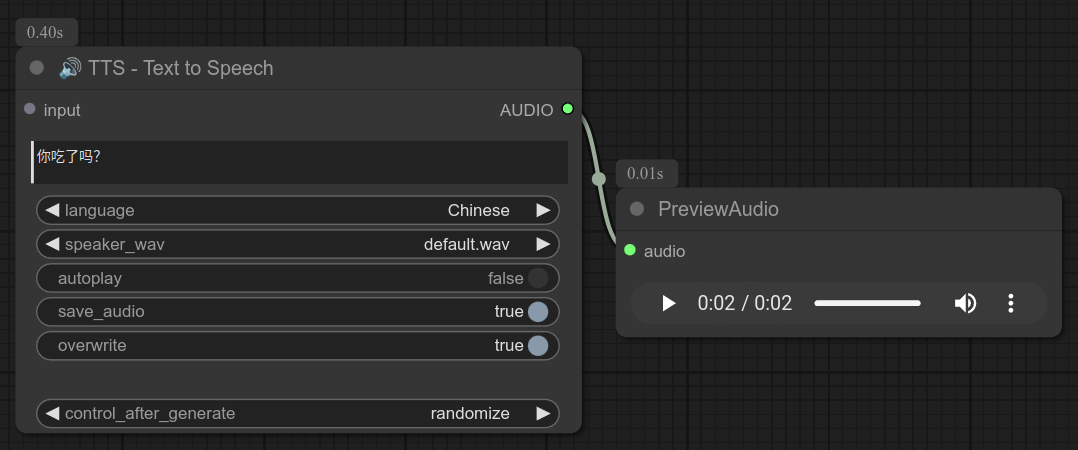
This node should always be connected to a core node : Preview audio.
My node will generate and save the audio files in the ComfyUI/Bjornulf_TTS/ folder, followed by the language selected, the name of the voice sample, and the text.
Example of audio file from the screenshot above : ComfyUI/Bjornulf_TTS/Chinese/default.wav/你吃了吗.wav
You can notice that you don't NEED to select a chinese voice to speak chinese. Yes it will work, you can record yourself and make yourself speak whatever language you want.
Also, when you select a voice with this format fr/fake_Bjornulf.wav, it will create an extra folder fr of course. : ComfyUI/Bjornulf_TTS/English/fr/fake_Bjornulf.wav/hello_im_me.wav. Easy to see that you are using a french voice sample for an english recording.
control_after_generate as usual, it is used to force the node to rerun for every workflow run. (Even if there is no modification of the node or its inputs.)
overwrite is used to overwrite the audio file if it already exists. (For example if you don't like the generation, just set overwrite to True and run the workflow again, until you have a good result. After you can set it to back to False. (Paraphrasing : without overwrite set to True, It won't generate the audio file again if it already exists in the Bjornulf_TTS folder.)
autoplay is used to play the audio file inside the node when it is executed. (Manual replay or save is done in the preview audio node.)
So... note that if you know you have an audio file ready to play, you can still use my node but you do NOT need my TTS server to be running.
My node will just play the audio file if it can find it, won't try to connect th backend TTS server.
Let's say you already use this node to create an audio file saying workflow is done with the Attenborough voice :
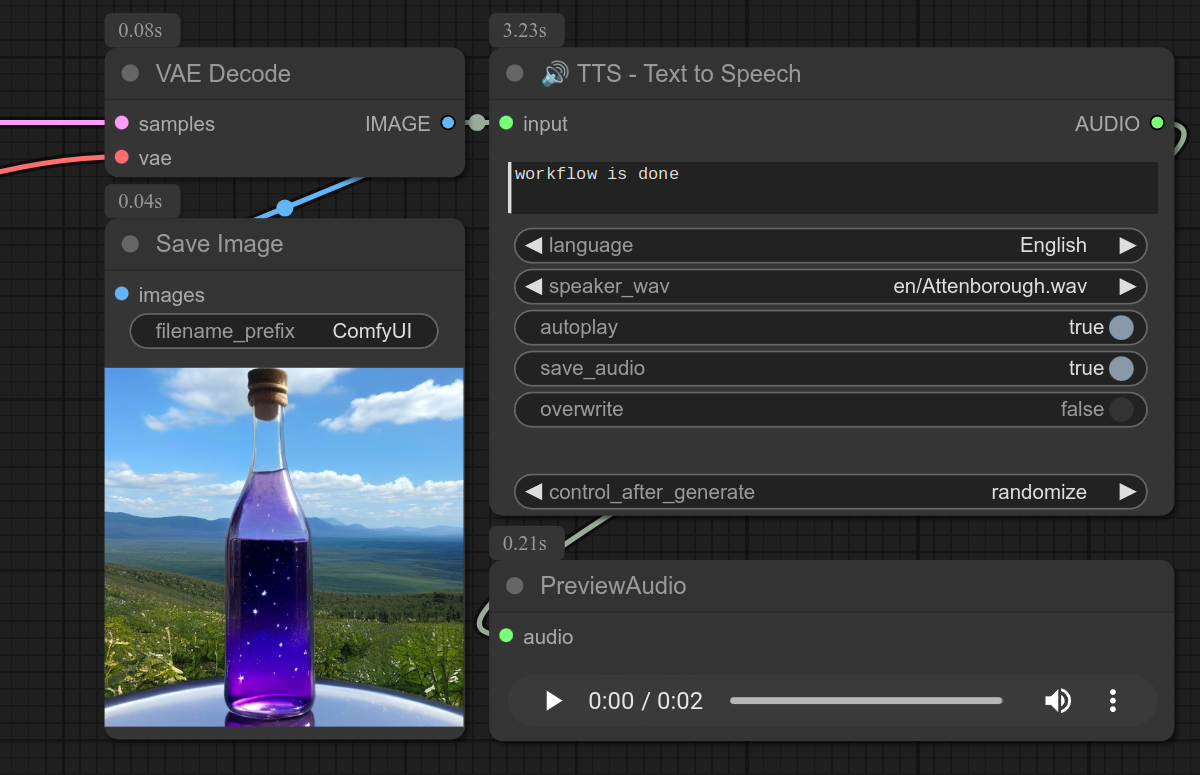
As long as you keep exactly the same settings, it will not use my server to play the audio file! You can safely turn the TTS server off, so it won't use your precious VRAM Duh. (TTS server should be using ~3GB of VRAM.)
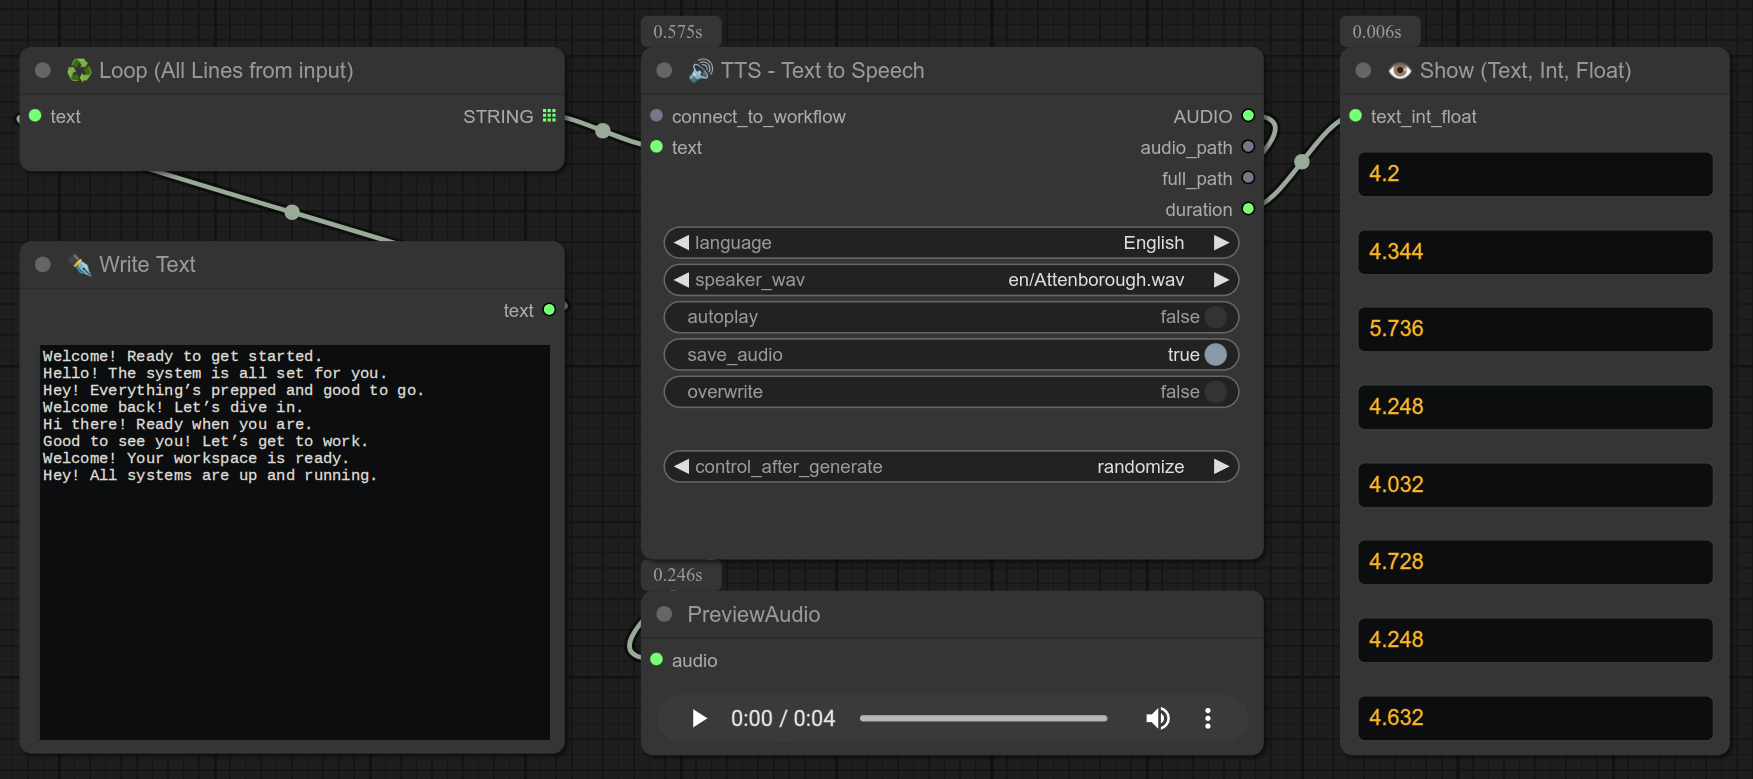
Also connect_to_workflow is optional, it means that you can make a workflow with ONLY my TTS node to pre-generate the audio files with the sentences you want to use later, example :
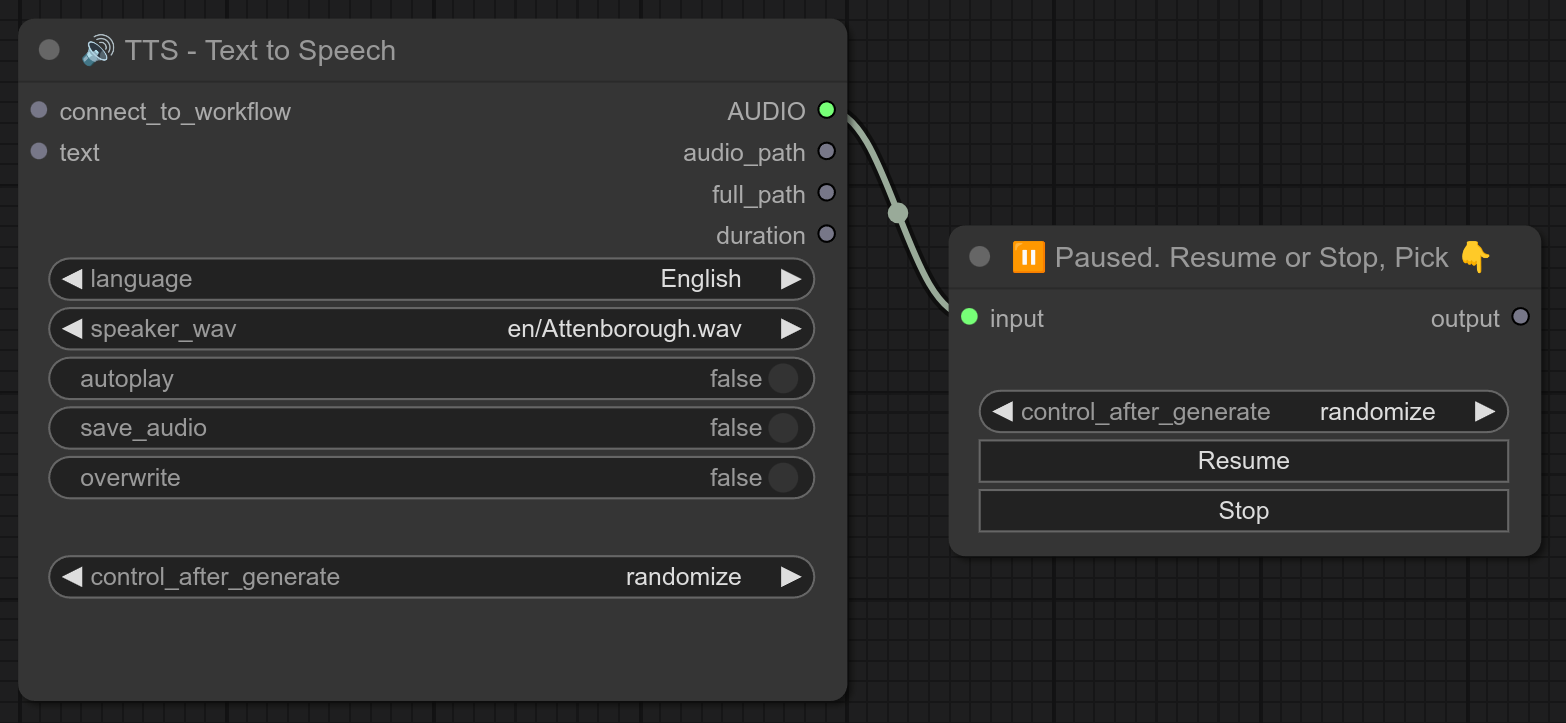
If you want to run my TTS nodes along side image generation, i recommend you to use my PAUSE node so you can manually stop the TTS server after my TTS node. When the VRAM is freed, you can the click on the RESUME button to continue the workflow.
If you can afford to run both at the same time, good for you, but Locally I can't run my TTS server and FLUX at the same time, so I use this trick. :
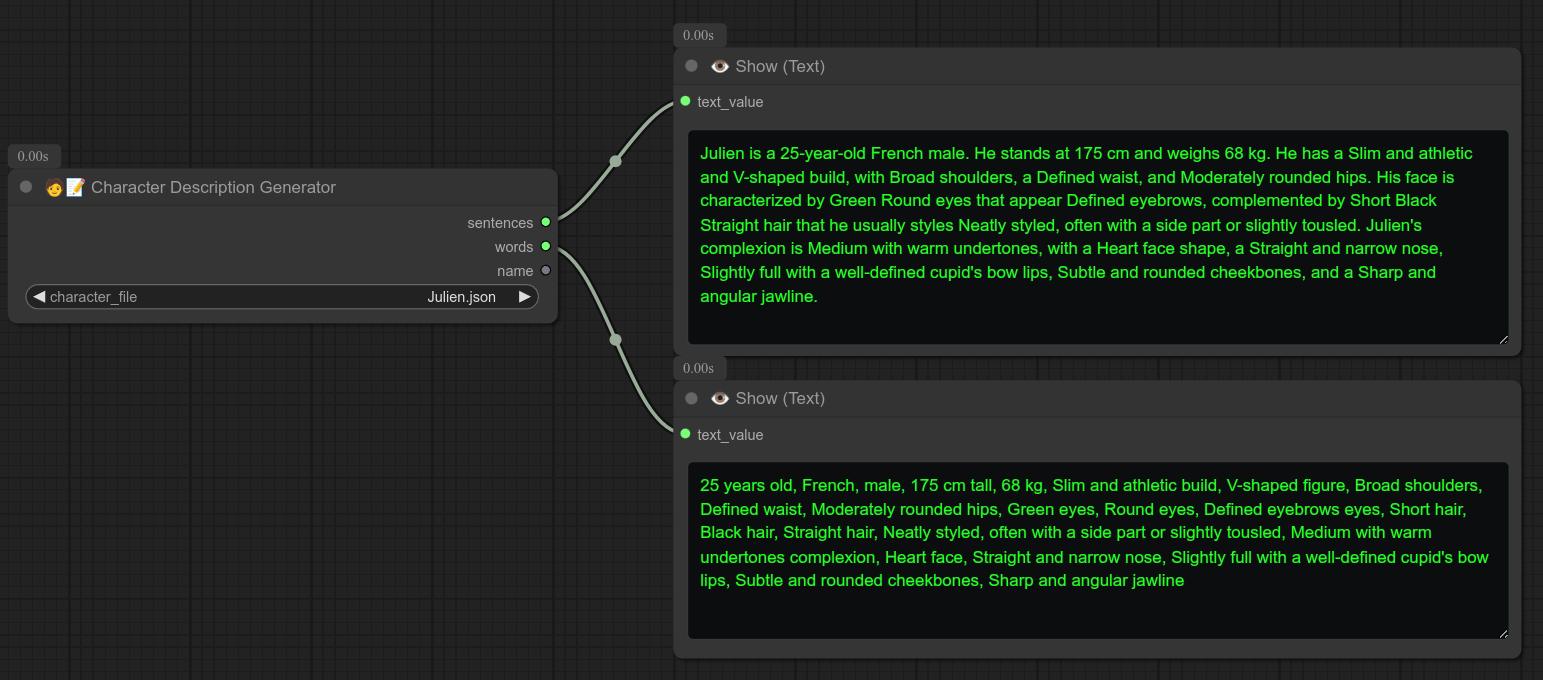
32 - 🧑📝 Character Description Generator
Description:
Generate a character description based on a json file in the folder characters : ComfyUI/custom_nodes/Bjornulf_custom_nodes/characters
Make your own json file with your own characters, and use this node to generate a description.
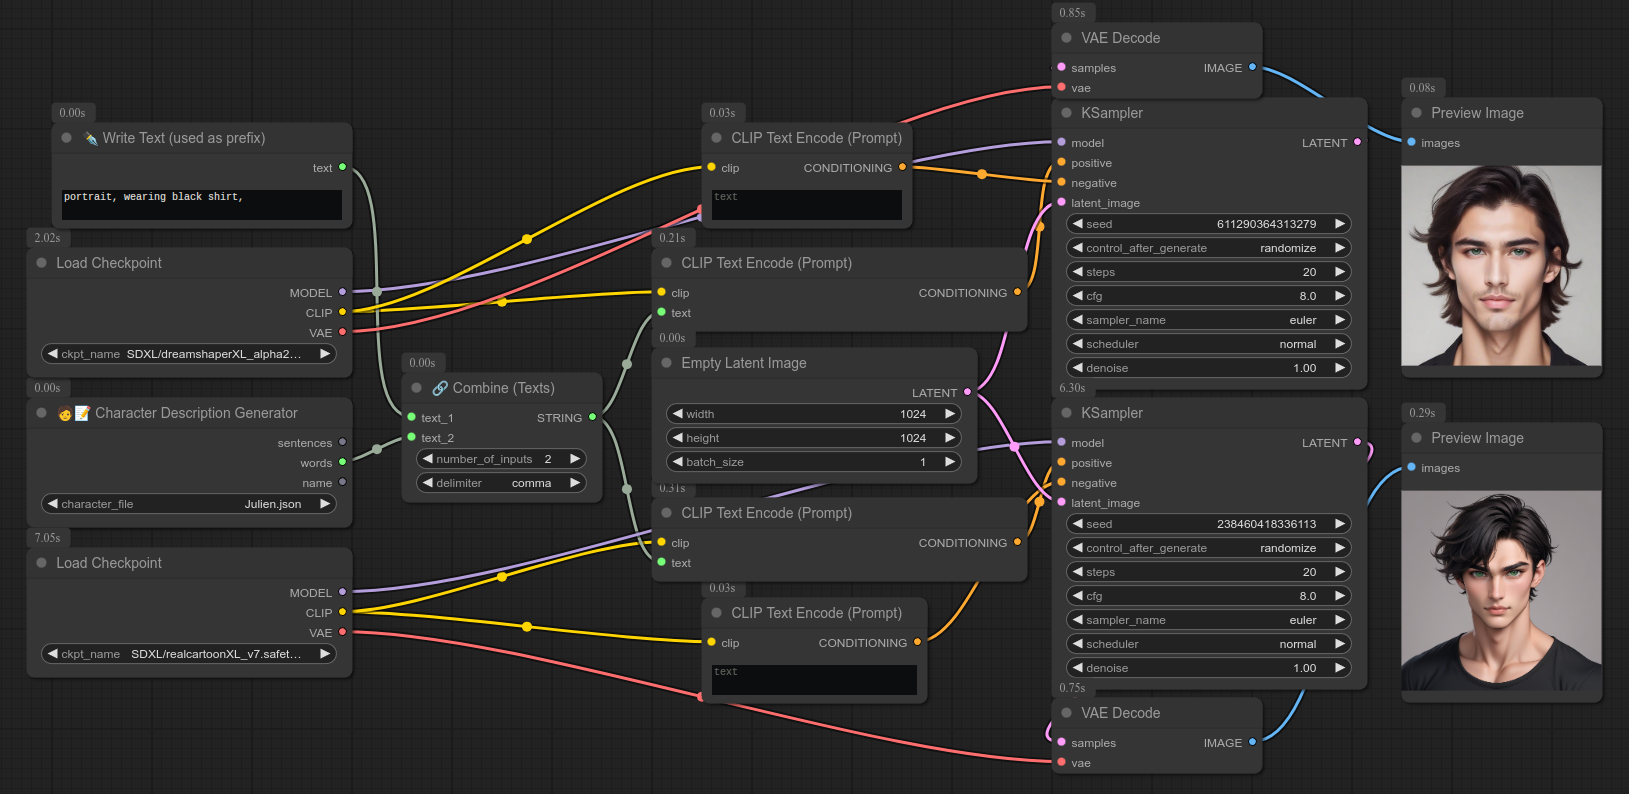
❗ For now it's very basic node, a lot of things are going to be added and changed !!!
Some details are unusable for some checkpoints, very much a work in progress, the json structure isn't set in stone either.
Some characters are included.
33 - ♻ Loop (All Lines from input 🔗 combine by lines)
Description:
Sometimes you want to loop over several inputs but you also want to separate different lines of your output.
So with this node, you can have the number of inputs and outputs you want. See example for usage.
34 - 🧹 Free VRAM hack
Description:
So this is my attempt at freeing up VRAM after usage, I will try to improve that.
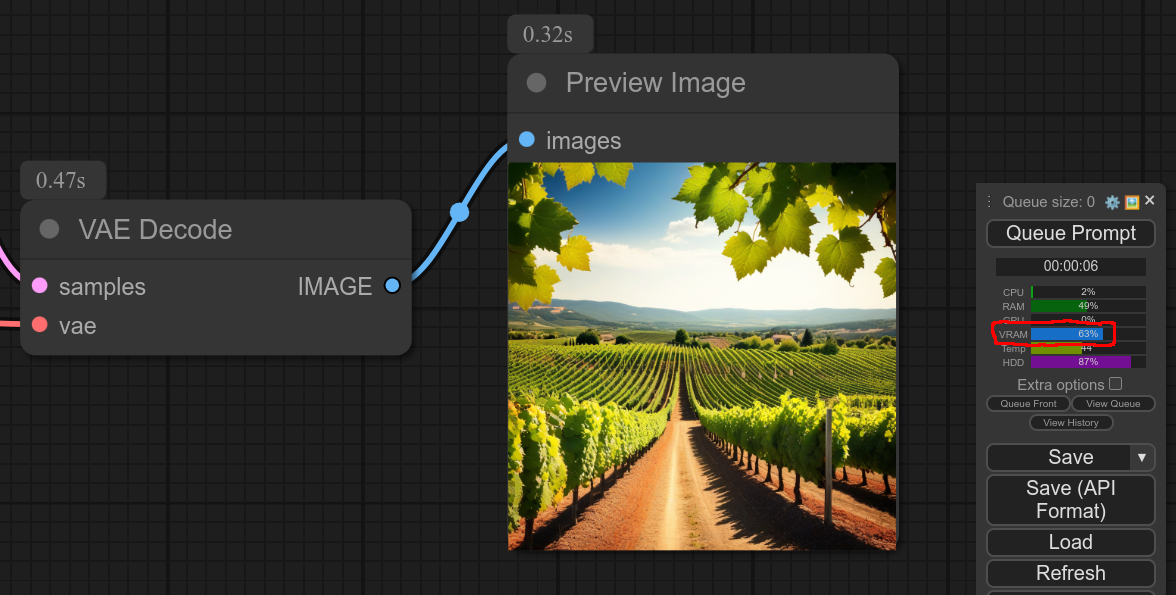
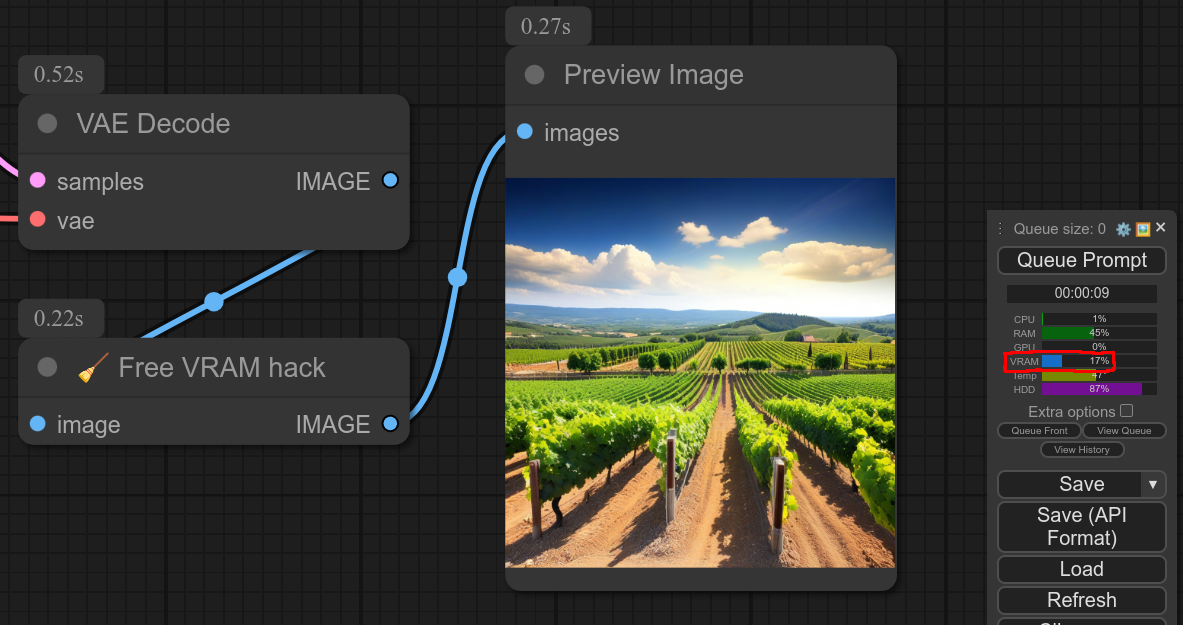
For me, on launch ComfyUI is using 180MB of VRAM, after my clean up VRAM node it can go back down to 376MB.
I don't think there is a clean way to do that, so I'm using a hacky way.
So, not perfect but better than being stuck at 6GB of VRAM used if I know I won't be using it again...
Just connect this node with your workflow, it takes anything as input and return it as output.
You can therefore put it anywhere you want.
❗ Comfyui is using cache to run faster (like not reloading checkpoints), so only use this free VRAM node when you need it.
❗ For this node to work properly, you need to enable the dev/api mode in ComfyUI. (You can do that in the settings)
It is also running an "empty/dummy" workflow to free up the VRAM, so it might take a few seconds to take effect after the end of the workflow.
35 - ⏸️ Paused. Resume or Stop ?
Description:
Automatically pause the workflow, and rings a bell when it does. (play the audio bell.m4a file provided)

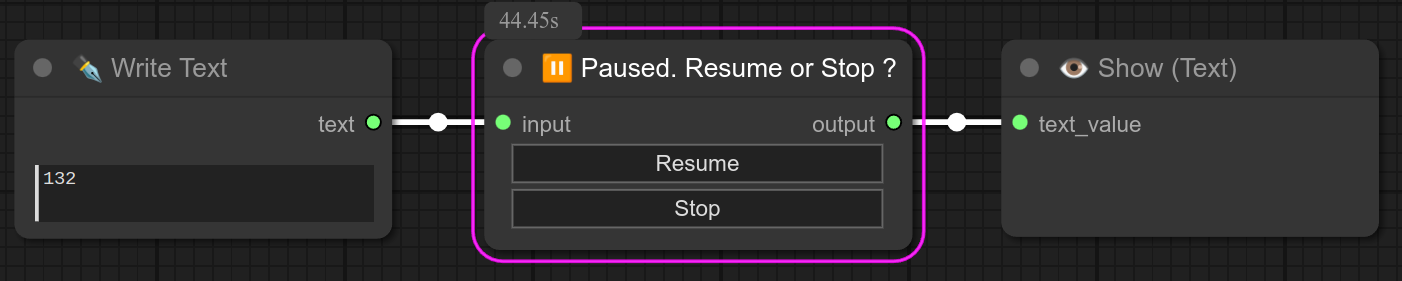

You can then manually resume or stop the workflow by clicking on the node's buttons.
I do that let's say for example if I have a very long upscaling process, I can check if the input is good before continuing. Sometimes I might stop the workflow and restart it with another seed.
You can connect any type of node to the pause node, above is an example with text, but you can send an IMAGE or whatever else, in the node input = output. (Of course you need to send the output to something that has the correct format...)
36 - ⏸️🔍 Paused. Select input, Pick one
Description:
Automatically pause the workflow, and rings a bell when it does. (play the audio bell.m4a file provided)
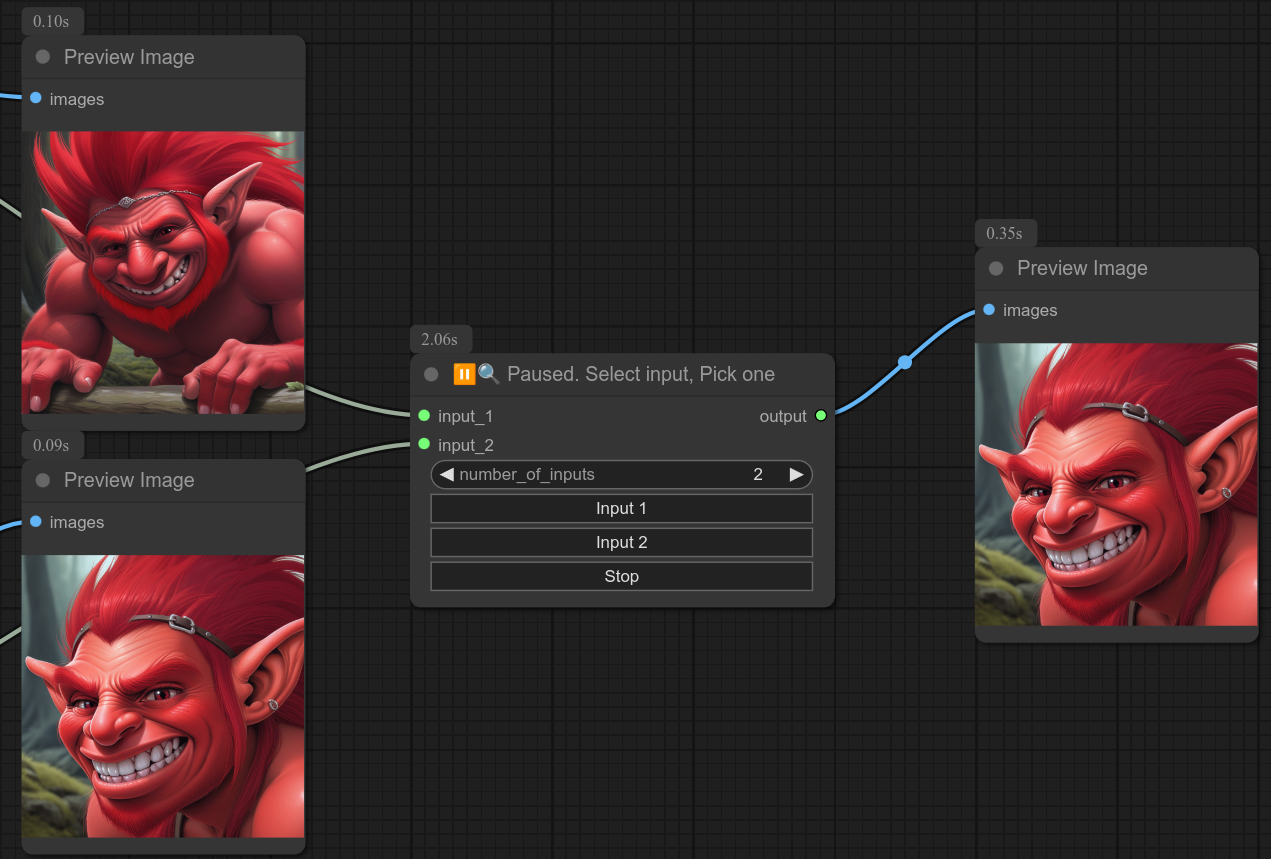
You can then manually select the input you want to use, and resume the workflow with it.
You can connect this node to anything you want, above is an example with IMAGE. But you can pick whatever you want, in the node input = output.
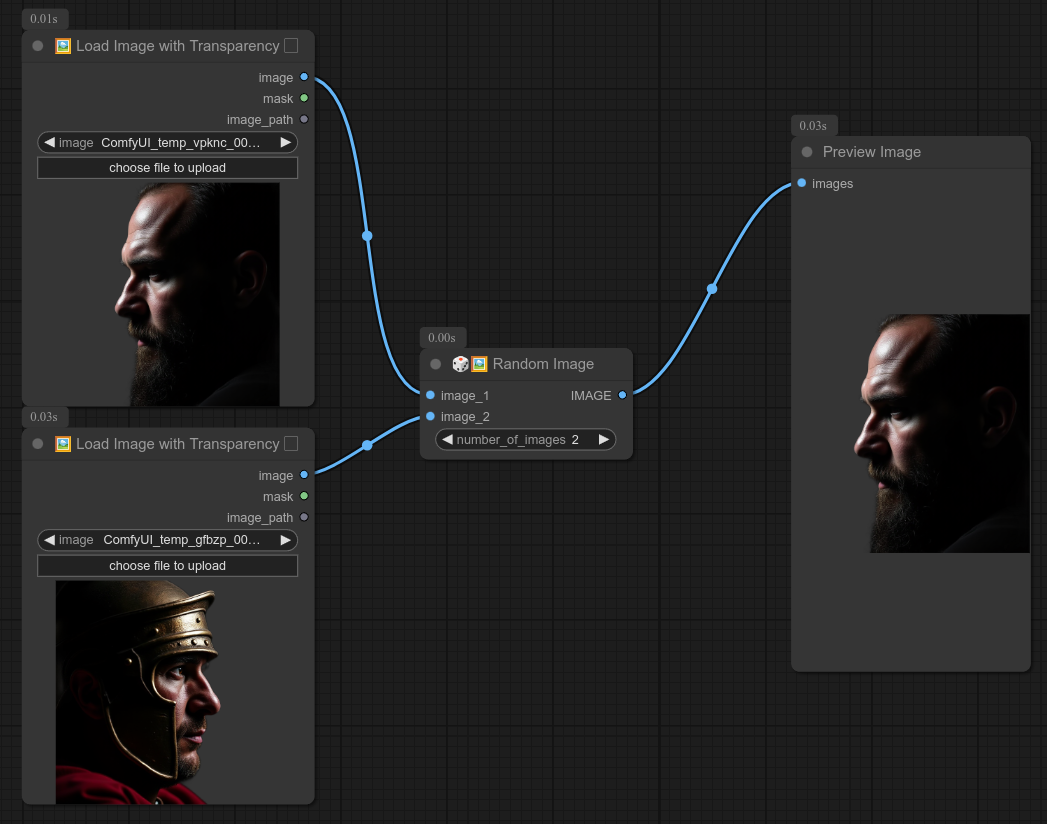
37 - 🎲🖼 Random Image
Description:
Just take a random image from a list of images.
38 - ♻🖼 Loop (Images)
Description:
Loop over a list of images.
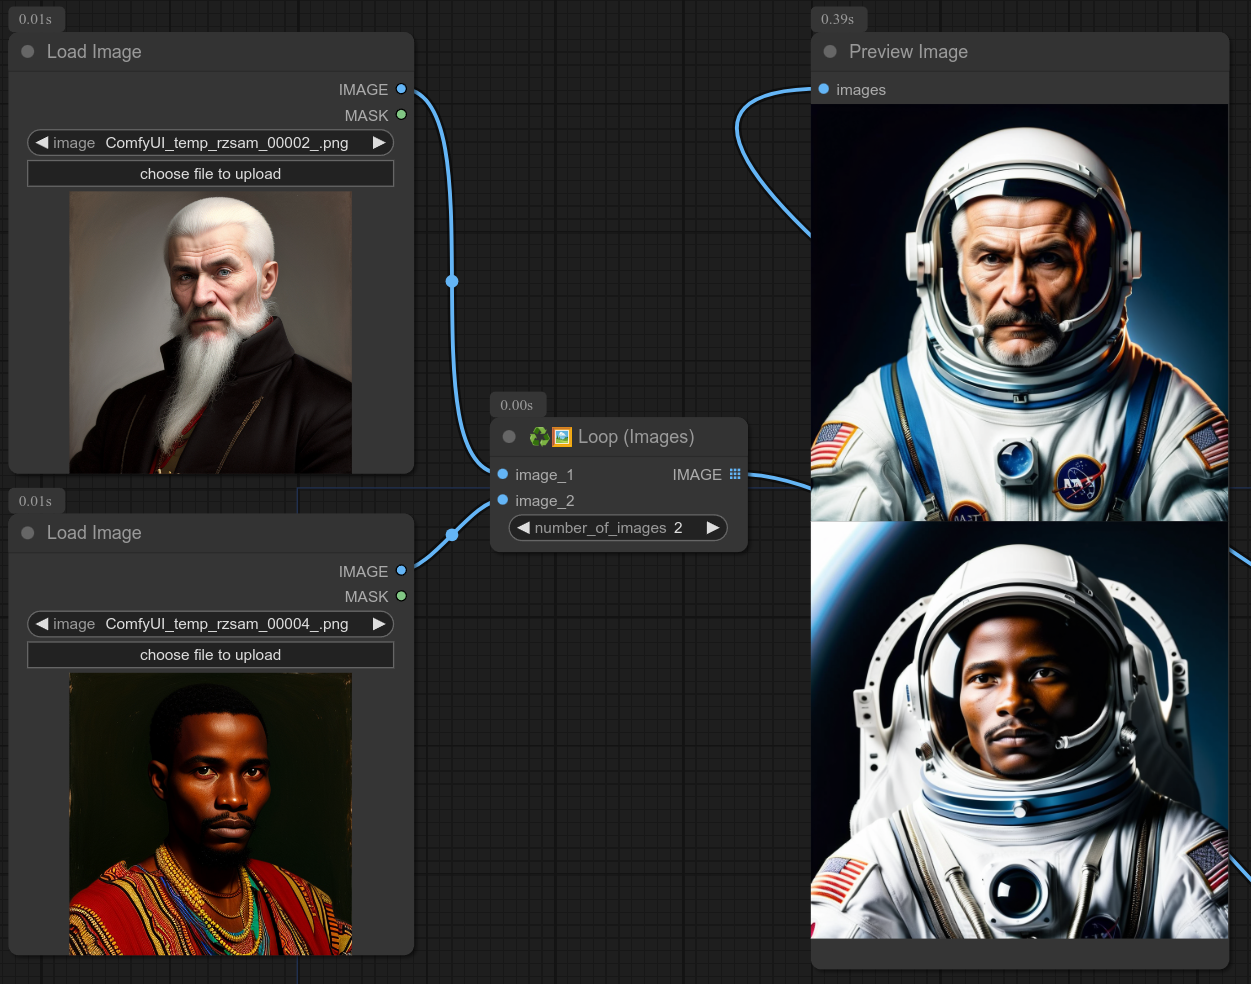
Usage example : You have a list of images, and you want to apply the same process to all of them.
Above is an example of the loop images node sending them to an Ipadapter workflow. (Same seed of course.)
39 - ♻ Loop (✒🗔🅰️ Advanced Write Text)
Description:
If you need a quick loop but you don't want something too complex with a loop node, you can use this combined write text + loop.
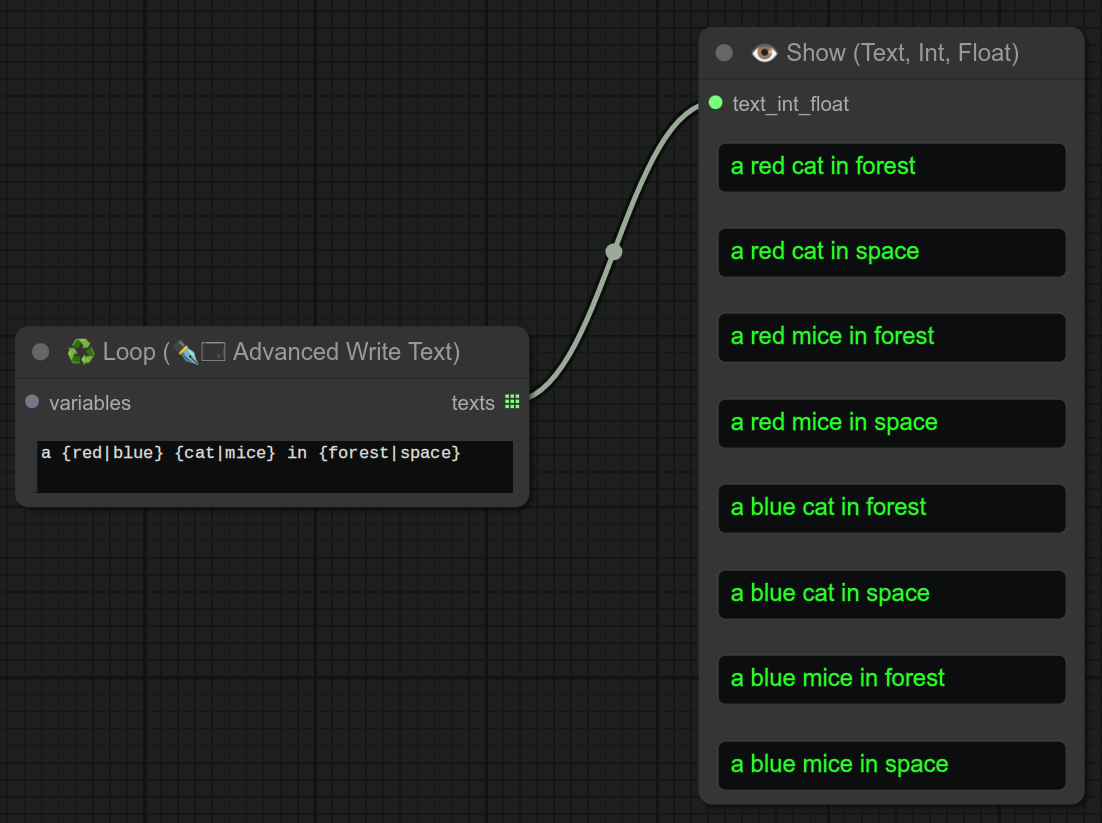
It will take the same special syntax as the Advanced write text node {blue|red}, but it will loop over ALL the possibilities instead of taking one at random.
0.40 : You can also use variables <name> in the loop.
40 - 🎲 Random (Model+Clip+Vae) - aka Checkpoint / Model
Description:
Just simply take a trio at random from a load checkpoint node.
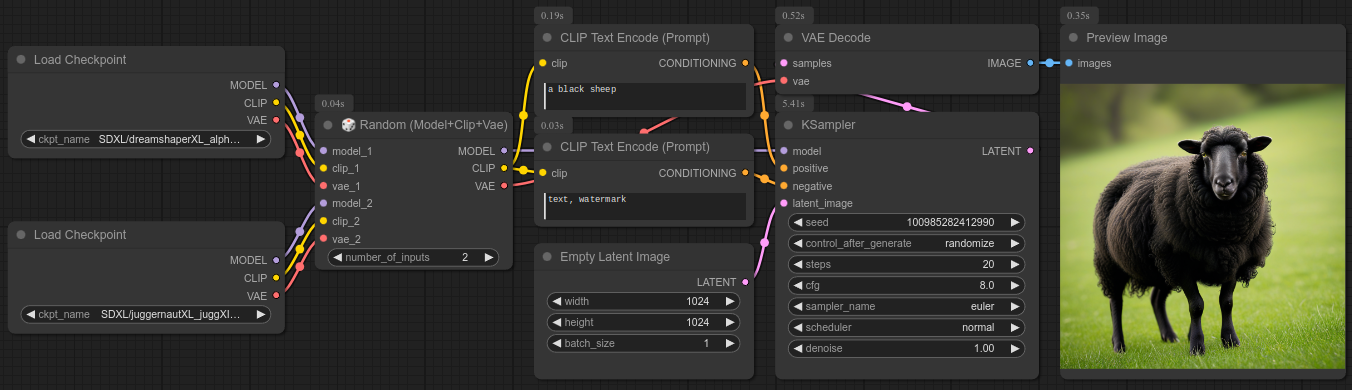
Notice that it is using the core Load checkpoint node. It means that all checkpoint will be preloaded in memory.
Details :
- It will take more VRAM, but it will be faster to switch between checkpoints.
- It can't give you the currently loaded checkpoint name's.
Check node number 41 before deciding which one to use.
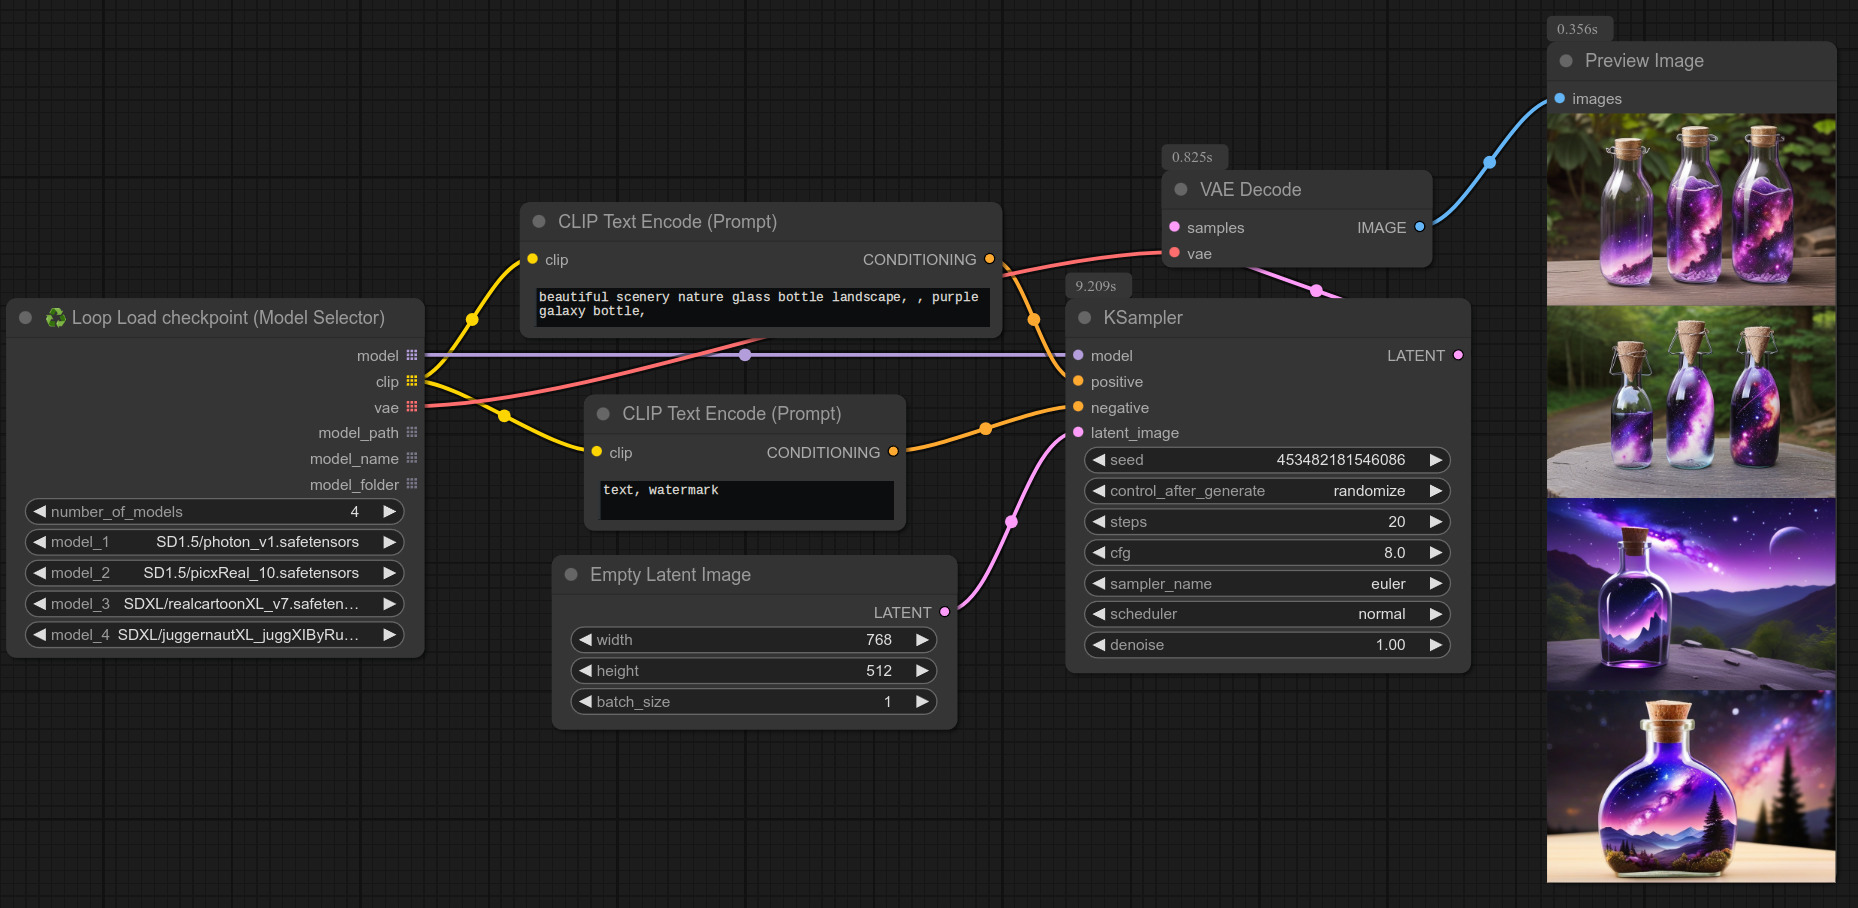
41 - 🎲 Random Load checkpoint (Model Selector)
Description:
This is another way to select a load checkpoint node randomly.
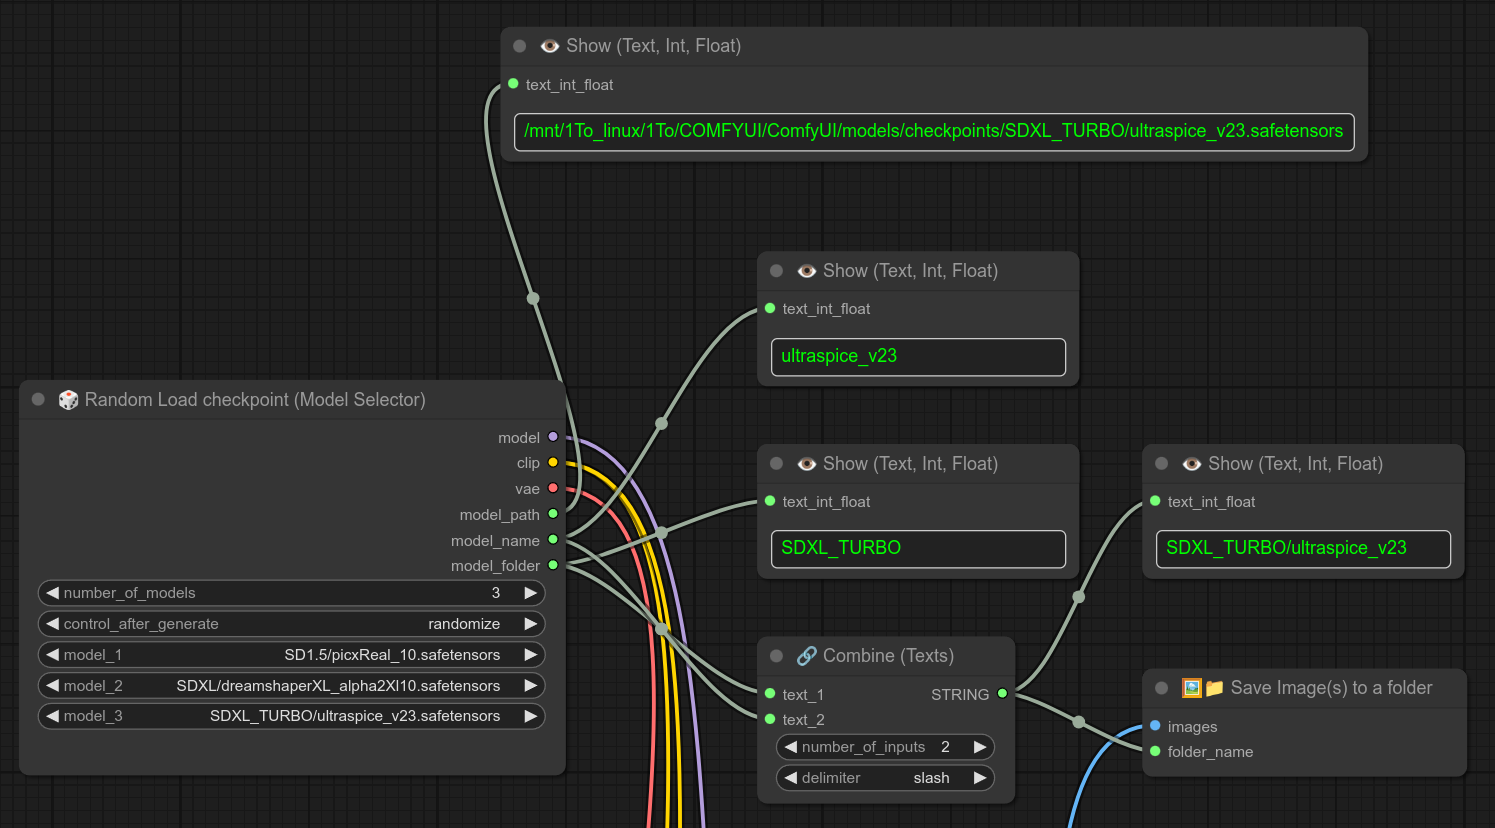
It will not preload all the checkpoints in memory, so it will be slower to switch between checkpoints.
But you can use more outputs to decide where to store your results. (model_folder is returning the last folder name of the checkpoint.)
I always store my checkpoints in a folder with the type of the model like SD1.5, SDXL, etc... So it's a good way for me to recover that information quickly.
Details :
- Note that compared to node 40, you can't have separate configuration depending of the selected checkpoint. (For example
CLIP Set Last Layernode set at -2 for a specific model, or a separate vae or clip.) Aka : All models are going to share the exact same workflow.
Check node number 40 before deciding which one to use.
Node 53 is the loop version of this node.
NOTE : If you want to load a single checkpoint but want to extract its folder name (To use the checkpoint name as a folder name for example, or with if/else node), you can use my node 41 with only one checkpoint. (It will take one at random, so... always the same one.)
42 - ♻ Loop (Model+Clip+Vae) - aka Checkpoint / Model

Description:
Loop over all the trios from several checkpoint node.
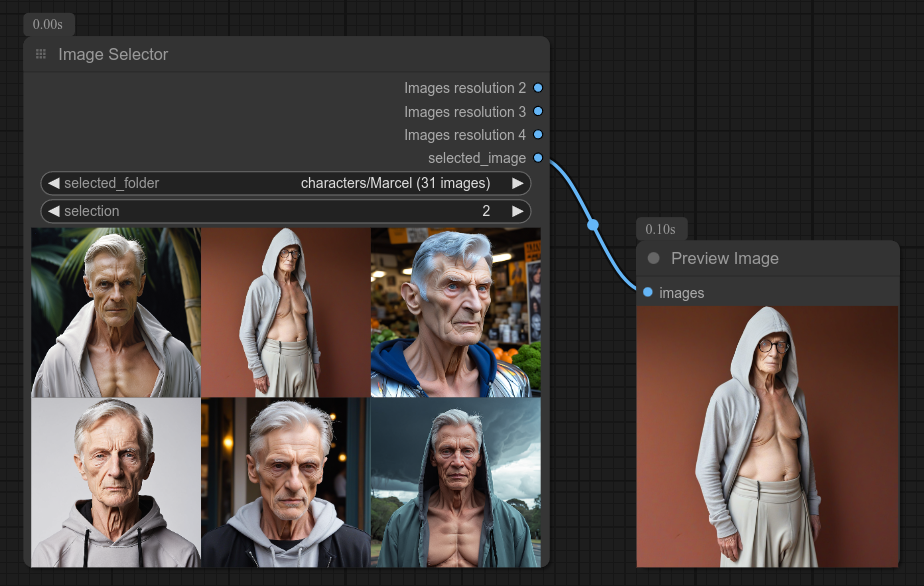
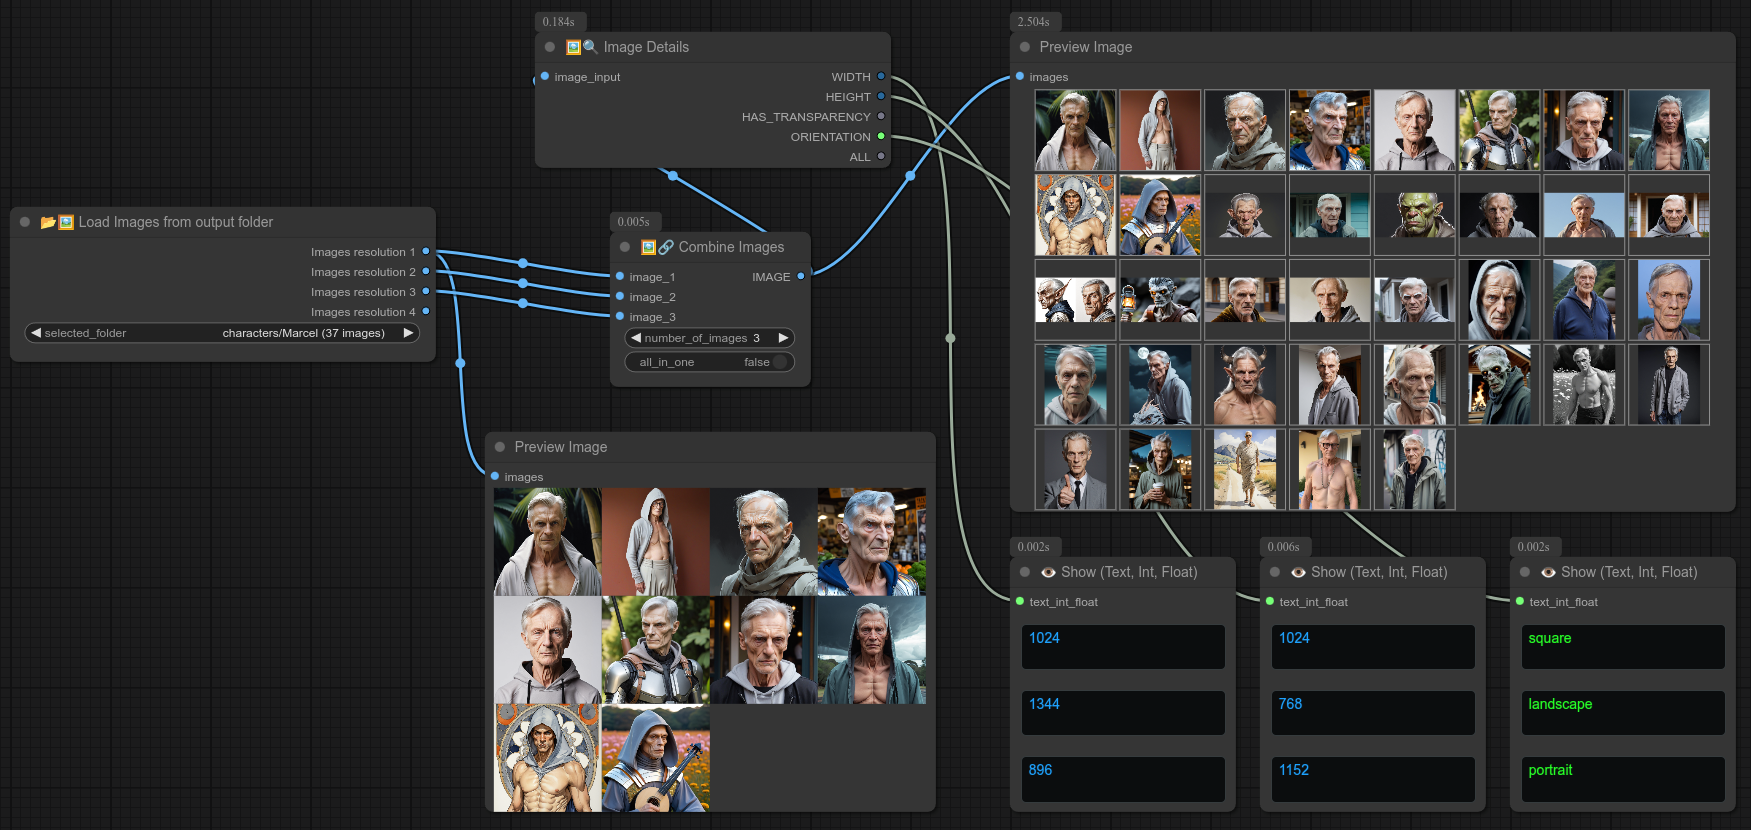
43 - 📥🖼📂 Load Images from output folder
Description:
Quickly select all images from a folder inside the output folder. (Not recursively.)
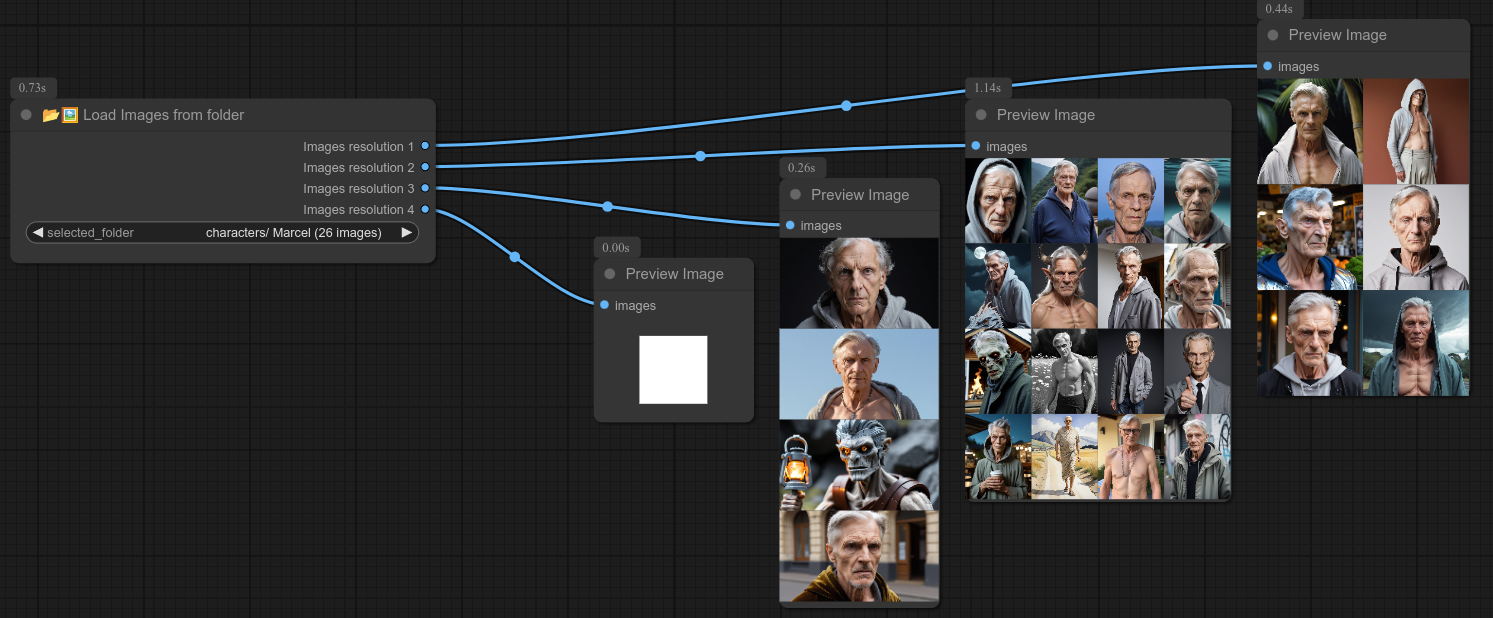
So... As you can see from the screenshot the images are split based on their resolution.
It's also not possible to edit dynamically the number of outputs, so I just picked a number : 4.
The node will separate the images based on their resolution, so with this node you can have 4 different resolutions per folder. (If you have more than that, maybe you should have another folder...)
To avoid error or crash if you have less than 4 resolutions in a folder, the node will just output white tensors. (white square image.)
So this node is a little hacky for now, but i can select my different characters in less than a second.
If you want to know how i personnaly save my images for a specific character, here is part of my workflow (Notice that i personnaly use / for folders because I'm on linux) :
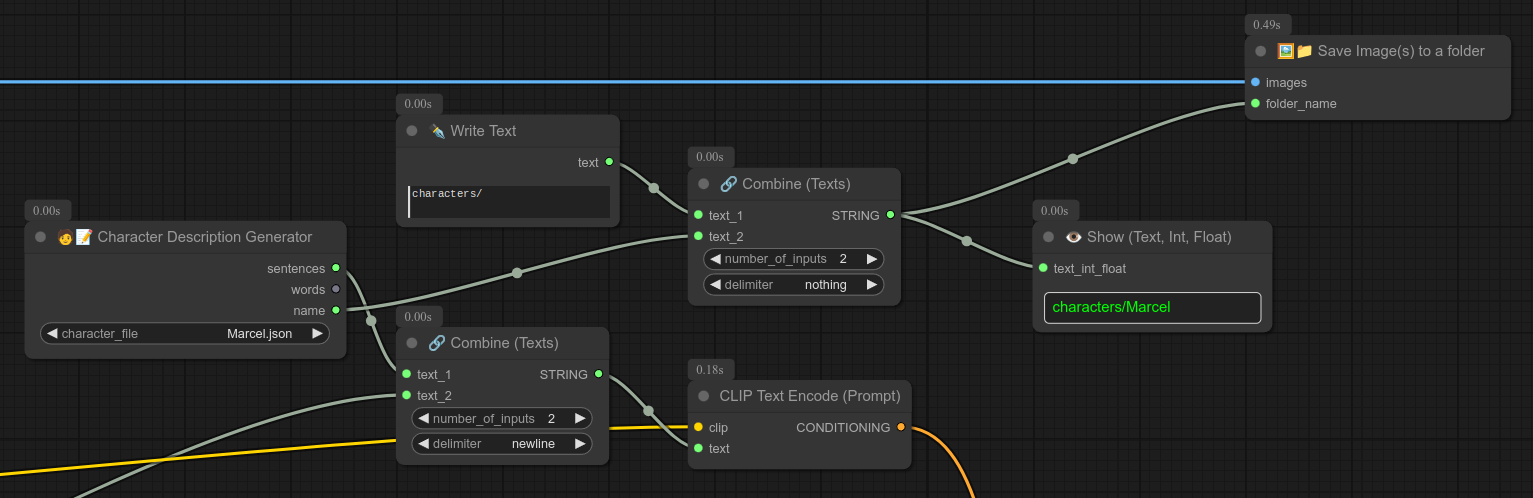
In this example I put "character/" as a string and then combine with "nothing". But it's the same if you do "character" and then combine with "/". (I just like having a / at the end of my folder's name...)
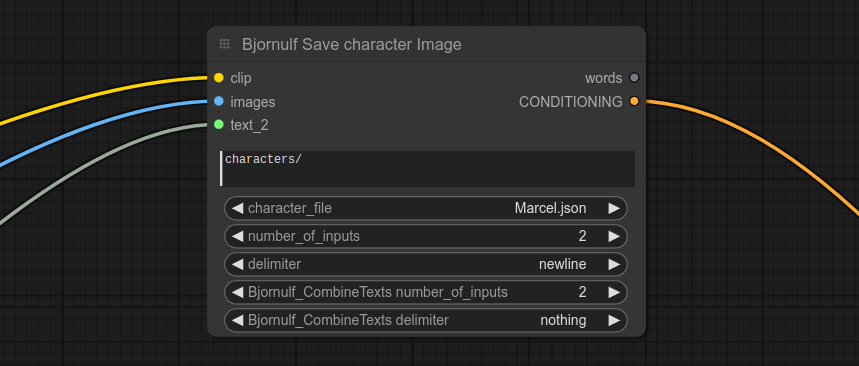
If you are satisfied with this logic, you can then select all these nodes, right click and Convert to Group Node, you can then have your own customized "save character node" :
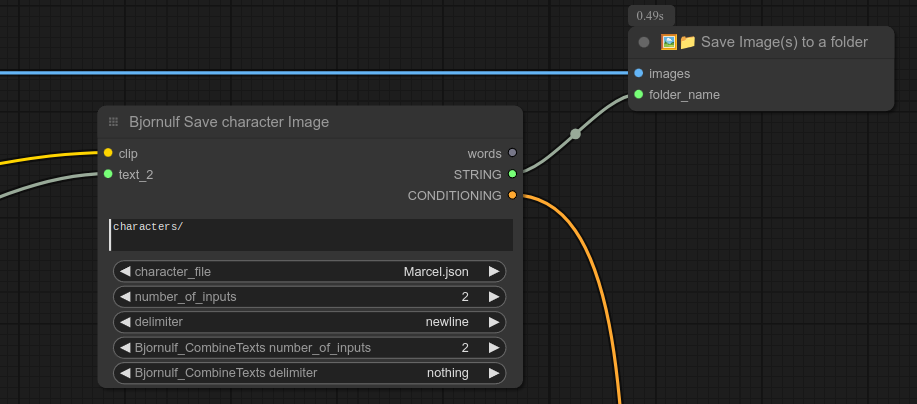
Here is another example of the same thing but excluding the save folder node :
⚠️ If you really want to regroup all the images in one flow, you can use my node 47 Combine images to put them all together.
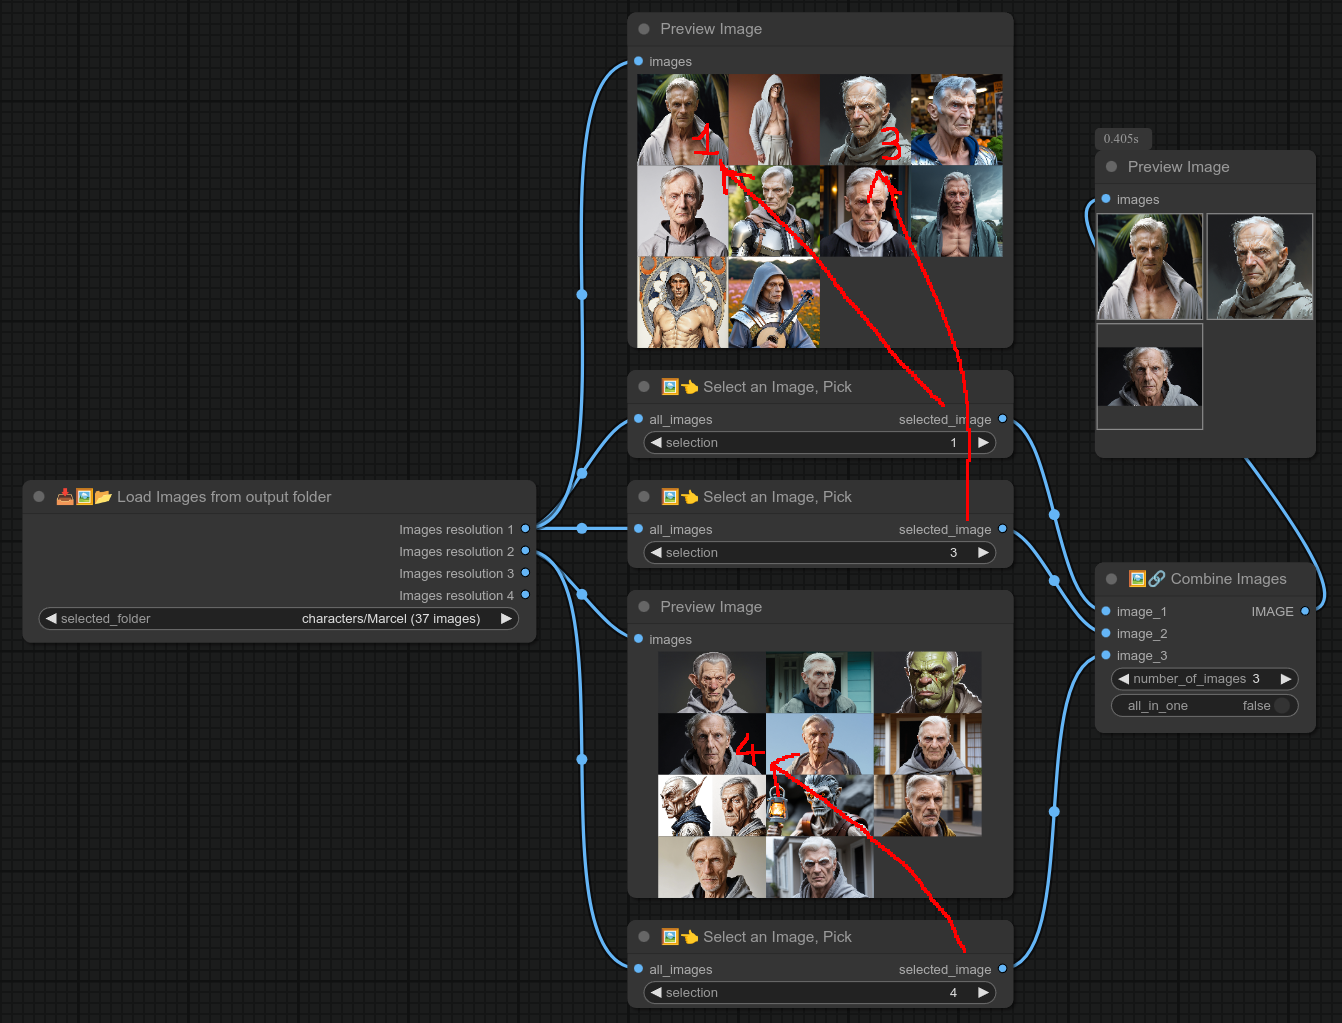
44 - 🖼👈 Select an Image, Pick
Description:
Select an image from a list of images.
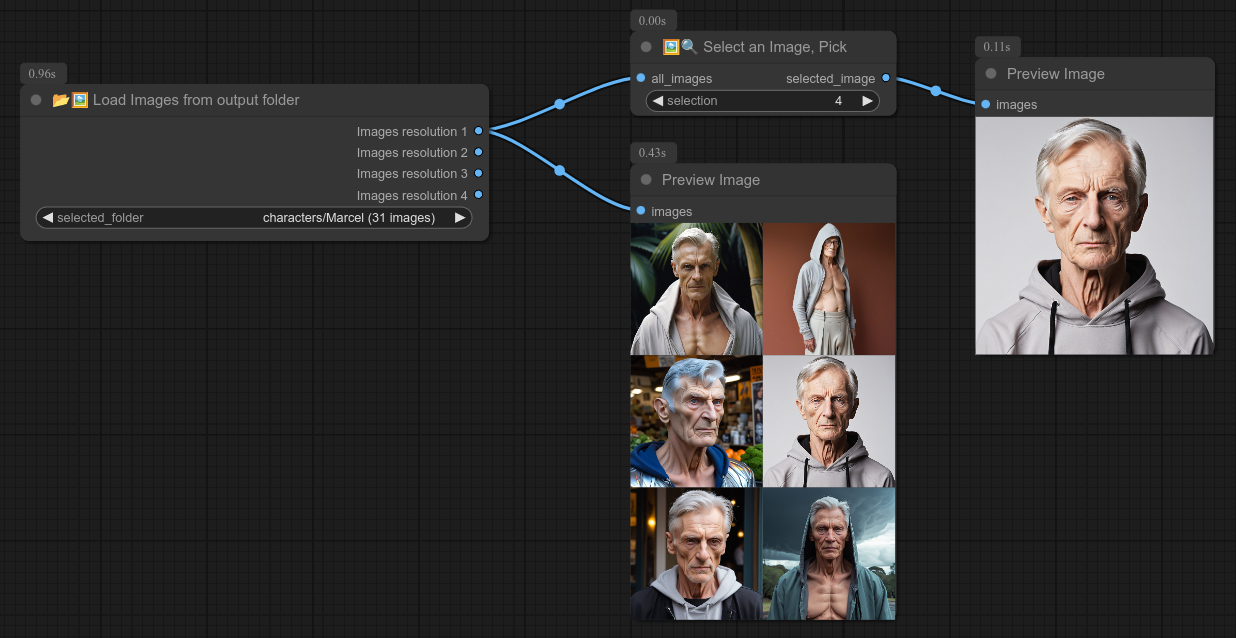
Useful in combination with my Load images from folder and preview image nodes.
You can also of course make a group node, like this one, which is the same as the screenshot above :
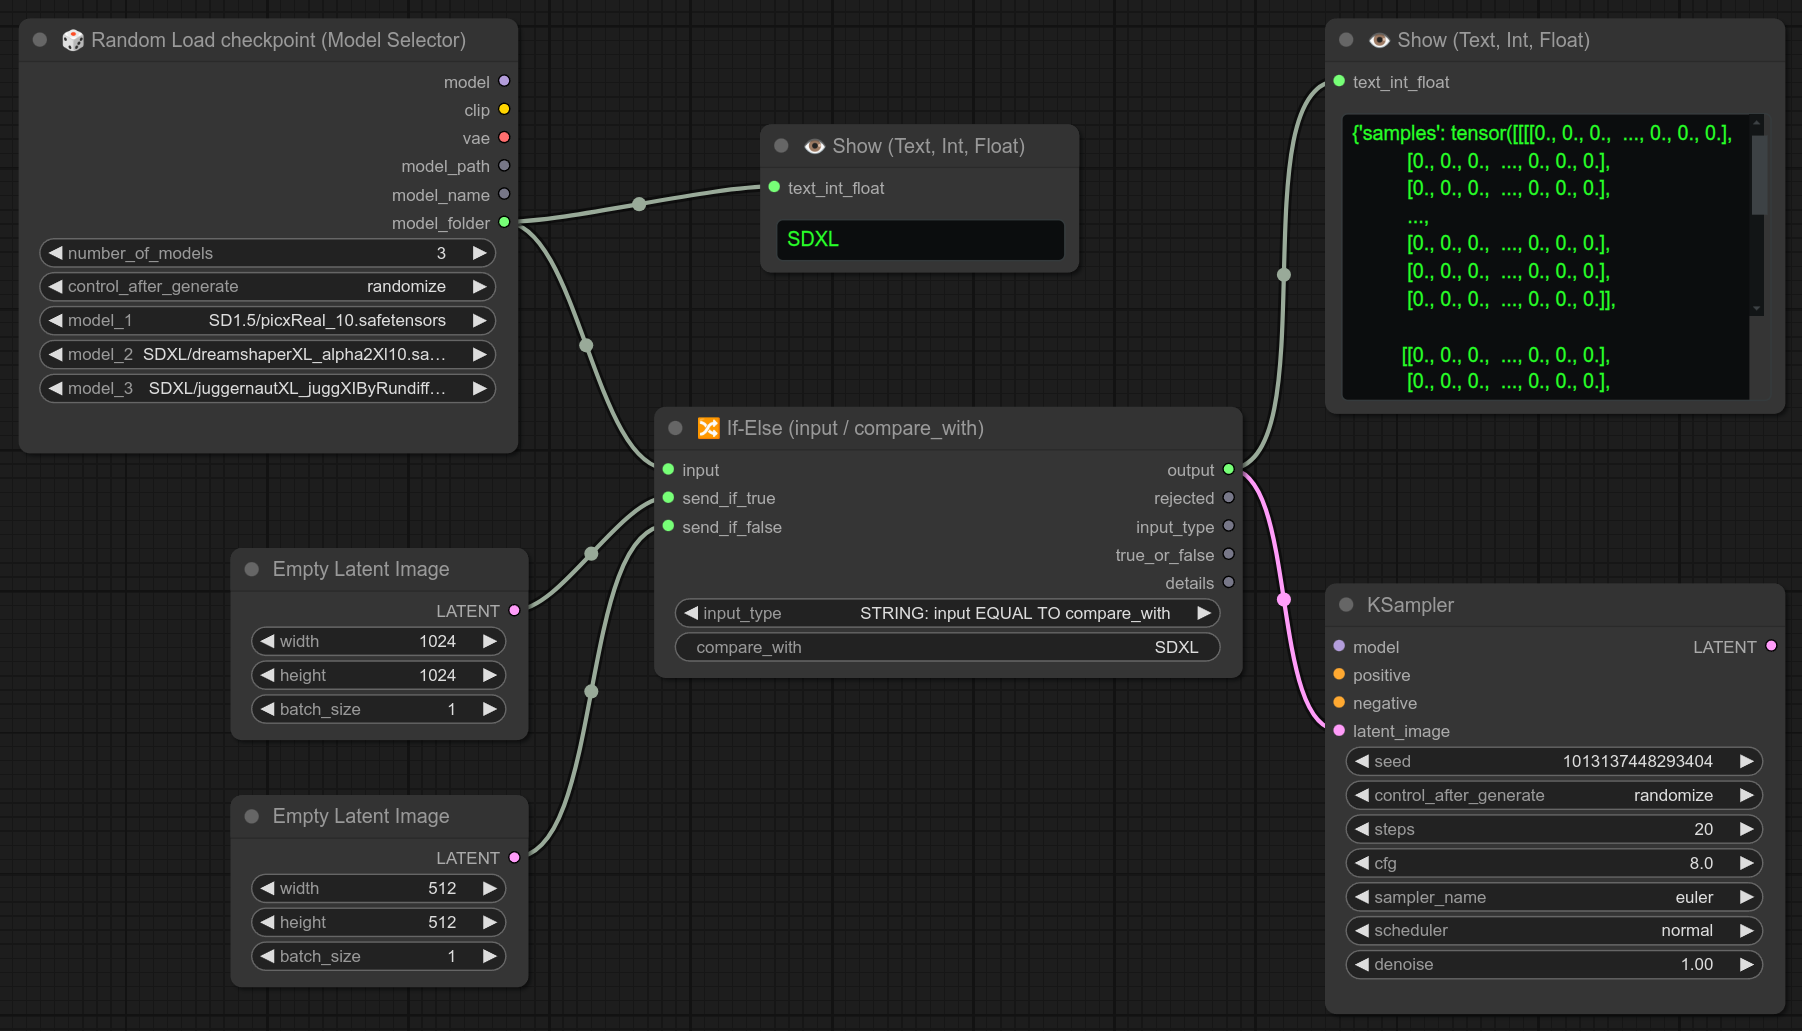
45 - 🔀 If-Else (input / compare_with)
Description:
Complex logic node if/else system.
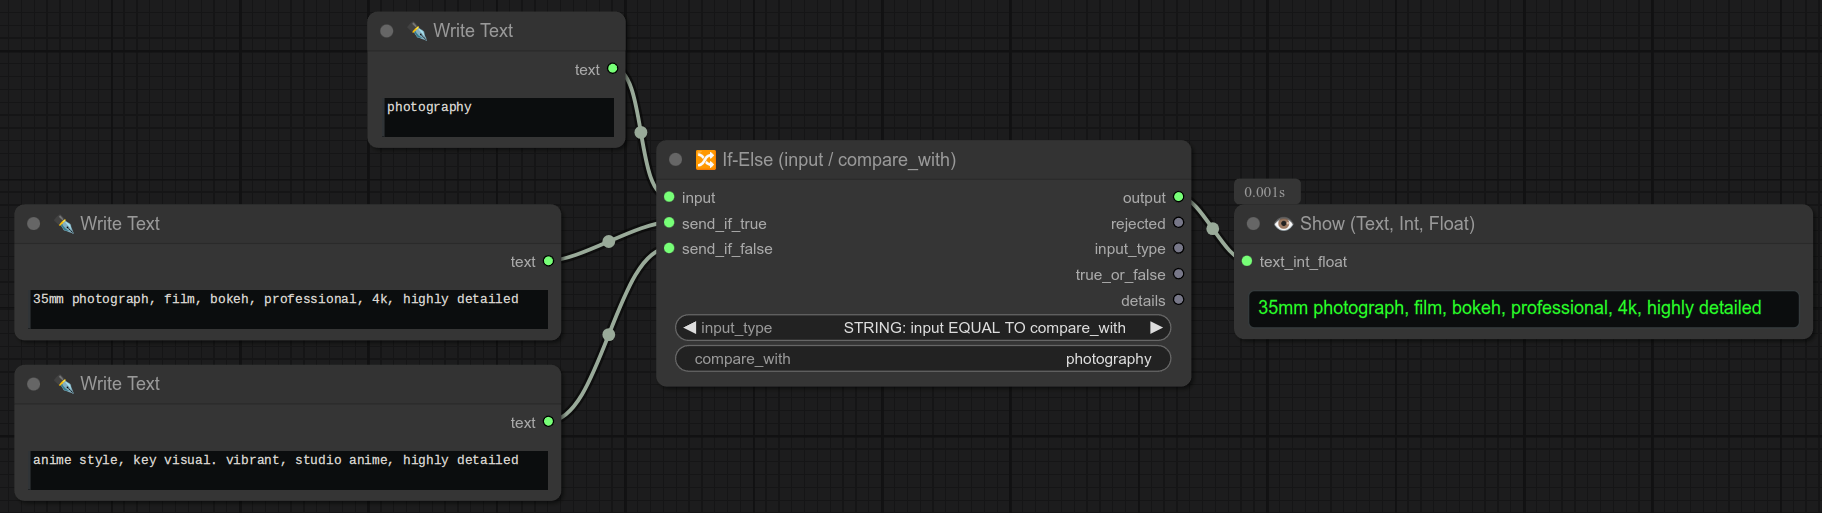
If the input given is equal to the compare_with given in the widget, it will forward send_if_true, otherwise it will forward send_if_false. (If no send_if_false it will return None.)
You can forward anything, below is an example of forwarding a different size of latent space depending if it's SDXL or not.
Here is an example of the node with all outputs displayed with Show text nodes :
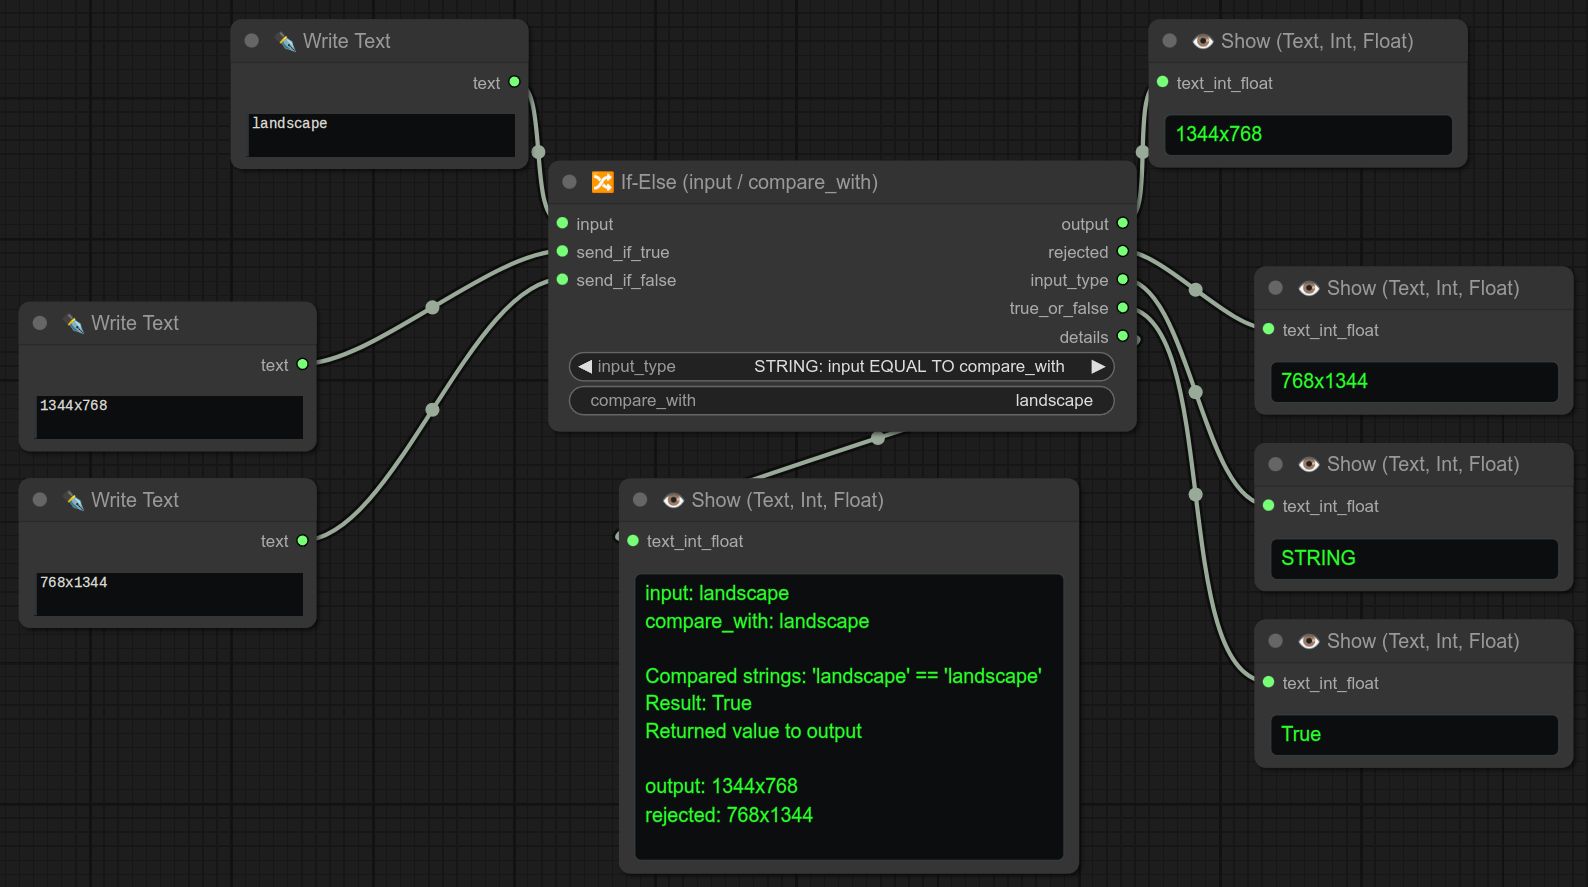
send_if_false is optional, if not connected, it will be replaced by None.
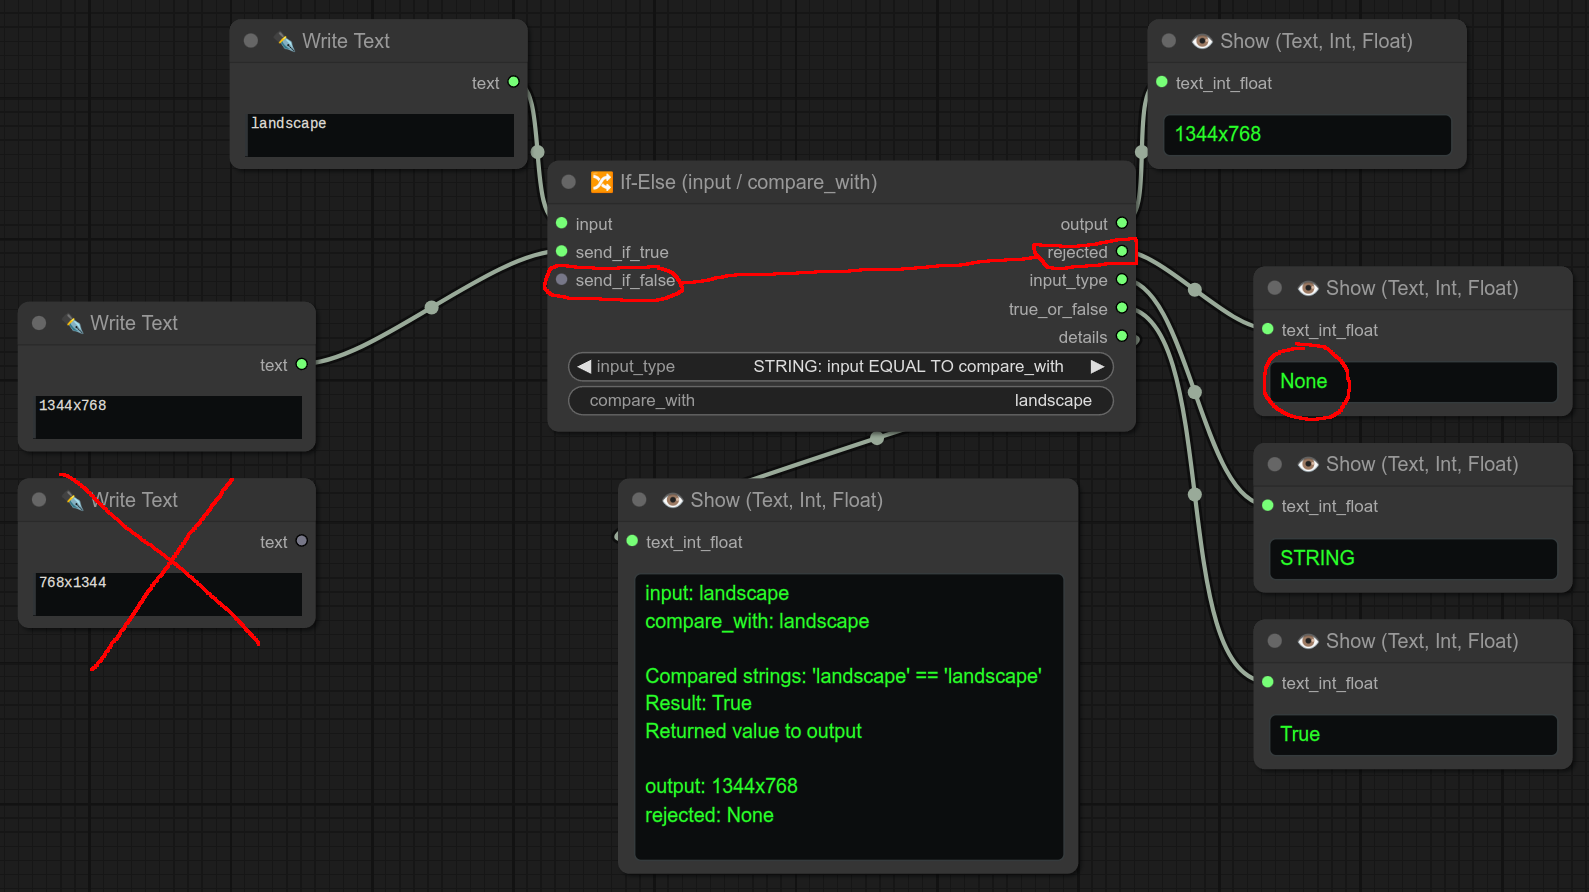
If-Else are chainables, just connect output to send_if_false.
⚠️ Always simply test input with compare_with, and connect the desired value to send_if_true. ⚠️
Here a simple example with 2 If-Else nodes (choose between 3 different resolutions).
❗ Notice that the same write text node is connected to both If-Else nodes input :

Let's take a similar example but let's use my Write loop text node to display all 3 types once :
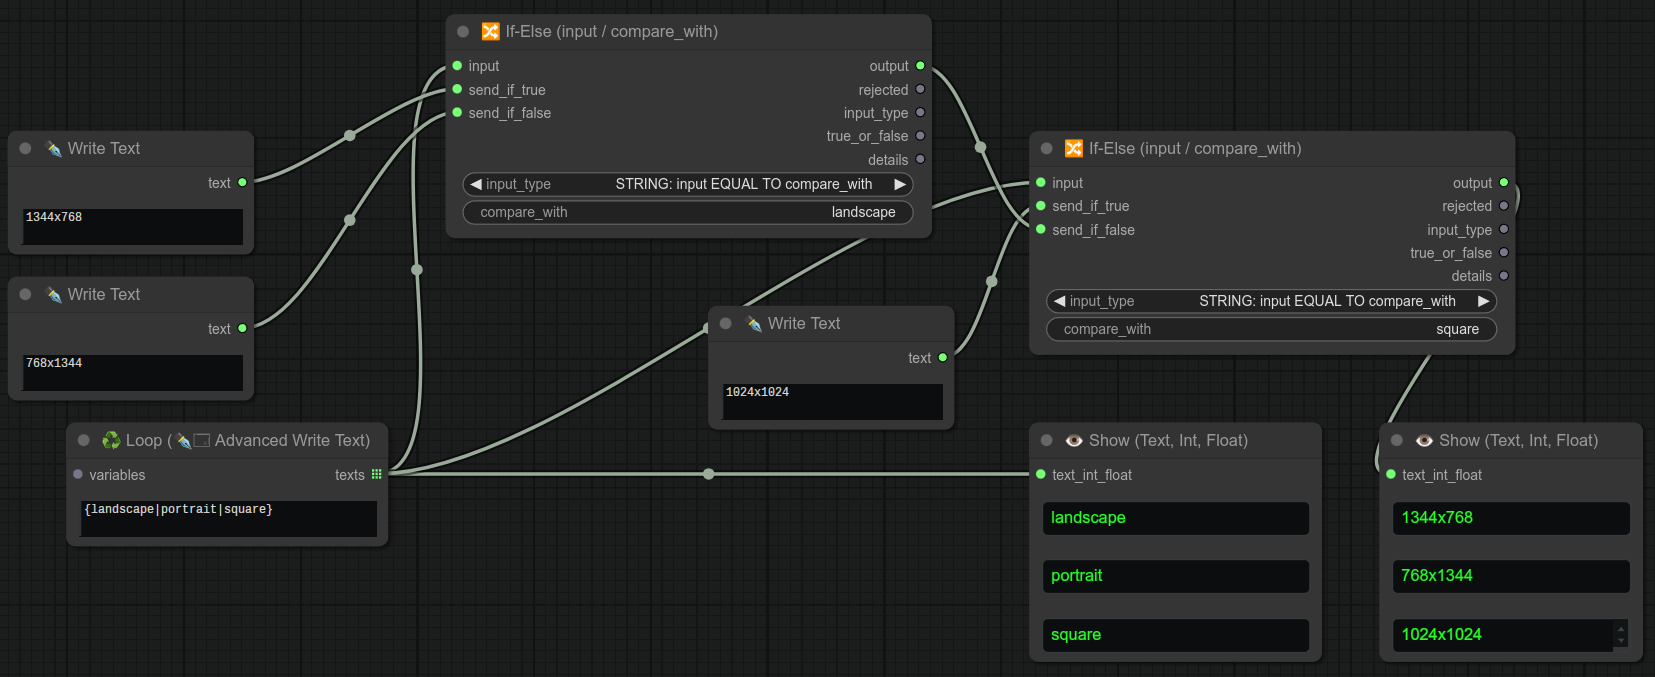
If you understood the previous examples, here is a complete example that will create 3 images, landscape, portrait and square :
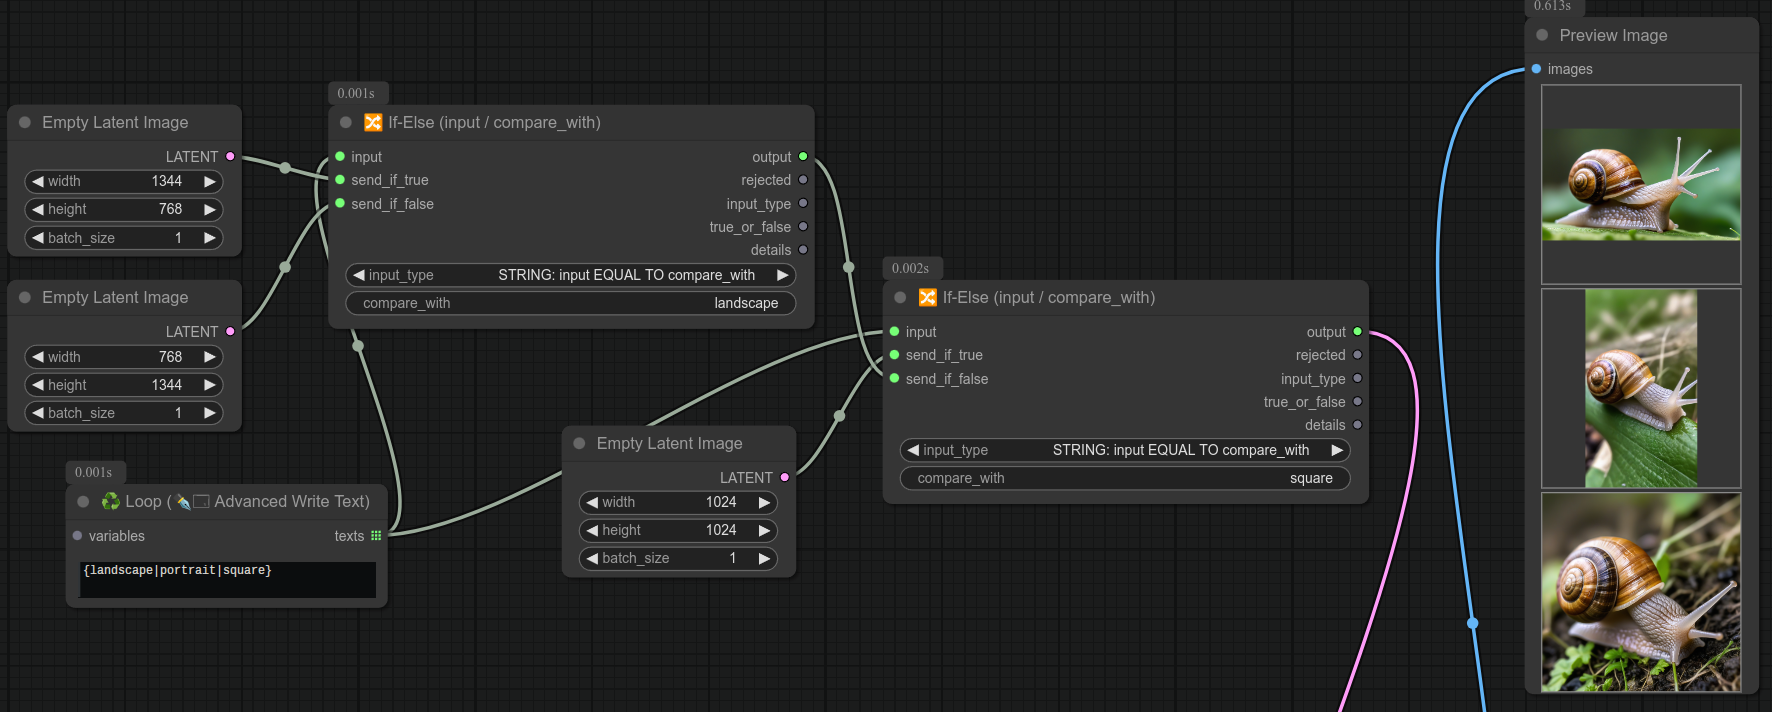
Workflow is hidden for simplicity, but is very basic, just connect latent to Ksampler, nothing special.)
You can also connect the same advanced loop write text node with my save folder node to save the images (landscape/portrait/square) in separate folders, but you do you...
46 - 🖼🔍 Image Details
Description:
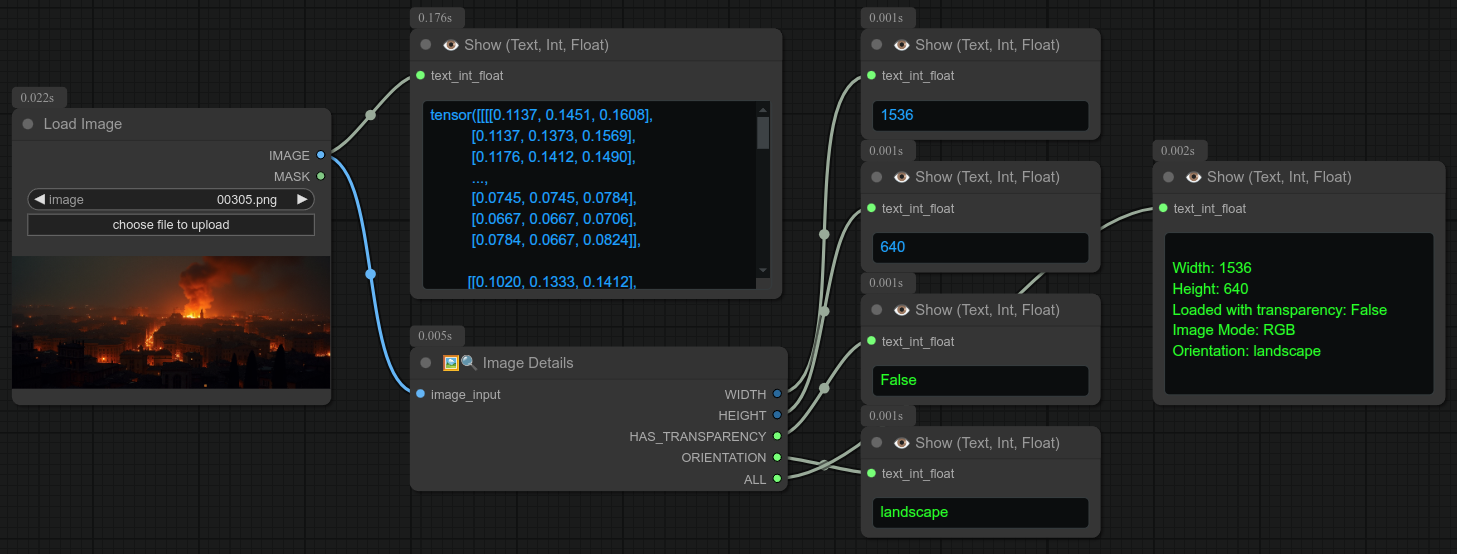
Display the details of an image. (width, height, has_transparency, orientation, type)
RGBA is considered as having transparency, RGB is not.
orientation can be landscape, portrait or square.
47 - 🖼🔗 Combine Images
Description:
Combine multiple images (A single image or a list of images.)
If you want to merge several images into a single image, check node 60 or 61.
There are two types of logic to "combine images". With "all_in_one" enabled, it will combine all the images into one tensor.
Otherwise it will send the images one by one. (check examples below) :
This is an example of the "all_in_one" option disabled (Note that there are 2 images, these are NOT side by side, they are combined in a list.) :
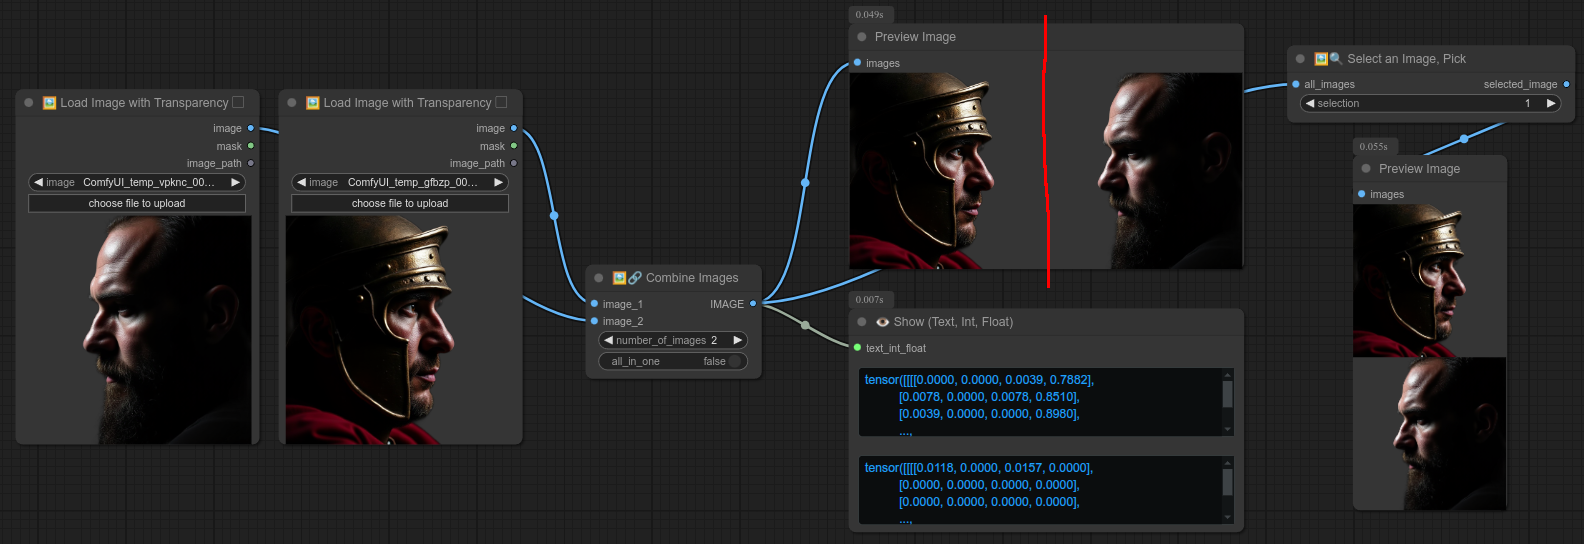
But for example, if you want to use my node select an image, pick, you need to enable all_in_one and the images must all have the same resolution.
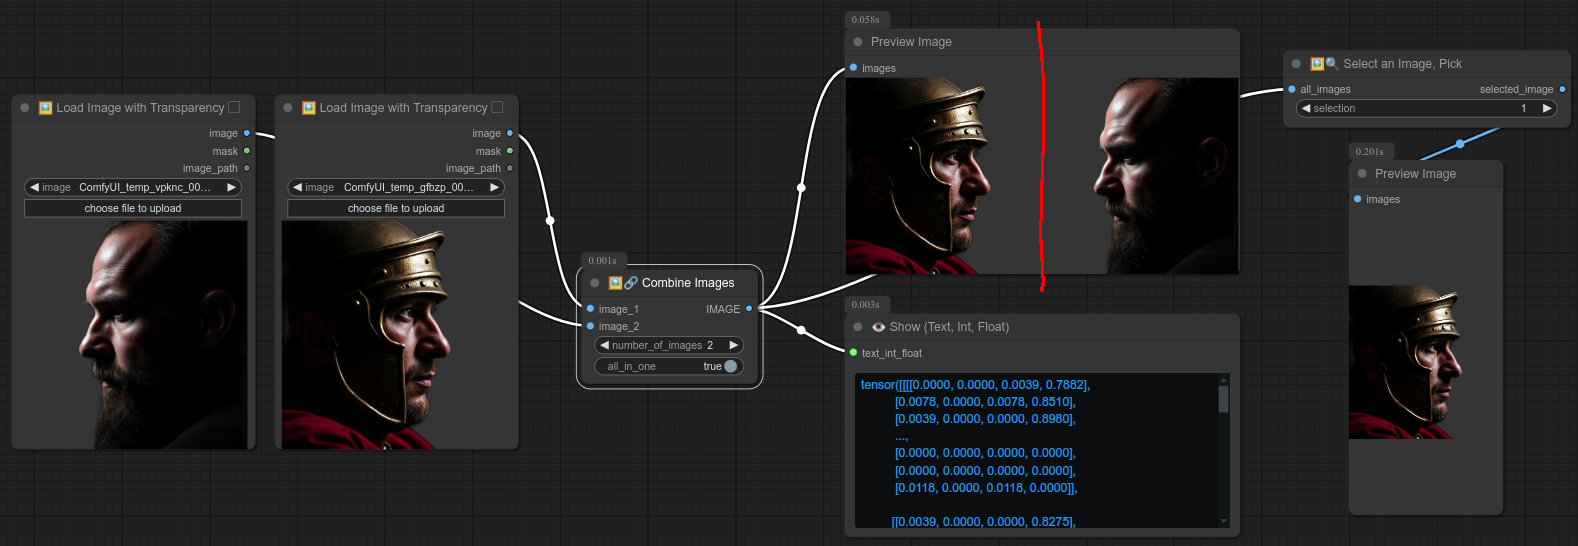
You can notice that there is no visible difference when you use all_in_one with preview image node. (this is why I added the show text node, note that show text will make it blue, because it's an image/tensor.)
When you use combine image node, you can actually also send many images at once, it will combine them all.
Here is an example with Load images from folder node, Image details node and Combine images node. (Of course it can't have all_in_one set to True in this situation because the images have different resolutions) :
Here another simple example taking a few selected images from a folder and combining them (For later processing for example) :
48 - 🔀🎲 Text scrambler (🧑 Character)
Description:
Take text as input and scramble (randomize) the text by using the file scrambler/character_scrambler.json in the comfyui custom nodes folder.
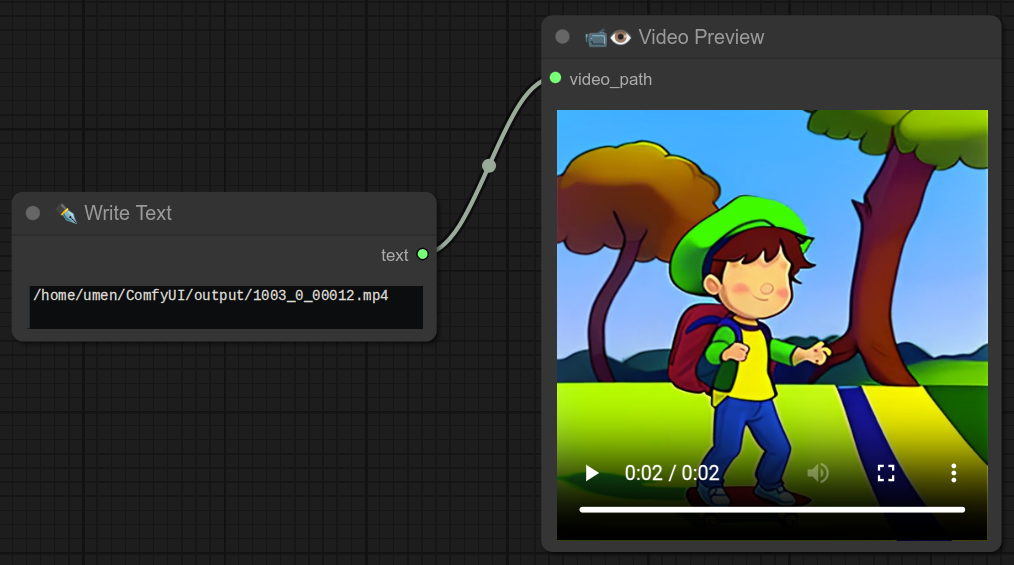
49 - 📹👁 Video Preview
Description:
This node takes a video path as input and displays the video.
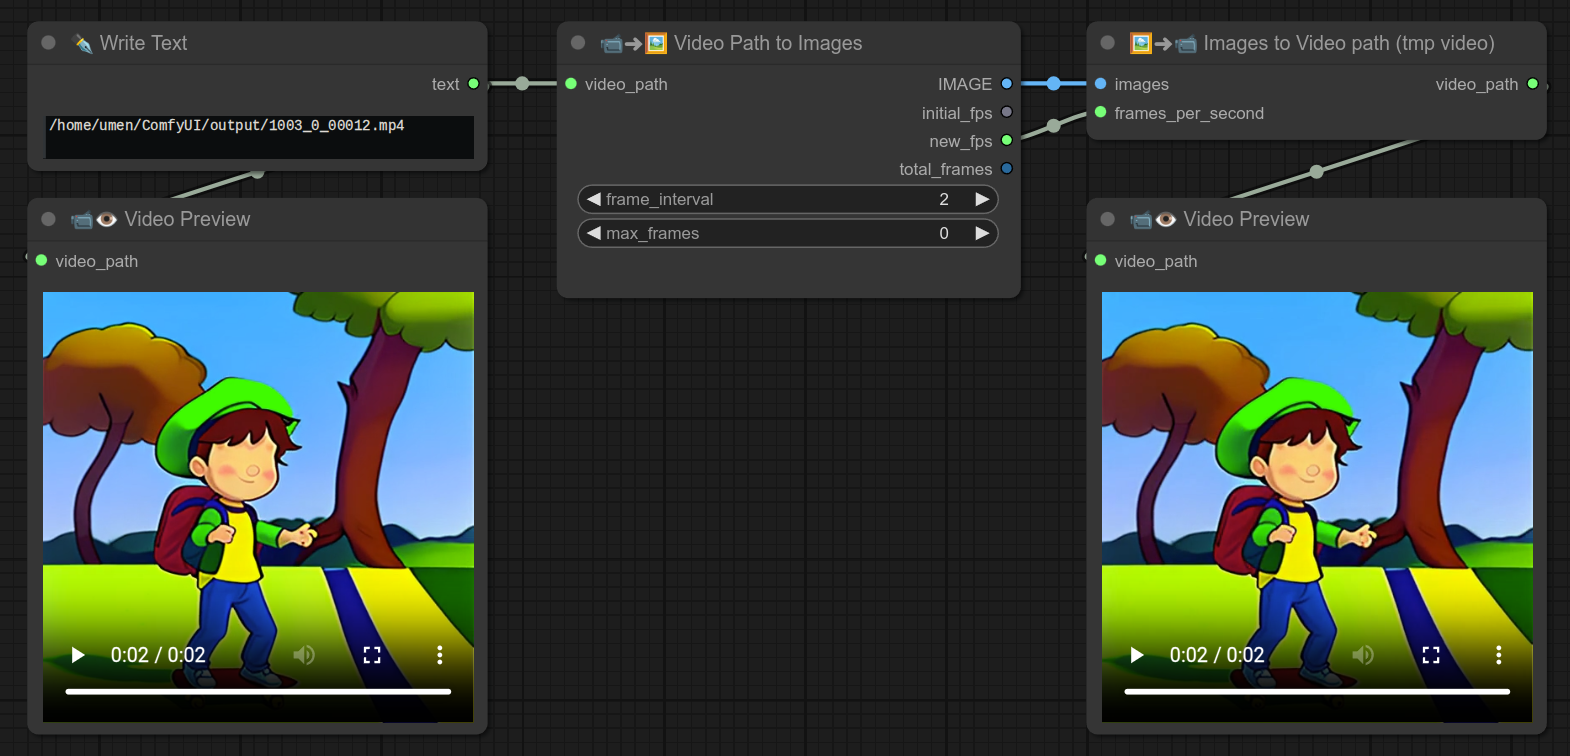
50 - 🖼➜📹 Images to Video path (tmp video)
Description:
This node will take a list of images and convert them to a temporary video file.
❗ Update 0.50 : You can now send audio to the video. (audio_path OR audio TYPE)
51 - 📹➜🖼 Video Path to Images
Description:
This node will take a video path as input and convert it to a list of images.
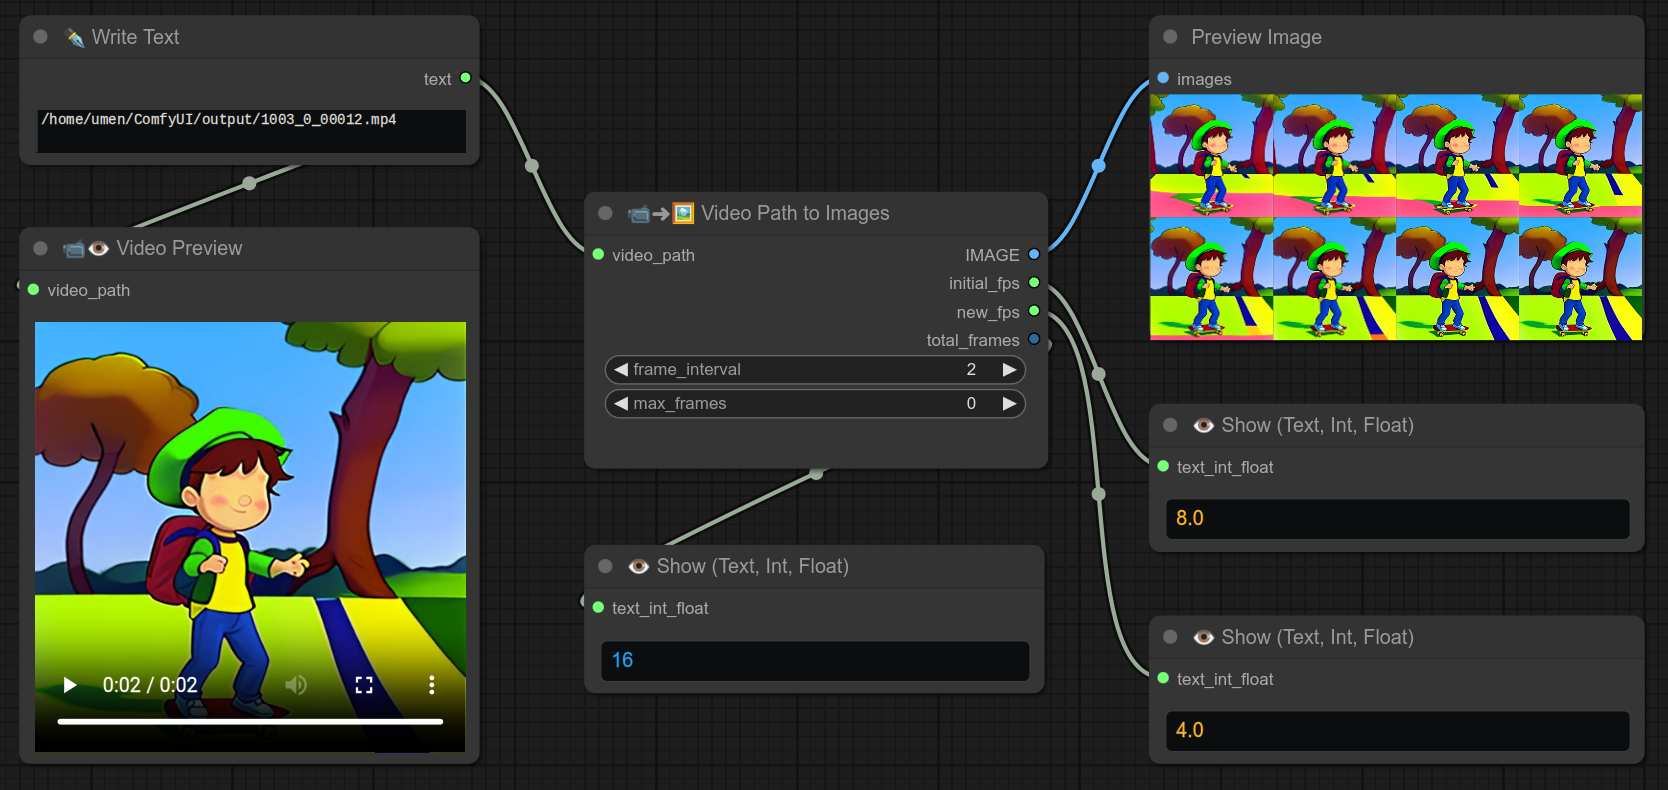
In the above example, I also take half of the frames by setting frame_interval to 2.
Note that i had 16 frames, on the top right preview you can see 8 images.
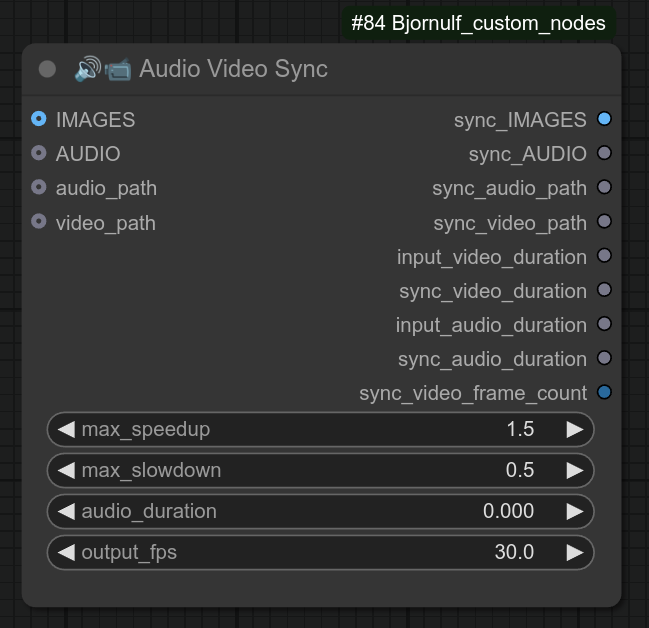
52 - 🔊📹 Audio Video Sync
Description:
This node is an overengineered node that will try to synchronize the duration of an audio file with a video file.
❗ Video ideally needs to be a loop, check my ping pong video node if needed.
The main goal of this synchronization is to have a clean transition between the end and the beginning of the video. (same frame)
You can then chain up several video and they will transition smoothly.
Some details, this node will :
- If video slightly too long : add silence to the audio file.
- If video way too long : will slow down the video up to 0.50x the speed + add silence to the audio. (now editable)
- If audio slightly too long : will speed up video up to 1.5x the speed. (now editable)
- If video way too long : will speed up video up to 1.5x the speed + add silence to the audio.
It is good like for example with MuseTalk https://github.com/chaojie/ComfyUI-MuseTalk
Here is an example of the Audio Video Sync node, notice that it is also convenient to recover the frames per second of the video, and send that to other nodes. (Spaghettis..., deal with it. 😎 If you don't understand it, you can test it.) :
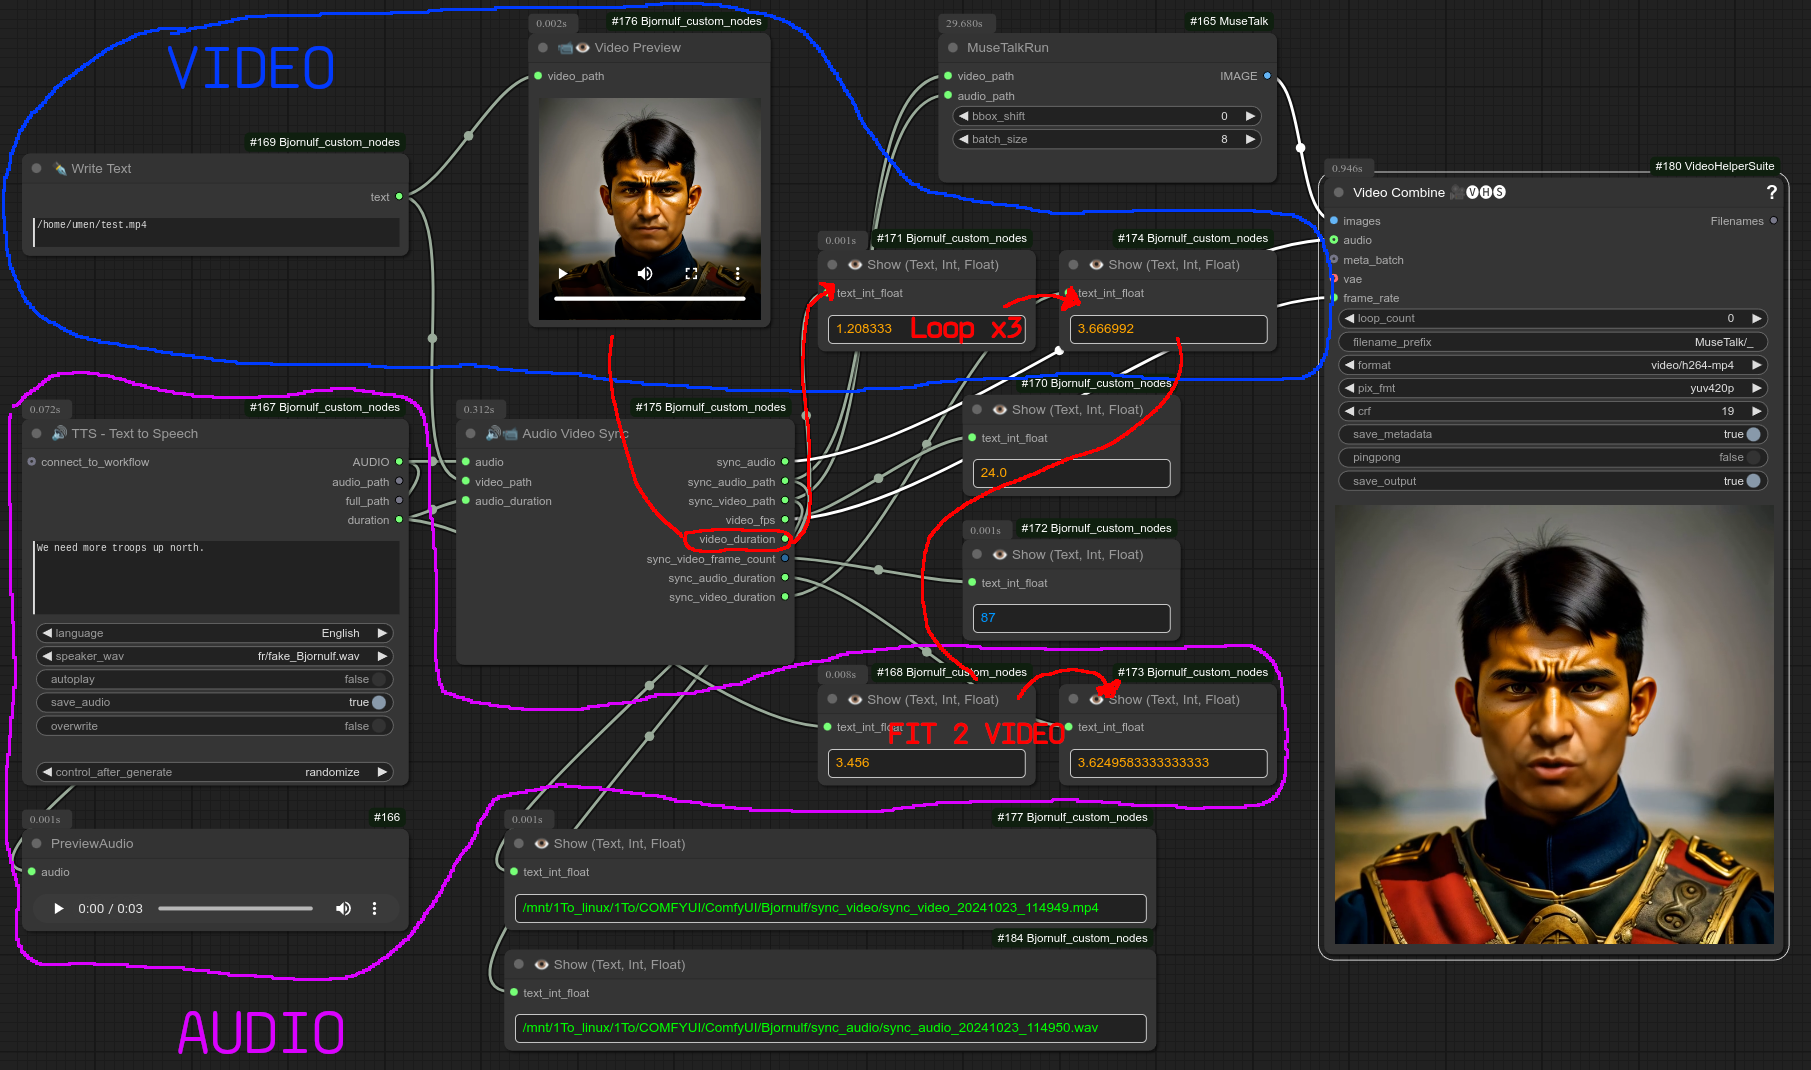
❗ Update 0.50 : audio_duration is now optional, if not connected it will take it from the audio.
❗ Update 0.50 : You can now send the video with a list of images OR a video_path, same for audio : AUDIO or audio_path.
New v0.50 layout, same logic :
53 - ♻ Loop Load checkpoint (Model Selector)
Description:
This is the loop version of node 41. (check there for similar details)
It will loop over all the selected checkpoints.
❗ The big difference with 41 is that checkpoints are preloaded in memory. You can run them all faster all at once.
It is a good way to test multiple checkpoints quickly.
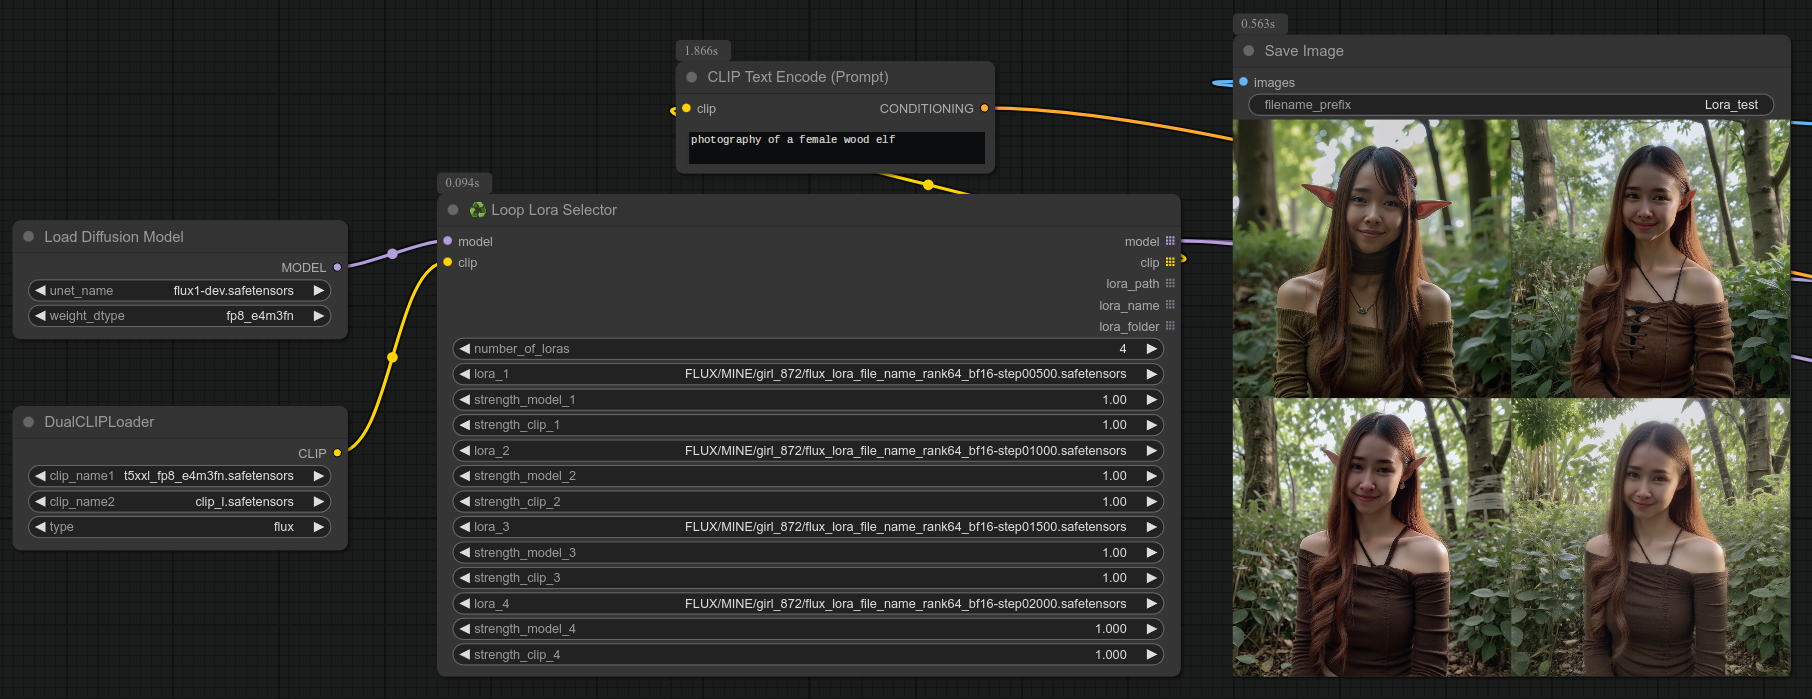
54 - ♻ Loop Lora Selector
Description:
Loop over all the selected Loras.
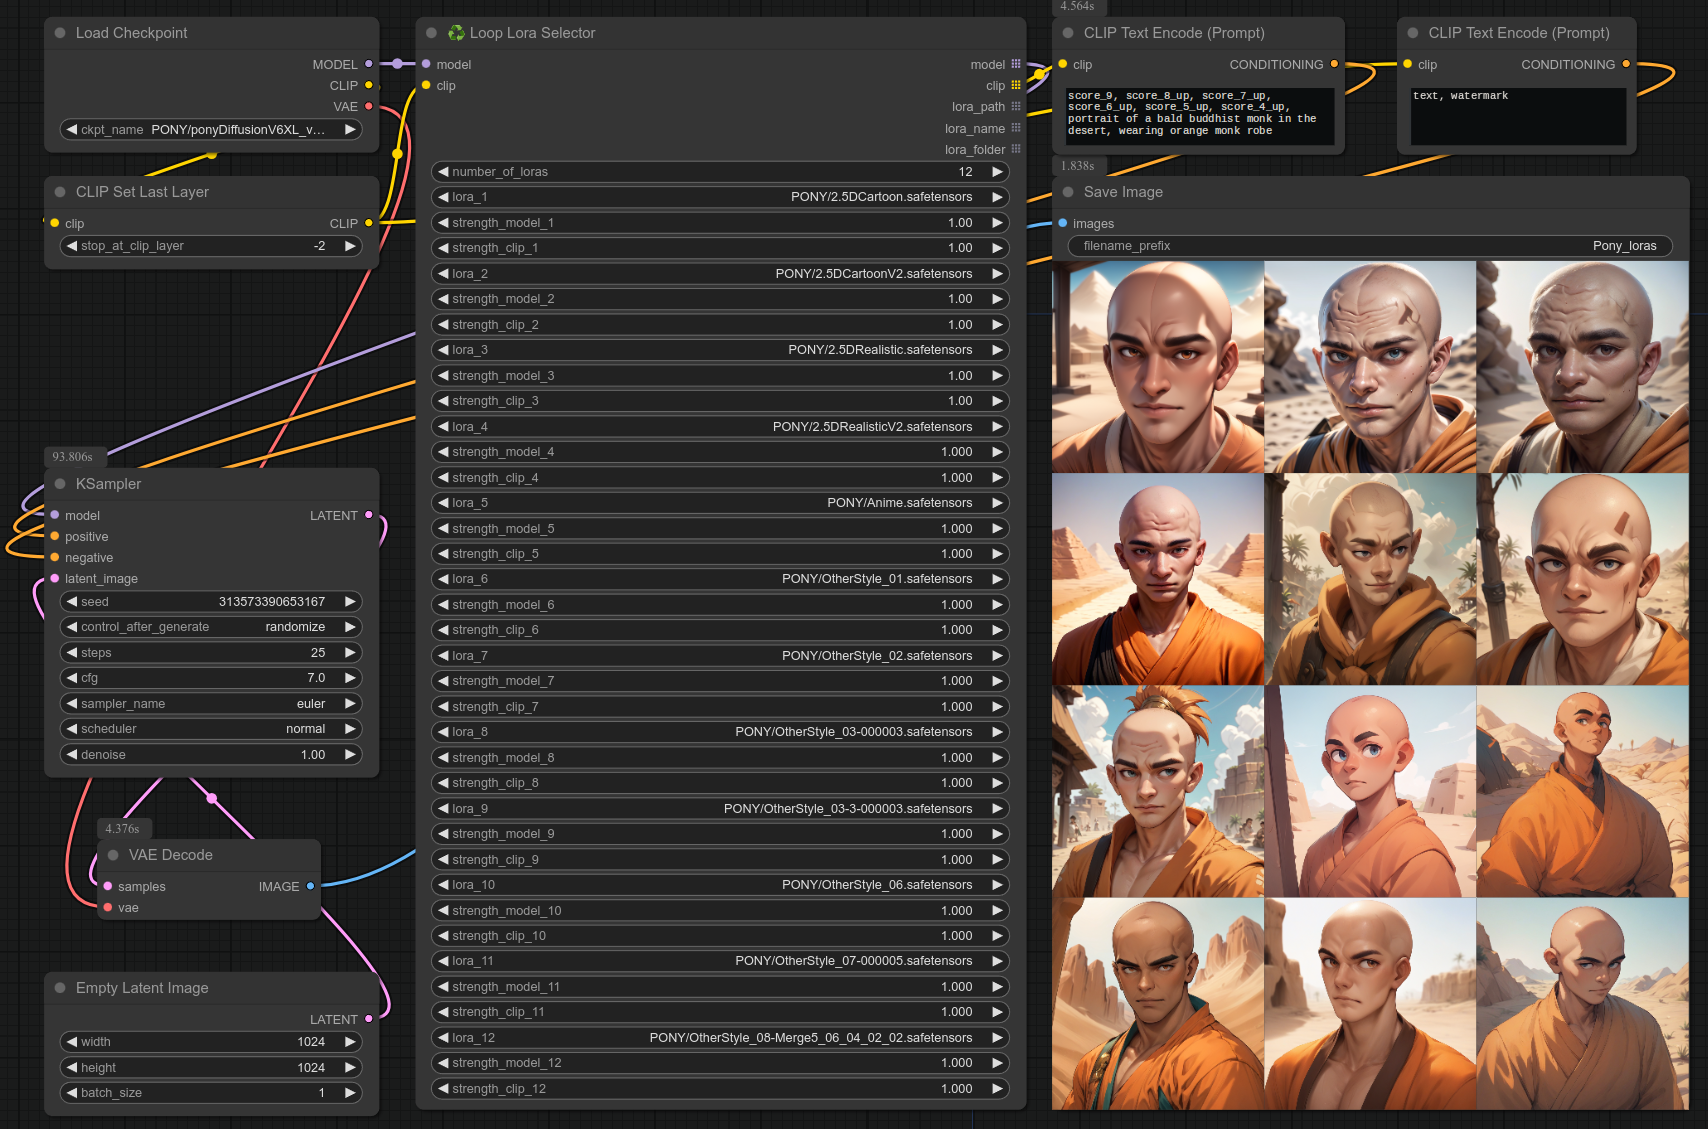
Above is an example with Pony and several styles of Lora.
Below is another example, here with flux, to test if your Lora training was undertrained, overtrained or just right :
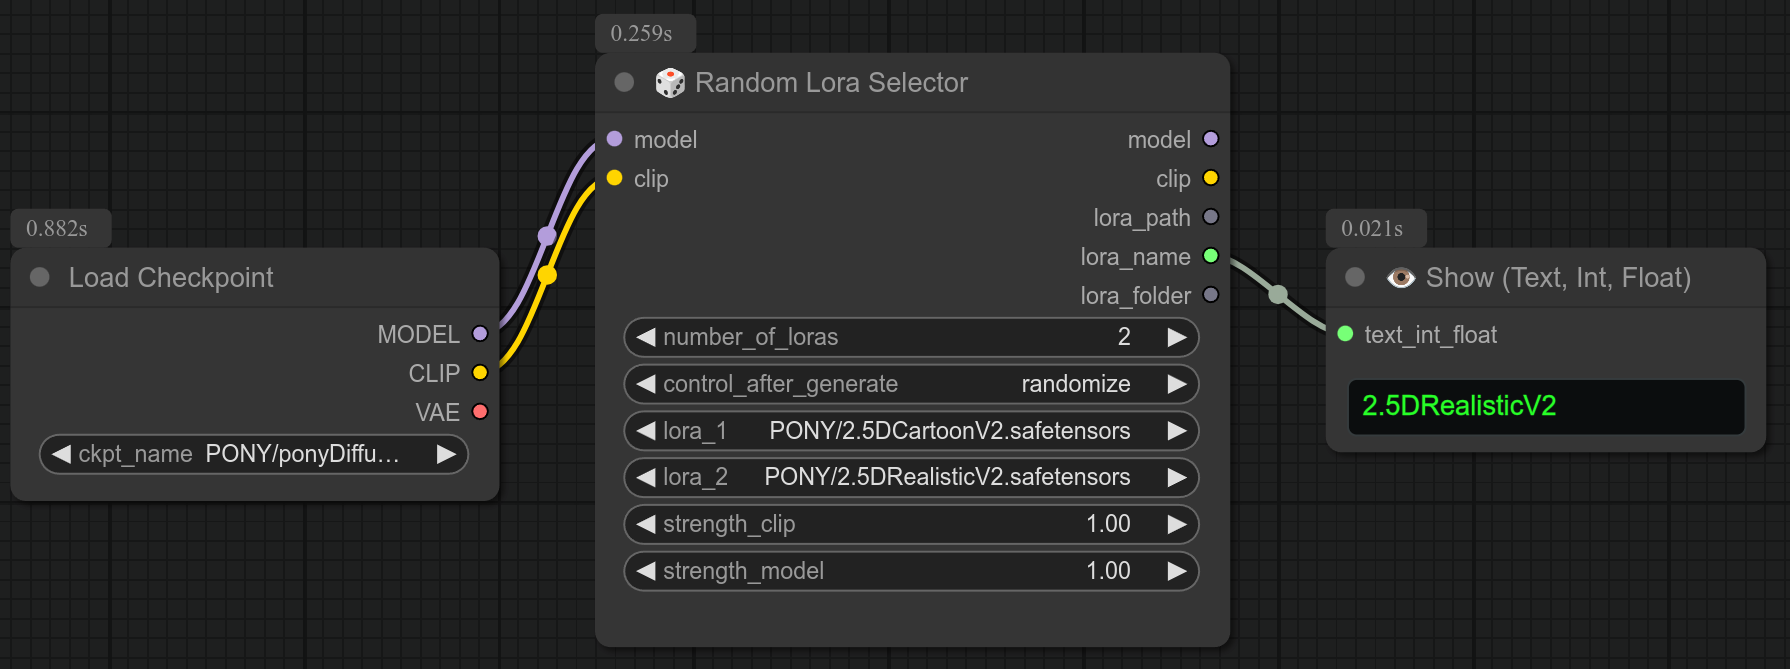
55 - 🎲 Random Lora Selector
Description:
Just take a single Lora at random from a list of Loras.
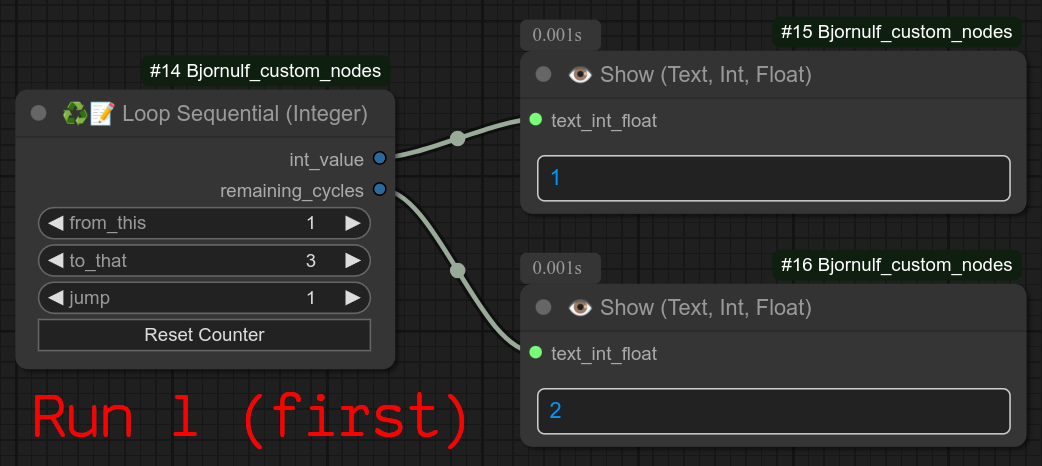
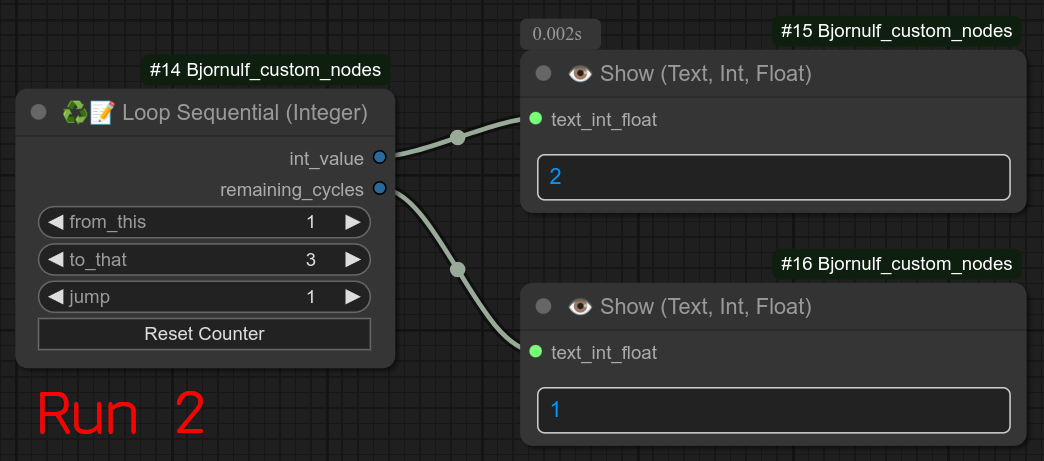
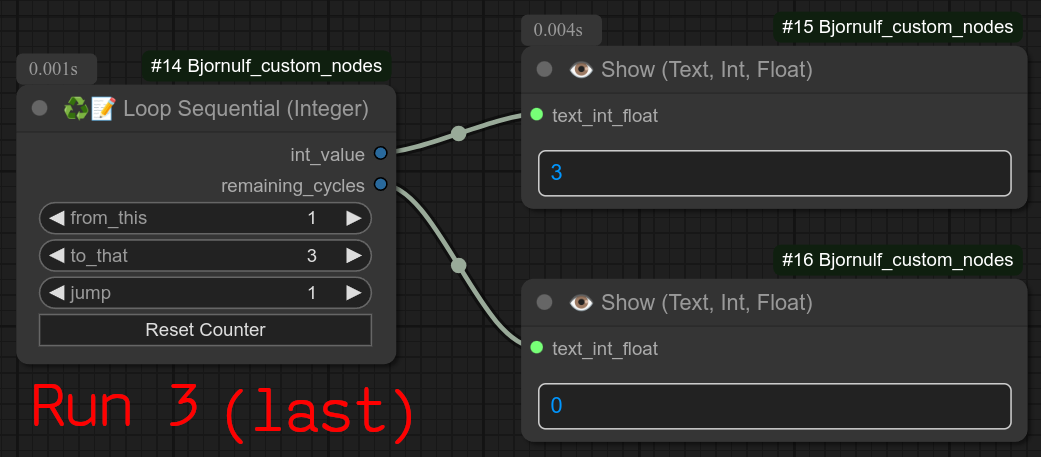
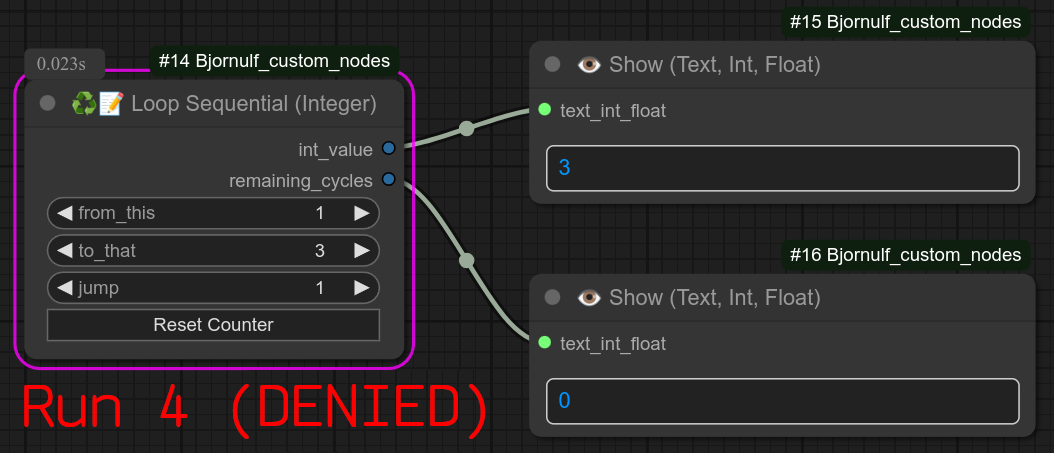
56 - ♻📑📝 Loop Sequential (Integer)
Description:
This loop works like a normal loop, BUT it is sequential : It will run only once for each workflow run !!!
The first time it will output the first integer, the second time the second integer, etc...
When the last is reached, the node will STOP the workflow, preventing anything else to run after it.
Under the hood it is using a single file counter_integer.txt in the ComfyUI/Bjornulf folder.
❗ Do not use more than one node like this one in a workflow, because they will share the same counter_integer.txt file. (unexpected behaviour.)
Update 0.57: Now also contains the next counter in the reset button.
57 - ♻📑 Loop Sequential (input Lines)
Description:
This loop works like a normal loop, BUT it is sequential : It will run only once for each workflow run !!!
The first time it will output the first line, the second time the second line, etc...
You also have control of the line with +1 / -1 buttons.
When the last is reached, the node will STOP the workflow, preventing anything else to run after it.
Under the hood it is using the file counter_lines.txt in the ComfyUI/Bjornulf folder.
Here is an example of usage with my TTS node : when I have a list of sentences to process, if i don't like a version, I can just click on the -1 button, tick "overwrite" on TTS node and it will generate the same sentence again, repeat until good.
❗ Do not use more than one node like this one in a workflow, because they will share the same counter_lines.txt file. (unexpected behaviour.)
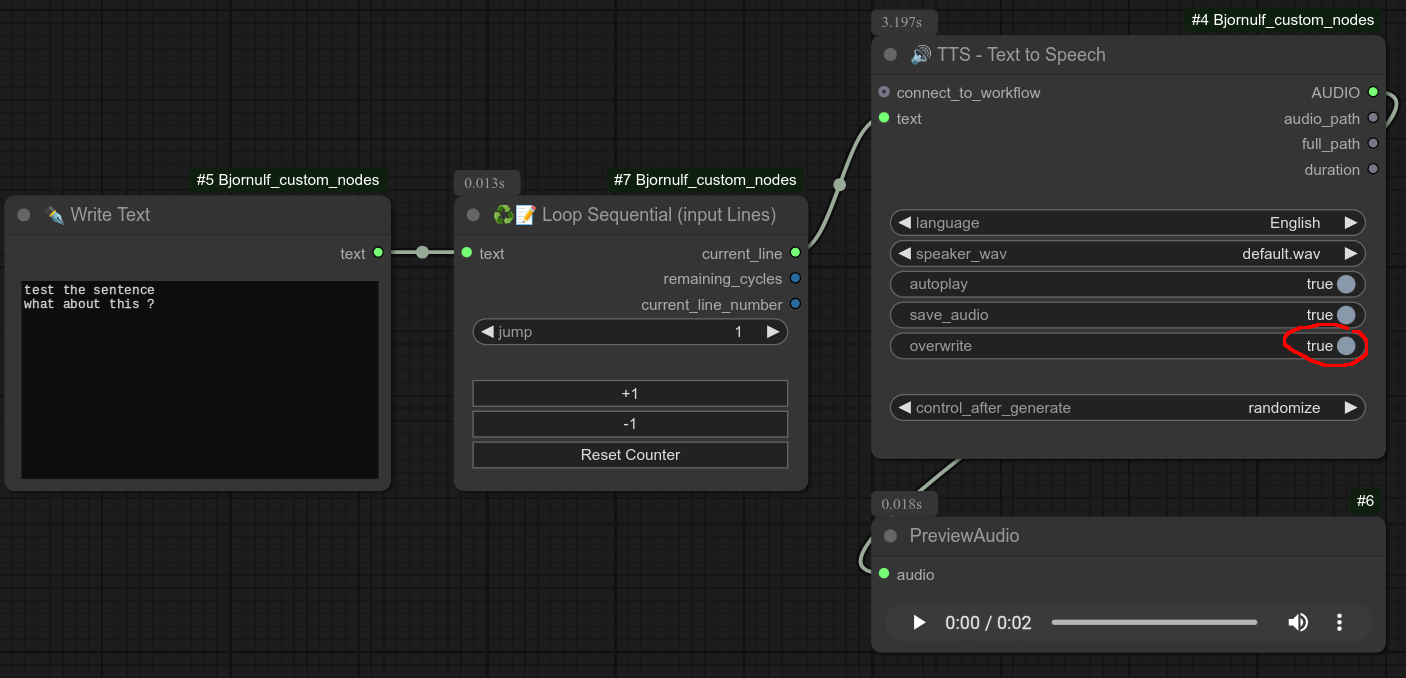
Update 0.57: Now also contains the next counter in the reset button.
If you want to be able to predict the next line, you can use node 68, to Add line numbers.
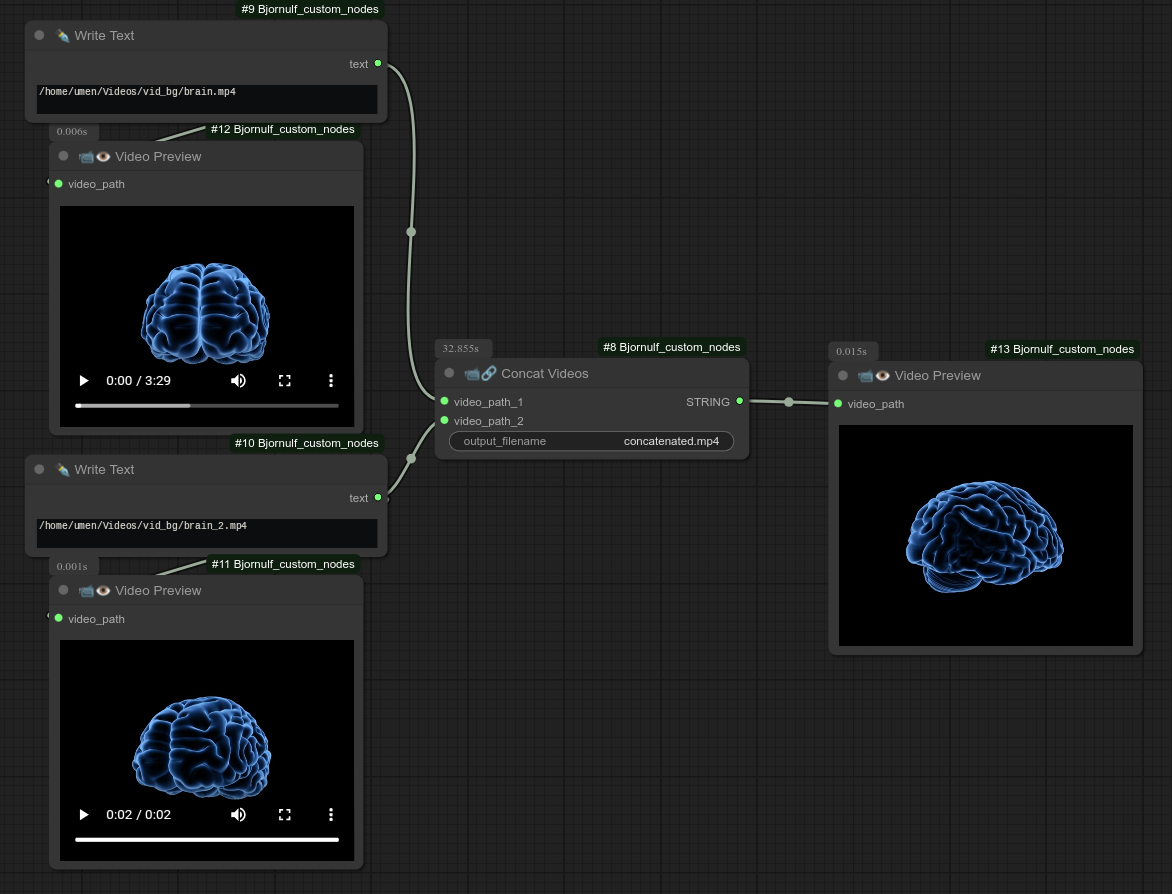
58 - 📹🔗 Concat Videos
Description:
Take two videos and concatenate them. (One after the other in the same video.)
Convert a video, can use FFMPEG_CONFIG_JSON. (From node 76 / 77)
59 - 📹🔊 Combine Video + Audio
Description:
Simply combine video and audio together.
Video : Use list of images or video path.
Audio : Use audio path or audio type.
60 - 🖼🖼 Merge Images/Videos 📹📹 (Horizontally)
Description:
Merge images or videos horizontally.

Here is one possible example for videos with node 60 and 61 :
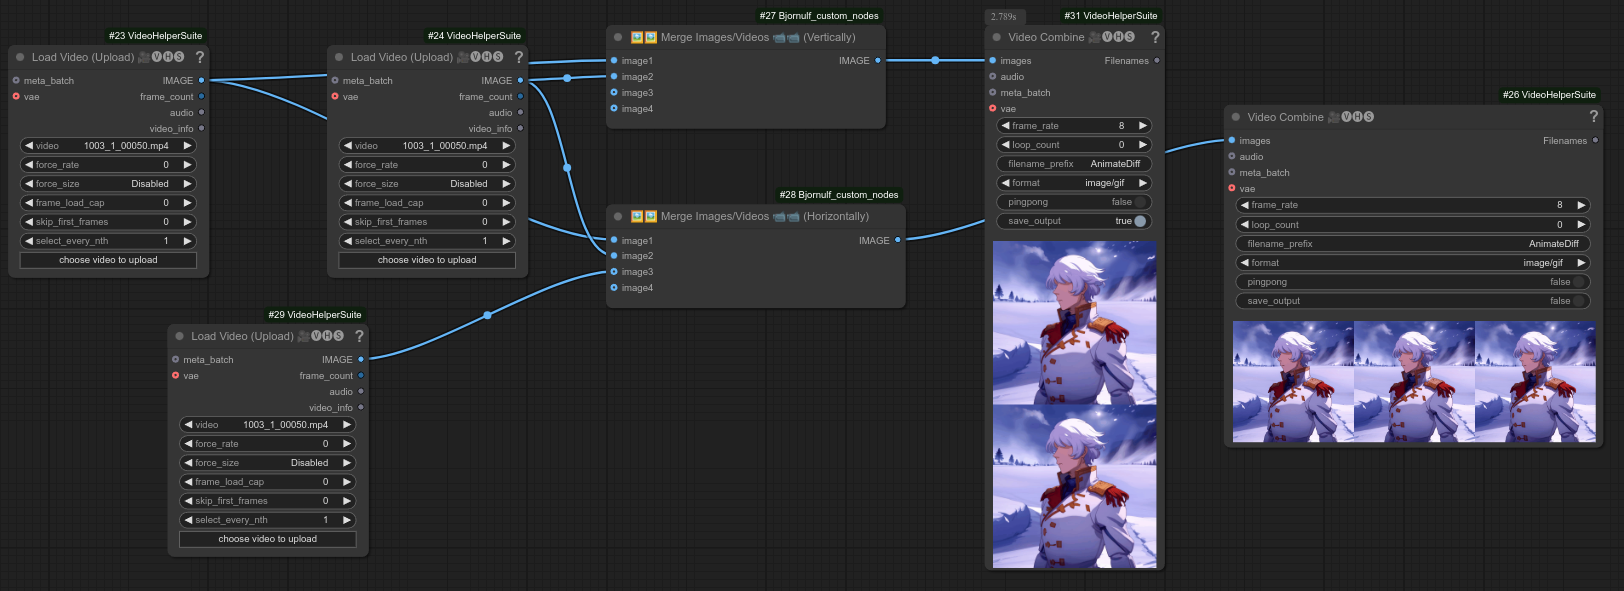
61 - 🖼🖼 Merge Images/Videos 📹📹 (Vertically)
Description:
Merge images or videos vertically.
Here is one possible example for videos with node 60 and 61 :
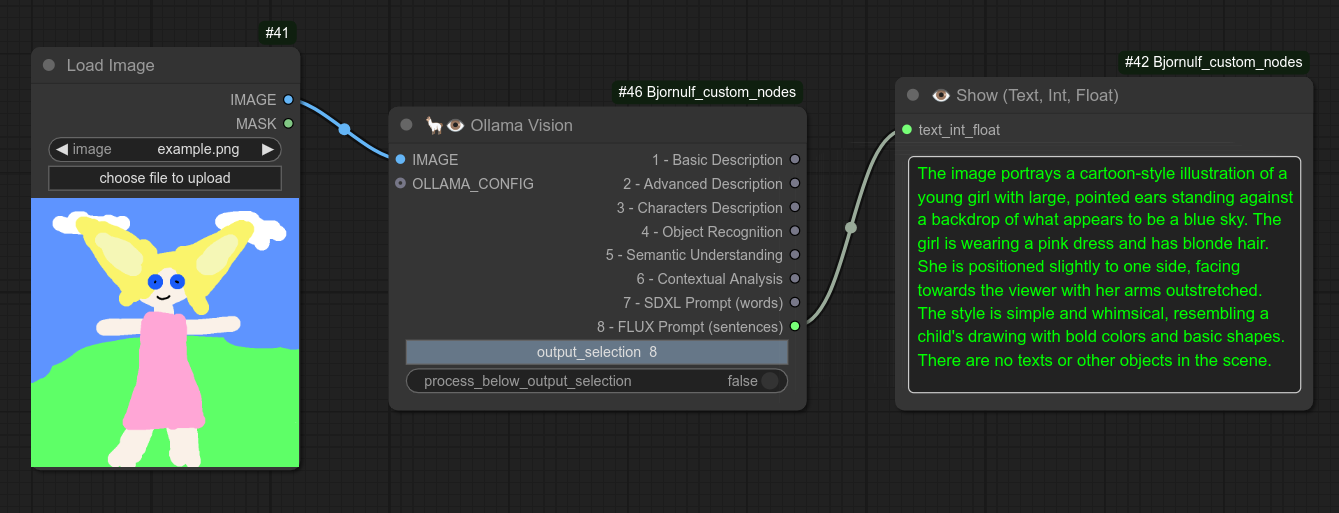
62 - 🦙👁 Ollama Vision
Description:
Take an image as input and will describe the image. Uses moondream by default, but can select anything with node 63, and a custom prompt with node 161.
63 - 🦙 Ollama Configuration ⚙
Description:
Use custom configurations for Ollama Talk and Vision.
You can change the ollama Url and the model used.
Some vision models can also do text to a certain extent.
Example of a Ollama Vision Node and Ollama Talk Node using the same Ollama Configuration Node :
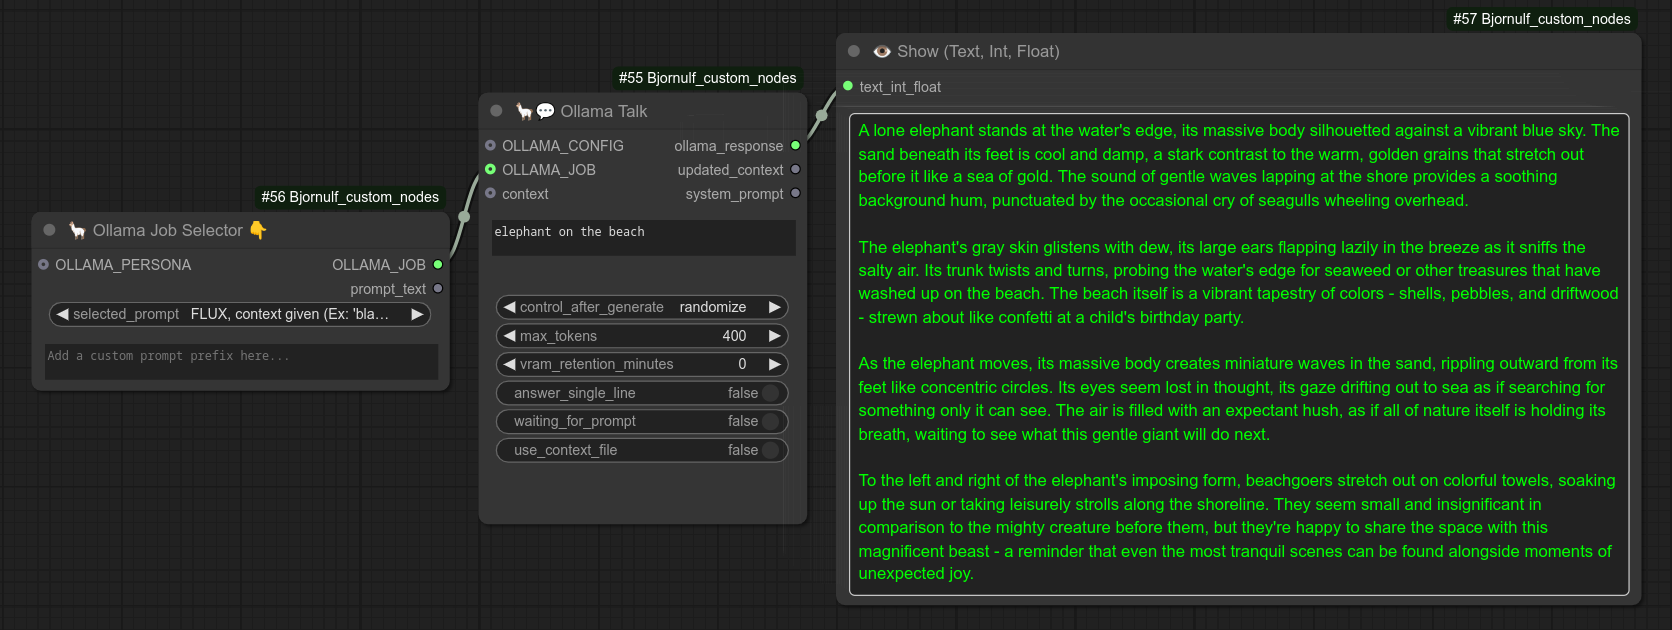
64 - 🦙 Ollama Job Selector 💼
Description:
Select a personnality for your Ollama Talk Node, set it to None for just chat.
If you want to write your own, just set it to None and write your prompt as prefix.
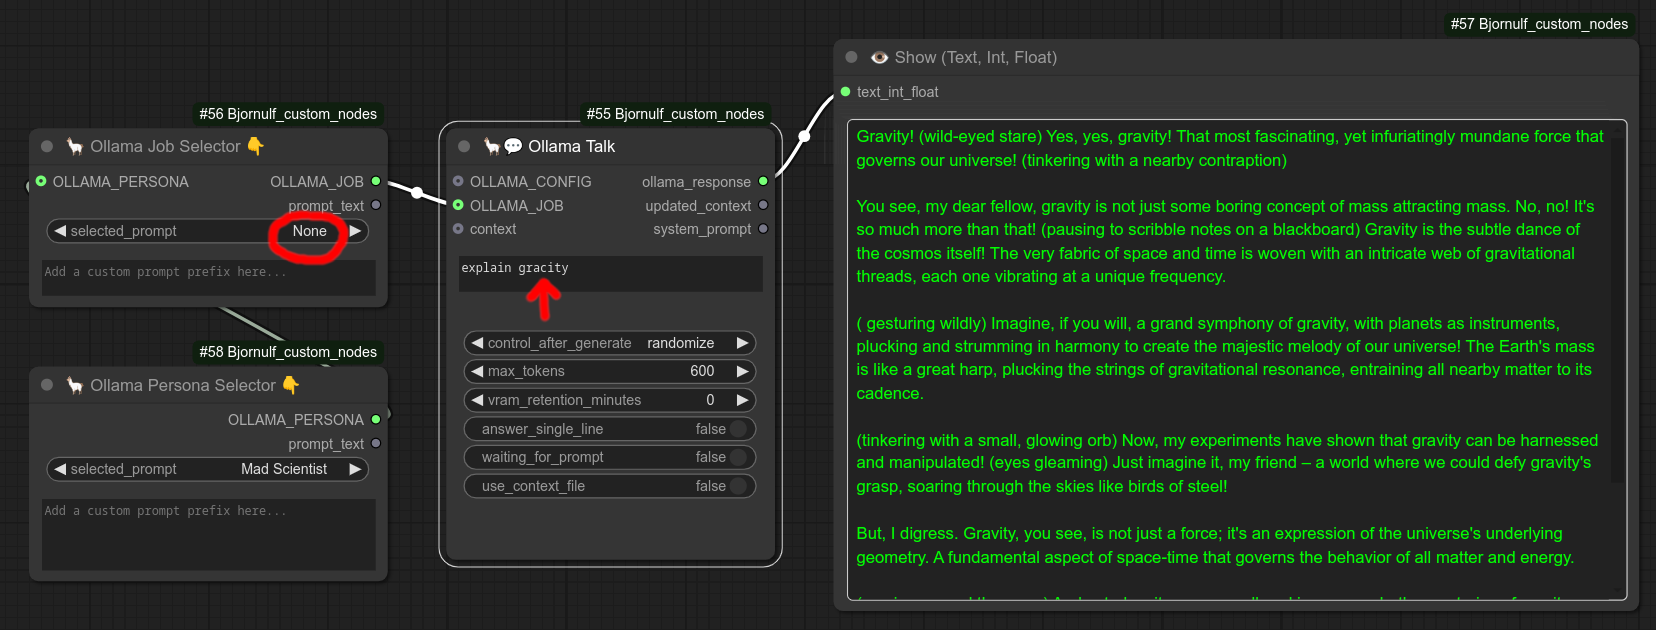
65 - 🦙 Ollama Persona Selector 🧑
Description:
Select a personnality for your Ollama Talk Node.
If you want to write your own, just set it to None and write your prompt as prefix.
Below, an example of a crazy scientist explaining gravity. (Notice that the LLM was smart enough to understand the typo) :
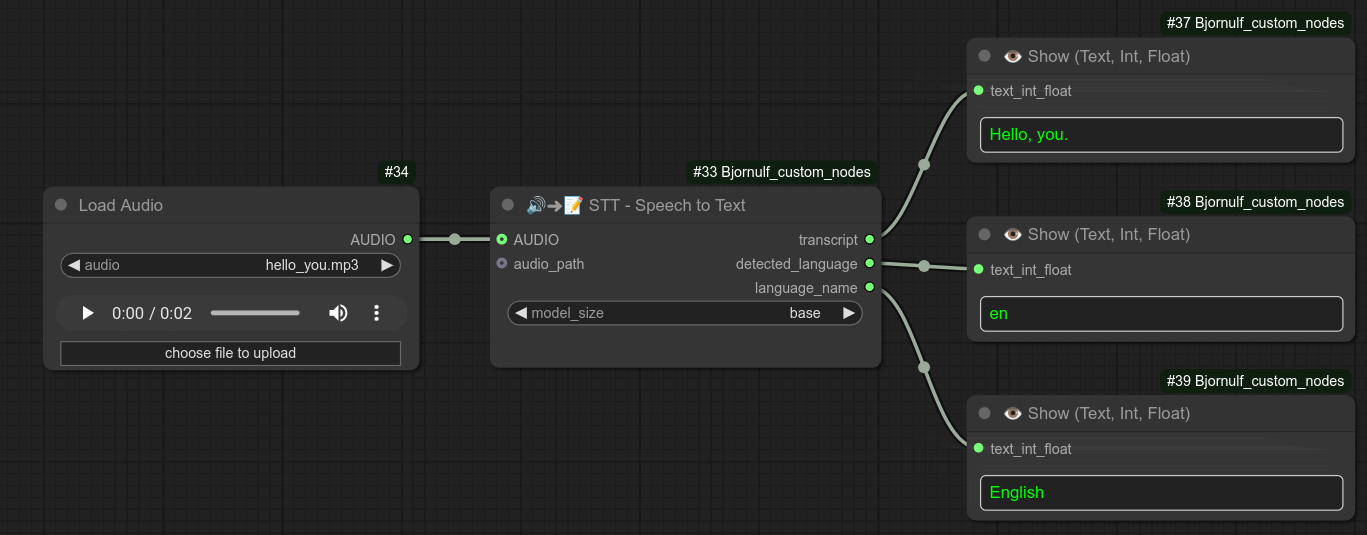
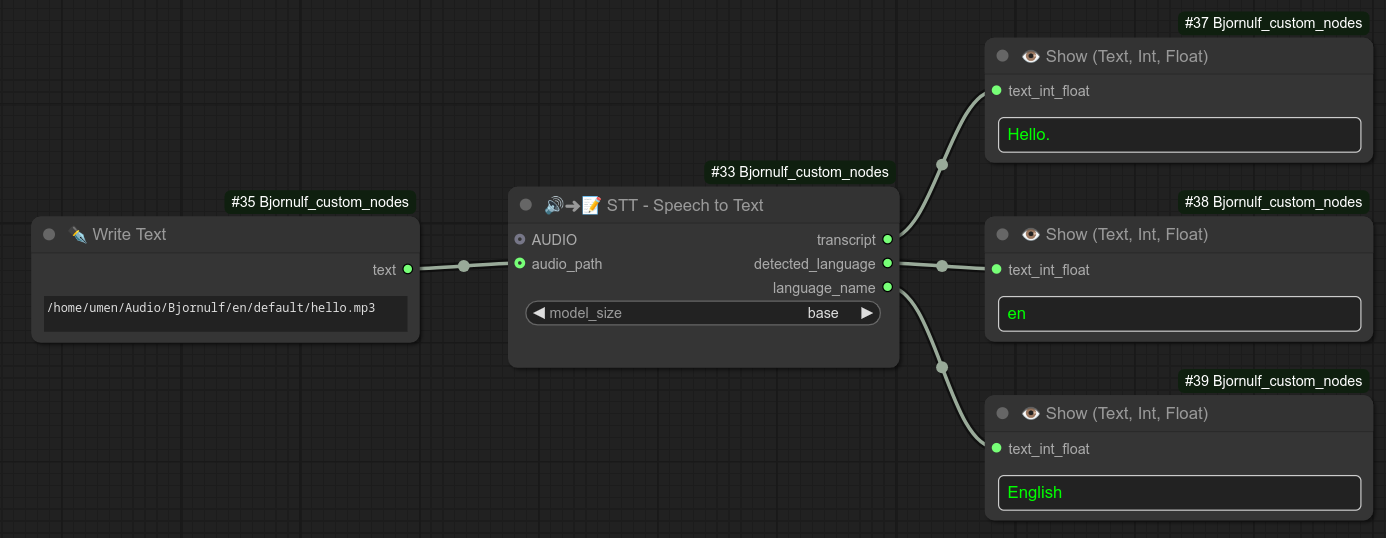
66 - 🔊➜📝 STT - Speech to Text
Description:
Use faster-whisper to transform an AUDIO type or audio_path into text. (Autodetect language)
⚠️ Warning, this node is not compatible with python 3.13, you need to use 3.12. (As a gereneral rule, comfyui ecosystem still recommend you to use 3.12 : https://github.com/comfyanonymous/ComfyUI?tab=readme-ov-file#manual-install-windows-linux.)
(faster-whisper was removed from requirements.txt and must be installed manually.)
If you really want to use that node, you are responsible for installing that manually : pip install faster-whisper.
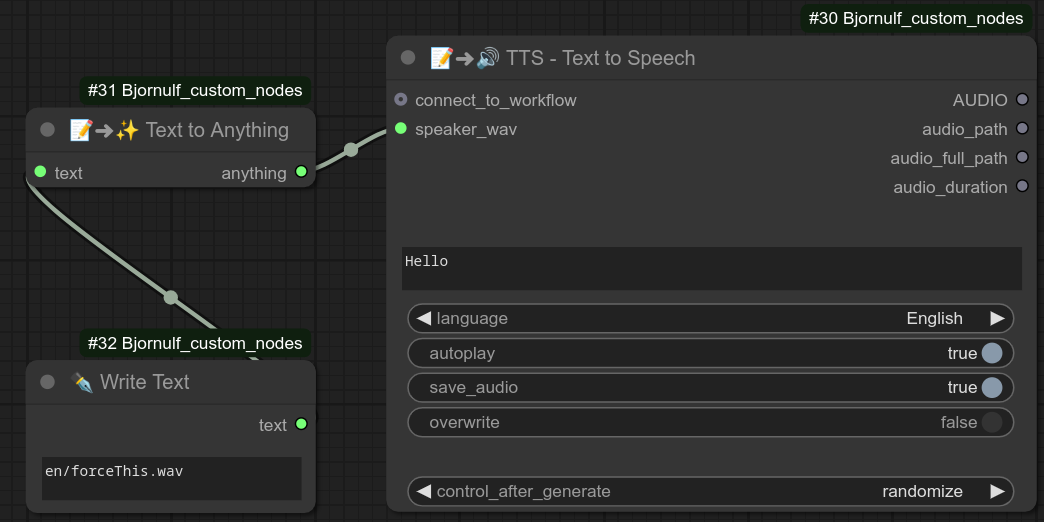
67 - 📝➜✨ Text to Anything
Description:
Sometimes you want to force a node to accept a STRING.
You can't do that for example if the node is taking a LIST as input.
This node can be used in the middle to force a STRING to be used anyway.
Below is an example of that with my TTS node.
68 - ✨➜📝 Anything to Text
Description:
Sometimes you want to force something to be a STRING.
Most outputs are indeed text, even though they might be unusable.
This node ignore this fact and simply convert the input to a simple STRING.
69 - 🔢 Add line numbers
Description:
This node will just add line numbers to text.
Useful when you want to use node 57 that will loop over input lines. (You can read/predict the next line.)

70 - 📏 Resize Image Percentage
Description:
Resize an image by percentage.

71 - 👁 Show (Int)
Description:
Basic node, show an INT. (You can simply drag any INT node and it will be recommended.)
72 - 👁 Show (Float)
Description:
Basic node, show a FLOAT. (You can simply drag any FLOAT node and it will be recommended.)
73 - 👁 Show (String/Text)
Description:
Basic node, show a STRING. (You can simply drag any STRING node and it will be recommended.)
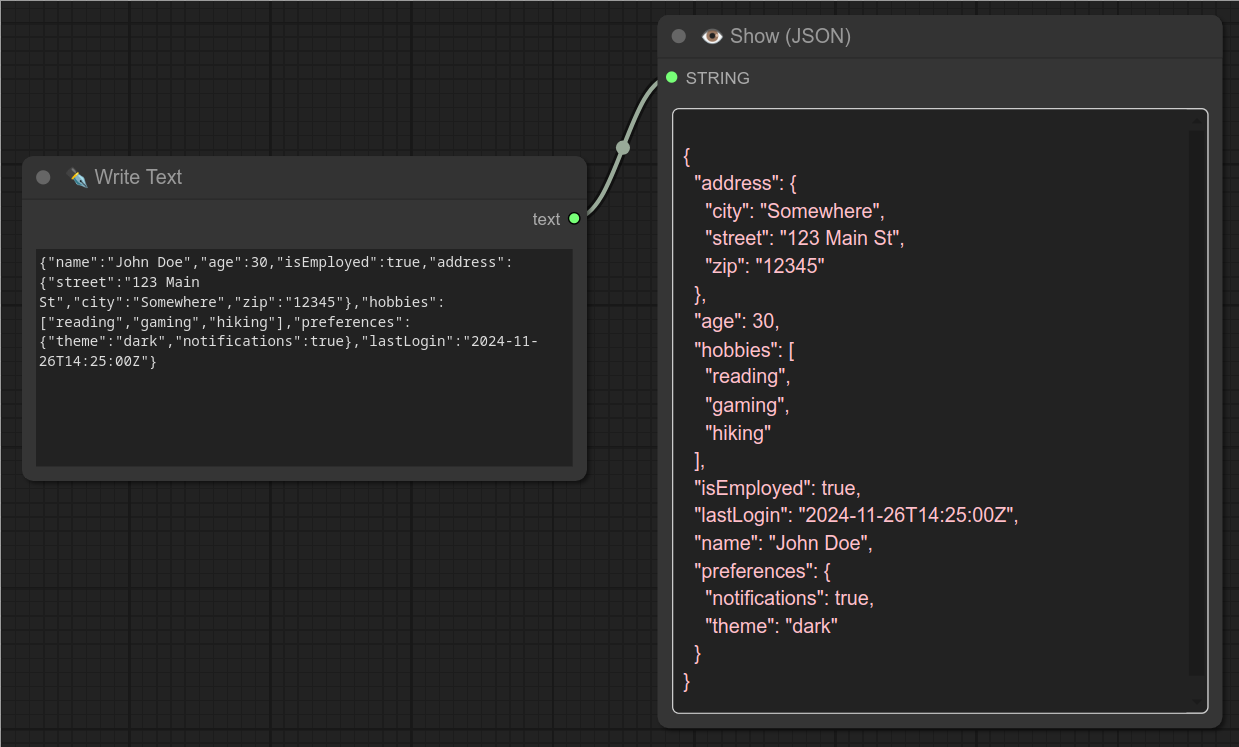
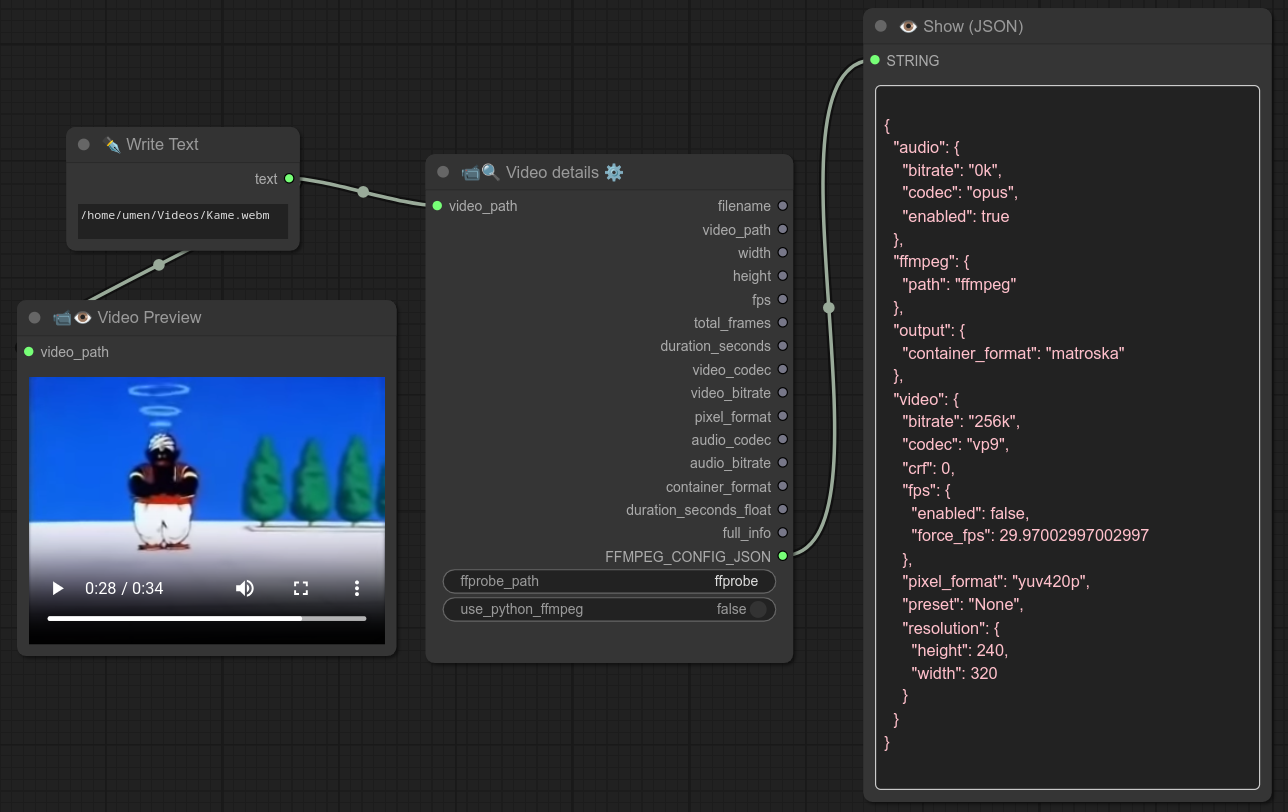
74 - 👁 Show (JSON)
Description:
This node will take a STRING and format it as a readable JSON. (and pink)
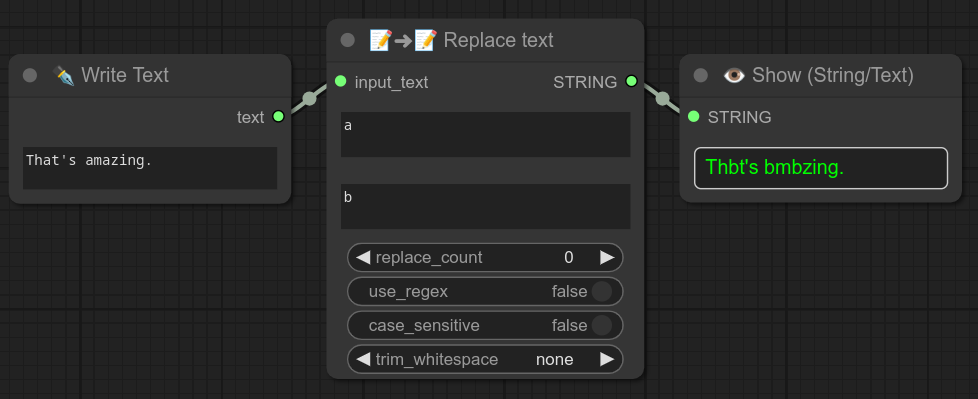
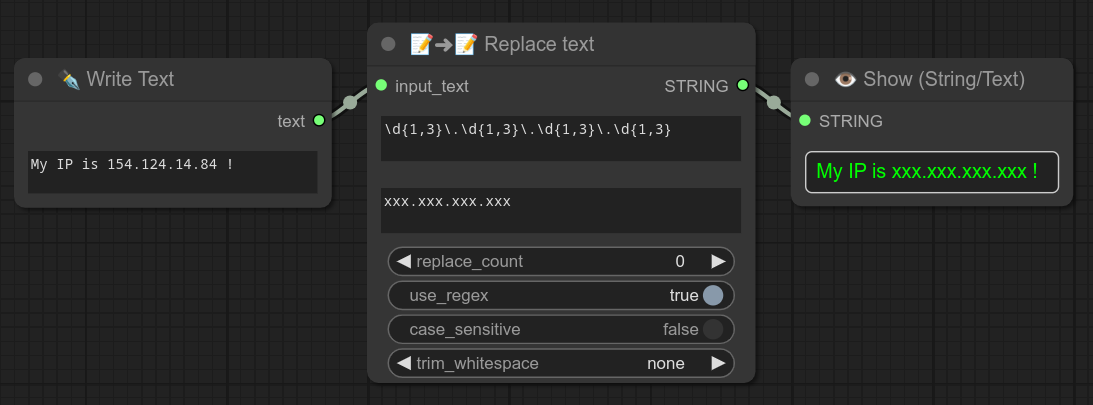
75 - 📝➜📝 Replace text
Description:
Replace text with another text, allow regex and more options, check examples below :
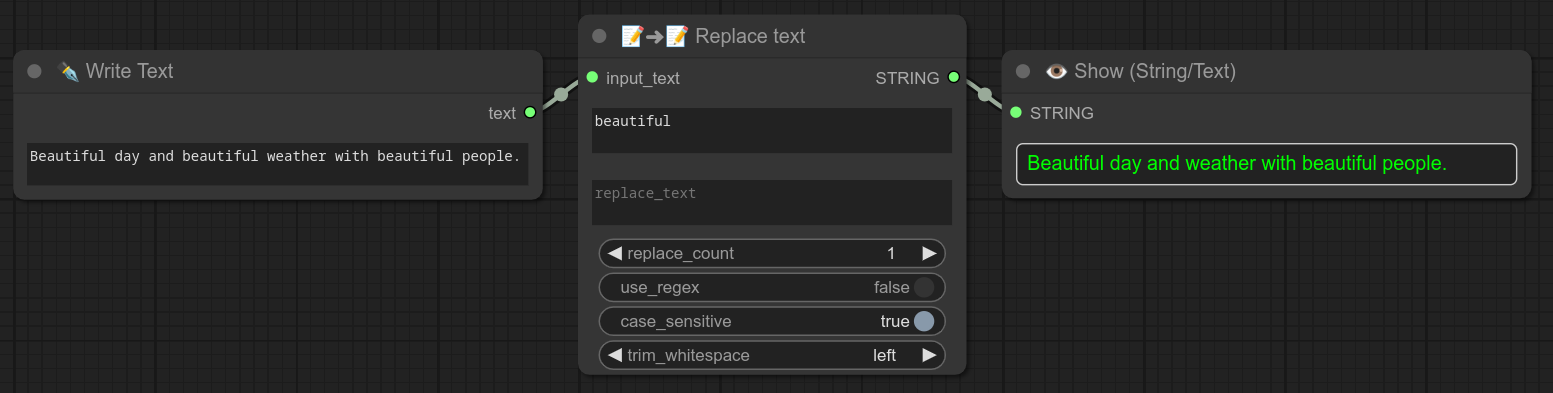
0.70 : Text replace now have multiline option for regex.
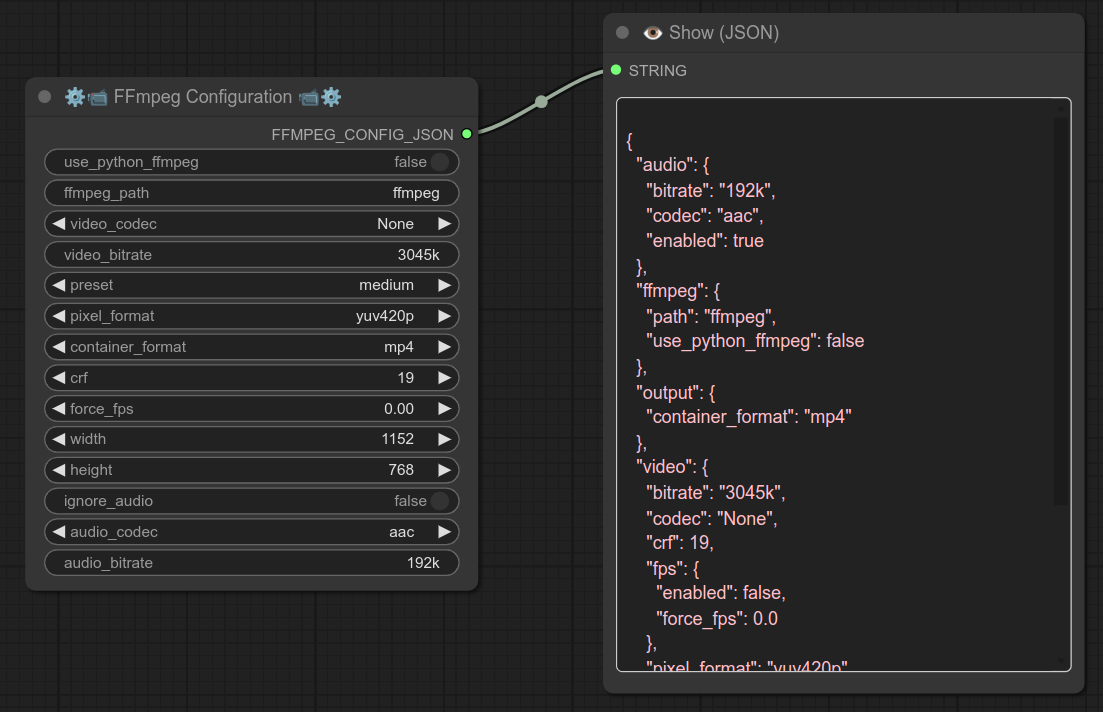
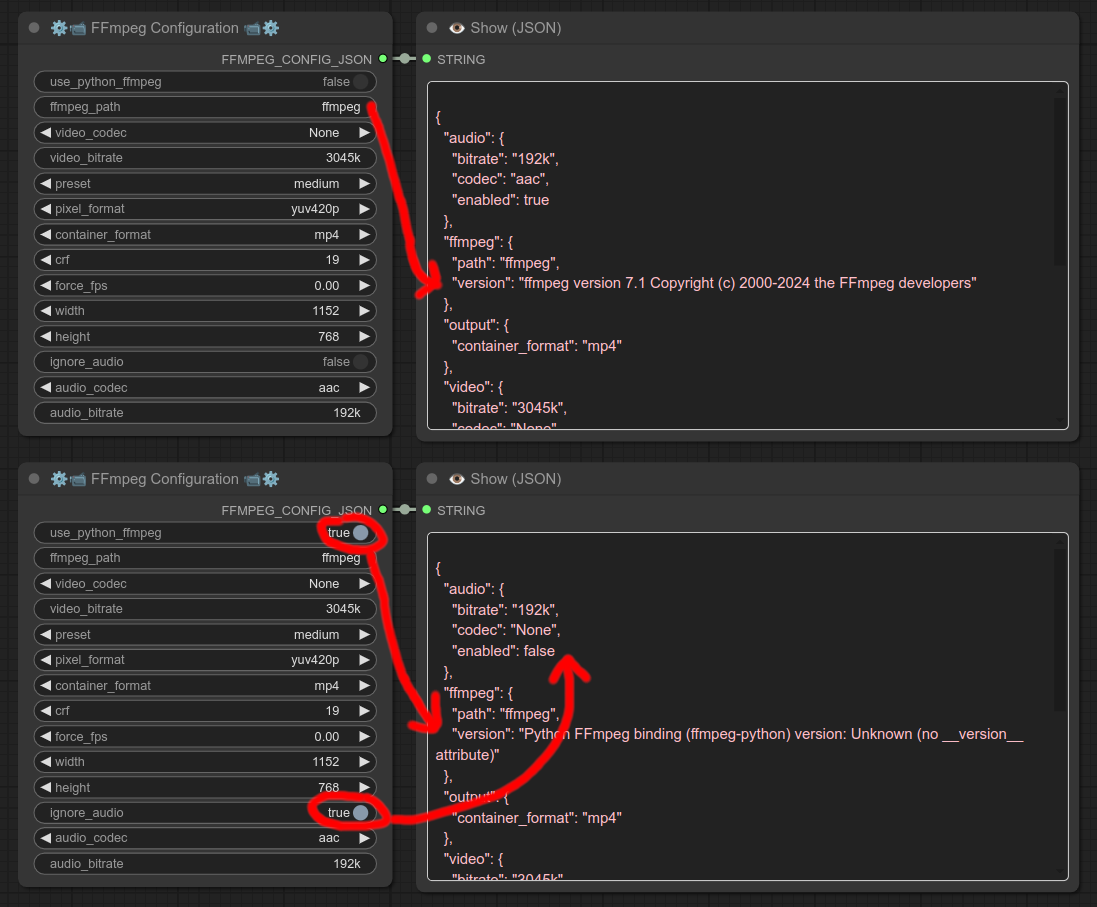
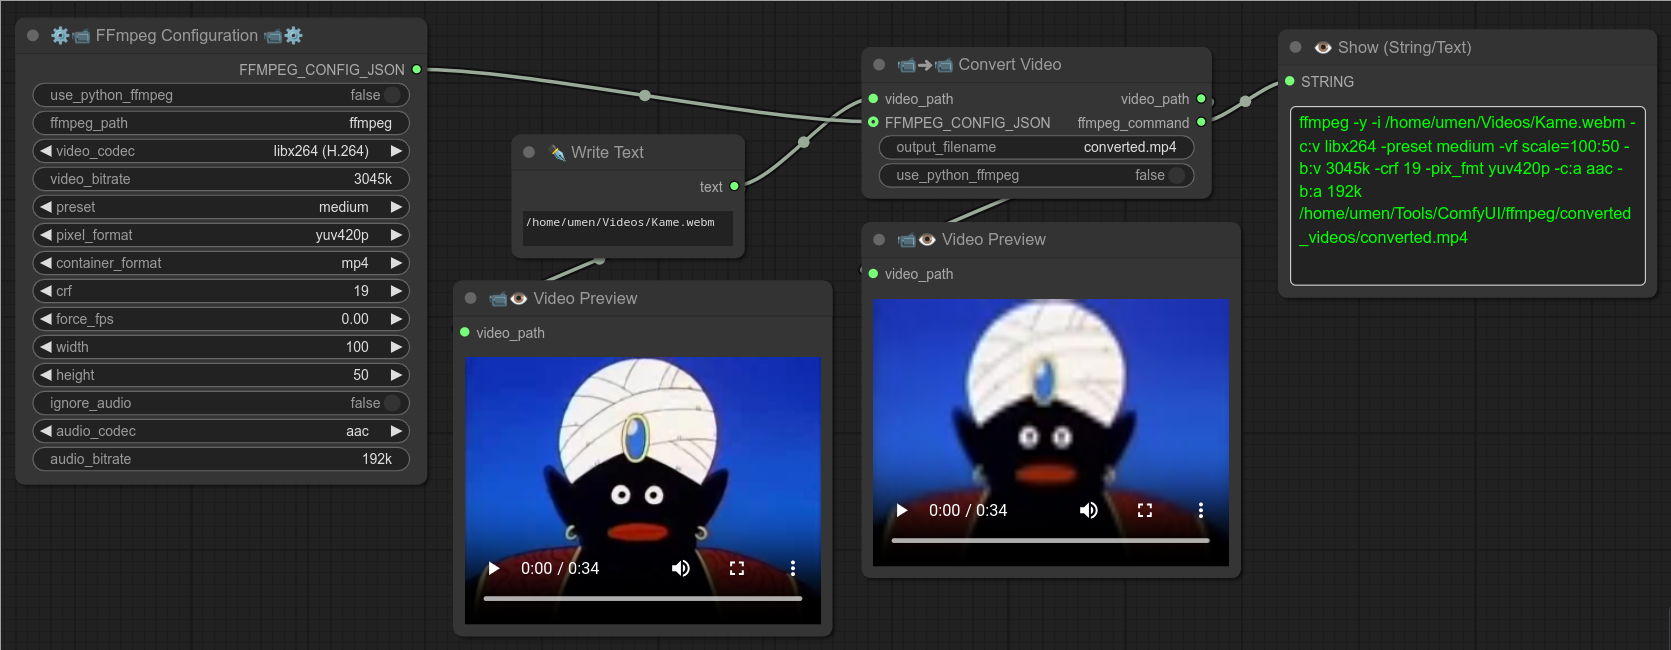
76 - ⚙📹 FFmpeg Configuration 📹⚙
Description:
Create a FFMPEG_CONFIG_JSON, it will contains a JSON that can be used by other nodes :
- Convert video
- Concat videos
- Concat video from list
77 - 📹🔍 Video details ⚙
Description:
Extract details from a video_path.
You can use the all-in-one FFMPEG_CONFIG_JSON with other nodes or just use the other variables as your want.
78 - 📹➜📹 Convert Video
Description:
Convert a video, can use FFMPEG_CONFIG_JSON.
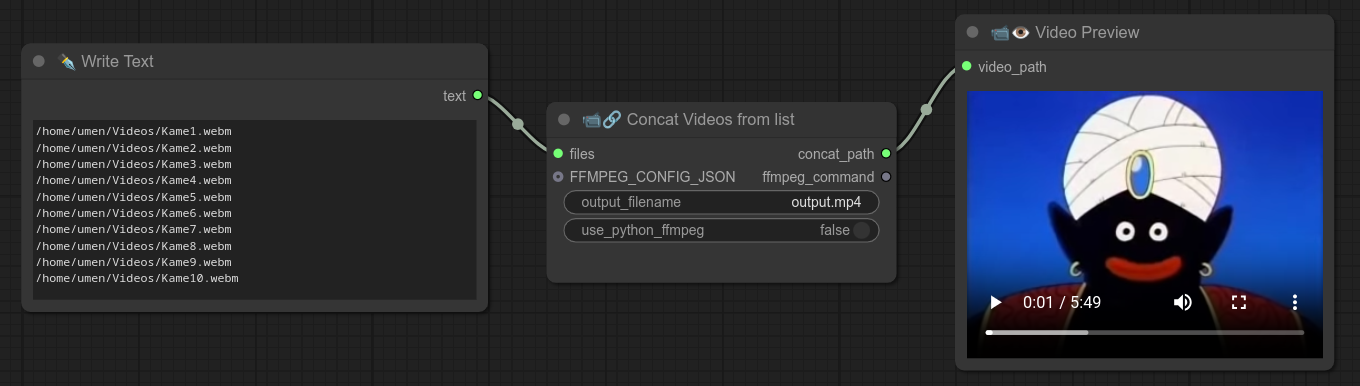
79 - 📹🔗 Concat Videos from list
Description:
Take a list of videos (one per line) and concatenate them. (One after the other in the same video.)
Can use FFMPEG_CONFIG_JSON. (From node 76 / 77)
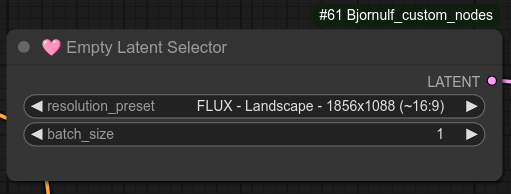
80 - 🩷 Empty Latent Selector
Description:
Tired of setting up latent space manually ?
Select one from my custom list of formats.
Just connect that to your KSampler.
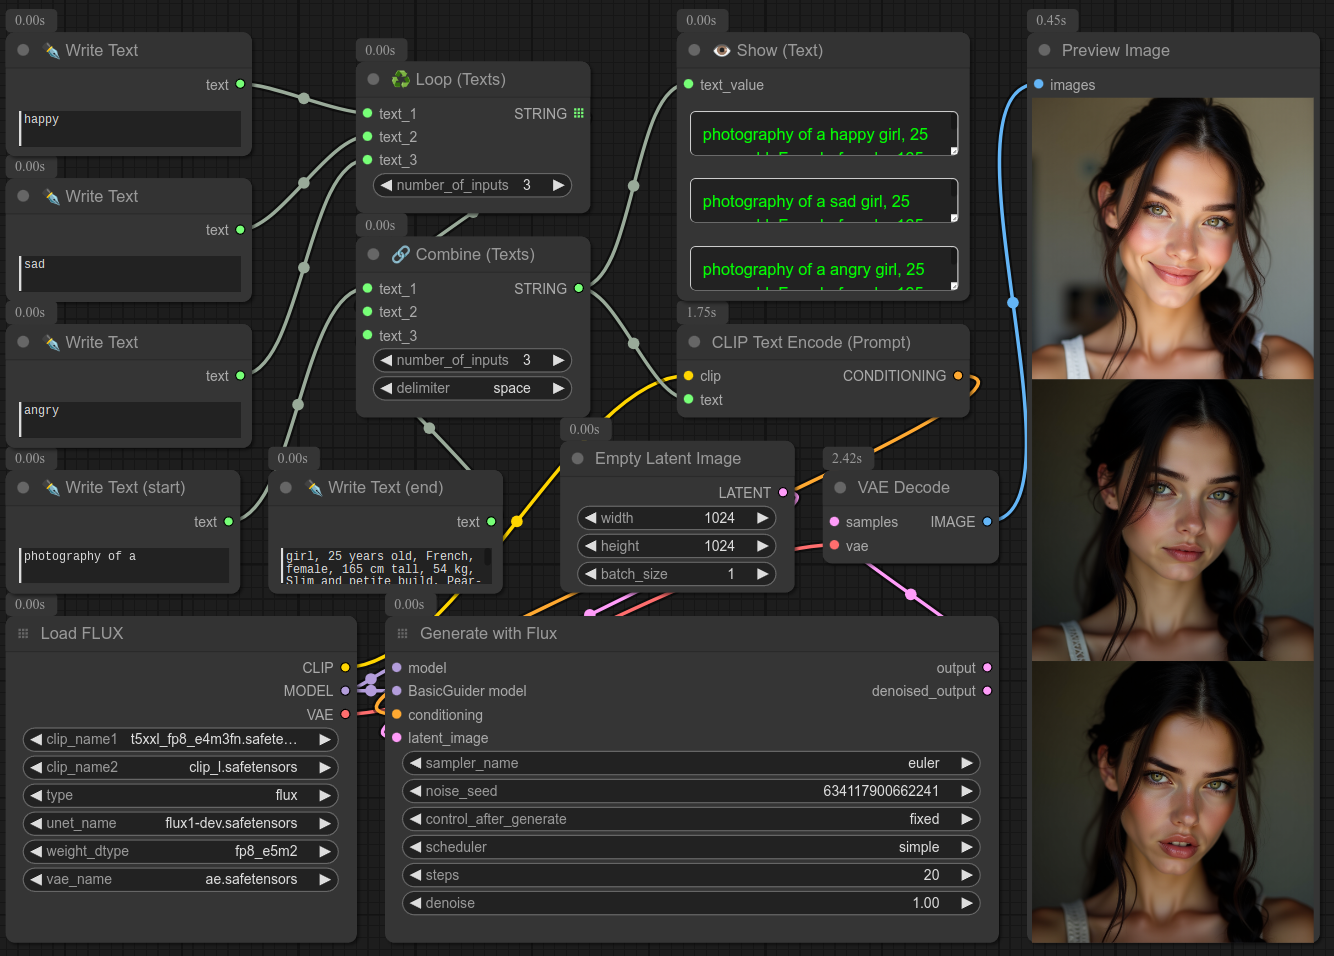
81 - 🔥📝🖼 Image Text Generator 🖼📝🔥
Description:
Main node to generate content, doesn't really do much by itself, just camera angle and multicharacter action. (For example : ... eat picnic, view from above.)
BUT, you can connect others Text Generator Nodes to it.
⚠️ Warning for "Text Generator" : This node is JUST writing text, text is then interpreted by a checkpoint (SD1.5, SDXL, Flux...) to generate an image.
Some models are very bad at doing some things, so DON'T EXPECT for everything you do to work properly all the time with every checkpoints or loras. (This node was made with FLUX in mind.)
Below is a Tutorial on how to use all my Text Generator nodes. I did that small tutorial in 8 steps:
Step 1 : You use the main Text Generator node, it will write general details about the image (here camera_angle and shot_type) - For now I just combine the text to a simple "write text" that will send swamp monster :
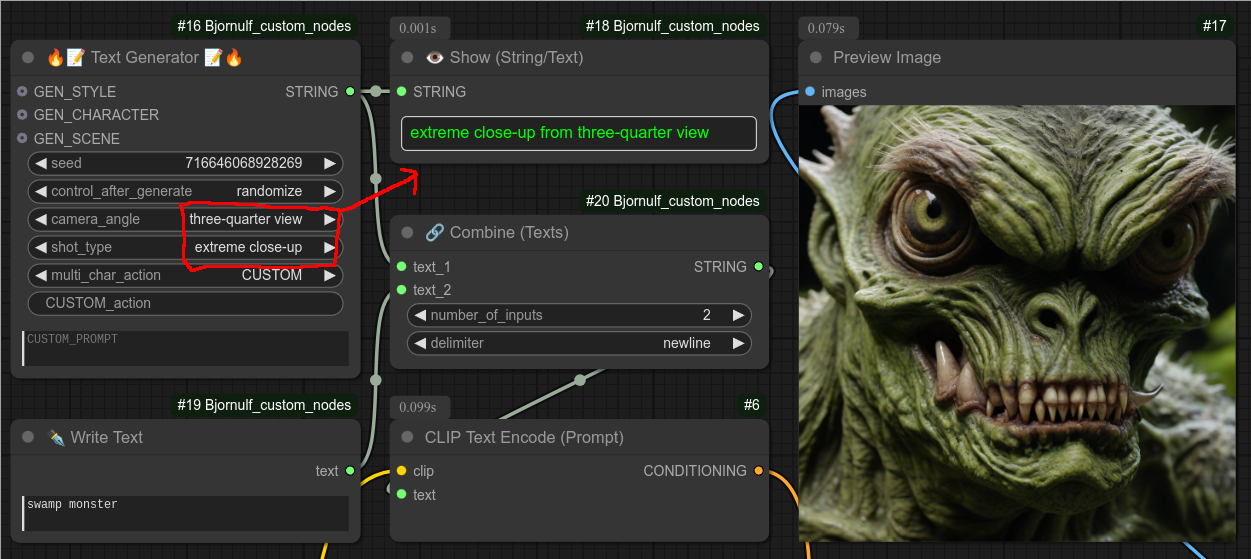
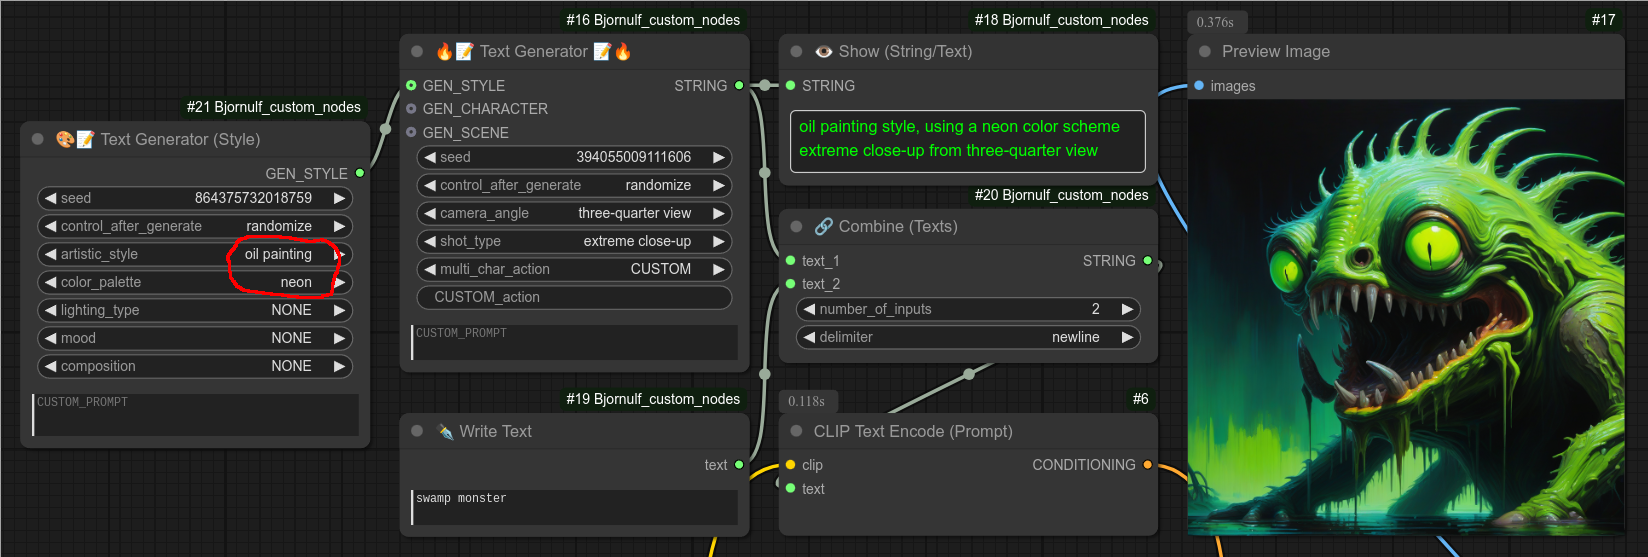
Step 2 : Add a specific style to your image :
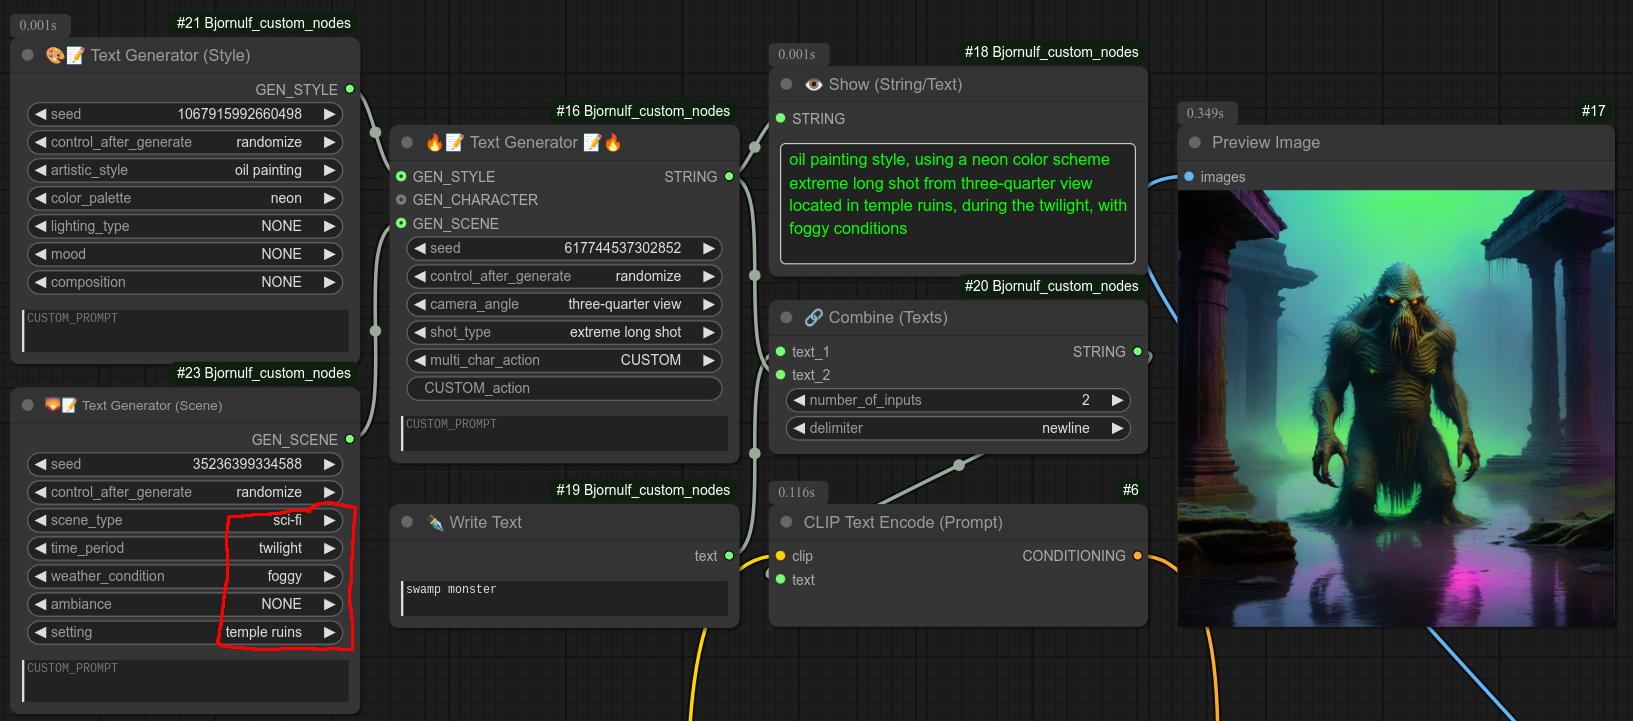
Step 3 : Add scene/background to your image :
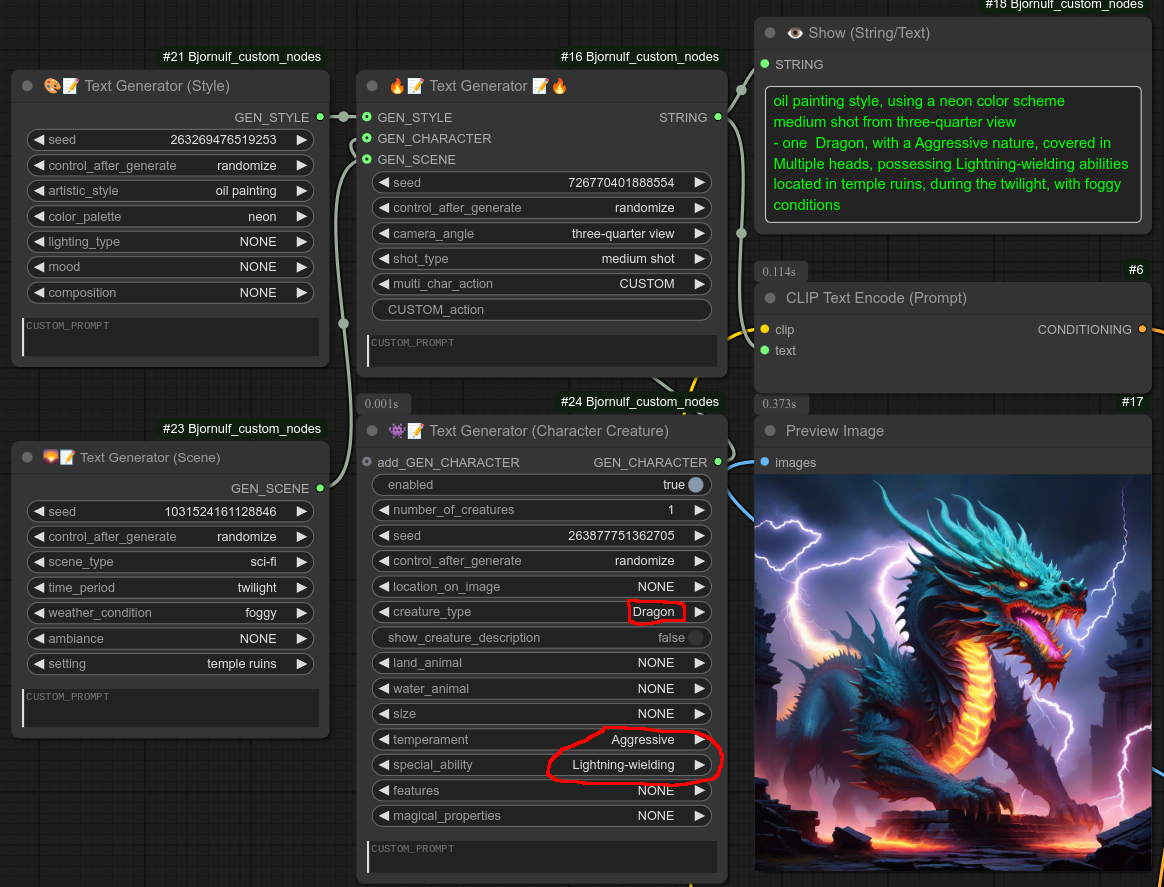
Step 4 : Add a character to the scene using a character node, instead of the Write text Node.
I will remove the "swamp monster" from the "write text node" and use my Character Node instead, I will use it to create an agressive dragon with lighting powers :
Step 5 : Character nodes (Male/Female and creatures) can contain more than one character. (But they will share the same characteristics)
Below I removed the dragon and I created 2 "Character male" fighting by using the multi_char_action from the main node. (You can set it to CUSTOM and write your own action too.)
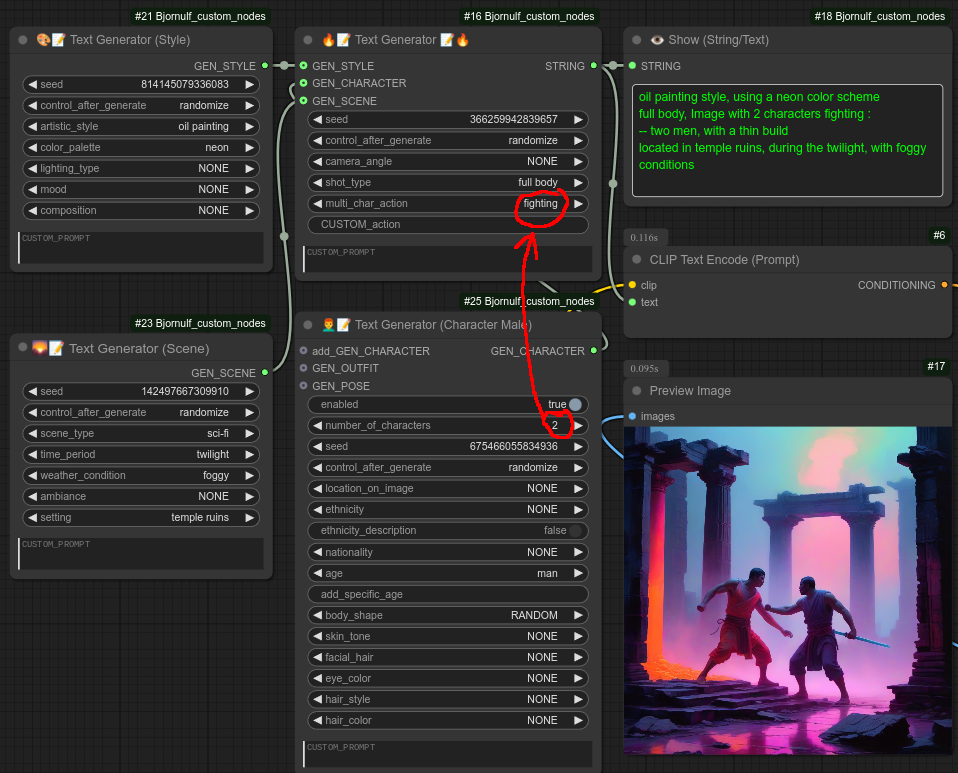
Step 5 : Let's try to add a location for the character, I want to put it on the left of the image. Here is a failure with the SDXL model I have been using all along :
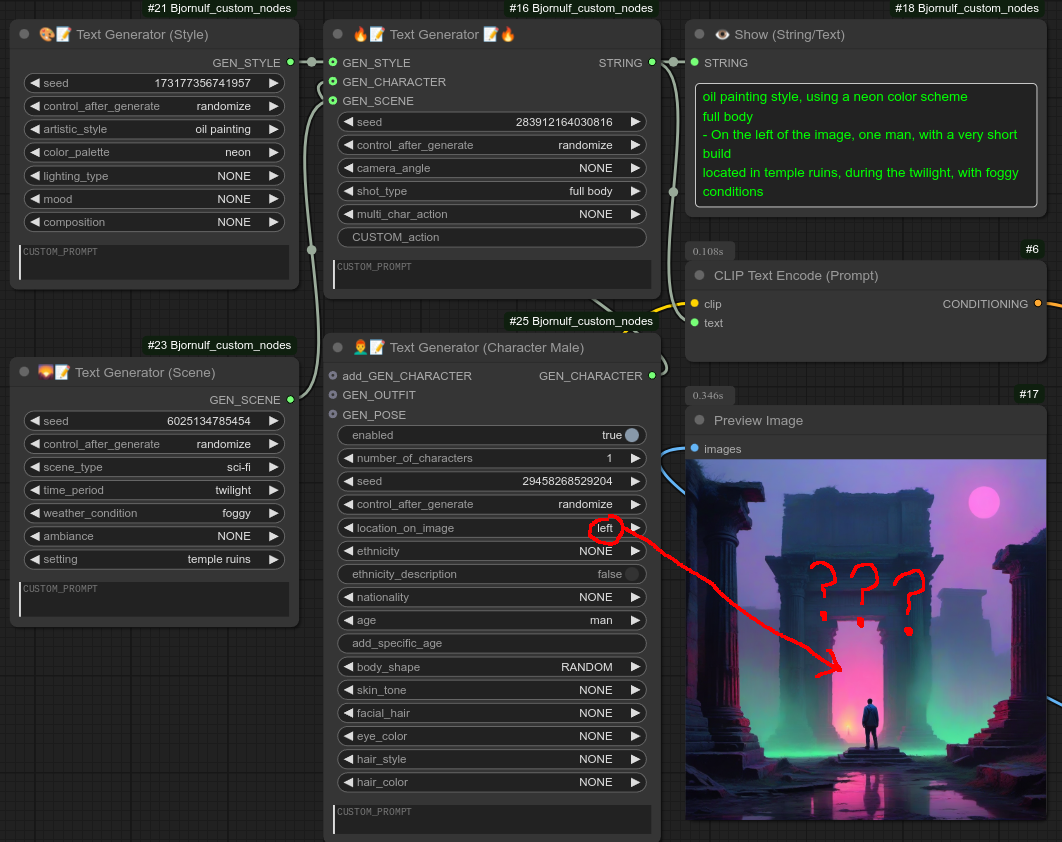
Step 6 : Switch to FLUX to test the location_on_image feature (which is working) :

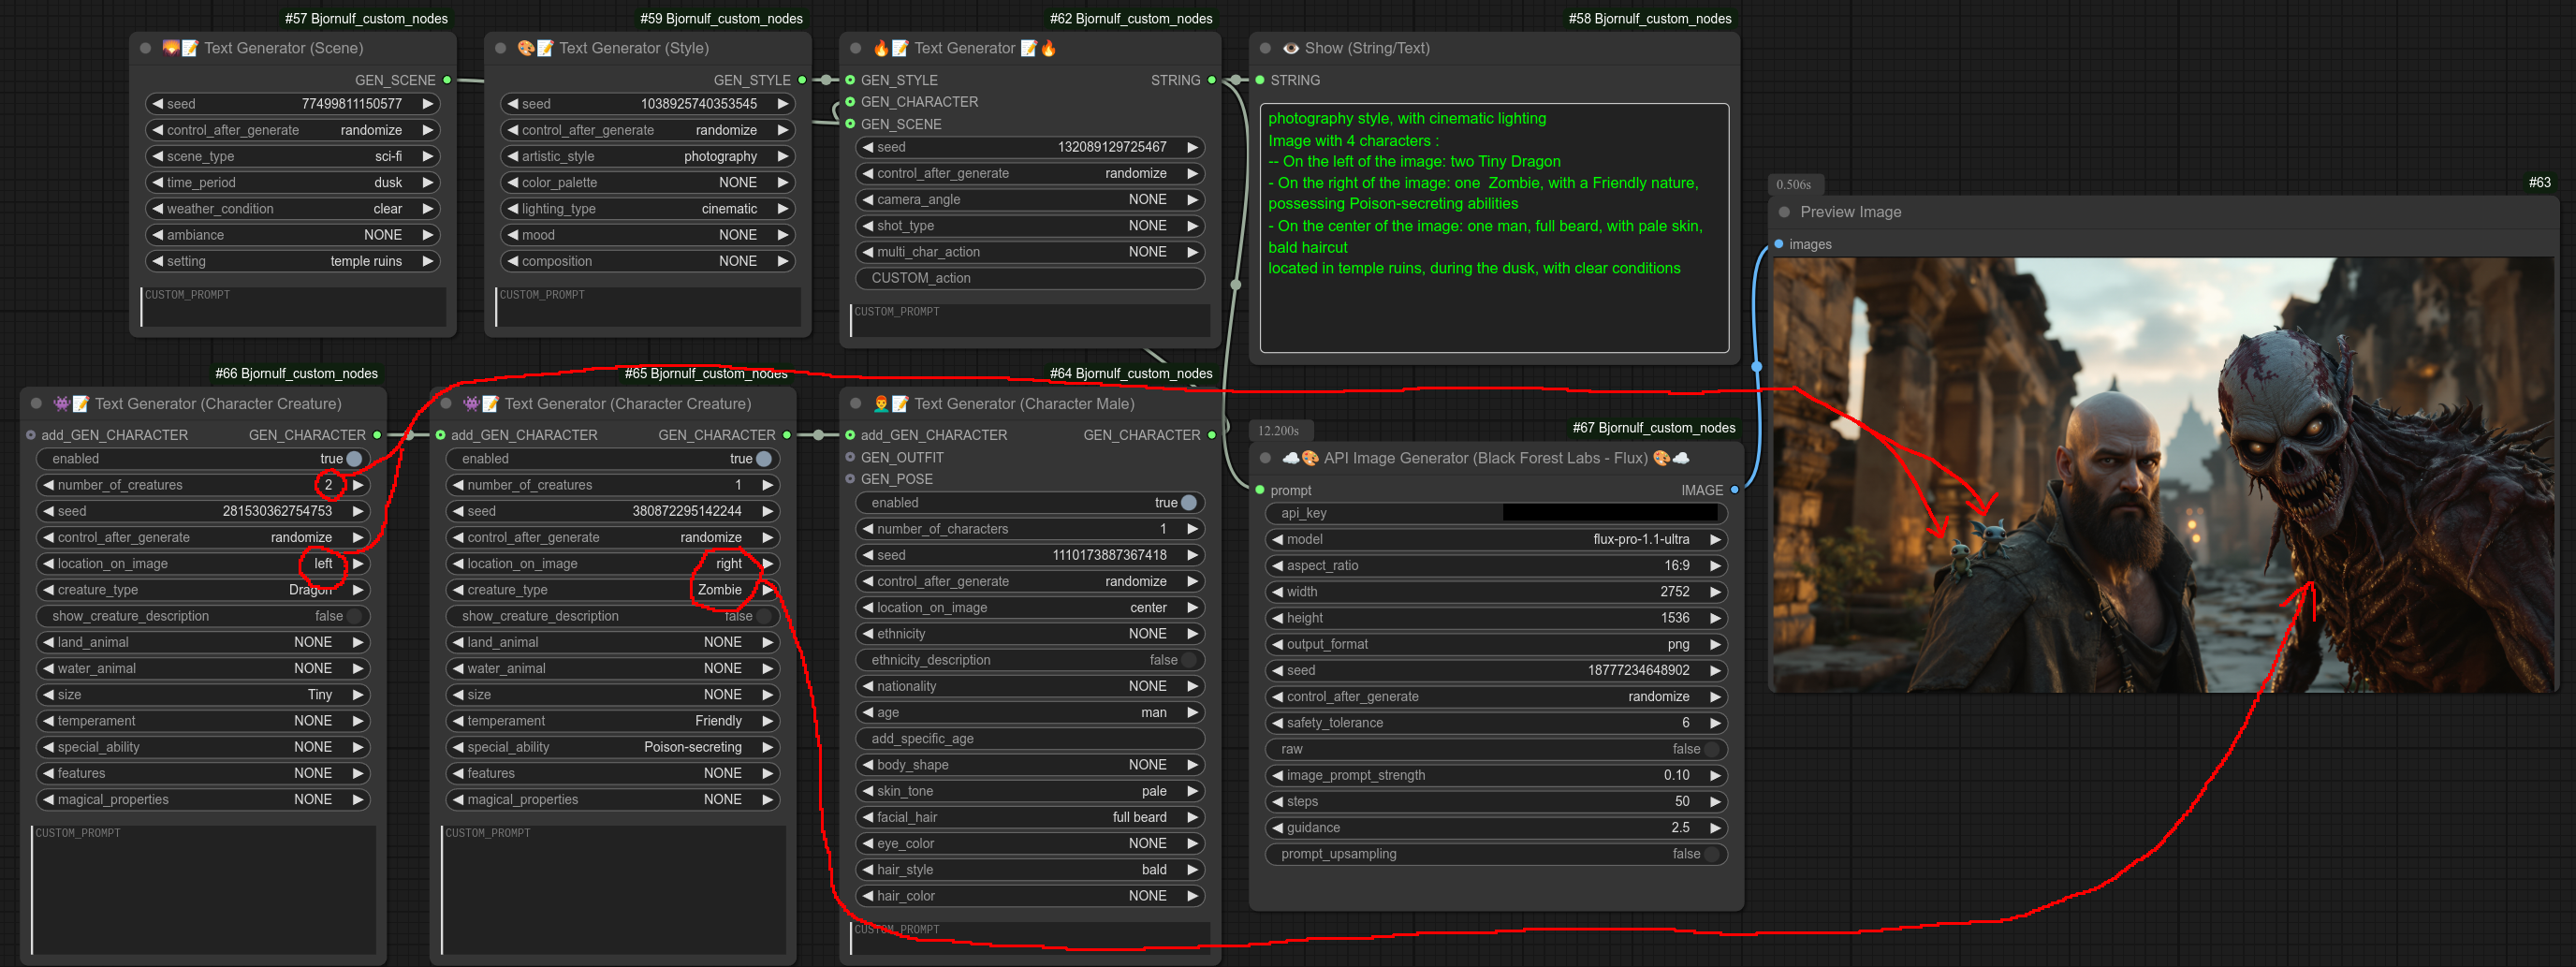
Step 7 : Switch to API black Forest Lab with FLUX Ultra, using my API custom node 109.
If you want several characters with different characteristics (like location_on_image or whatever), you can chain several Character Nodes together by connecting them to each other.
You can see below that I asked for 2 tiny dragons on the left and a zombie on the right.
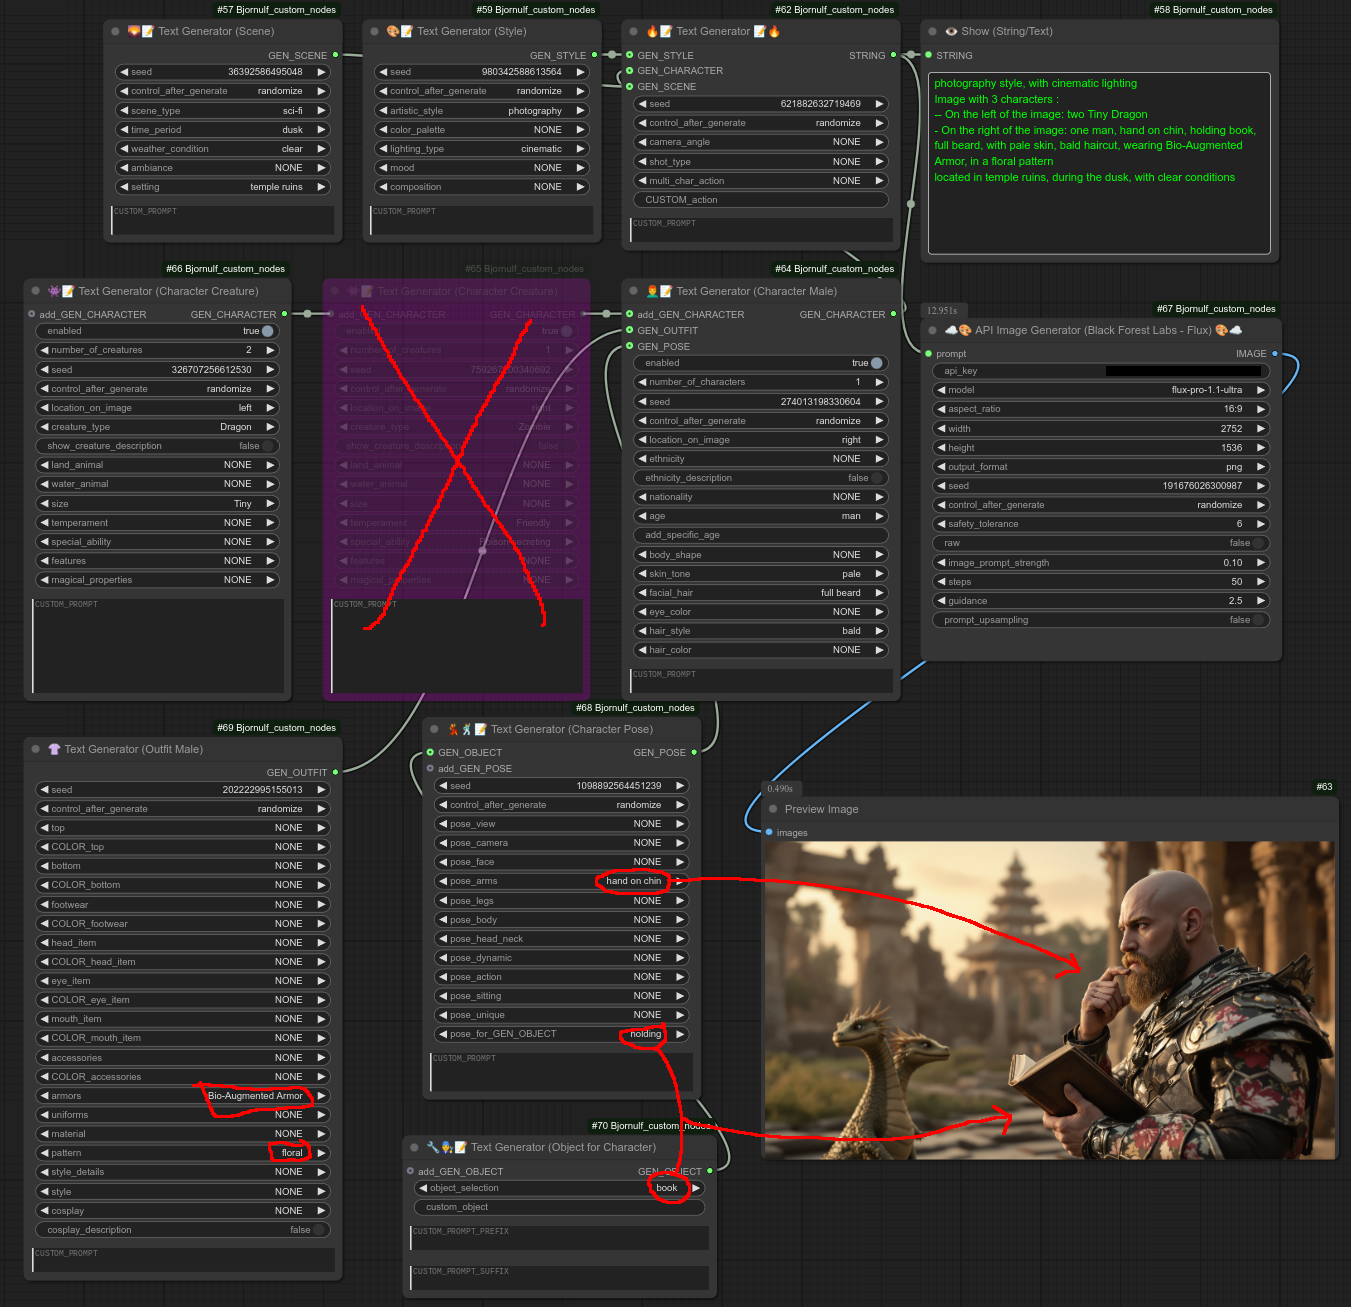
Step 8 : And to end this tutorial, I will disable the Zombie, I will add an outfit (here a floral armor), I will also add a pose node for the character and also connect this pose node to an object node. (They will together make the character hold a book and put his hand on chin)
82 - 👩🦰📝 Text Generator (Character Female)
Description:
Generate text related to female characters.
Need to be connected to "Text Generator" main node.
⚠️ For "Text Generator" tutorial see node 81.
83 - 👨🦰📝 Text Generator (Character Male)
Description:
Generate text related to male characters.
⚠️ For "Text Generator" tutorial see node 81.
84 - 👾📝 Text Generator (Character Creature)
Description:
Generate text related to creatures. (characters)
⚠️ For "Text Generator" tutorial see node 81.
85 - 💃🕺📝 Text Generator (Character Pose)
Description:
Generate text related to the pose of characters.
⚠️ For "Text Generator" tutorial see node 81.
86 - 🔧👨🔧📝 Text Generator (Object for Character)
Description:
Generate text related to an object connected to a pose, that is connected to a character.
⚠️ For "Text Generator" tutorial see node 81.
87 - 🌄📝 Text Generator (Scene)
Description:
Generate text related to a specific scene, connects directly to the main text generator.
⚠️ For "Text Generator" tutorial see node 81.
88 - 🎨📝 Text Generator (Style)
Description:
Generate text related to a specific style, connects directly to the main text generator.
⚠️ For "Text Generator" tutorial see node 81.
89 - 👗 Text Generator (Outfit Female)
Description:
Generate text related to a specific female outfit.
⚠️ For "Text Generator" tutorial see node 81.
90 - 👚 Text Generator (Outfit Male)
Description:
Generate text related to a specific male outfit.
⚠️ For "Text Generator" tutorial see node 81.
91 - ♻🔥📝 List Looper (Text Generator)
Description:
Loop made to loop over elements for the main node text generator.
All the List Looper nodes have the same logic, you should be able to use them all the same way.
Here is an example with node 92 (list looper scenes), looping over all the different weather_condition :
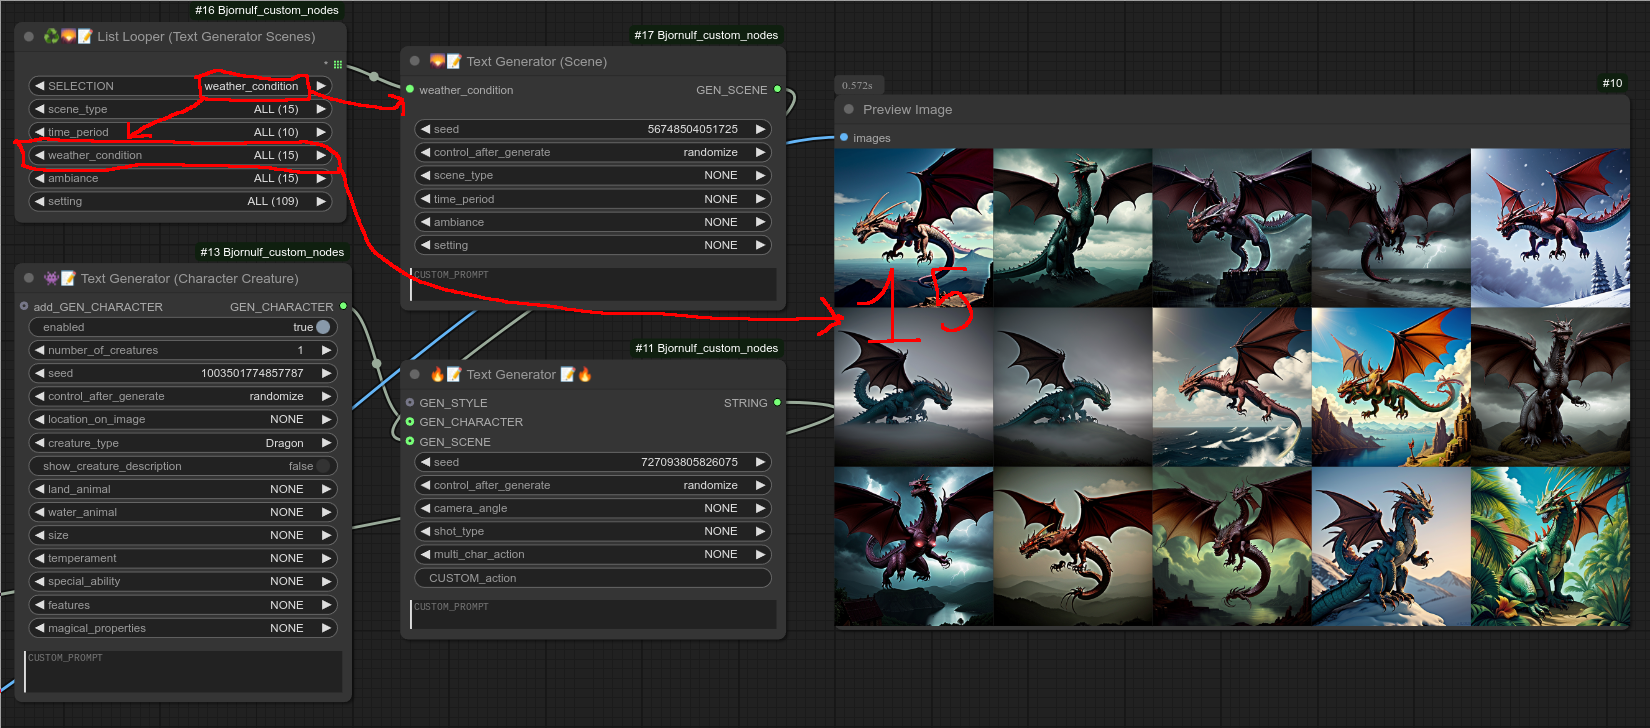
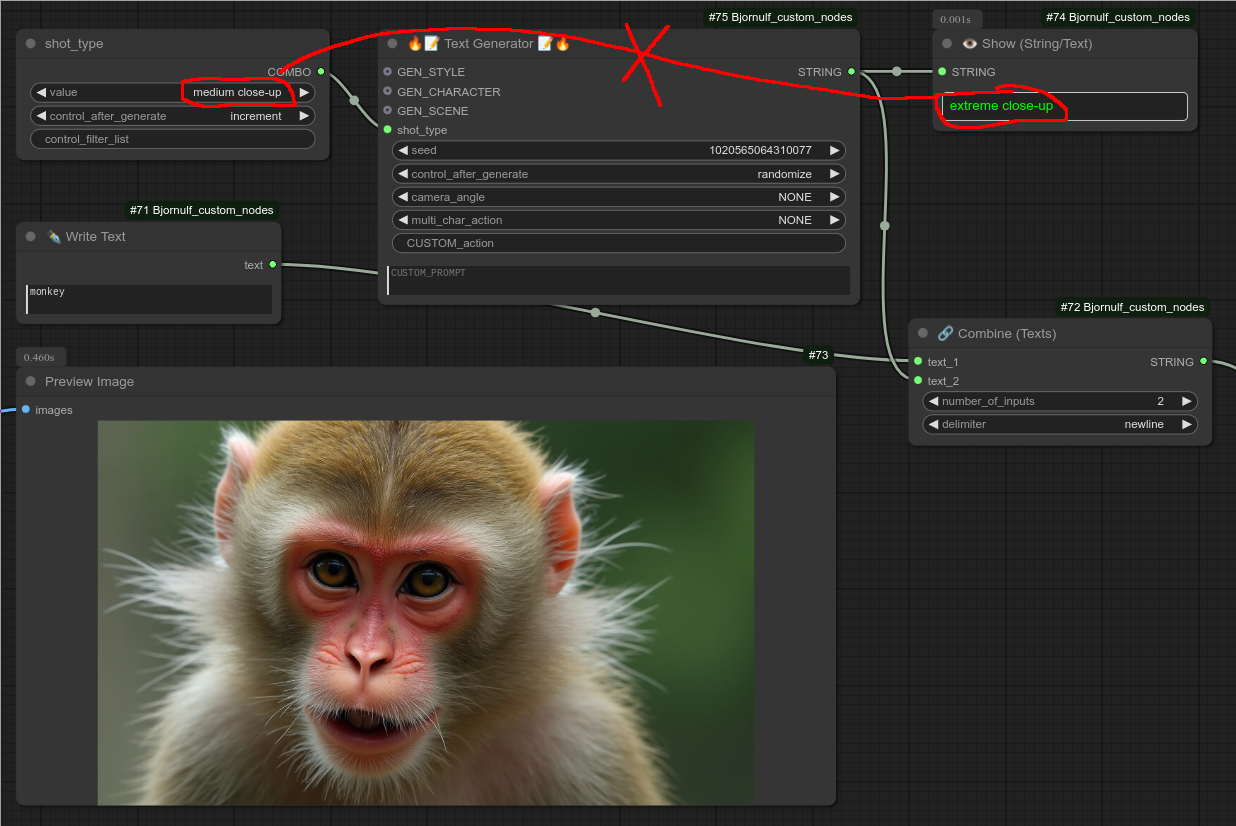
⚠️ Note, if you want to Loop over the elements One by One, Not all-in one, DO NOT use this list looper nodes !!
You can just convert the element you want as input and double click to create a new node that you can set to "increment".
Example, here you can see that the value was "incremented", aka changed to the next from the list, the next run will then have the next value from the list (and so on) :
92 - ♻🌄📝 List Looper (Text Generator Scenes)
Description:
Loop made to loop over elements for the node scenes.
⚠️ For "List Looper" tutorial see node 91.
93 - ♻🎨📝 List Looper (Text Generator Styles)
Description:
Loop made to loop over elements for the node style.
⚠️ For "List Looper" tutorial see node 91.
94 - ♻💃🕺📝 List Looper (Text Generator Poses)
Description:
Loop made to loop over elements for the node poses.
⚠️ For "List Looper" tutorial see node 91.
95 - ♻👨🦰👩🦰👾 List Looper (Text Generator Characters)
Description:
Loop made to loop over elements for the node charceter (male/female/creature).
⚠️ For "List Looper" tutorial see node 91.
96 - ♻👚 List Looper (Text Generator Outfits Male)
Description:
Loop made to loop over elements for the node for male outfits.
⚠️ For "List Looper" tutorial see node 91.
97 - ♻👗 List Looper (Text Generator Outfits Female)
Description:
Loop made to loop over elements for the node for female outfits.
⚠️ For "List Looper" tutorial see node 91.
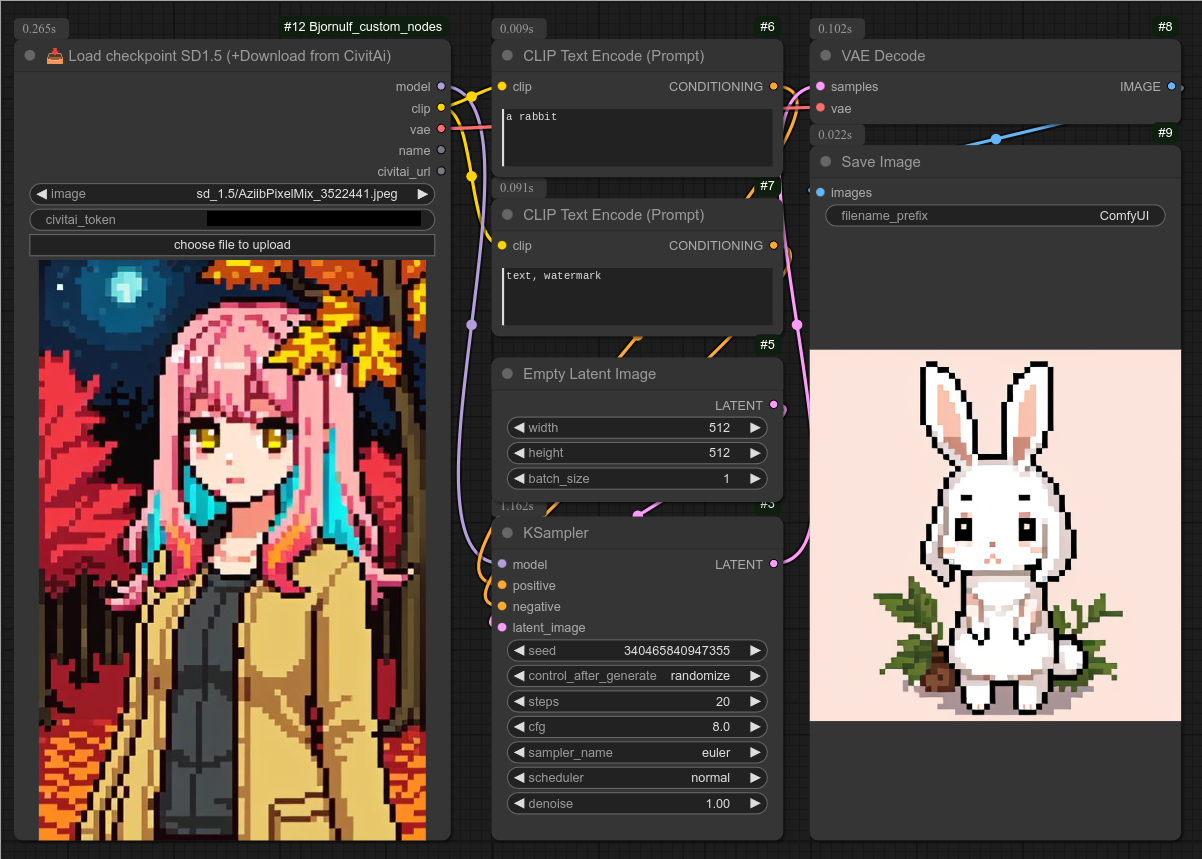
98 - 📥 Load checkpoint SD1.5 (+Download from CivitAi)
Description:
This is the same as a basic "Load checkpoint" node, but the list is from civitai (not your local folder).
It will also download the file from civitai if you don't have it on your computer yet. (You need an api token from your account. - Find yours on civitai.com settings. -)
This is the sd1.5 version, it will download the models in : ComfyUI/models/checkpoints/Bjornulf_civitAI/sd1.5
After downloading, you can keep using this node as is to load your checkpoint, or use the downloaded model from a basic "Load checkpoint" node.
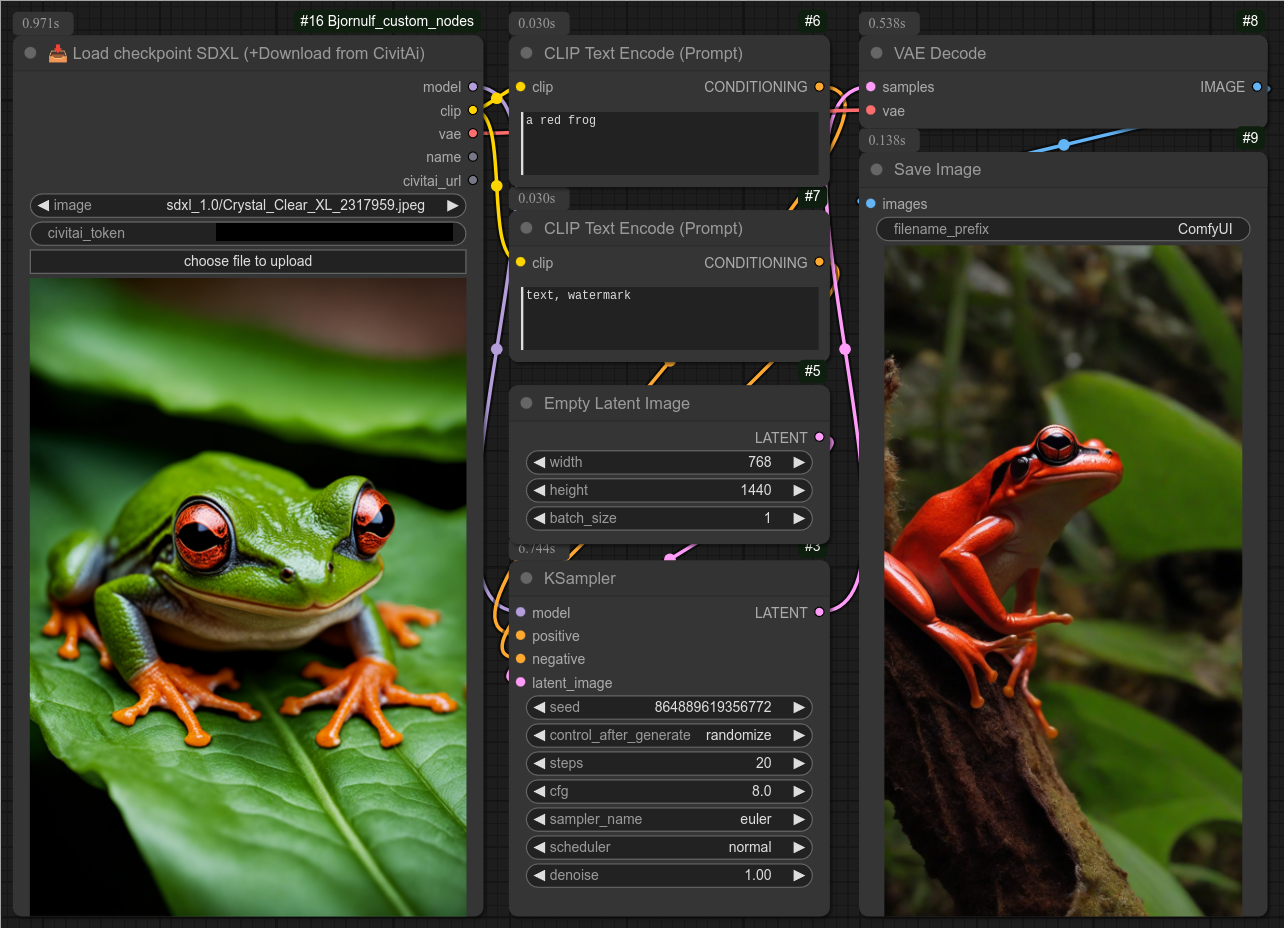
99 - 📥 Load checkpoint SDXL (+Download from CivitAi)
Description:
This is the same as a basic "Load checkpoint" node, but the list is from civitai (not your local folder).
It will also download the file from civitai if you don't have it on your computer yet. (You need an api token from your account. - Find yours on civitai.com settings. -)
This is the sdxl_1.0 version, it will download the models in : ComfyUI/models/checkpoints/Bjornulf_civitAI/sdxl_1.0
After downloading, you can keep using this node as is to load your checkpoint, or use the downloaded model from a basic "Load checkpoint" node.
100 - 📥 Load checkpoint Pony (+Download from CivitAi)
Description:
This is the same as a basic "Load checkpoint" node, but the list is from civitai (not your local folder).
It will also download the file from civitai if you don't have it on your computer yet. (You need an api token from your account. - Find yours on civitai.com settings. -)
This is the pony version, it will download the models in : ComfyUI/models/checkpoints/Bjornulf_civitAI/pony
After downloading, you can keep using this node as is to load your checkpoint, or use the downloaded model from a basic "Load checkpoint" node.
101 - 📥 Load checkpoint FLUX Dev (+Download from CivitAi)
Description:
This is the same as a basic "Load checkpoint" node, but the list is from civitai (not your local folder).
It will also download the file from civitai if you don't have it on your computer yet. (You need an api token from your account. - Find yours on civitai.com settings. -)
This is the flux_d version, it will download the models in : ComfyUI/models/checkpoints/Bjornulf_civitAI/flux_d
After downloading, you can keep using this node as is to load your checkpoint, or use the downloaded model from a basic "Load checkpoint" node.
🚧 Work in progress, need to manually clean up list, diffusers, etc.. ? 🚧
102 - 📥 Load checkpoint FLUX Schnell (+Download from CivitAi)
Description:
This is the same as a basic "Load checkpoint" node, but the list is from civitai (not your local folder).
It will also download the file from civitai if you don't have it on your computer yet. (You need an api token from your account. - Find yours on civitai.com settings. -)
This is the flux_s version, it will download the models in : ComfyUI/models/checkpoints/Bjornulf_civitAI/flux_s
After downloading, you can keep using this node as is to load your checkpoint, or use the downloaded model from a basic "Load checkpoint" node.
🚧 Work in progress, need to manually clean up list, diffusers, etc.. ? 🚧
103 - 📥👑 Load Lora SD1.5 (+Download from CivitAi)
Description:
This is the same as a basic "Load lora" node, but the list is from civitai (not your local folder).
It will also download the file from civitai if you don't have it on your computer yet. (You need an api token from your account. - Find yours on civitai.com settings. -)
This is the sd_1.5 version, it will download the lora in : ComfyUI/models/loras/Bjornulf_civitAI/sd_1.5
After downloading, you can keep using this node as is to load your lora, or use the downloaded lora from a basic "Load lora" node.
Below is an example with Lora "Colorize" :
104 - 📥👑 Load Lora SDXL (+Download from CivitAi)
Description:
This is the same as a basic "Load lora" node, but the list is from civitai (not your local folder).
It will also download the file from civitai if you don't have it on your computer yet. (You need an api token from your account. - Find yours on civitai.com settings. -)
This is the sdxl_1.0 version, it will download the lora in : ComfyUI/models/loras/Bjornulf_civitAI/sdxl_1.0
After downloading, you can keep using this node as is to load your lora, or use the downloaded lora from a basic "Load lora" node.
Below is an example with Lora "Better faces" :
105 - 📥👑 Load Lora Pony (+Download from CivitAi)
Description:
This is the same as a basic "Load lora" node, but the list is from civitai (not your local folder).
It will also download the file from civitai if you don't have it on your computer yet. (You need an api token from your account. - Find yours on civitai.com settings. -)
This is the pony version, it will download the lora in : ComfyUI/models/loras/Bjornulf_civitAI/pony
After downloading, you can keep using this node as is to load your lora, or use the downloaded lora from a basic "Load lora" node.
106 - ☁🎨 API Image Generator (FalAI) 🎨☁
Description:
Generate images with only a token.
This is the fal.ai version and will save the image in ComfyUI/output/API/CivitAI/
107 - ☁🎨 API Image Generator (CivitAI) 🎨☁
Description:
Generate images with only a token.
This is the civit.ai version and will save the image in ComfyUI/output/API/CivitAI/
⚠️ Warning : Civitai isn't the best reliable API, sometimes it doesn't answer, or take long time to answer, some urn don't answer as well as others, etc...
Use it at your own risks, I do not recommend running anything "costly" using their API, like Flux Ultra, etc... (Use the website instead with blue buzz)
API requests (like from this node) are using yellow buzz.
108 - ☁👑 Add Lora (API ONLY - CivitAI) 👑☁
Description:
Use lora with the API, below is an example to see clearly with the same seed the different with/without/lora.
109 - ☁🎨 API Image Generator (Black Forest Labs - Flux) 🎨☁
Description:
Generate an image with the Black Forest Labs API. (flux)
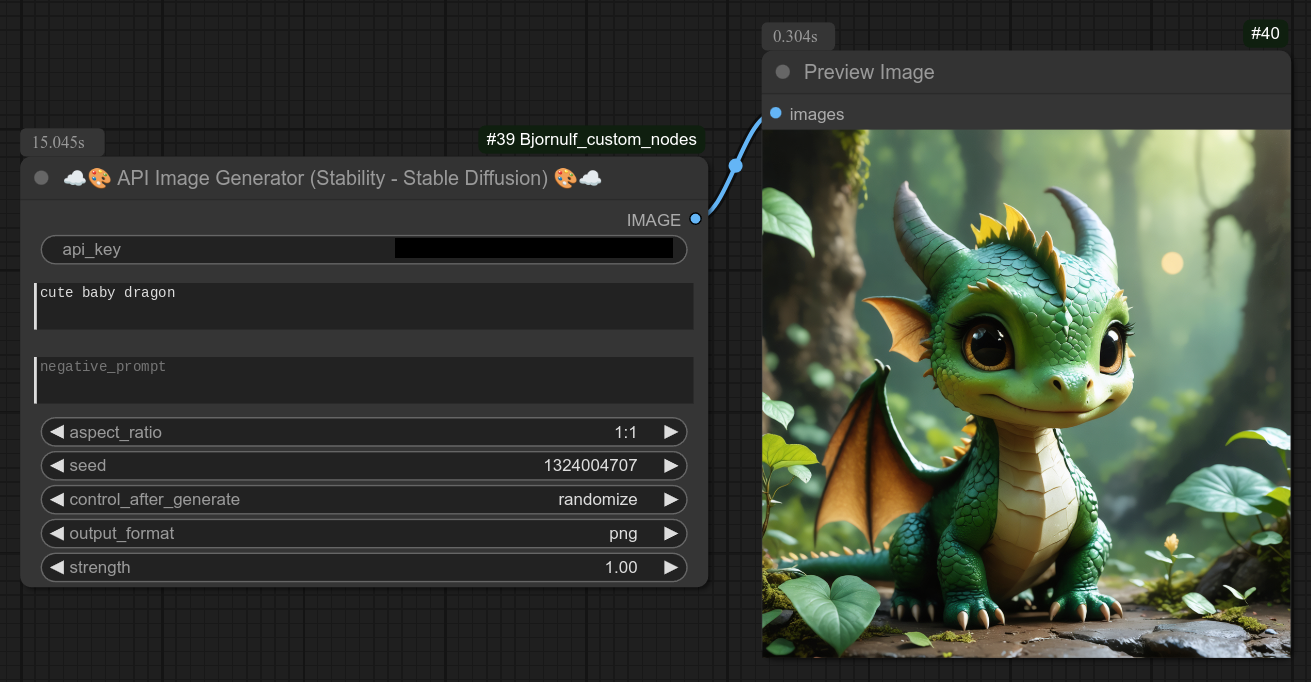
110 - ☁🎨 API Image Generator (Stability - Stable Diffusion) 🎨☁
Description:
Generate an image with the Stability API. (sd3)
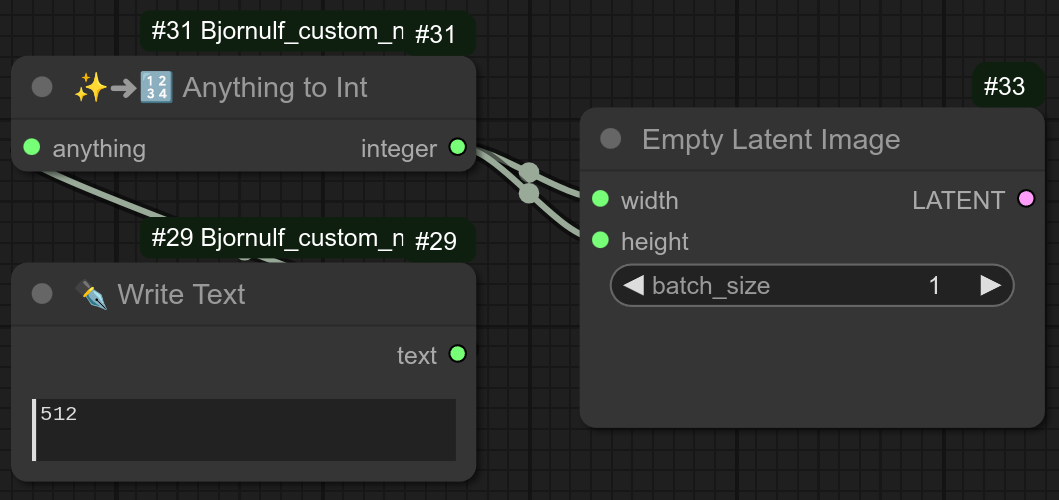
111 - ✨➜🔢 Anything to Int
Description:
Just convert anything to a valid INT. (integer)
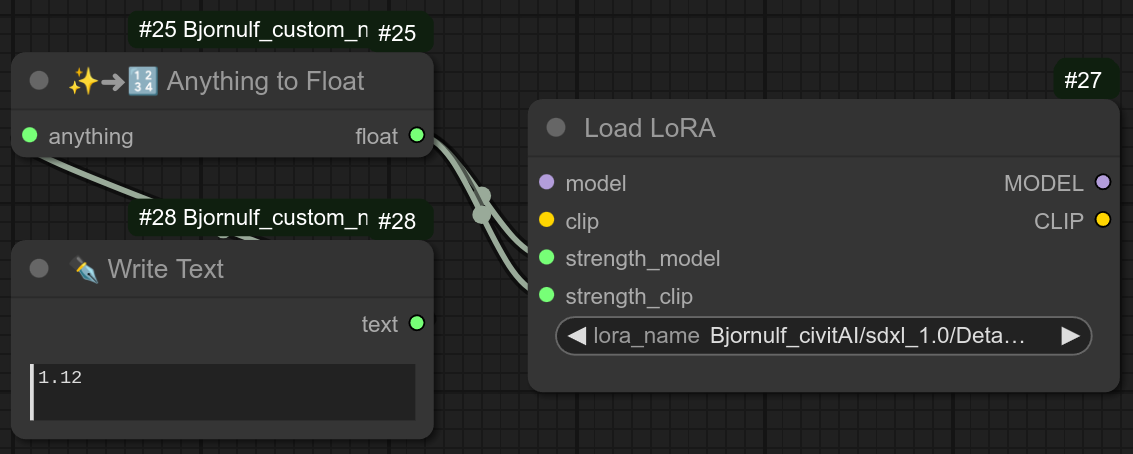
112 - ✨➜🔢 Anything to Float
Description:
Just convert anything to a valid FLOAT. (floating number)
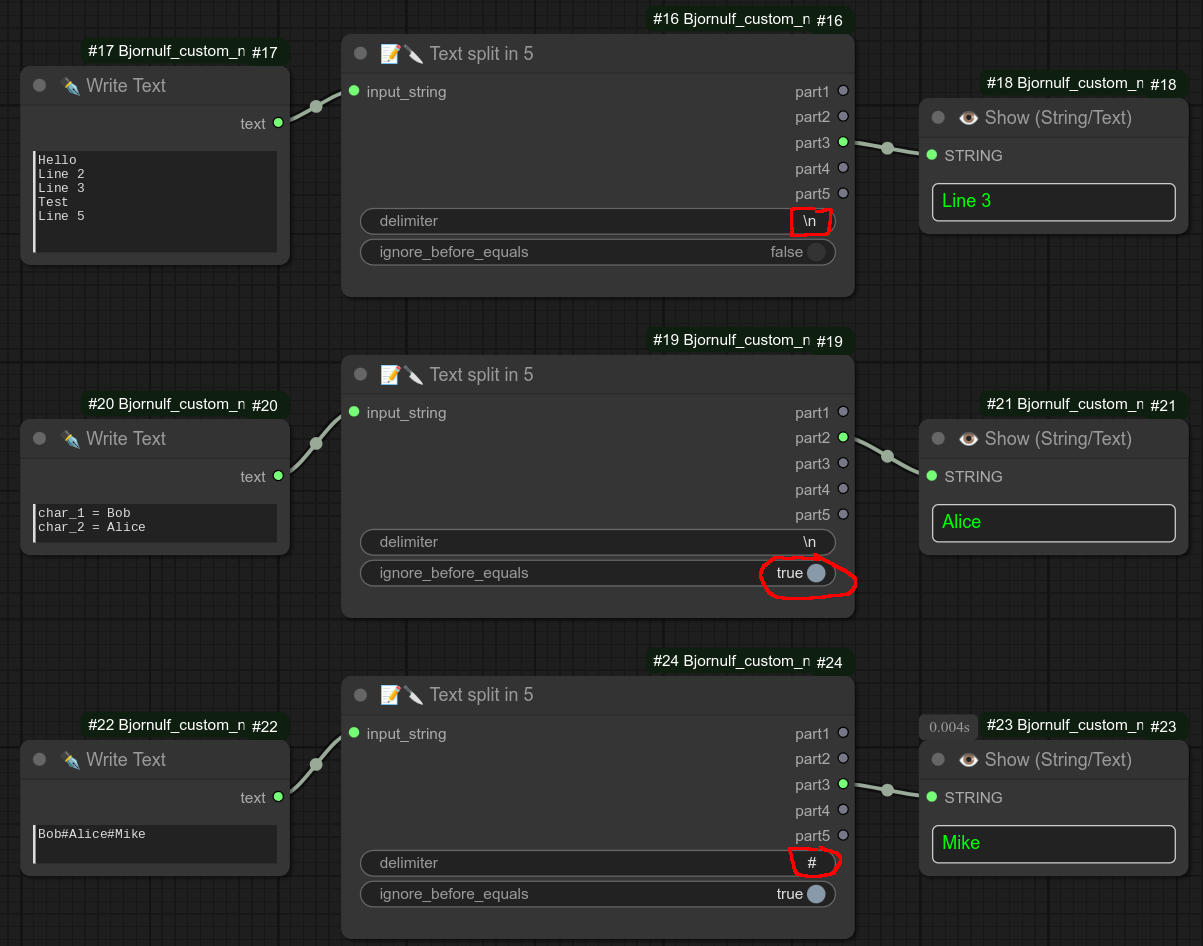
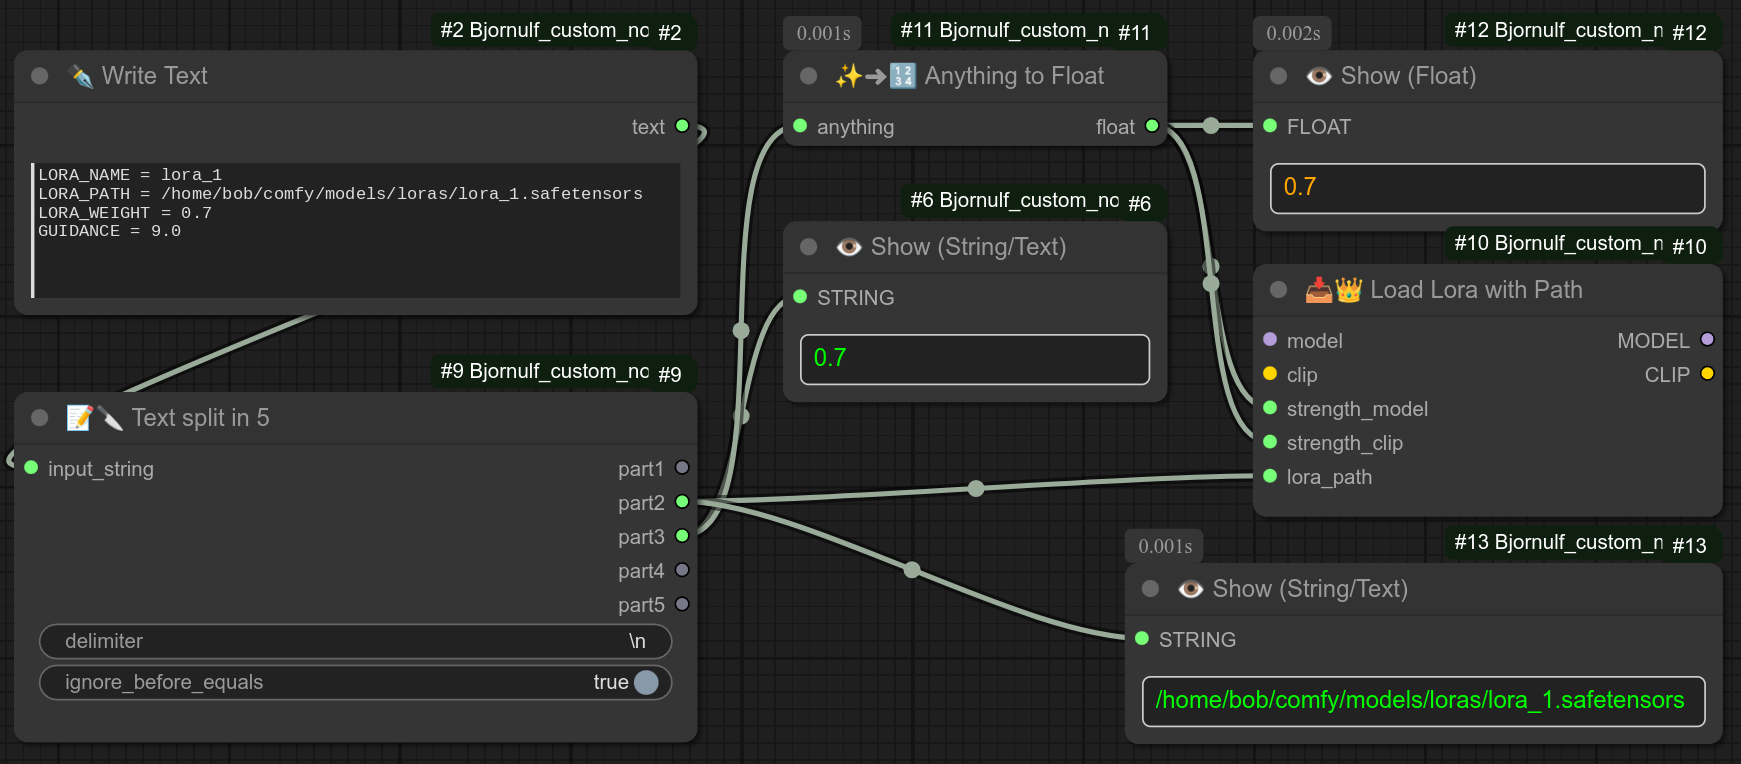
113 - 📝🔪 Text split in 5
Description:
Take a single input and split it in 5 with a delimiter (newline by default).
It can also ignore everything on the left side of a = symbol if you want to use a "variable type format".
114 - 📥👑 Load Lora with Path
Description:
Load a lora by using it's path.
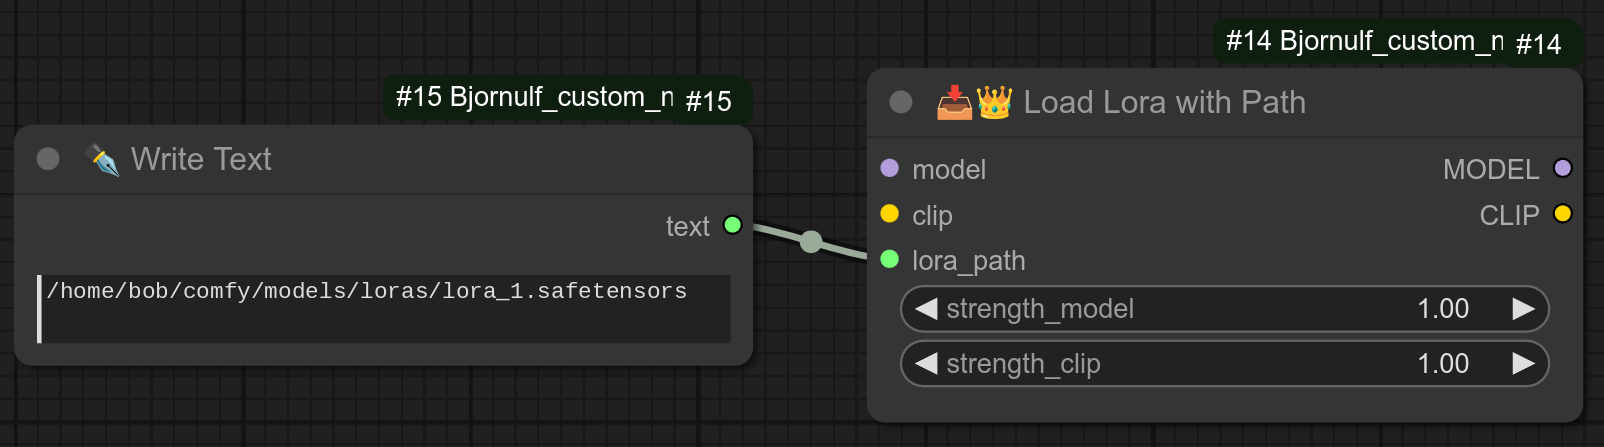
Here is a complex practical example using node 113, 114, 112 :
115 - 📥 Load Text From Bjornulf Folder
Description:
Just select a file from the folder Bjornulf/Text folder, it will recover its content.
It is made to be used with node 15 Save Text.
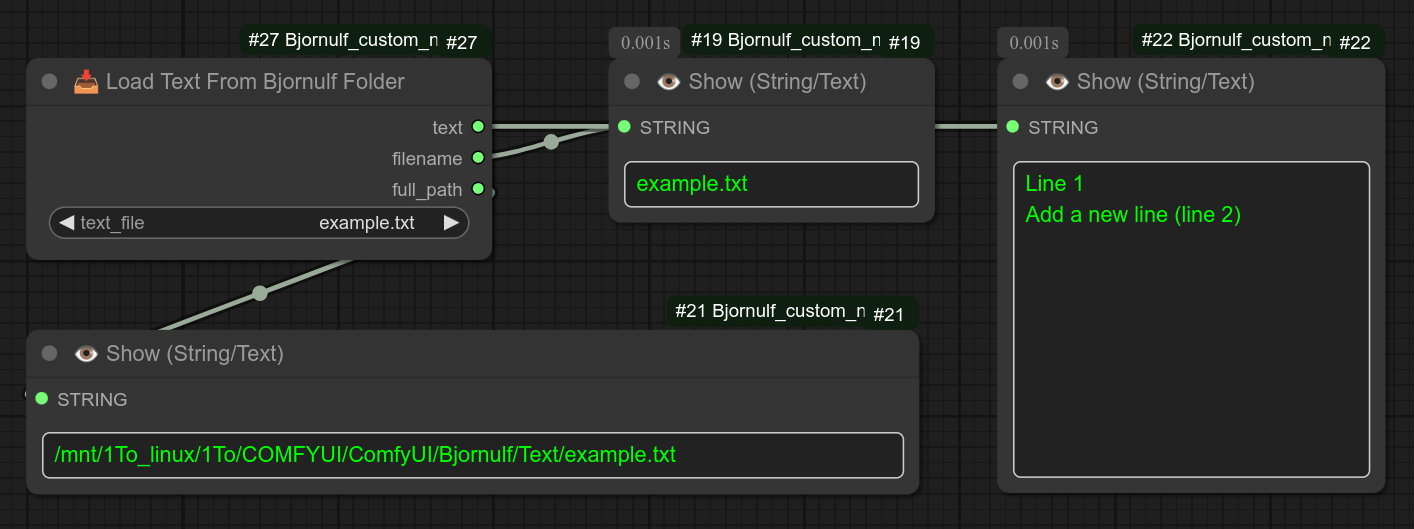
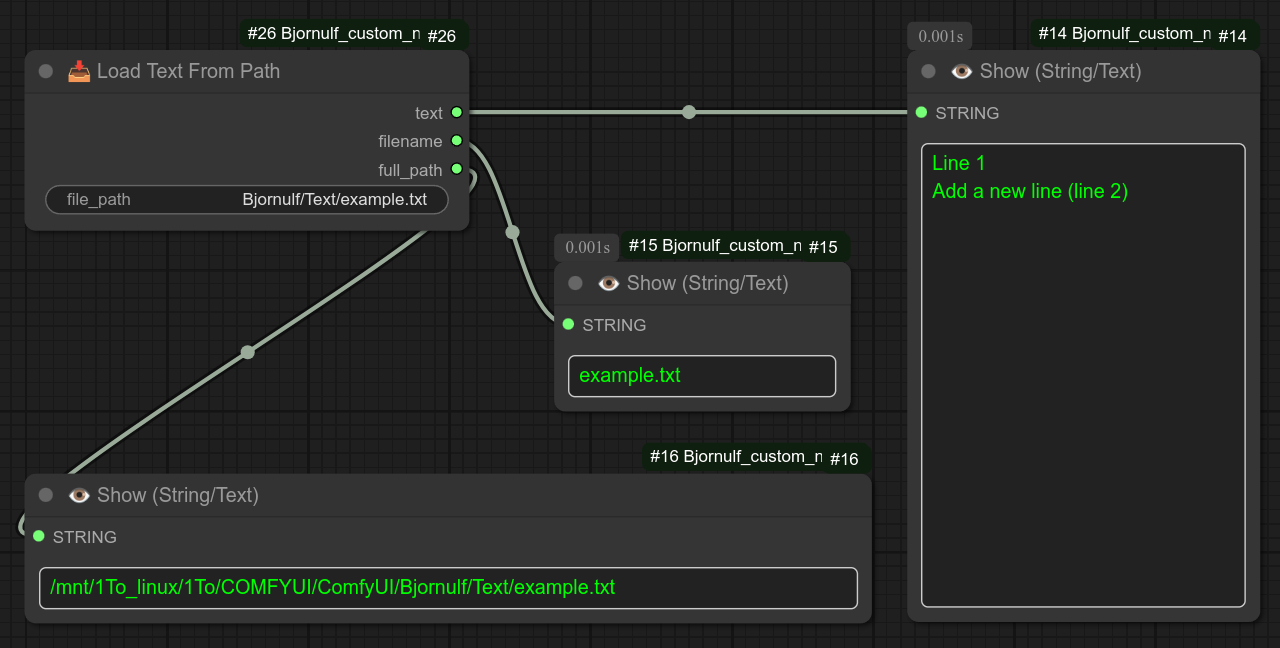
116 - 📥 Load Text From Path
Description:
Just give the path of the file, it will recover its content.
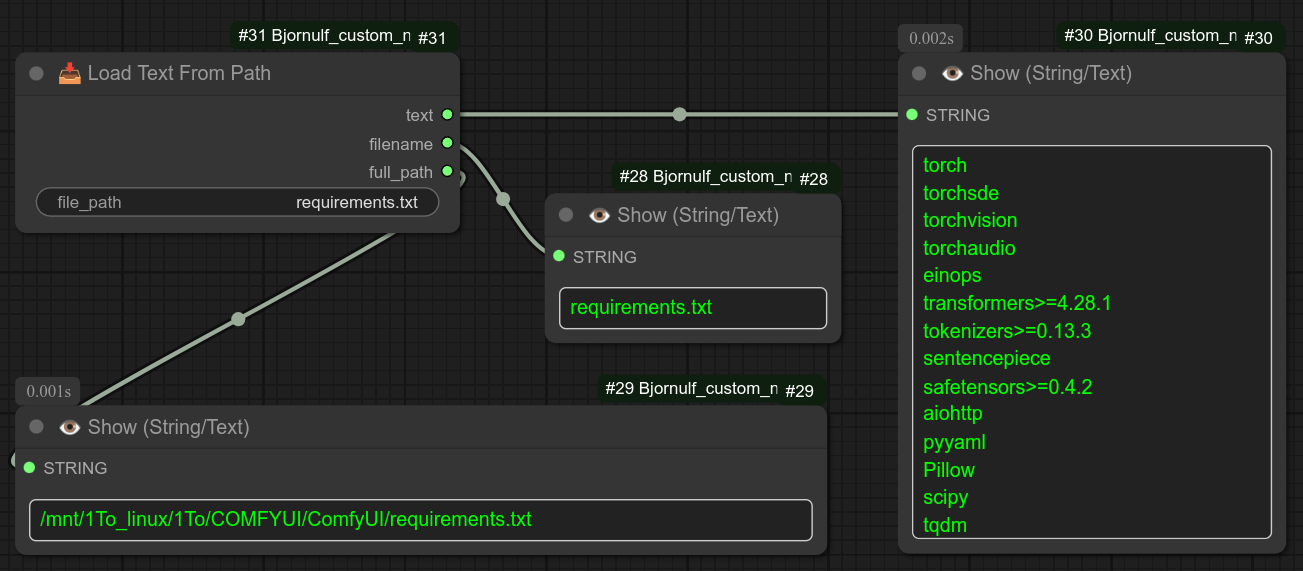
If you want, with Load Text From Path you can also recover the elements in "Bjornulf/Text" by just adding it:
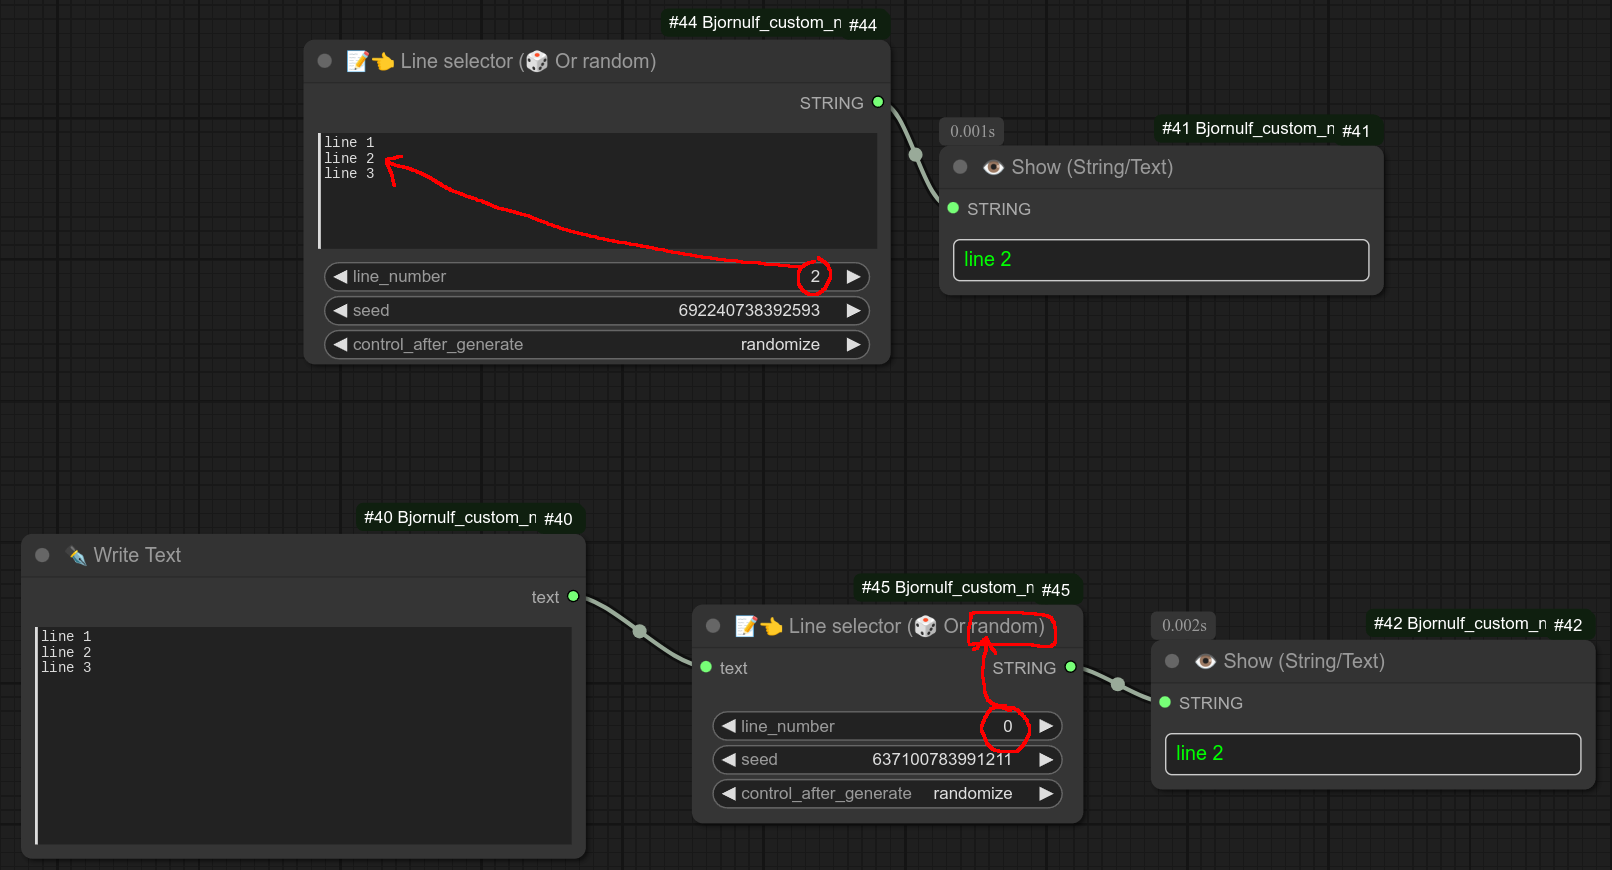
117 - 📝👈🅰️ Line selector (🎲 or ♻ or ♻📑)
Description:
Select a line from input text. If set to 0 it will take a line at random.
If line taken at random,. it will not take a line starting with the symbol #.
So use that if you want to ignore a line.
❗ 0.76 - New syntax available :
Groups, with no duplicate, example : {left|right|middle|group=LMR}+{left|right|middle|group=LMR}+{left|right|middle|group=LMR}
Random based on percentage : {A(80%)|B(15%)|C(5%)}
❗ 0.77 - New syntax available :
2 {apple|orange|banana|static_group=FRUIT}s, one {apple|orange|banana|static_group=FRUIT} on the left, one {apple|orange|banana|static_group=FRUIT} on the right
118 - 🔊 TTS Configuration ⚙
Description:
New optional configuration node to connect to TTS node, it can request a list of speakers for a given language and replace in the main TTS node :
- The URL.
- The language.
- The speaker. Connect them only if you want to replace them with the one from the configuration node.
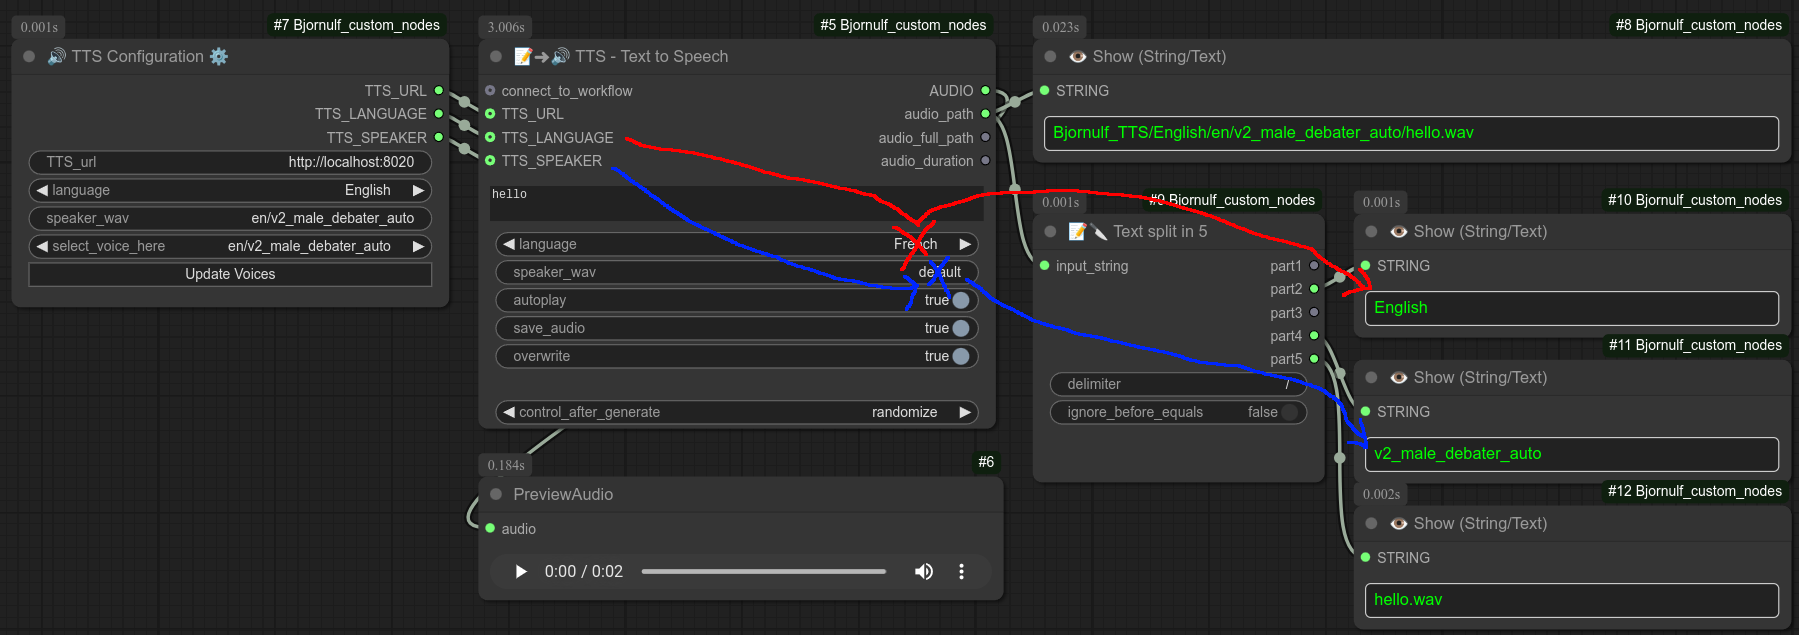
119 - 📥👑 Load Lora Hunyuan Video (+Download from CivitAi)
Description:
Take a CivitAI Lora to use with Hunyuan. (NSFW list not on github of course.)
The workflow below is included : workflows/HUNYUAN_basic_lora.json) :
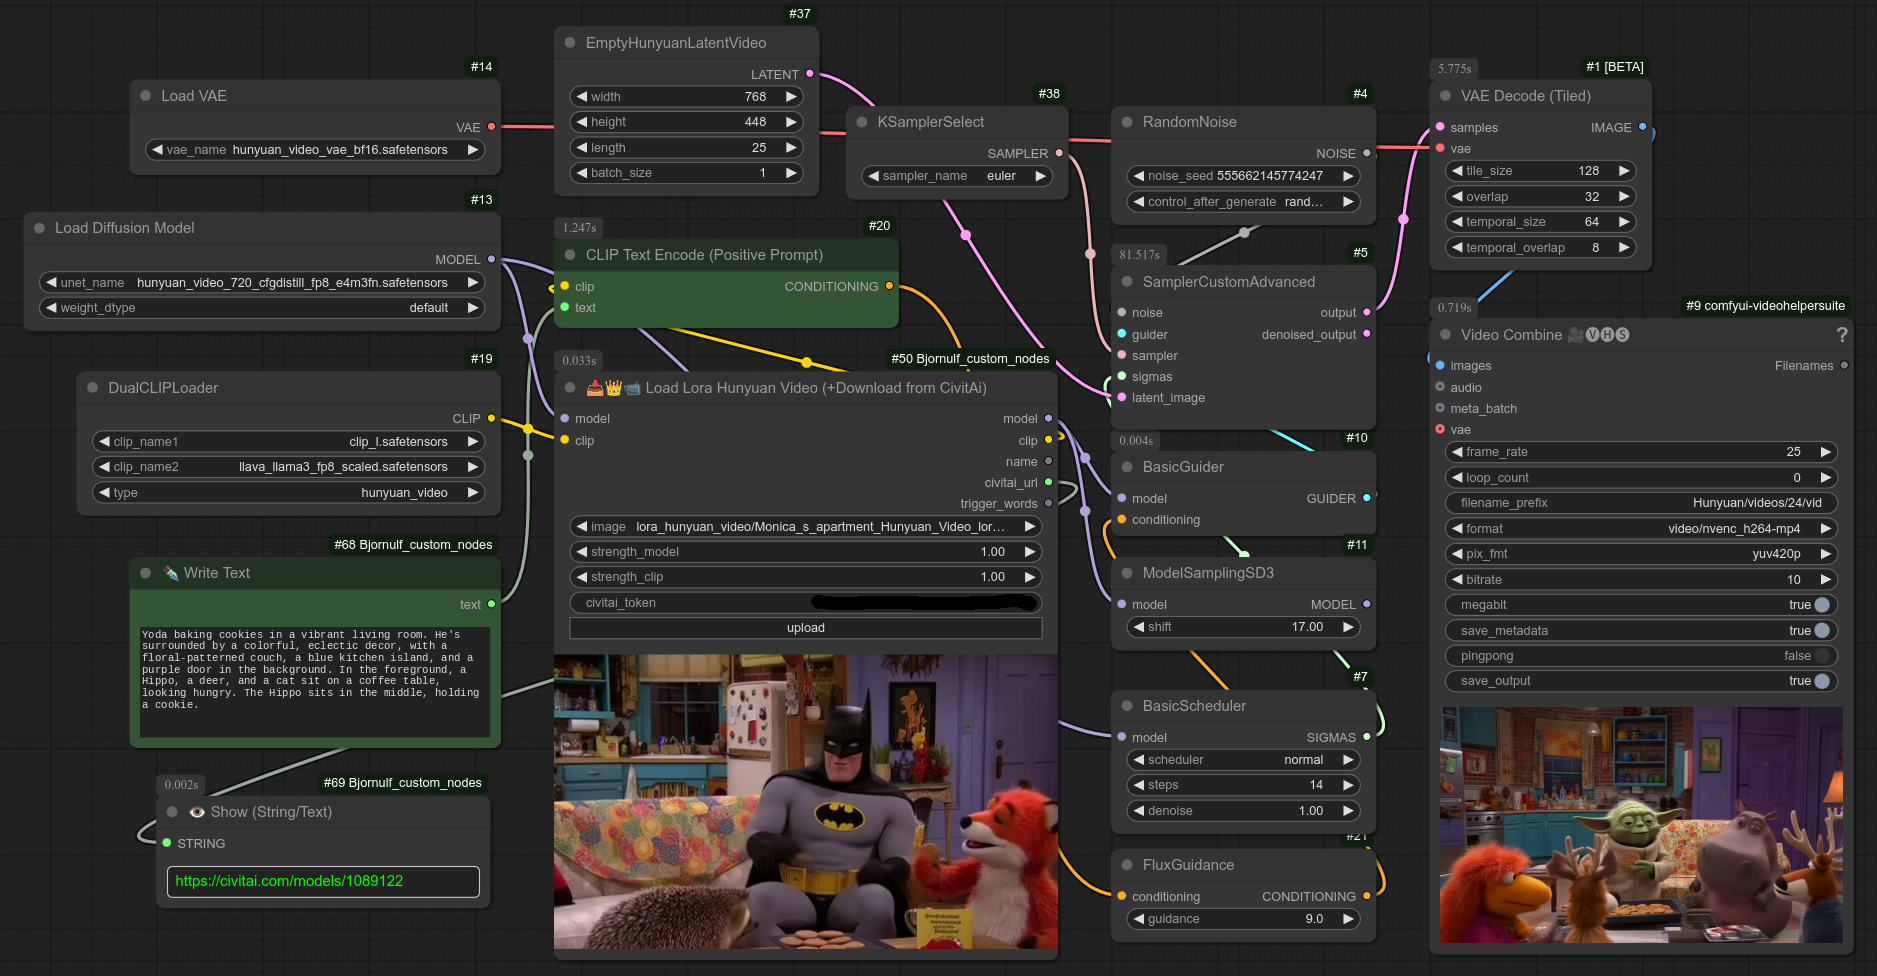
120 - 📝➜🔊 Kokoro - Text to Speech
Description:
❗ 0.76 - Due to some compatibility issues with other custom now, you now need to install it manually if you want to use it : pip install kokoro_onnx
Another Text to Speech node based on Kokoro. : https://github.com/thewh1teagle/kokoro-onnx
Lightweight, much simpler, no configuration and fully integrated into Comfyui. (No external backend to run.)
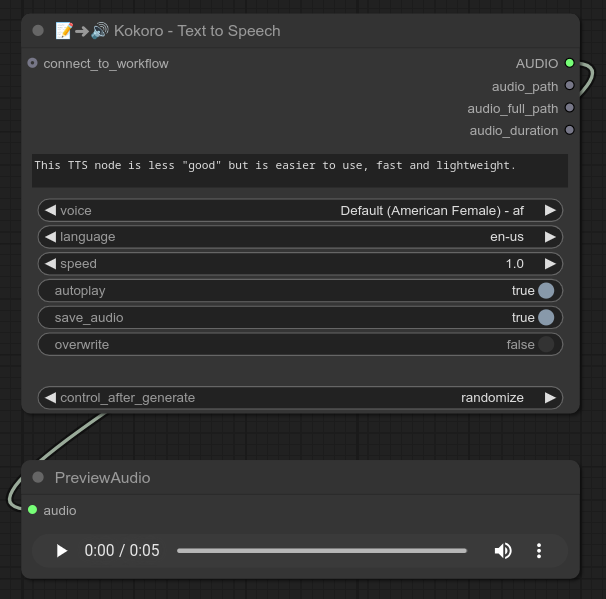
121 - 💾 Huggingface Downloader
Description:
This node allows you to download models/vae/unet etc... directly from huggingface with your access token.
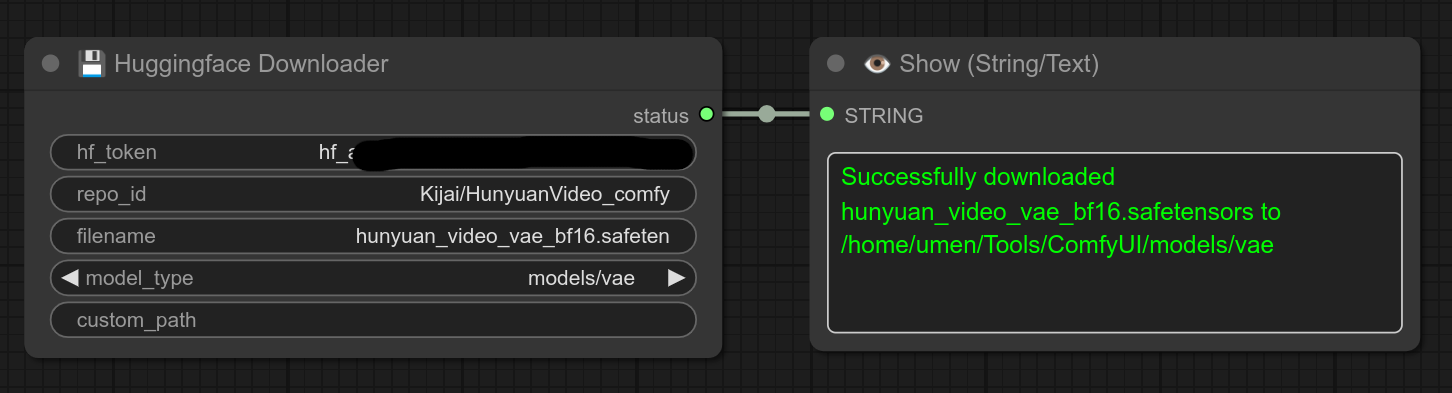
122 - 👑 Combine Loras, Lora stack
Description:
If you want to have multiple loras in a single node, well this is it.
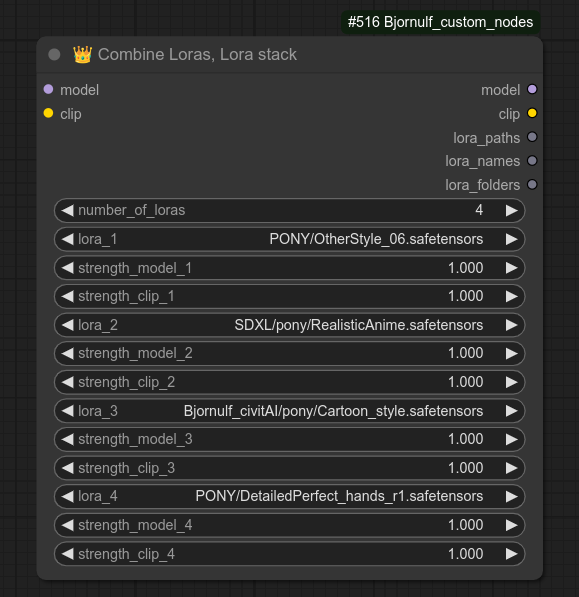
123 - 💾🅰️ Save Global Variables
Description:
So if you know how to use variables with my nodes, this node gives you the opportunity to create global variables.
This node is very simple, it will just append (or overwrite) the file : Bjornulf/GlobalVariables.txt (You can edit that manually if you want.)
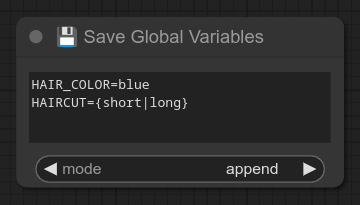
124 - 📥🅰️ Load Global Variables
Description:
This node will load the global variables as text from the file Bjornulf/GlobalVariables.txt.
Here is an example of usage save/load :
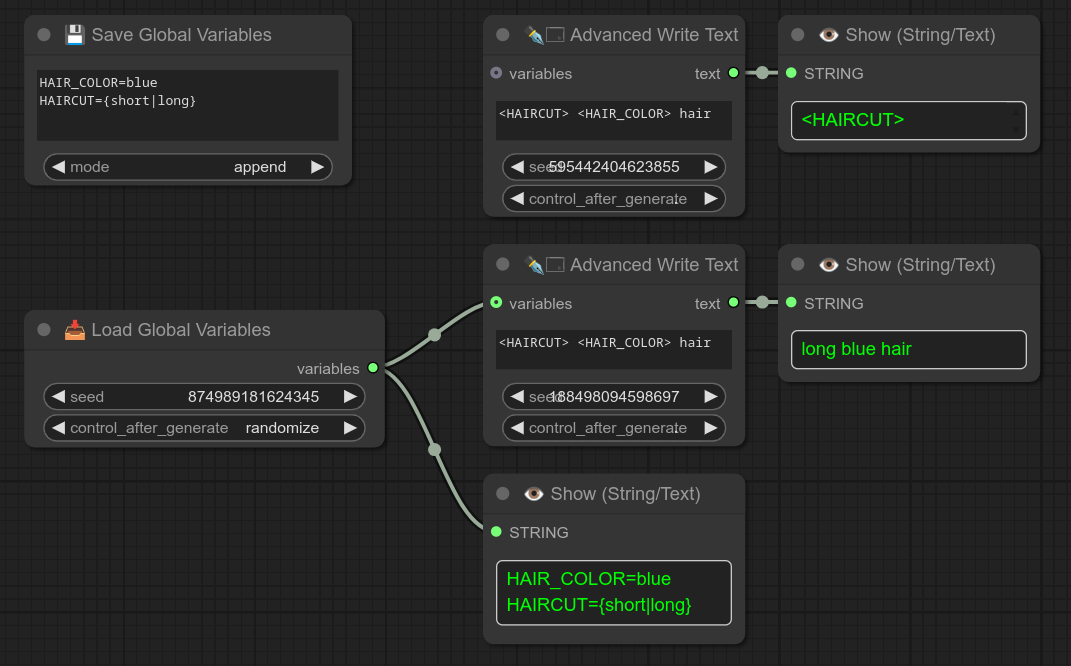
125 - 📝👈 Model-Clip-Vae selector (🎲 or ♻ or ♻📑)
Description:
If you want to use and manage multiple models/clip/vae : this is the universal node for it.
You can run them in a LOOP, one at RANDOM, a LOOP SEQUENTIAL (one at a time for each workflow run) and even SELECT a specific one.
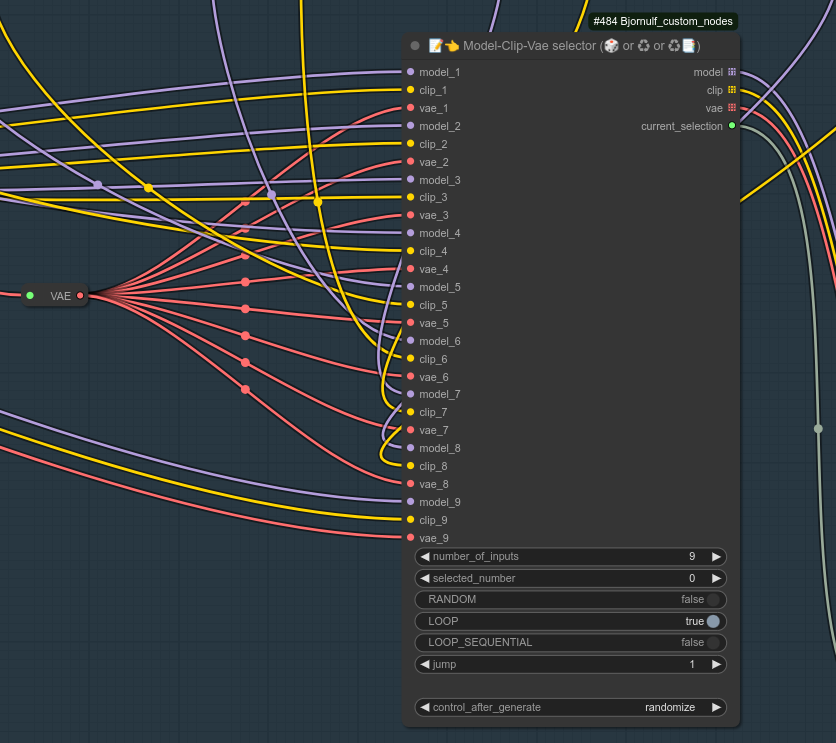
126 - 📒 Note
Description:
Sometimes I want to add a NOTE but I want this note to be connected to a specific spaghetti.
So you can use this to write details about a specific connection, it will move with it.
You can do whatever you want of course, below is an example about HunYuan video generation. (You can quickly switch connection to the rest of your workflow, depending on what you want to run.)
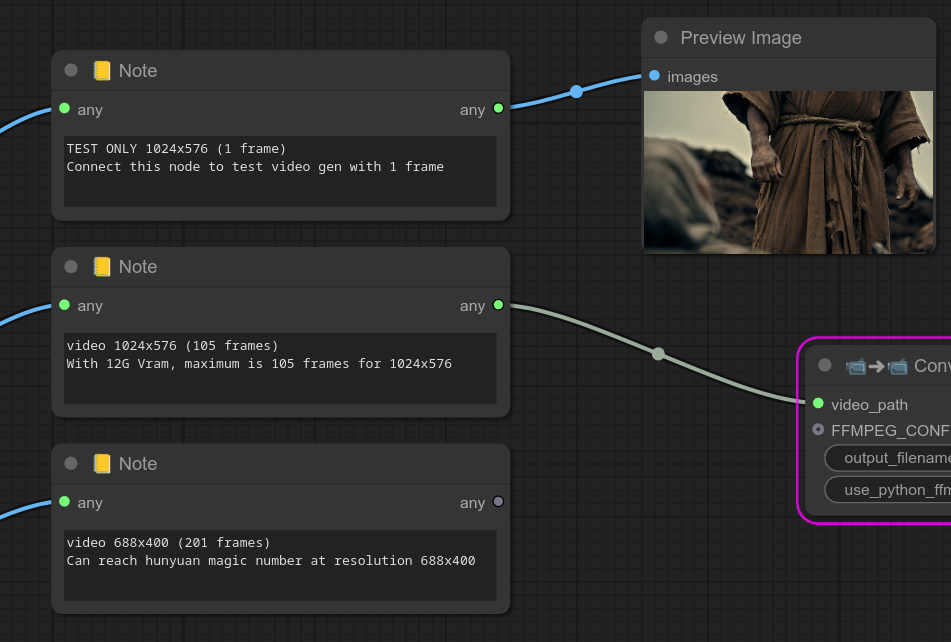
127 - 🖼📒 Image Note
Description:
You can use this node to have it show a previously generated image and some custom text. (Use image_path or IMAGE type.)
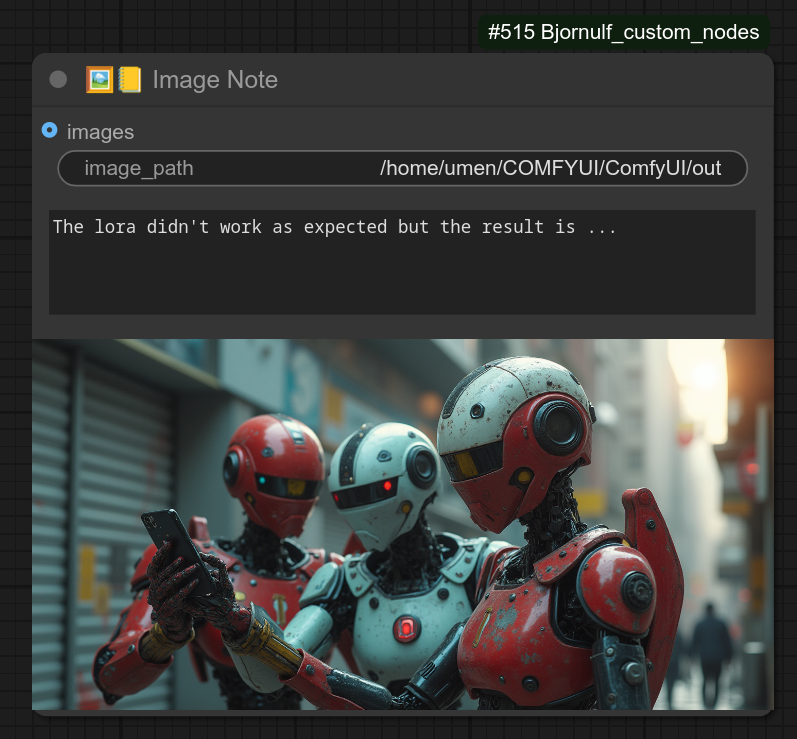
You can use the text to display the prompt used to generate the image for example. It's behavior is like a "Preview image" node. (See node 130 if you want a behavior similar to "Load image")
Sometimes I want to display an image to explain what something specific is doing visually. (For example a stack of loras will have a specific style.)
Here is a complex example on how i use that, for a list of loras stacks. (I then "select" a style by using node 125 - Model-Clip-Vae selector)
0.77 Multiline + image is now an issue on newer comfyui versions. Replaced with single line notes, couldn't find any clean js hack to solve the layout issue...
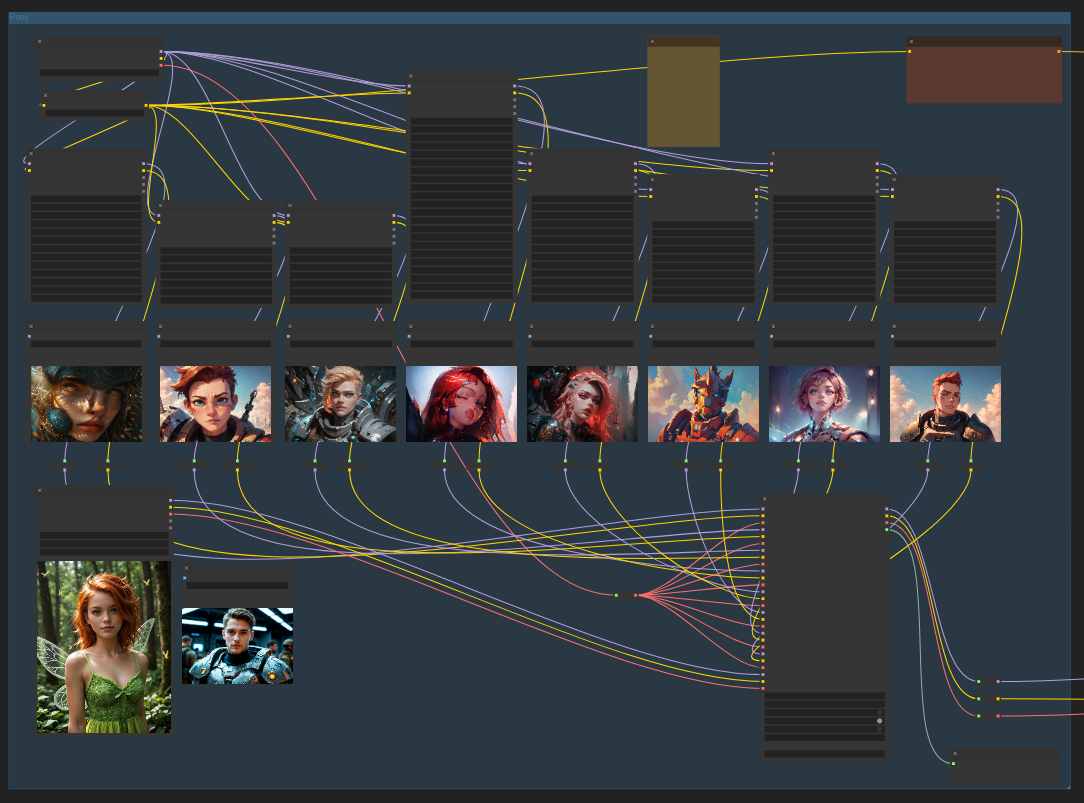
128 - 🖼👁 Preview (first) image
Description:
This node can display a preview of an image...
- But also can take a list of images and preview only the first image. (Useful for video, it will take the first image.)
- But can also take as input the full path of an image.
- BUT it can also take a video path as input and extract the first frame of it.
Very useful for testing when working with videos.
Below is a visual example of what I just said :
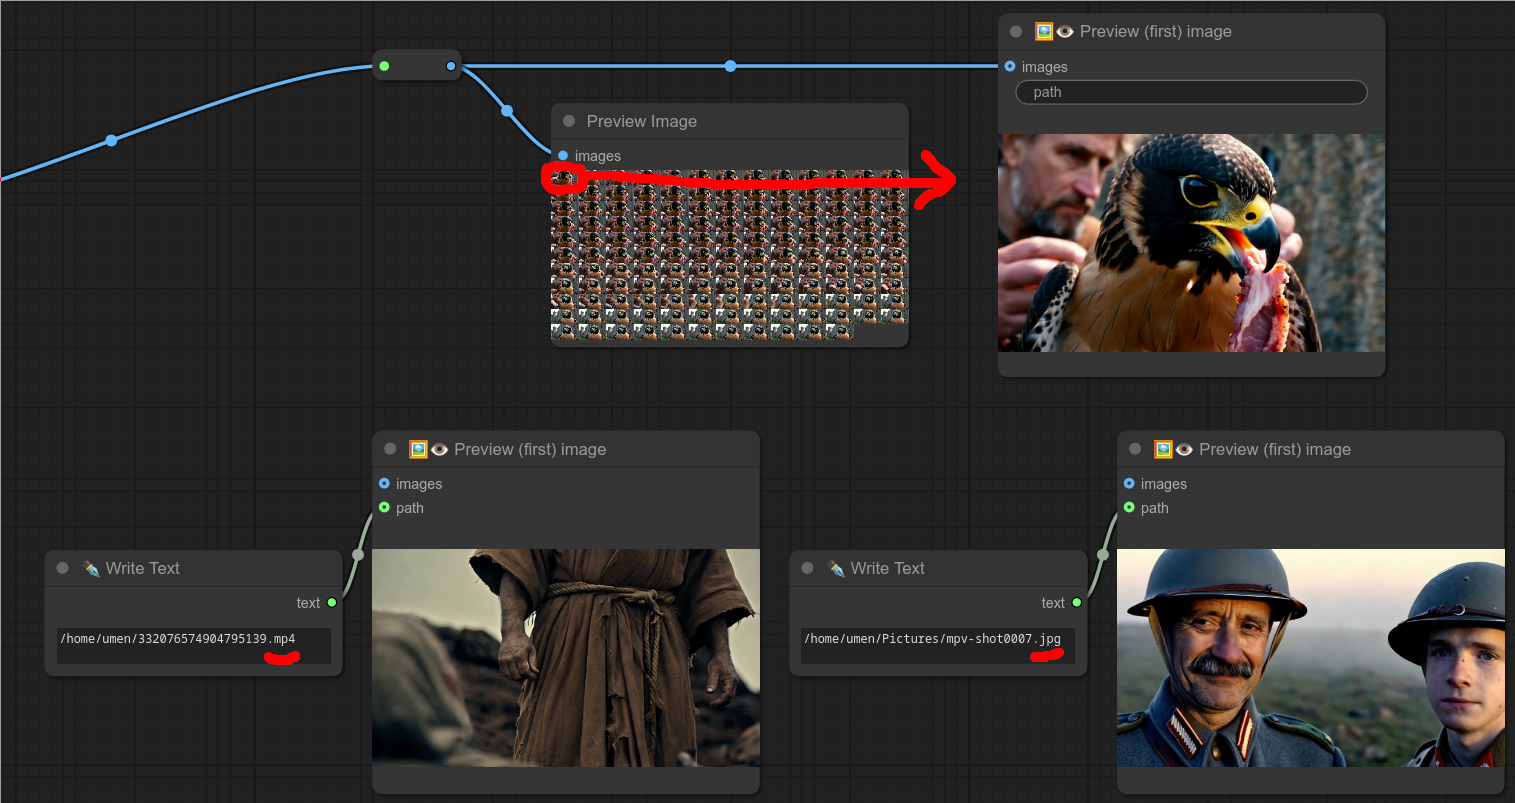
0.77 Multiline + image is now an issue on newer comfyui versions. Replaced with single line notes, couldn't find any clean js hack to solve the layout issue...
129 - 📌🅰️ Set Variable from Text
Description:
This node will just quickly transform a text in another text which can be quickly used for all my variables nodes.
Here is an example below with "Advanced write text", but you can use with all of them, global variables, etc...
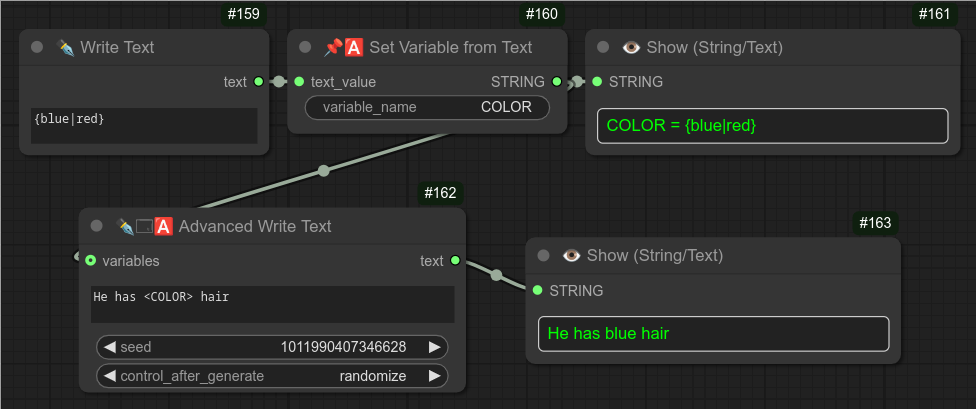
130 - 📥🖼📒 Image Note (Load image)
Description:
This node is quite similar to the node 127. But this one uses LoadImage instead of a preview system.
So if you want to have a "preview" before you launch workflow one time, you can use this one.
It's behaviour is like a "Load image" node.
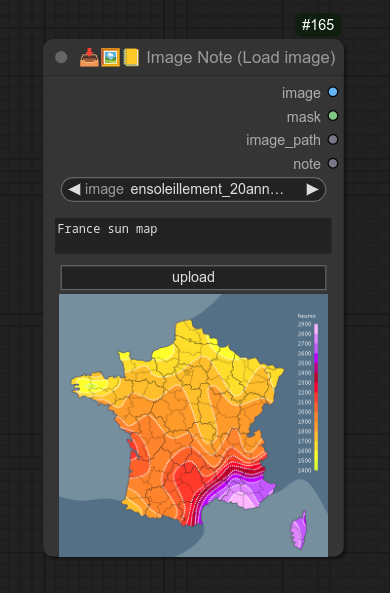
131 - ✒👉 Write Pick Me Chain
Description:
So this is a new "write text" node.
But with a twist. You can connect them to each other and when clicking on the PICK ME button, it will disable all other write text node of the chain and activate only the one you click on. (It will turn green.)
So with this node, you can switch from one prompt to another by the click of a button !!
Not limited to one line, you can use list, variables, etc... but below is a simple example :
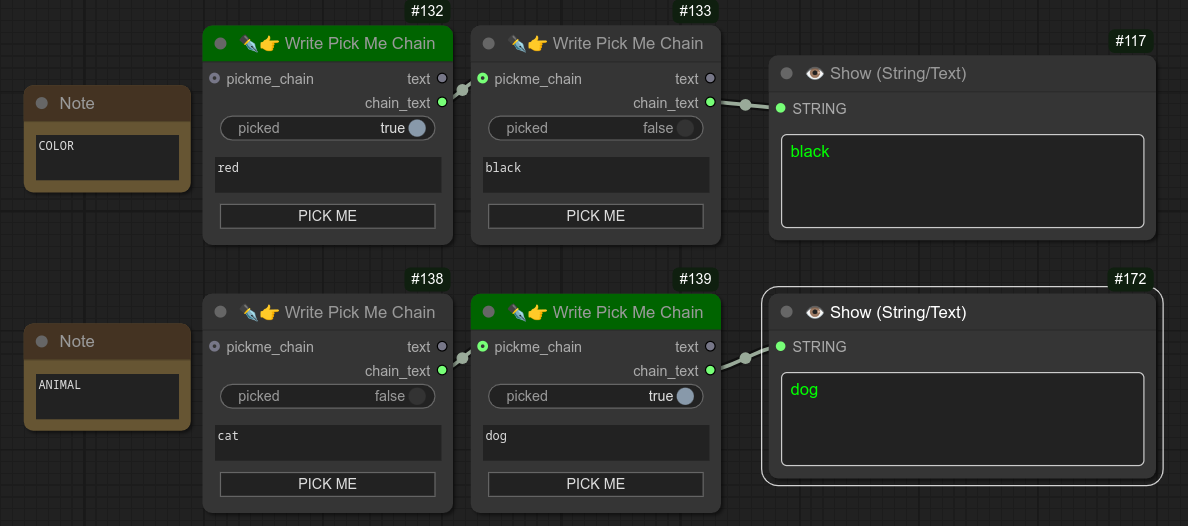
132 - 📝🔪 Text split in 10
Description:
Same as node 113, but split in 10 parts.
One day I had 6, and got stuck with the split in 5 node, so i guess it can be useful sometimes, let's make one with 10...
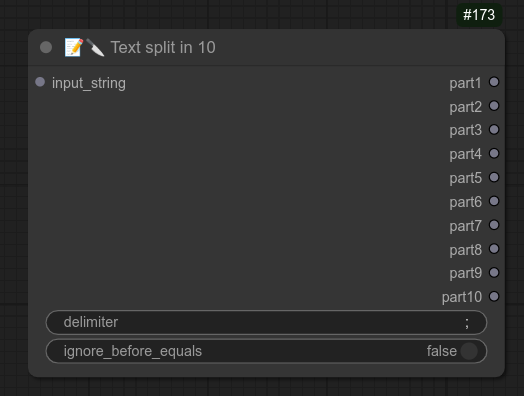
133 - 🖼👁 Preview 1-4 images (compare)
Description:
Cool node that you can use to compare several images.
The middle is a cursor that you can move wherever you want by just clicking on the image.
Below is an example, you can see that at this size/resolution, 25% is almost as good as the initial image.
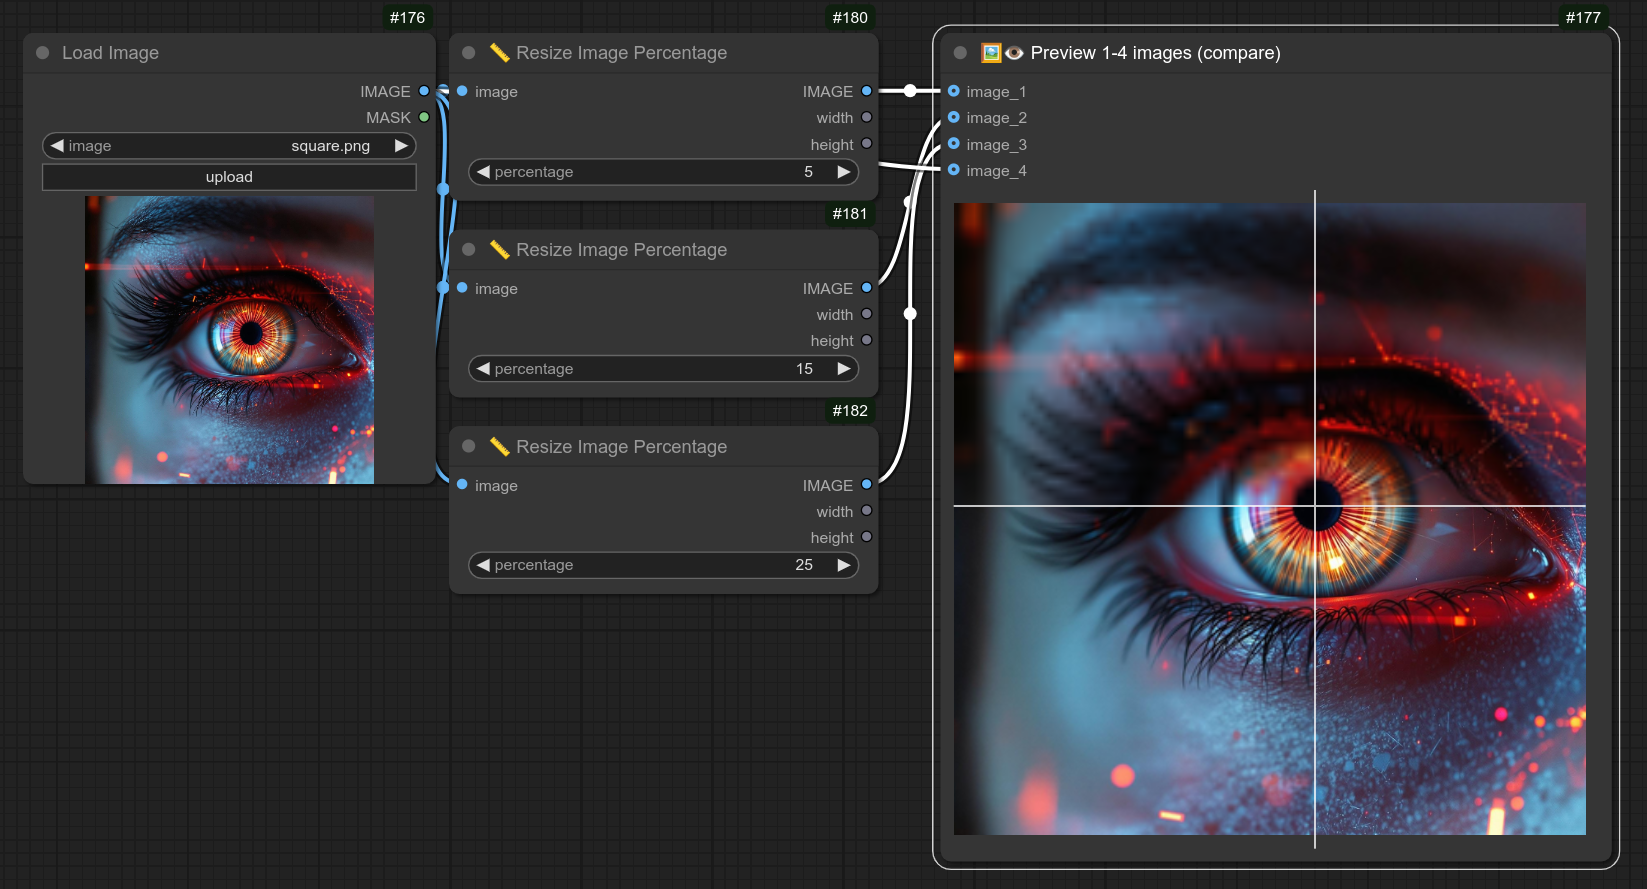
Here is a zoom on the same image :
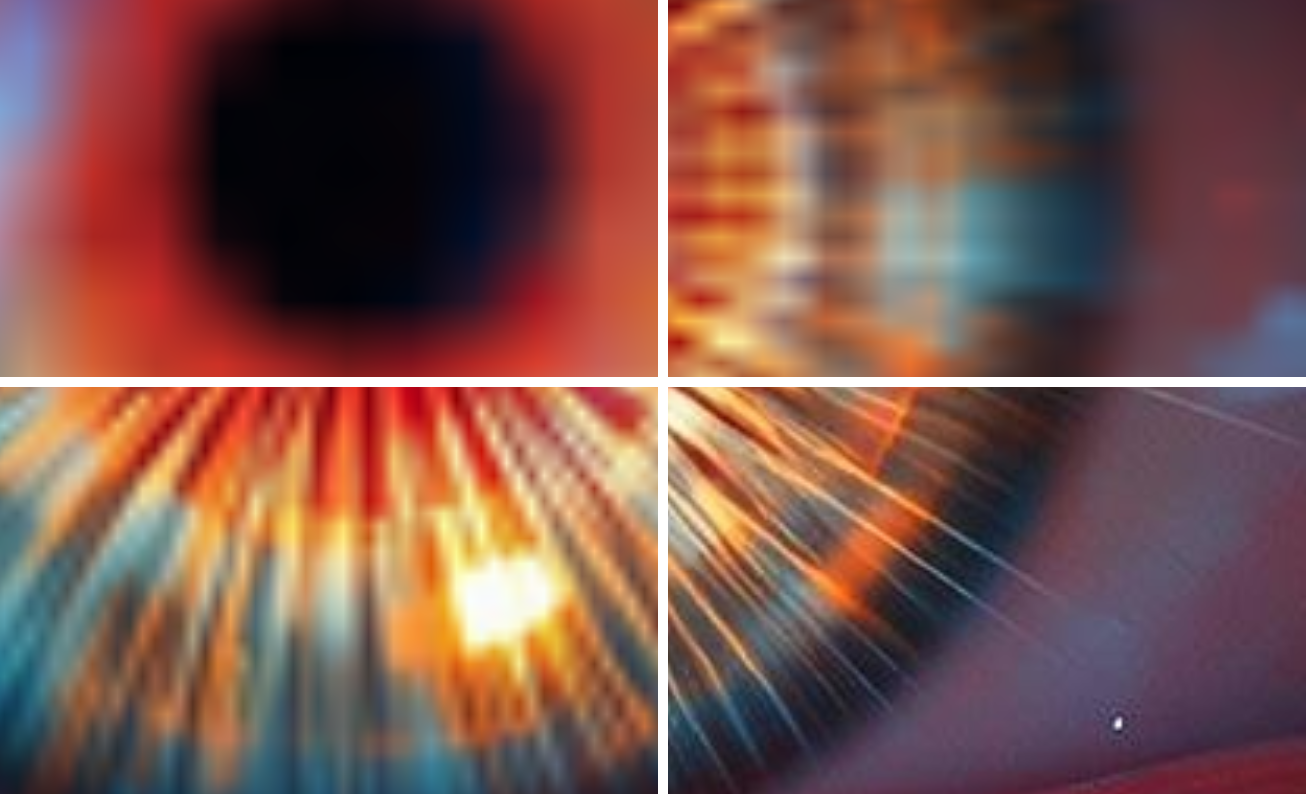
134 - 🔊▶ Play Audio
Description:
This node will just play a bell.
For example, if you have a workflow that takes a while and you want to be alerted every time it's over.

You can connect to it a custom path of an audio file :

Or send it an AUDIO type format :
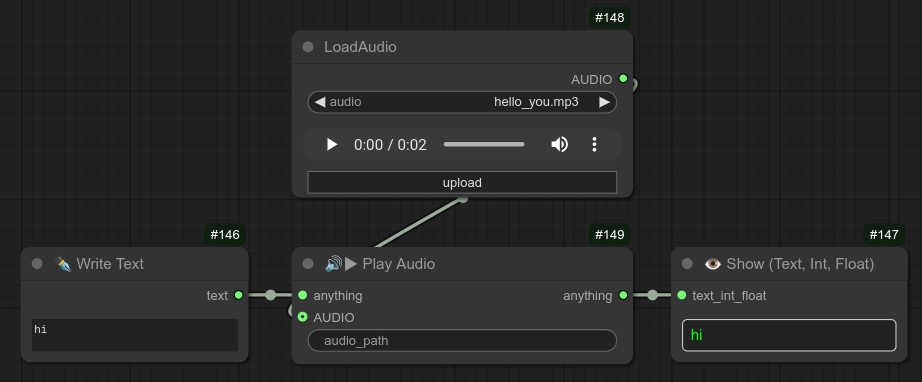
135 - 🔛✨ Anything Switch On/Off
Description:
Basic switch that will not send anything if toggled off.
below is an example with the compatible "combine image node", here you can see that the top image was ignored.
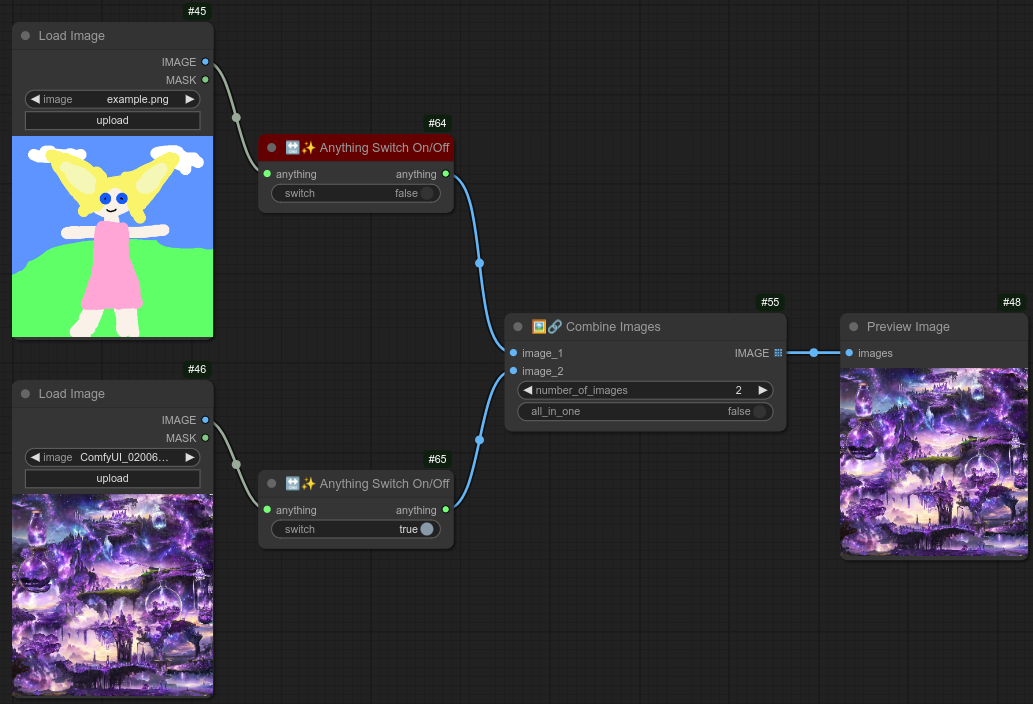
136 - 🔛📝 Text Switch On/Off
Description:
Tired of disconnecting nodes you don't want for a moment ?
Maybe you are working on this input, but your workflow isn't ready for it yet ?
Well now you can quickly enable / disable it. (If disabled you will see it in red.)
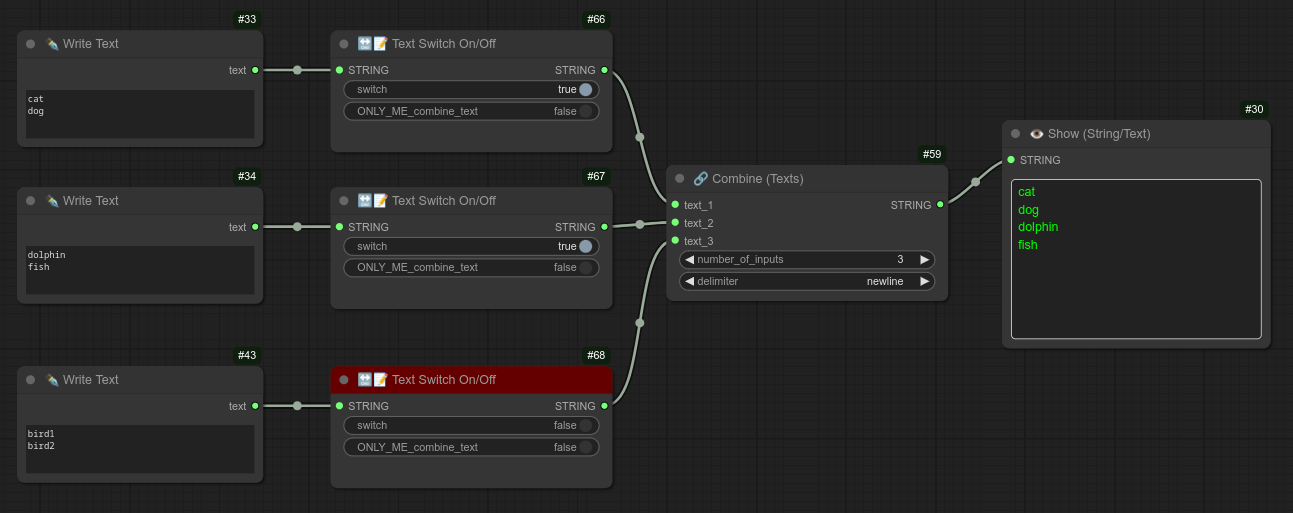
If connected with my combine text node, you can use a special option ONLY_ME_combine_text that will tell combine text to write ONLY the selected node. It will ignore all the others. (Here will appear in blue.) :
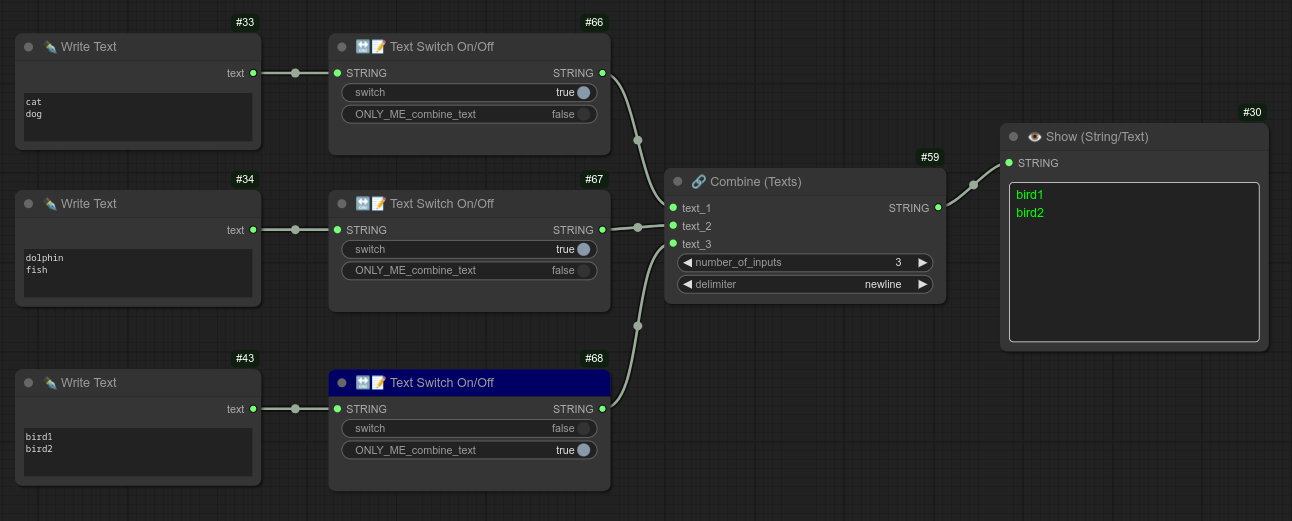
137 - 🌎🎲 Global Seed Manager
Description:
Seed manager.
It is :
- Generating a random seed every run.
- Return the current seed as a STRING that you can use in other nodes with STRING format.
- Return the value of the previously used seed.
- Will save all the seeds used inside a file. (that you can reset with a button.) If you want to select a seed from this list, use node 138.
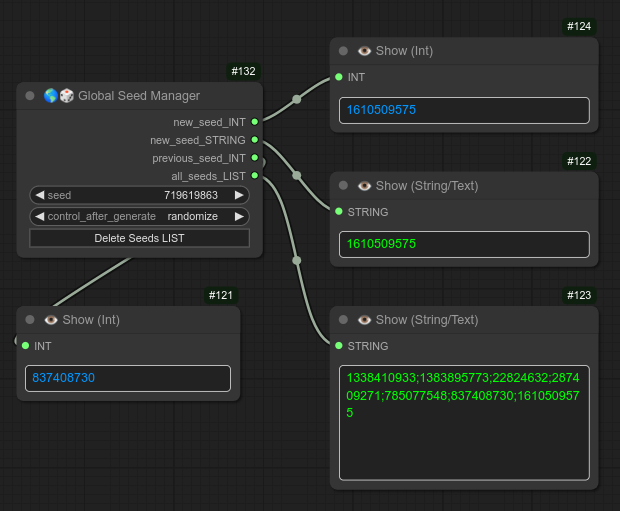
138 - 📑👈 Select from List
Description:
Select quickly an element from a LIST. (a STRING with elements separated by ; by default) Example of LIST : a;b;c;d
Below is an example for quickly selecting the third seed used by Global Seed Manager :
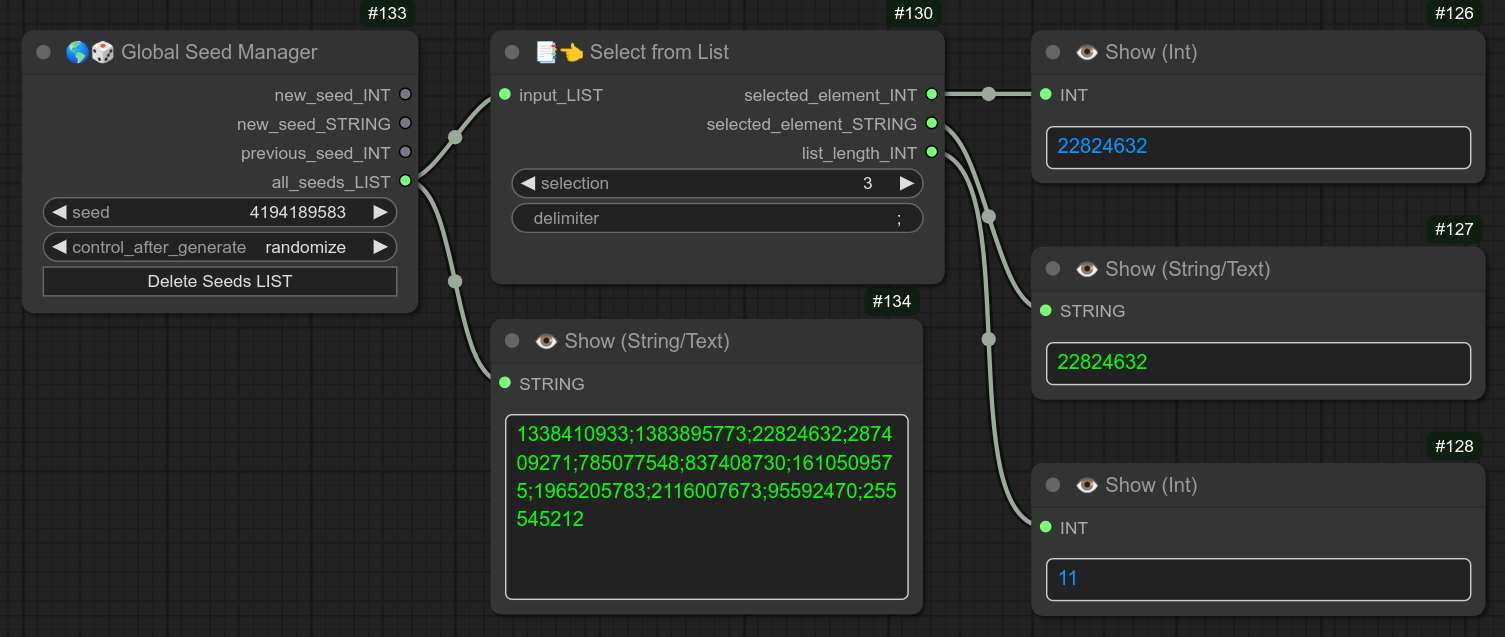
139 - 🎲 Random Integer
Description:
Simply return an INT in between the 2 values provided.

140 - 🎲 Random Float
Description:
Simply return a FLOAT in between the 2 values provided.
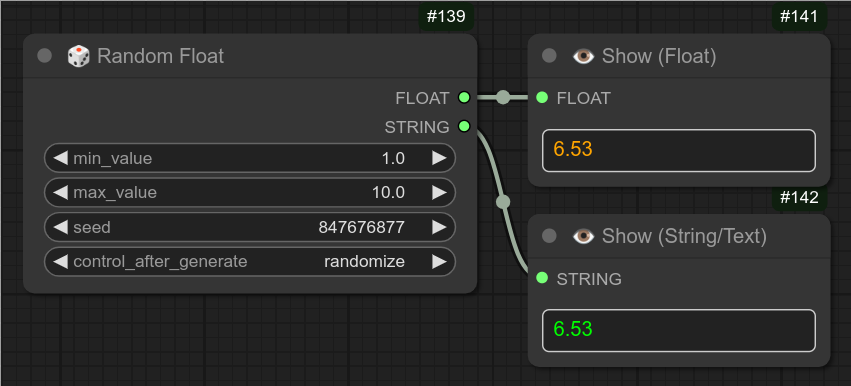
141 - 🌎✒👉 Global Write Pick Me
Description:
Do you enjoy Pick Me chain nodes ?
This one is using IDENTIFIERS (global_pickme_id) instead of connections.
Just pick up a name as global_pickme_id and if the nodes have the same global_pickme_id they will automatically connect to each other.
Below is an example of write + load :
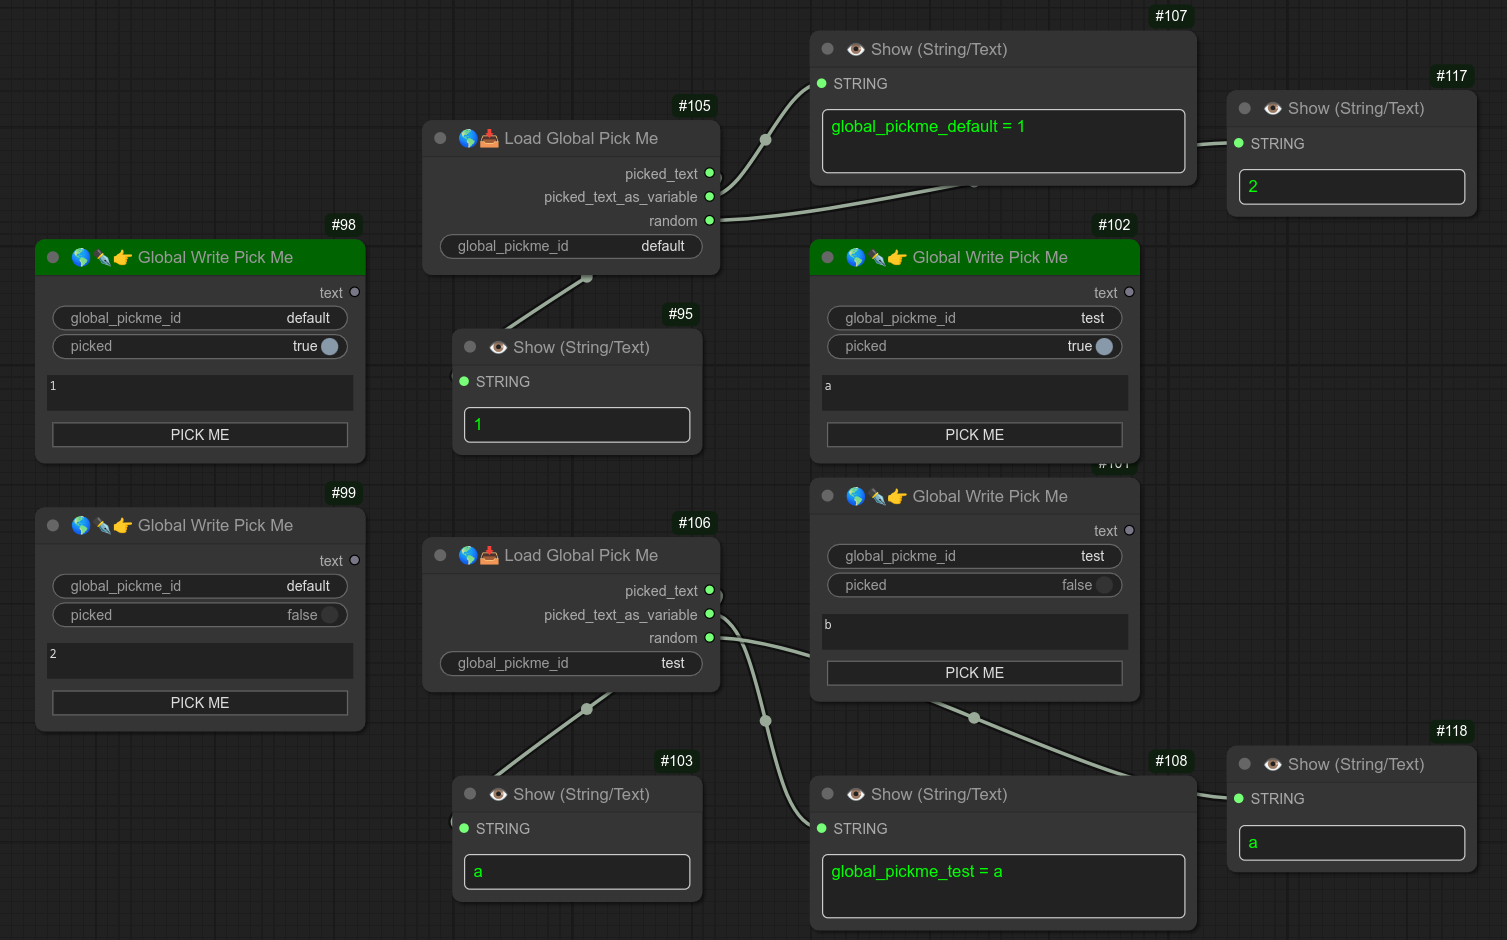
142 - 🌎📥 Load Global Pick Me
Description:
The node used to recover the values from PICK ME global write nodes.
It will return the value from the currently selecte global_pickme_id.
This node also automatically return a random value from the list with the global_pickme_id.
Below is an example of write + load :
143 - 🧮 Basic Math
Description:
Basic node for basic math.
Addition, multiplication...
Here is an example that I use to detect the number of "missing" frames in a video, compared to another video :
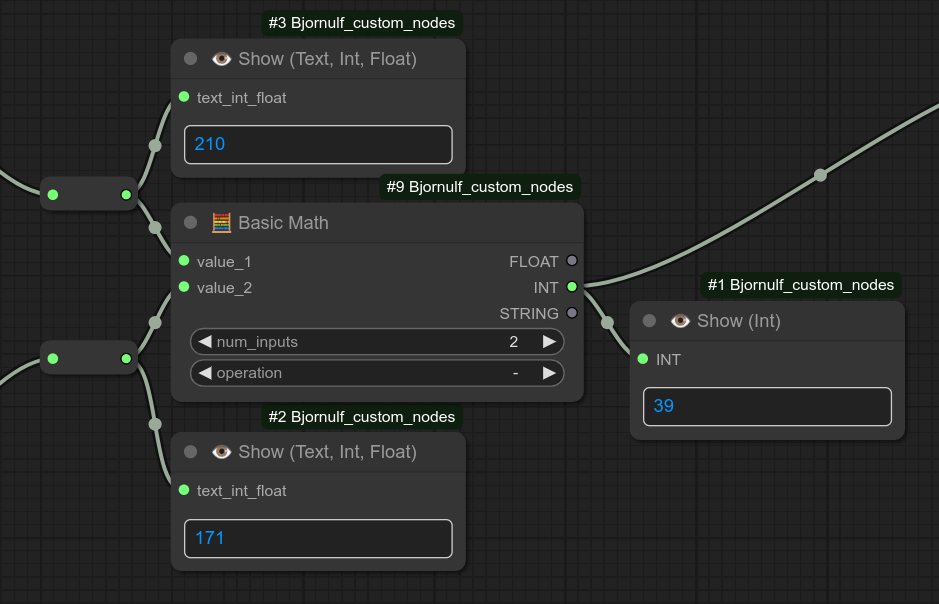
144 - 📊🔍 Text Analyzer
Description:
Display details about an input text.
You can use it just to recover the number of characters, you can then for example use this number to avoid too long prompts and avoid OOM :
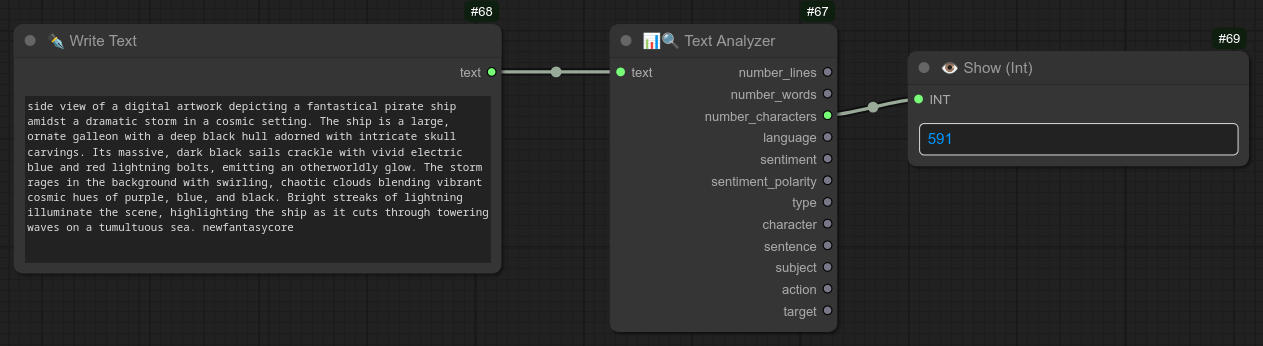
Or extract more details about dialog and sentiment polarity of it. (For example, if you want a specific TTS voice for positive/neutral/negative.) :
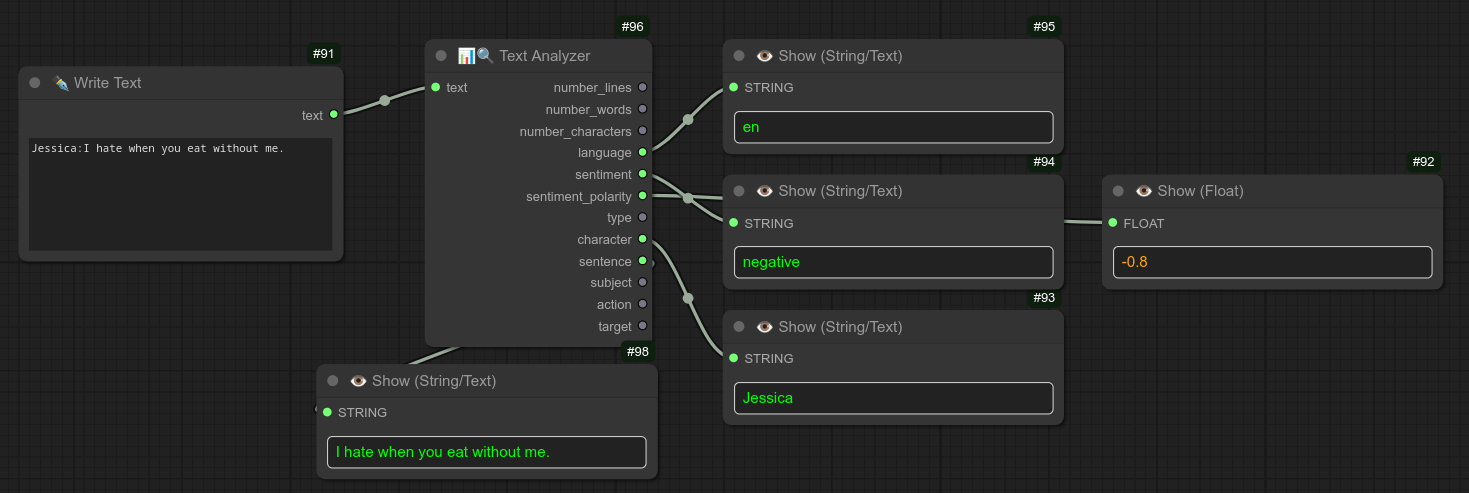
145 - 🔊▶ Audio Preview (Audio player)
Description:
Simple preview audio node that can take as input an audio_path, mp3 or wav.
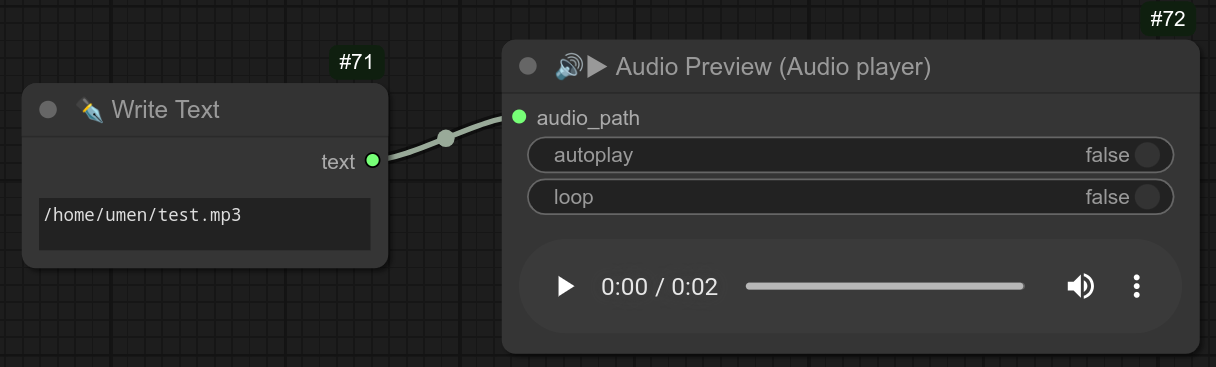
146 - 🖼📹🔪 Split Image/Video Grid
Description:
This node will split a grid of images or videos into separate images or videos.
Below is an example with a grid of 6 images, it will split them into 6 separate images (3 rows X 3 columns) :
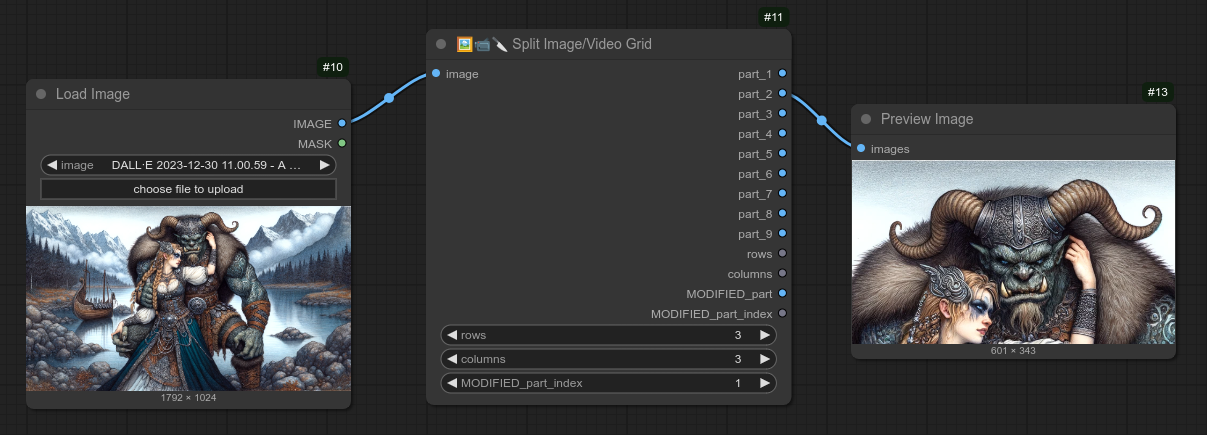
Why do I need that ? Sometimes I have several characters in a single image/video.
When I want to apply lip sync to a character, I need to split them into separate images/videos where4 the character is located, create the lip sync, and then reassemble them with node 147.
Or just to save VRAM, by processing only the part of the image that I need.
147 - 🖼📹🔨 Reassemble Image/Video Grid
Description:
Reassemble an image/video that was grid split with node 146.
Will need to take the same grid size as input.
You can apply changes to a specific element of the grid, and then reassemble them.
You can select each part individually.
But there is also a "special" part, the MODIFIED one.
This part is selected with the MODIFIED_part and the MODIFIED_part_index (part number, if index set to 2, it will use part_2).
Below is an example where I modify part_2 and reassmbling it. (Without using part_2 output but selectionning it using 2 as MODIFIED_part_index) :
You can also work directly with part_2, but twith this setup you can quickly switch in between parts without changing the node layout.
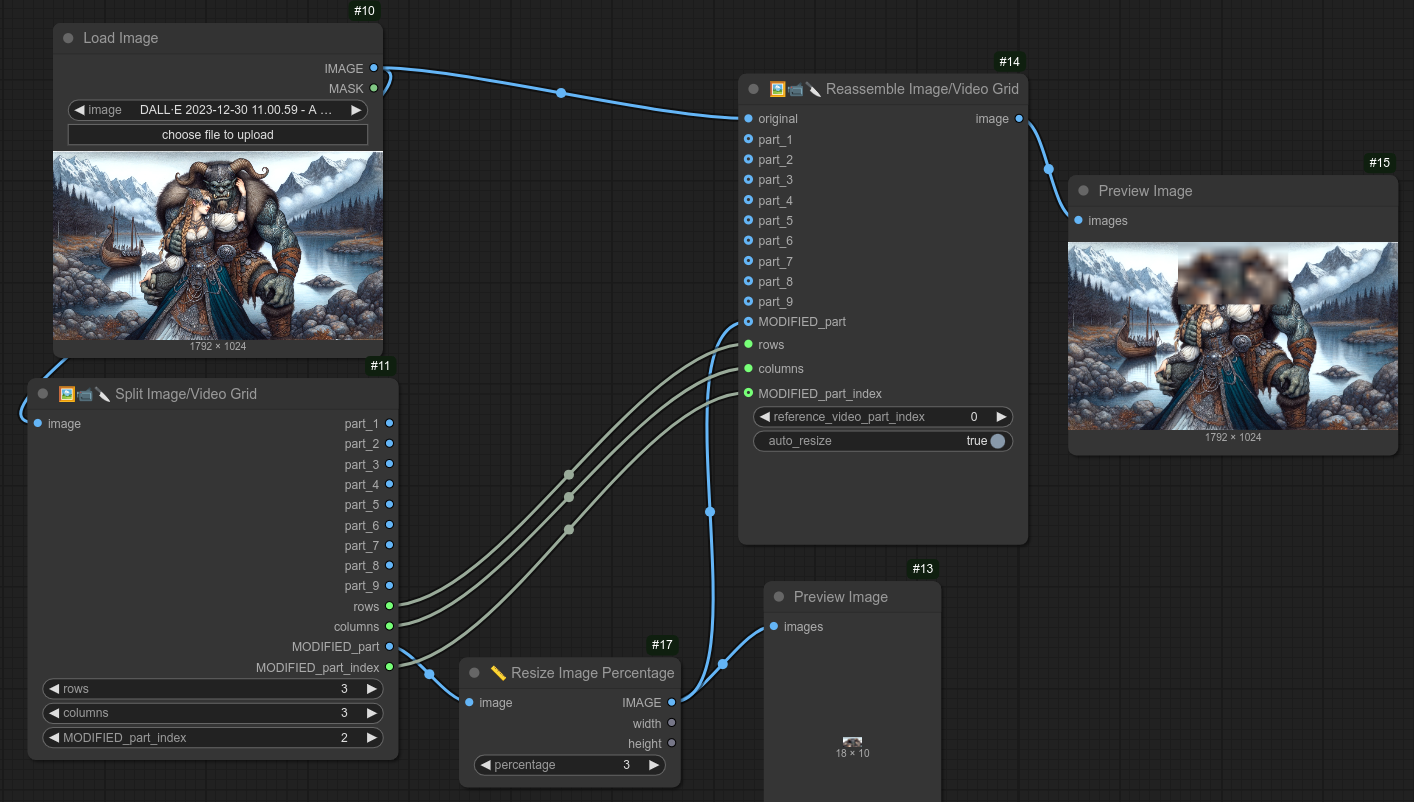
Below is an example where I show you that you can also influence different parts "manually". (Here, I just send part_1 to replace part 7,8,9.)
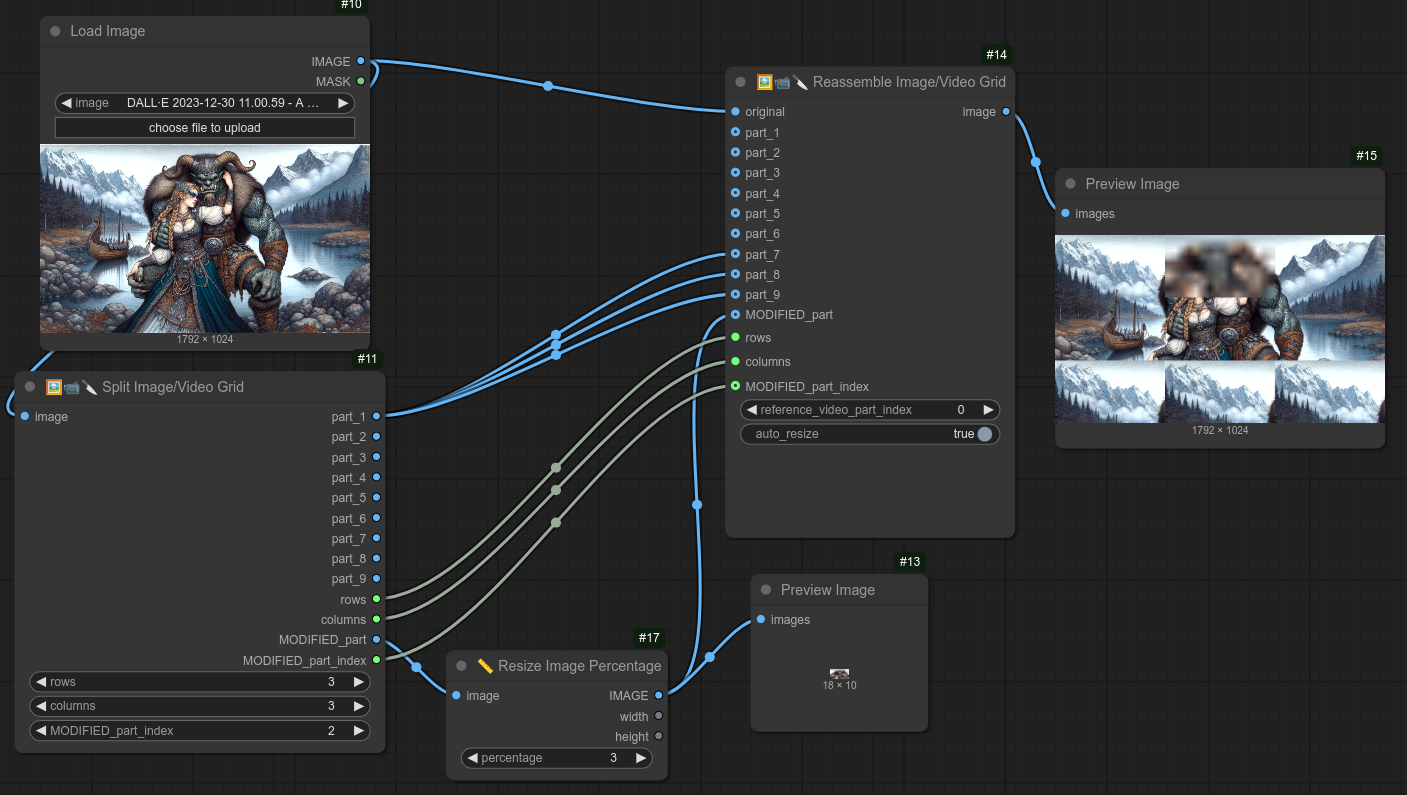
For reassembling videos it might get tricky.
For example if you used the node 52 - 🔊📹 Audio Video Sync, the modified part might be shorter/longer, change FPS etc...
You can try to re-synchronize them all if the duration was modified.
In this situation you need to use the reference_video_part_index to select the reference video part. (Probably the same as the MODIFIED_part_index.)

148 - 💾🔊 Save Audio (tmp_api.wav/mp3) ⚠️💣
Description:
Temporary save for an audio file, mp3 or wav.
Useful if you want to synchronize data in between API calls from several Comfyui instances. (Used in the background by my API nodes, like node 157 🔮⚡ Execute Workflow, to exchange audio files. - raw/processed -)
You can send audio_path (This will create file tmp_api.mp3) :

Or an AUDIO type (This will create file tmp_api.wav) :

Note that if you are sending an AUDIO type, this node will save it as a wav file. (Even if your selection is an mp3 file.)
149 - 💾📹 Save Video (tmp_api.mp4/mkv/webm) ⚠️💣
Description:
Temporary save for a video file, mp4, mkv or webm.
Useful if you want to synchronize data in between API calls from several Comfyui instances. (Used in the background by my API nodes, like node 157 🔮⚡ Execute Workflow, to exchange video files. - raw/processed -)
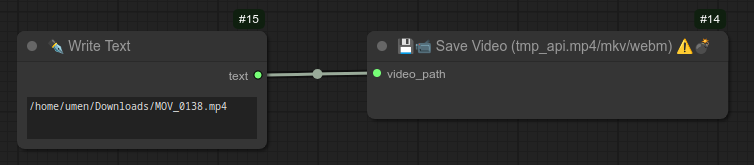
150 - 🎨📜 Style Selector (🎲 or ♻ or ♻📑) + Civitai urn
Description:
A new Universal node for selecting styles.
Also contains some informations for Civitai urn. (Need test and better "database" of good/fast models, i recommended you to send the urns you like manually.)
Here is an example of usage with CivitAI API node :
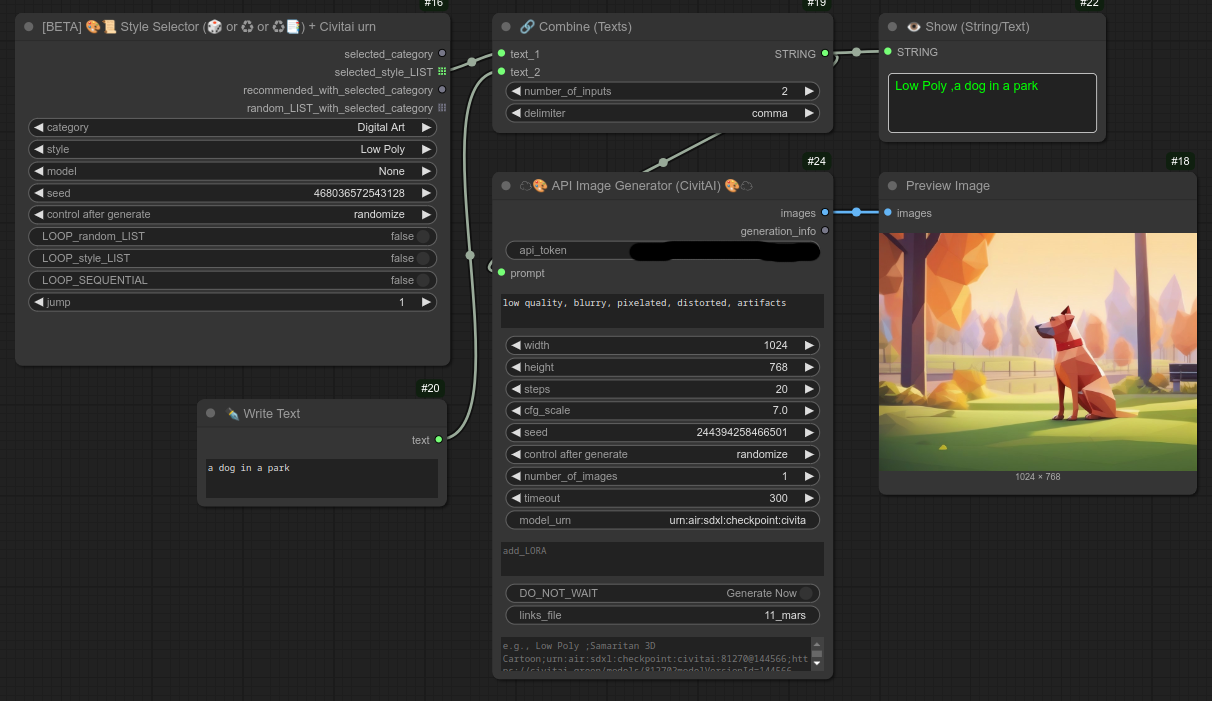
Here is a slightly more complex example using model urns :
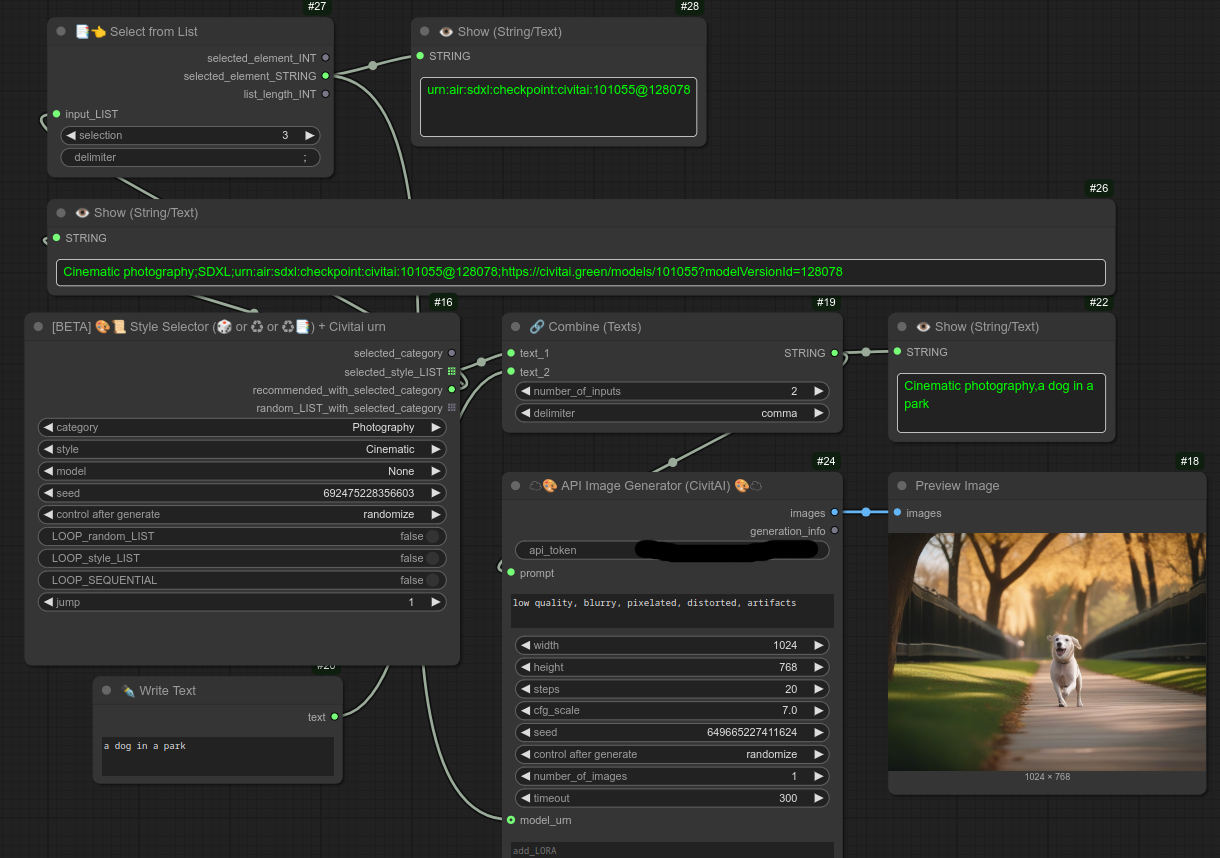
NOTE : CivitAI can be particularly slow !! So you can use the option DO_NOT_WAIT instead with an optional "links_file".
It will create a file with the links to recover the generated images later with the node 151.
So you can make as many requests as you want, and come back another time to recover the images with this txt file.
Note that you can also send the LIST directly with all the values.
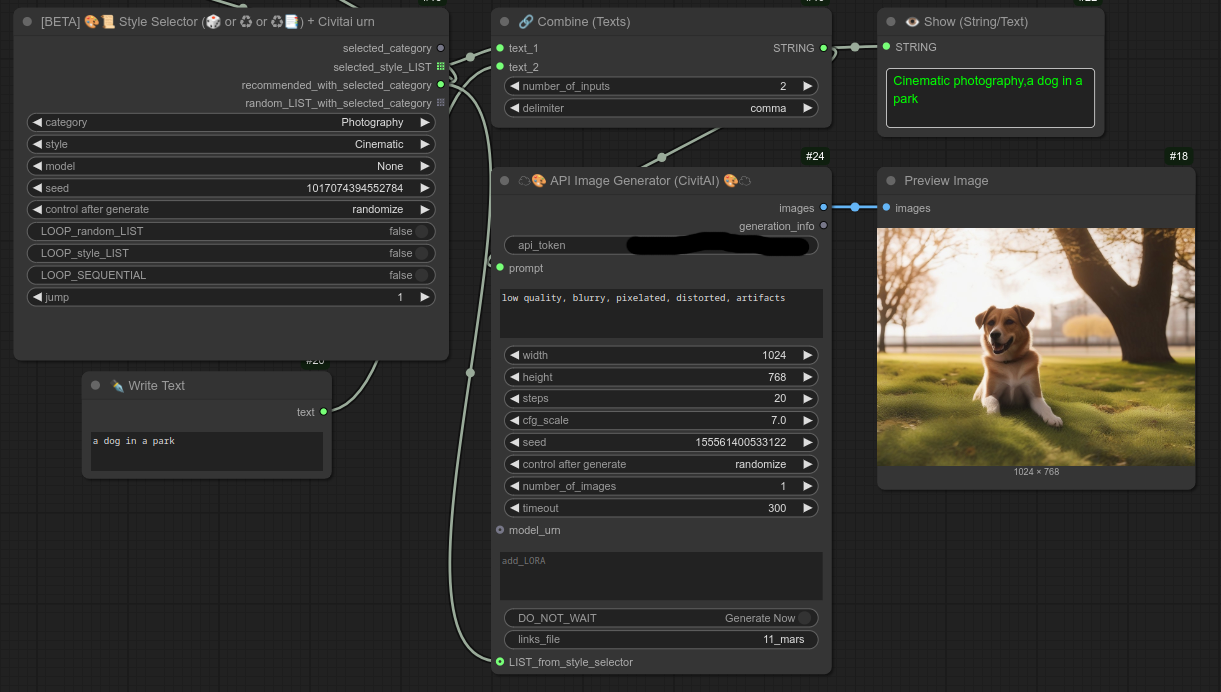
If you do that you can later recover the values like text and use the "autosave" option of node 151.
It will take the style and make a folder for it. Example from the image above : ./ComfyUI/output/civitai_autosave/Cinematic_photography/
It is very useful if you use node 150 as a LOOP, you can recover the images later and organise them automatically in separate folders according to the selected style.
151 - 📥🕑🤖 Load CivitAI Links
Description:
This node must be used after using the node 150 + DO_NOT_WAIT + links_file.
When saving DO_NOT_WAIT and the "links_file" from the node 150, it will create a txt file in "ComfyUI/Bjornulf/civitai_links/", you can load them with this node.
Below are the images recovered from the file "11_mars.txt":
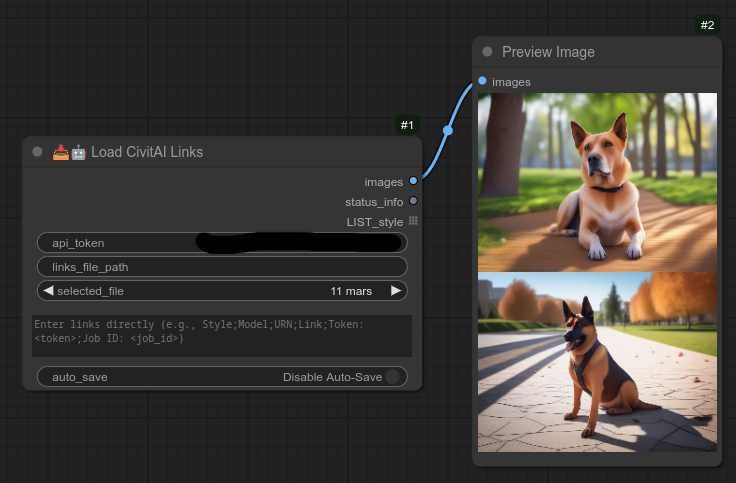
If you used from node 150 the LIST_from_style_selector you can later recover the values and use the "autosave" option of node 151.
It will take the style and make a folder for it. Example from the image above : ./ComfyUI/output/civitai_autosave/Cinematic_photography/
It is very useful if you use node 150 as a LOOP, you can recover the images later and organise them automatically in separate folders according to the selected style.
152 - [Coming soon] 💾 Save Tensors (tmp_api.pt) ⚠️💣
Description:
This is BETA, it will save a tensor in a file.
The goal is to optimize the VRAM usage by saving tensors in files.
153 - [Coming soon] 📥 Load Tensor (tmp_api.pt)
Description:
This is BETA, it will load a tensor.
The goal is to optimize the VRAM usage by saving tensors in files.
154 - 🔮 Remote VAE Decoder
Description:
Simple node to decode a VAE model from a remote machine.
The VAE decode node doesn't have to be on the same machine, so if you have a remote machine and want to save the VRAM, you can use that.
The remote machine need to have my custom nodes too.
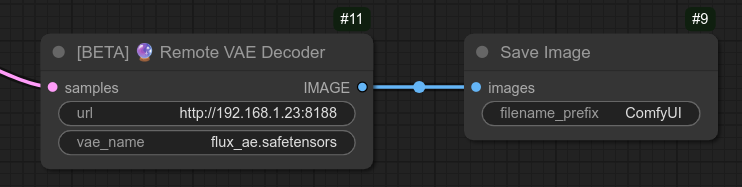
155 - [Coming soon] 🔮 Remote VAE Decoder (Tiled)
Description:
Same as 154 but with tiled version.
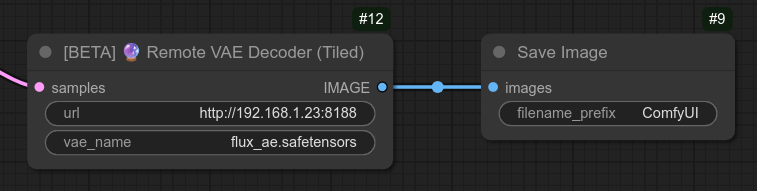
156 - [Coming soon] 📥🔮 Load from Base64
Description:
This is BETA, it is used to recovered some values between Comfyui instances.
157 - [Coming soon] 🔮⚡ Remote Execute Workflow
Description:
This is the start of a complex new environment and this is in BETA.
The goal of this node is to run a workflow on another Comfyui instance and recover what was generated.
For now it supports image/sound/video.
It can do anything that a normal workflow can do.
Create an image, create a video, upscale an image, etc...
Keep in touch for more informations... Wip...
Basically use run heavy duty workflows on another machine, and recover the results.
Below is an example of a lipsync workflow that I run on another Comfyui instance. (For now local network only, but will run on runpod too.)
I use that on my laptop (192.168.1.23), that recovers the results from my "ai dedicated" desktop machine (192.168.1..100) :

158 - [Coming soon] 📥🔮📝 Text Manager Api (Execute Workflow)
Description:
This is BETA.
This node need to be used to create functional workflows to run with node 157.
It is communicating with node 157 from another Comfyui instance.
159 - [Coming soon] 🔥📝📹 Video Text Generator 📹📝🔥
Description:
This is BETA.
This is the start of a new node that will generate a video prompt.
It's goal is to be like the "Text Generator" node, but for videos.
The "old" Text Generator main node 81 is now renamed for image only : 🔥📝🖼 Image Text Generator 🖼📝🔥.
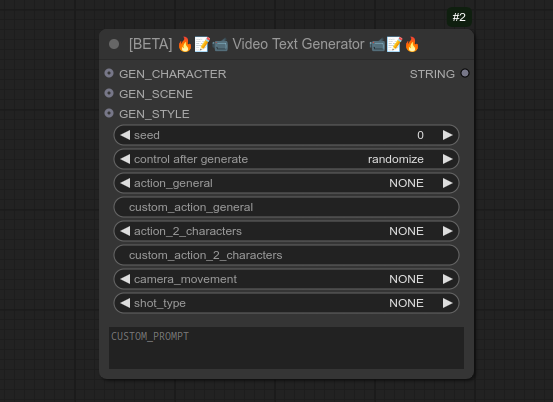
160 - 🦙👁 Ollama Vision Prompt Selector
Description:
New layout prompt selector for Ollama Vision.
Ollama vision is now divided in 2 separate nodes.
161 - [Coming soon] 🔧🧑 Fix Face
Description:
This is BETA.
First node of a new collection of "Fix Images" nodes.
Quickly fix, control and edit faces. (and more)
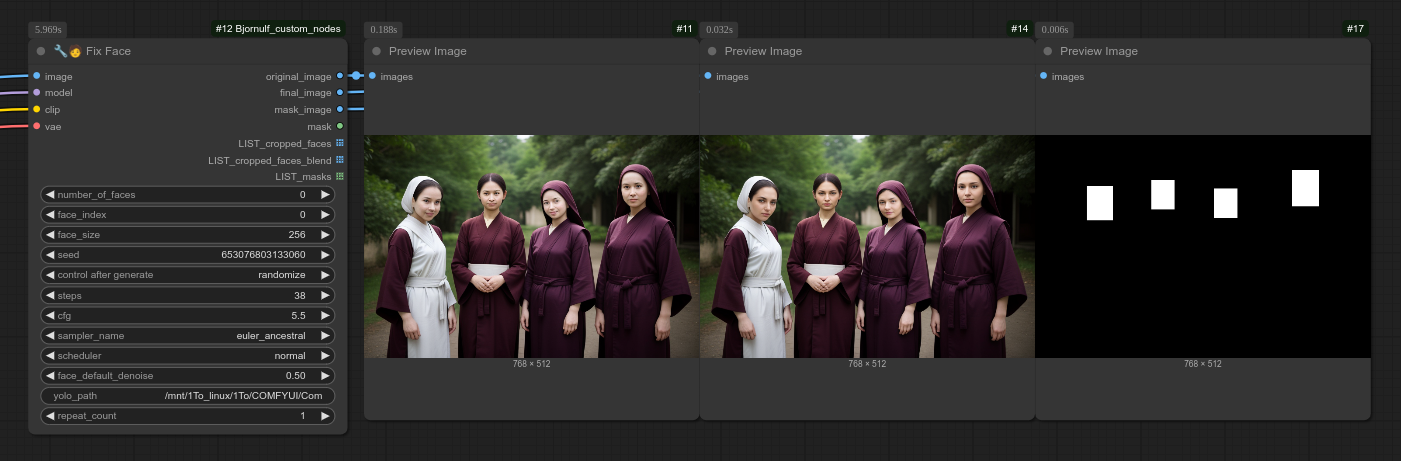
Here is a zoom of that :
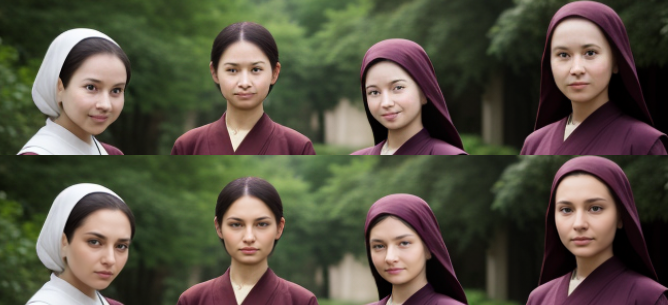
You can also give specific text and custom denoise for each faces :
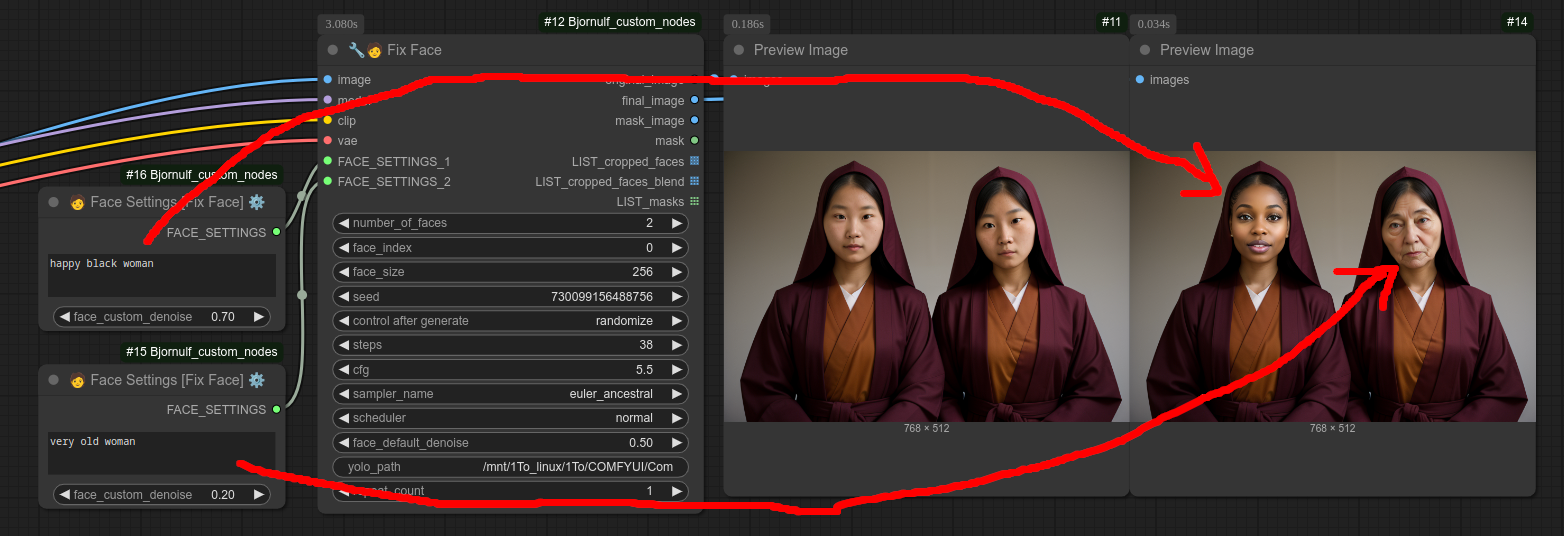
You can also select a specific face, if set at 0 it will do all the faces, but below I set it to 1 :
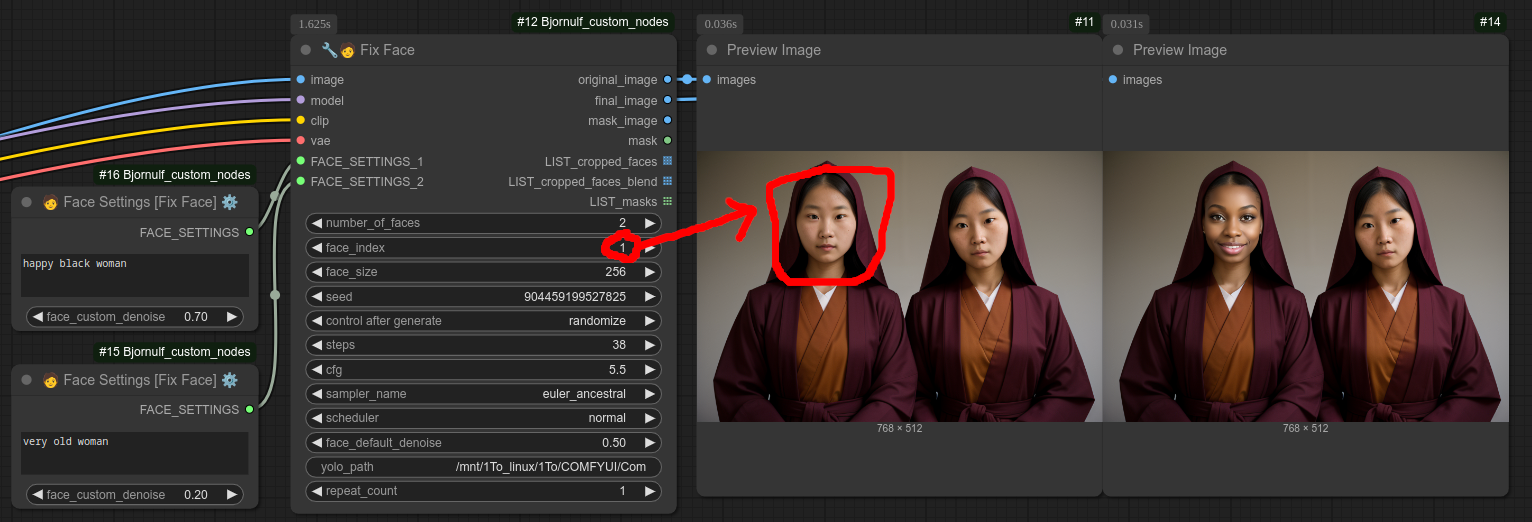
This node can also fix the whole person, but i will likely make another separate node for that later :
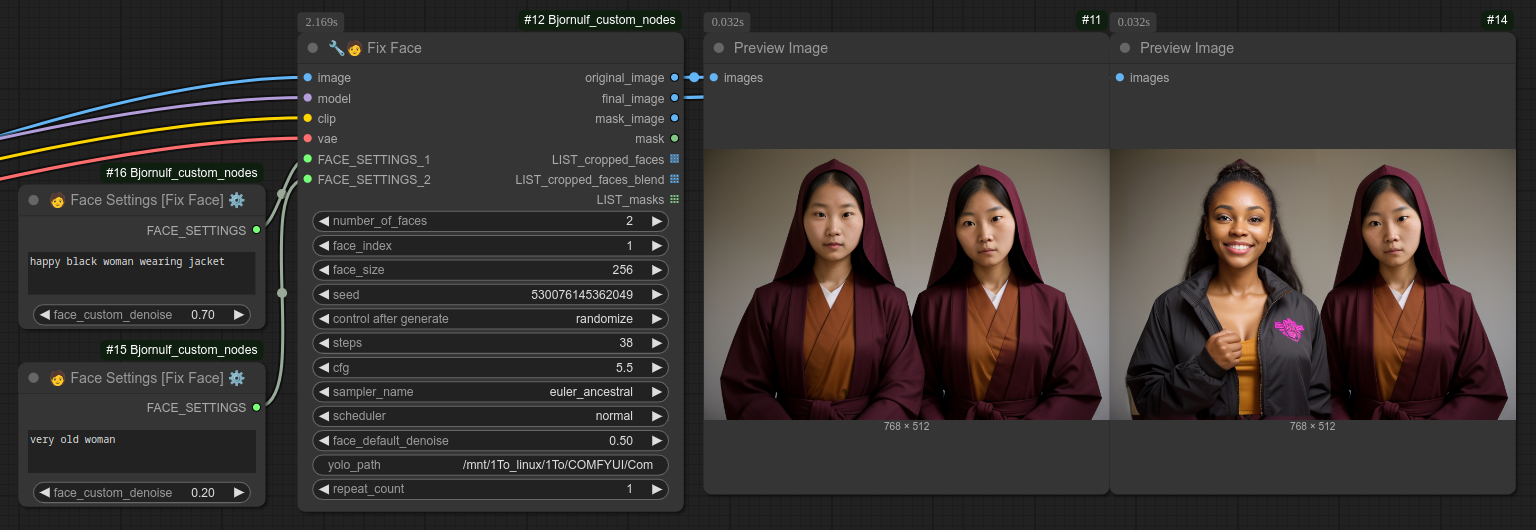
You can preview the nodes effects very well with my Preview Image node, You can clearly see here the white box that is the detected "person" :
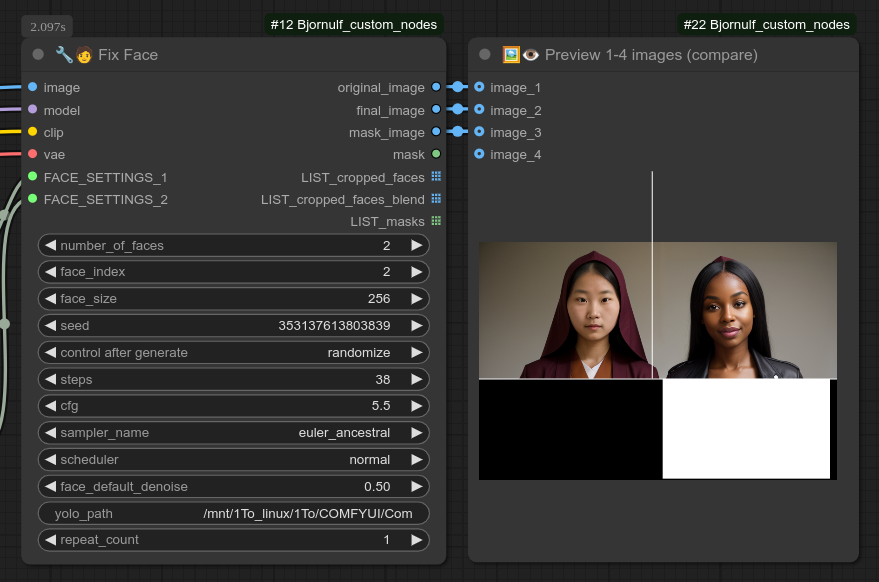
In the future I will make a system to "inject" a specific reusable character, probably connected to loras or suchs.
162 - [Coming soon] 🧑 Face Settings [Fix Face] ⚙
Description:
Connect to Fix Face node to modify a specific face.