Nodes Browser
ComfyDeploy: How ComfyUI-nunchaku works in ComfyUI?
What is ComfyUI-nunchaku?
Nunchaku ComfyUI Node. Nunchaku is the inference that supports SVDQuant. SVDQuant is a new post-training training quantization paradigm for diffusion models, which quantize both the weights and activations of FLUX.1 to 4 bits, achieving 3.5× memory and 8.7× latency reduction on a 16GB laptop 4090 GPU. See more details: https://github.com/mit-han-lab/nunchaku
How to install it in ComfyDeploy?
Head over to the machine page
- Click on the "Create a new machine" button
- Select the
Editbuild steps - Add a new step -> Custom Node
- Search for
ComfyUI-nunchakuand select it - Close the build step dialig and then click on the "Save" button to rebuild the machine
This repository provides the ComfyUI node for Nunchaku, an efficient inference engine for 4-bit diffusion models quantized with SVDQuant. For the quantization library, check out DeepCompressor.
Join our user groups on Slack and WeChat for discussions—details here. If you have any questions, run into issues, or are interested in contributing, feel free to share your thoughts with us!
Nunchaku ComfyUI Node
Installation
Please first install nunchaku following the instructions in README.md.
[Optional] You need to install image_gen_aux if you use FluxDepthPreprocessor node:
pip install git+https://github.com/asomoza/image_gen_aux.git
Comfy-CLI
You can easily use comfy-cli to run ComfyUI with Nunchaku:
pip install comfy-cli  # Install ComfyUI CLI
comfy install          # Install ComfyUI
comfy node registry-install nunchaku_nodes  # Install Nunchaku
ComfyUI-Manager
-
Install ComfyUI with
git clone https://github.com/comfyanonymous/ComfyUI.git cd ComfyUI pip install -r requirements.txt -
Install ComfyUI-Manager with the following commands:
cd custom_nodes git clone https://github.com/ltdrdata/ComfyUI-Manager comfyui-manager -
Launch ComfyUI
cd .. # Return to the ComfyUI root directory python main.py -
Open the Manager, search
nunchakuin the Custom Nodes Manager and then install it.
Manual Installation
-
Set up ComfyUI with the following commands:
git clone https://github.com/comfyanonymous/ComfyUI.git cd ComfyUI pip install -r requirements.txt -
Clone this repository into the
custom_nodesdirectory inside ComfyUI:cd custom_nodes https://github.com/mit-han-lab/ComfyUI-nunchaku
Usage
-
Set Up ComfyUI and Nunchaku:
-
Nunchaku workflows can be found at
workflows. To use them, copy the files touser/default/workflowsin the ComfyUI root directory:cd ComfyUI # Create the workflows directory if it doesn't exist mkdir -p user/default/workflows # Copy workflow configurations cp custom_nodes/ComfyUI-nunchaku/workflows/* user/default/workflows/ -
Install any missing nodes (e.g.,
comfyui-inpainteasy) by following this tutorial.
-
-
Download Required Models: Follow this tutorial to download the necessary models into the appropriate directories. Alternatively, use the following commands:
huggingface-cli download comfyanonymous/flux_text_encoders clip_l.safetensors --local-dir models/text_encoders huggingface-cli download comfyanonymous/flux_text_encoders t5xxl_fp16.safetensors --local-dir models/text_encoders huggingface-cli download black-forest-labs/FLUX.1-schnell ae.safetensors --local-dir models/vae -
Run ComfyUI: To start ComfyUI, navigate to its root directory and run
python main.py. If you are usingcomfy-cli, simply runcomfy launch. -
Select the Nunchaku Workflow: Choose one of the Nunchaku workflows (workflows that start with
nunchaku-) to get started. For theflux.1-fillworkflow, you can use the built-in MaskEditor tool to apply a mask over an image. -
All the 4-bit models are available at our HuggingFace or ModelScope collection. Except
svdq-flux.1-t5, please download the entire model folder tomodels/diffusion_models.
Nunchaku Nodes
-
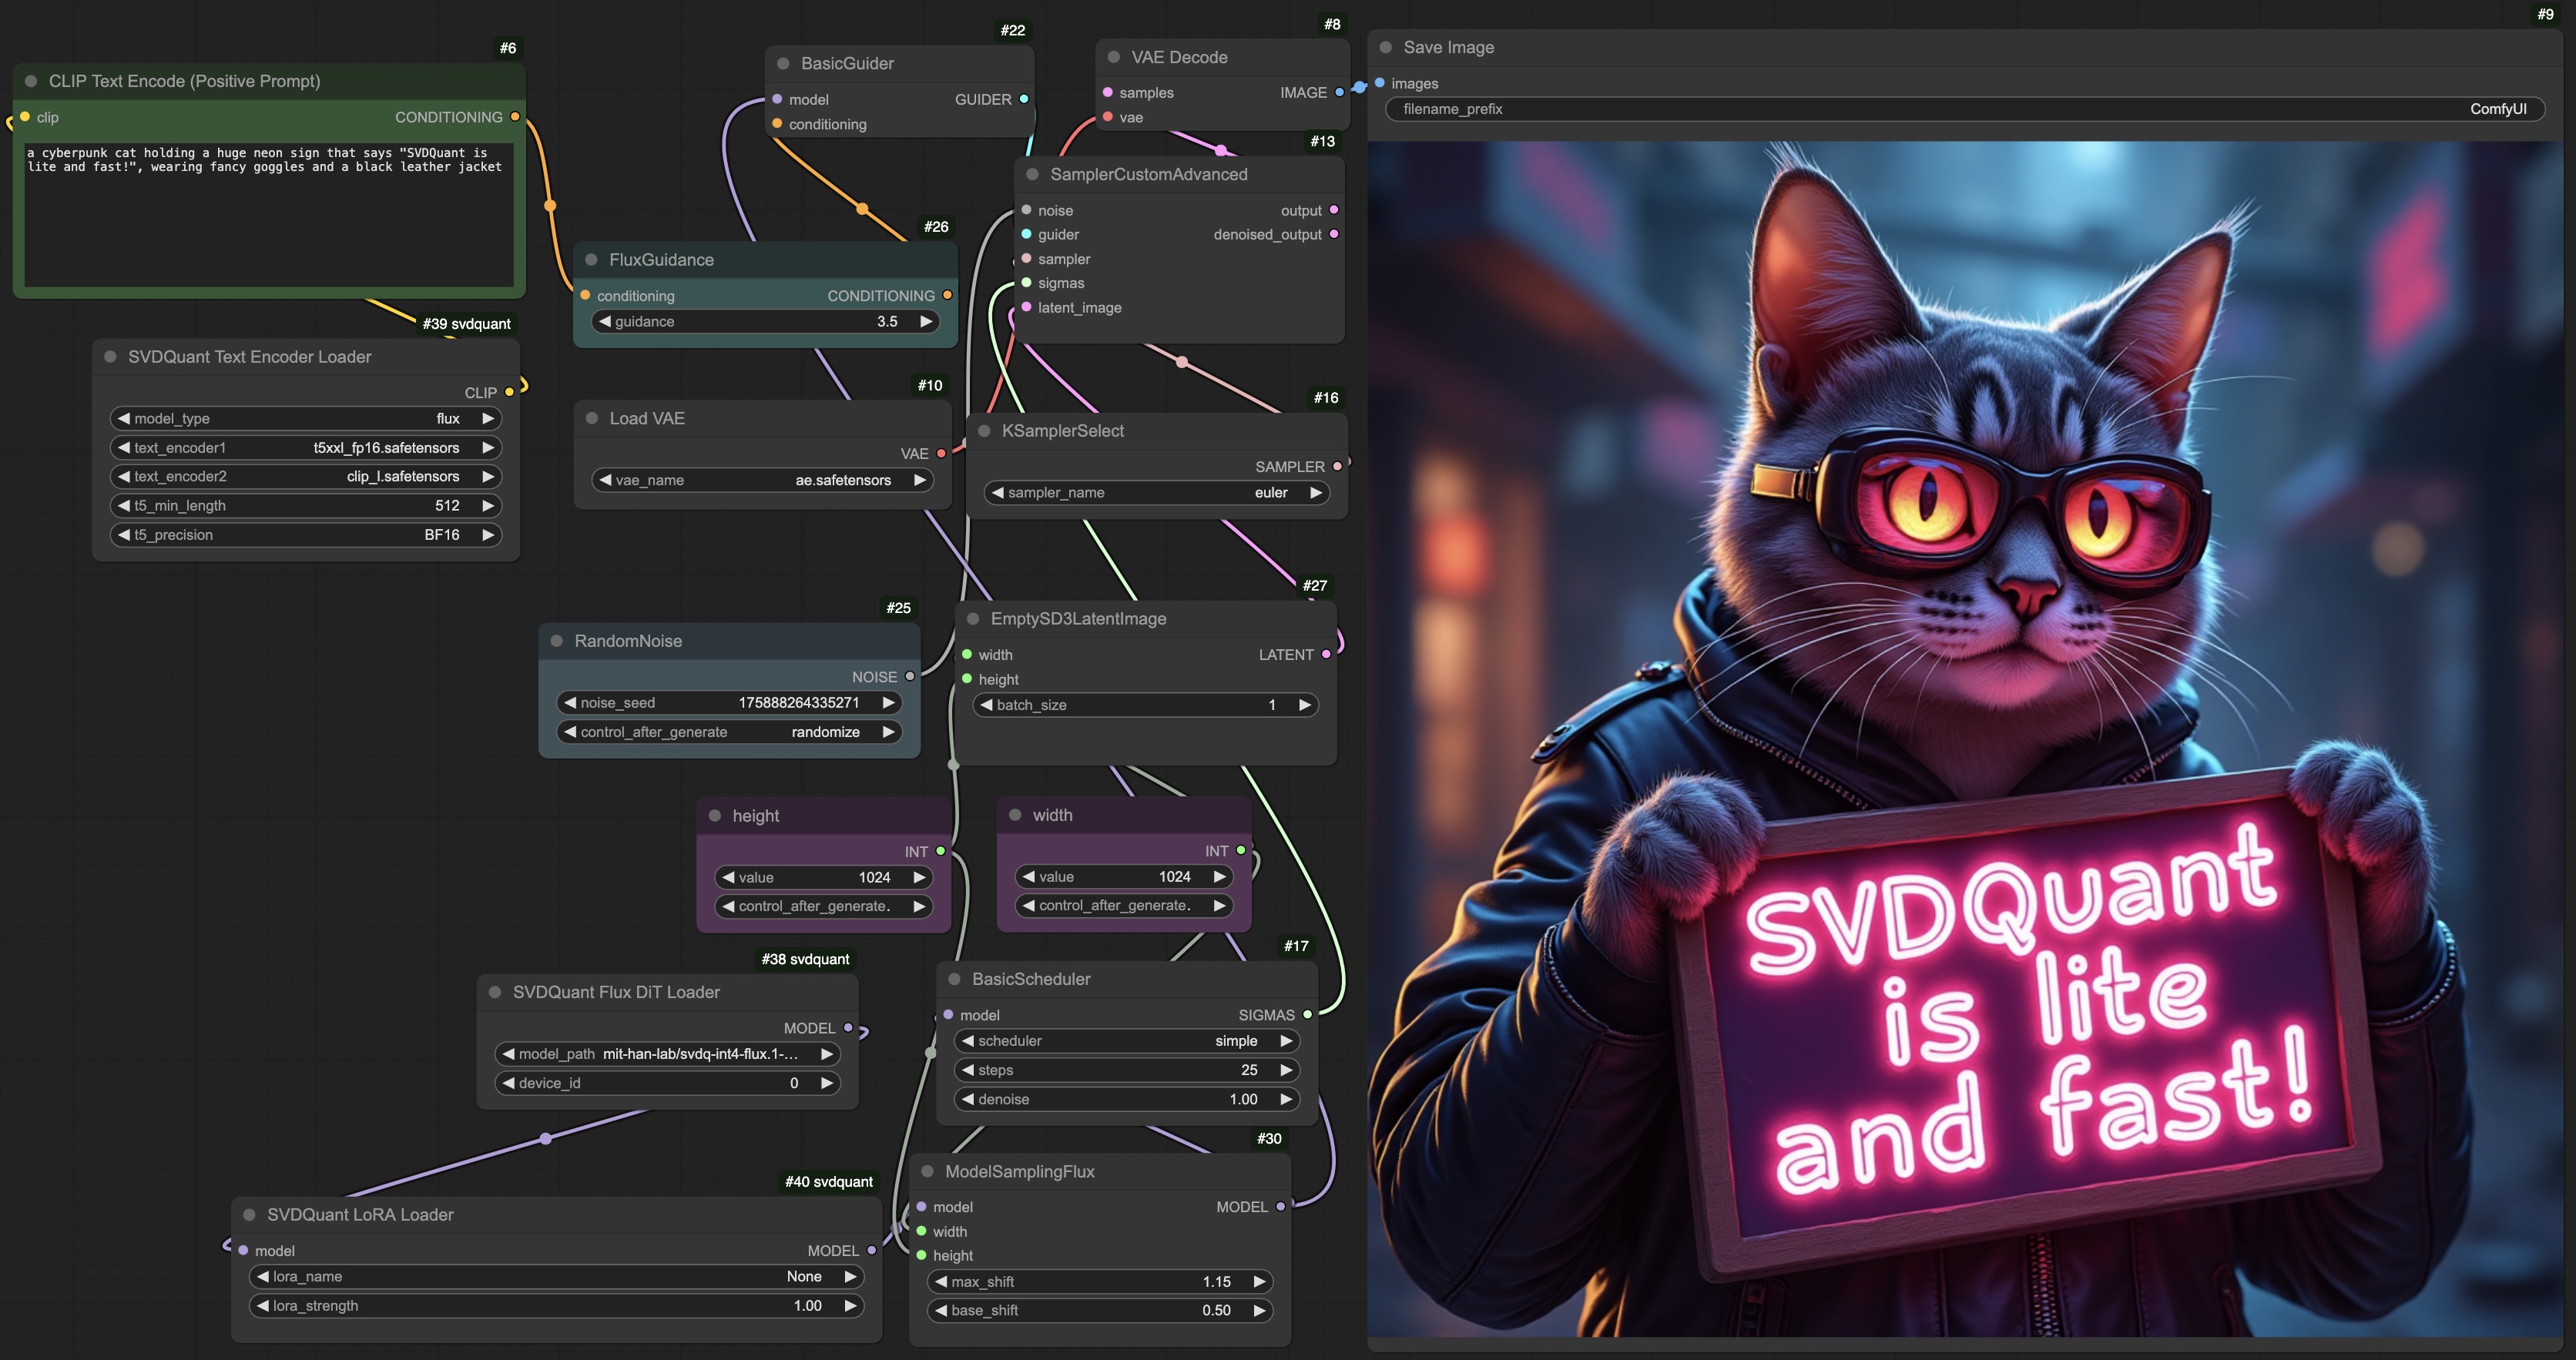
Nunchaku Flux DiT Loader: A node for loading the FLUX diffusion model.
-
model_path: Specifies the model's location. You need to manually download the model folder from our Hugging Face or ModelScope collection. For example, runhuggingface-cli download mit-han-lab/svdq-int4-flux.1-dev --local-dir models/diffusion_models/svdq-int4-flux.1-devAfter downloading, set
model_pathto the corresponding folder name.Note: If you rename the model folder, ensure that
comfy_config.jsonis present in the folder. You can find this file in our corresponding repositories on Hugging Face or ModelScope. -
cpu_offload: Enables CPU offloading for the transformer model. While this reduces GPU memory usage, it may slow down inference.- When set to
auto, it will automatically detect your available GPU memory. If your GPU has more than 14GiB of memory, offloading will be disabled. Otherwise, it will be enabled. - Memory usage will be further optimized in node v0.2.
- When set to
-
device_id: Indicates the GPU ID for running the model.
-
-
Nunchaku FLUX LoRA Loader: A node for loading LoRA modules for SVDQuant FLUX models.
-
Place your LoRA checkpoints in the
models/lorasdirectory. These will appear as selectable options underlora_name. -
lora_formatspecifies the LoRA format. Supported formats include:auto: Automatically detects the appropriate LoRA format.diffusers(e.g., aleksa-codes/flux-ghibsky-illustration)comfyui(e.g., Shakker-Labs/FLUX.1-dev-LoRA-Children-Simple-Sketch)xlab(e.g., XLabs-AI/flux-RealismLora)svdquant(e.g., mit-han-lab/svdquant-lora-collection).
-
base_model_name: Specifies the path to the quantized base model. Iflora_formatis set tosvdquant, this option is ignored. You can set it to the same value asmodel_pathin the SVDQuant FLUX DiT Loader. -
lora_strength: Controls the strength of the LoRA module. -
save_converted_lora: If enabled, non-SVDQuant LoRA models will be converted and saved to disk, reducing conversion time in future runs. The converted LoRA will be stored in the same folder with the filename format:svdq-{precision}-{name}.safetensors. -
Note: Currently, only one LoRA can be loaded at a time. Multi-LoRA support will be added in node v0.2.
-
-
Nunchaku Text Encoder Loader: A node for loading the text encoders.
-
For FLUX, use the following files:
text_encoder1:t5xxl_fp16.safetensors(or FP8/GGUF versions of T5 encoders).text_encoder2:clip_l.safetensors
-
t5_min_length: Sets the minimum sequence length for T5 text embeddings. The default inDualCLIPLoaderis hardcoded to 256, but for better image quality, use 512 here. -
use_4bit_t5: Specifies whether you need to use our quantized 4-bit T5 to save GPU memory. -
int4_model: Specifies the INT4 T5 location. This option is only used whenuse_4bit_t5is enabled. You can download our INT4 T5 model folder tomodels/text_encodersfrom HuggingFace or ModelScope. For example, you can run the following command:huggingface-cli download mit-han-lab/svdq-flux.1-t5 --local-dir models/text_encoders/svdq-flux.1-t5After downloading, specify the corresponding folder name as the
int4_model. -
Note: Currently, loading the 4-bit T5 model consumes excessive memory. We will optimize this in node v0.2.
-
-
FLUX.1 Depth Preprocessor: A node for loading the depth estimation model and output the depth map.
model_pathspecifies the model location. You can manually download the model repository from Hugging Face and place it in themodels/checkpointsdirectory. To download via CLI, run:huggingface-cli download LiheYoung/depth-anything-large-hf --local-dir models/checkpoints/depth-anything-large-hf