Nodes Browser
ComfyDeploy: How ComfyUI Hunyuan-3D-2 works in ComfyUI?
What is ComfyUI Hunyuan-3D-2?
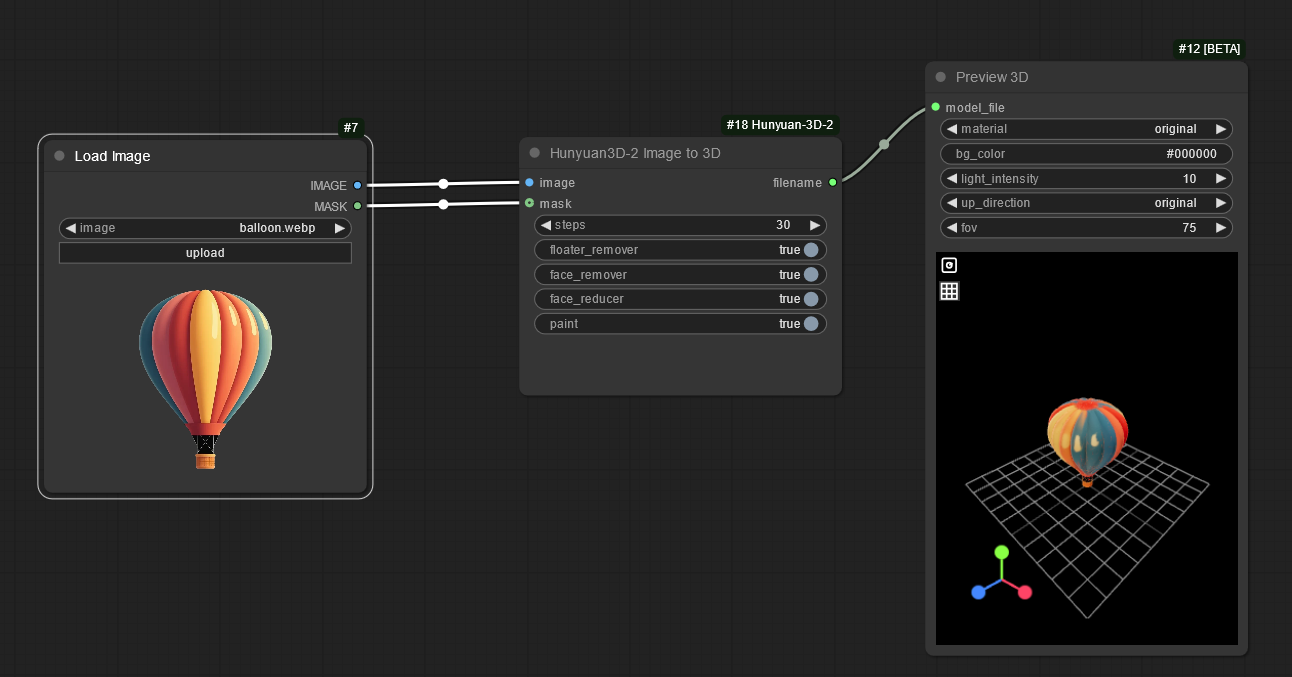
Image to 3D using Hunyuan-3D-2
How to install it in ComfyDeploy?
Head over to the machine page
- Click on the "Create a new machine" button
- Select the
Editbuild steps - Add a new step -> Custom Node
- Search for
ComfyUI Hunyuan-3D-2and select it - Close the build step dialig and then click on the "Save" button to rebuild the machine
This is a custom_node for ComfyUI. It converts an image into a 3D file you can import into Blender or whatever 3d software you use. It uses Hunyuan-3D-2 from Tencent.
Make sure you use an image with a transparent background.
This custom node might fail after the first restart. Restart ComfyUI again. Click on the panel ~~☐~~ to look for errors.
If it doesn't install...
Windows
You will need to install Visual C++ build tools
ComfyUI_windows_portable
If you installed ComfyUI with ComfyUI_windows_portable, it is using a version of python which is missing the libs and header files. The way around it is to either copy some folders or install the module from else where. See issue #
Ubuntu
sudo apt install python3-dev libgl-dev
Suse
Hunyuan-3D needs g++ 13, Suse has g++ 14+ by default
sudo zypper install g++-13 Mesa-libGL-devel python3-dev
Usage...
- Example workflow
- When you run it for the first time it will download the models which will take a long time. Press the panel button on the top right ~~☐~~ to see the progress.
- Put the input image into the "input" folder. It must have a transparent background.
- The 3D .glb file is saved in "output" after you run it.
Workarounds...
- If you get a square panel. Make sure you have a transparent background in the image. If the image came from another node, insert an "invert mask" node before giving the mask to this node, some nodes have a mask that's reversed.
Install from git
Not recommended because ComfyUI-Manager will auto update when you press the update button. git will need manual updates for every custom_node you have.
cd custom_nodes
git clone https://github.com/niknah/ComfyUI-Hunyuan-3D-2
pip install -r requirements.txt
cd ComfyUI-Hunyuan-3D-2
git submodule update --init   # You need to get the submodules if you install from git
Other models...
-
Right click on the node, click "convert input to widget", "model".
-
connect a string node to the "model" input.
-
Put in the string node the ID of the model on hugging face. ie. tencent/Hunyuan3D-2
-
The big model files are downloaded into
~/.cache/huggingface/hub