Nodes Browser
ComfyDeploy: How Comfyui-CatVTON works in ComfyUI?
What is Comfyui-CatVTON?
Comfyui-CatVTON This repository is the modified official Comfyui node of CatVTON, which is a simple and efficient virtual try-on diffusion model with 1) Lightweight Network (899.06M parameters totally), 2) Parameter-Efficient Training (49.57M parameters trainable) 3) Simplified Inference (< 8G VRAM for 1024X768 resolution). The original GitHub project is [a/https://github.com/Zheng-Chong/CatVTON](https://github.com/Zheng-Chong/CatVTON)
How to install it in ComfyDeploy?
Head over to the machine page
- Click on the "Create a new machine" button
- Select the
Editbuild steps - Add a new step -> Custom Node
- Search for
Comfyui-CatVTONand select it - Close the build step dialig and then click on the "Save" button to rebuild the machine
Comfyui-CatVTON: Concatenation Is All You Need for Virtual Try-On with Diffusion Models
<div style="display: flex; justify-content: center; align-items: center;"> <a href="http://arxiv.org/abs/2407.15886" style="margin: 0 2px;"> <img src='https://img.shields.io/badge/arXiv-2407.15886-red?style=flat&logo=arXiv&logoColor=red' alt='arxiv'> </a> <a href='https://huggingface.co/zhengchong/CatVTON' style="margin: 0 2px;"> <img src='https://img.shields.io/badge/Hugging Face-ckpts-orange?style=flat&logo=HuggingFace&logoColor=orange' alt='huggingface'> </a> <a href="https://github.com/Zheng-Chong/CatVTON" style="margin: 0 2px;"> <img src='https://img.shields.io/badge/GitHub-Repo-blue?style=flat&logo=GitHub' alt='GitHub'> </a> </div>Comfyui-CatVTON This repository is the modified official Comfyui node of CatVTON, which is a simple and efficient virtual try-on diffusion model with 1) Lightweight Network (899.06M parameters totally), 2) Parameter-Efficient Training (49.57M parameters trainable) 3) Simplified Inference (< 8G VRAM for 1024X768 resolution).
The original GitHub project is https://github.com/Zheng-Chong/CatVTON
Installation
- git clone https://github.com/pzc163/Comfyui-CatVTON.git under the ComfyUI-aki-v1.3/custom_nodes path or install https://github.com/pzc163/Comfyui-CatVTON.git according to Comfyui Manager with git URL
- install Detectron2 and DensePose
pip install git+https://github.com/facebookresearch/[email protected]
pip install git+https://github.com/facebookresearch/[email protected]#subdirectory=projects/DensePose
For Windows OS users, if you encounter a compilation and installation failure prompt, you can choose between the following two options if python==3.10 Please download Detectron2 and DensePose zip file in the Releases, which includes the code placed under /ComfyUI/python/Lib/site-packages of ComfyUI folder path. Notice that Detectron2 and DensePose zip file was compiled under python==3.10 Cuda==12.1 torch==2.1.2 environment if you can't install Detectron2 and DensePose with the released zip file. if python==3.11 Please download Detectron2 and DensePose whl file in the Releases, which includes the wheel file under python==3.11,placed under /ComfyUI/python/Lib/site-packages of ComfyUI folder path. then open cmd under ./ComfyUI/python/Lib/site-packages/ path pip install detectron2-0.6-cp311-cp311-win_amd64.whl pip install detectron2_densepose-0.6-py3-none-any.whl
- Run the ComfyUI.
- Download
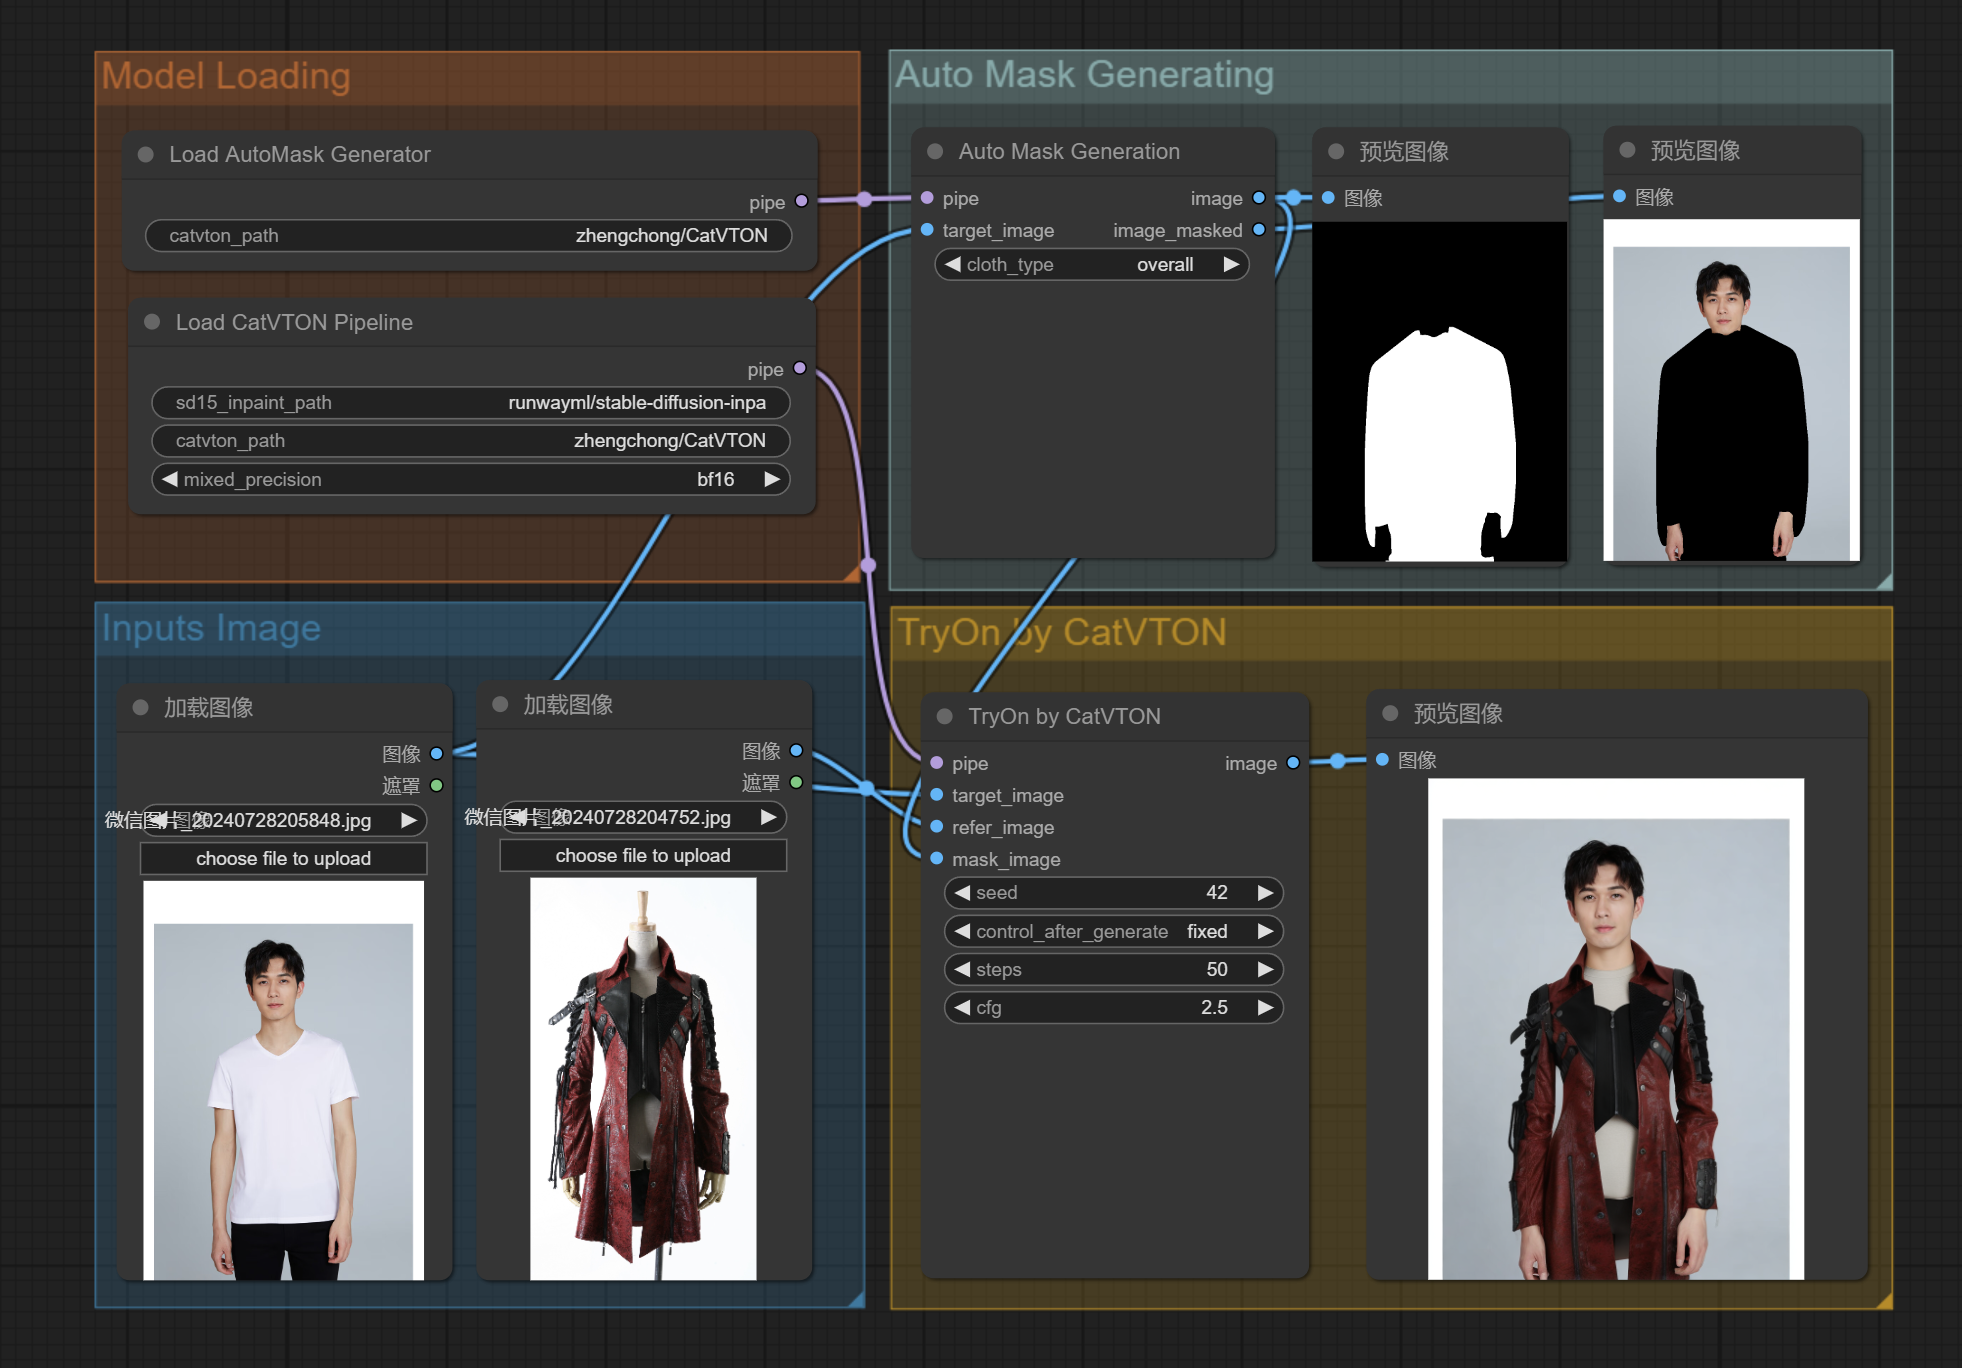
catvton_workflow.jsonand drag it into you ComfyUI webpage and enjoy 😆!
When you run the CatVTON workflow for the first time, the weight files will be automatically downloaded, which usually takes dozens of minutes.
If you need to deploy catVTON in a anaconda environment, you can follow the steps below: An Installation Guide is provided to help build the conda environment for CatVTON. When deploying the app, you will need Detectron2 & DensePose, but these are not required for inference on datasets. Install the packages according to your needs.
Reference
Our code is modified based on https://github.com/Zheng-Chong/CatVTON