Nodes Browser
ComfyDeploy: How Mflux-ComfyUI works in ComfyUI?
What is Mflux-ComfyUI?
Simple use of [a/Mflux](https://github.com/filipstrand/mflux) in ComfyUI, suitable for users who are not familiar with terminal usage. NOTE: A MLX port of FLUX based on the Huggingface Diffusers implementation.
How to install it in ComfyDeploy?
Head over to the machine page
- Click on the "Create a new machine" button
- Select the
Editbuild steps - Add a new step -> Custom Node
- Search for
Mflux-ComfyUIand select it - Close the build step dialig and then click on the "Save" button to rebuild the machine
Quick Mflux on Comfyui
Introduction
Simple use of Mflux in ComfyUI, suitable for users who are not familiar with terminal usage. Only for MacOS.
Acknowledgements
Thanks to the developers of the mflux project, especially the initiator @filipstrand and active contributor @anthonywu, for making it easier and more efficient for Mac users to generate flux model images. These contributions are truly delightful—thank you!
mflux:
https://github.com/filipstrand/mflux
Thanks also to @CharafChnioune, the author of MFLUX-WEBUI, from whom I partially referenced some code. In compliance with the Apache 2.0 license used in his project, I have added license comments in the referenced sections of my code.
Installation Guide
cd /path/to/your_ComfyUI- Activate the virtual environment
cd custom_nodesgit clone https://github.com/raysers/Mflux-ComfyUI.gitpip install mflux==0.4.1- Restart ComfyUI
Alternatively, you can search for "Mflux-ComfyUI" in ComfyUI-Manager for a quick installation.
Update Announcement
About This Update:
- The ControlNet node integrates images and intensity to distinguish it from img2img — contribution from @InformEthics.
This is the first time other contributors have participated in updating this plugin. Thanks @InformEthics.
Previous Updates Recap:
- Bring back the missing metadata
The Quick MFlux Generation node has metadata enabled by default (set to True). This means that the generated images will be automatically saved under ComfyUI/output/Mflux, along with a JSON file that shares the same name as the image.
In the ComfyUI directory, you can also use the mflux-generate --config-from-metadata command to load a JSON file and use the original mflux to generate images.
Example:
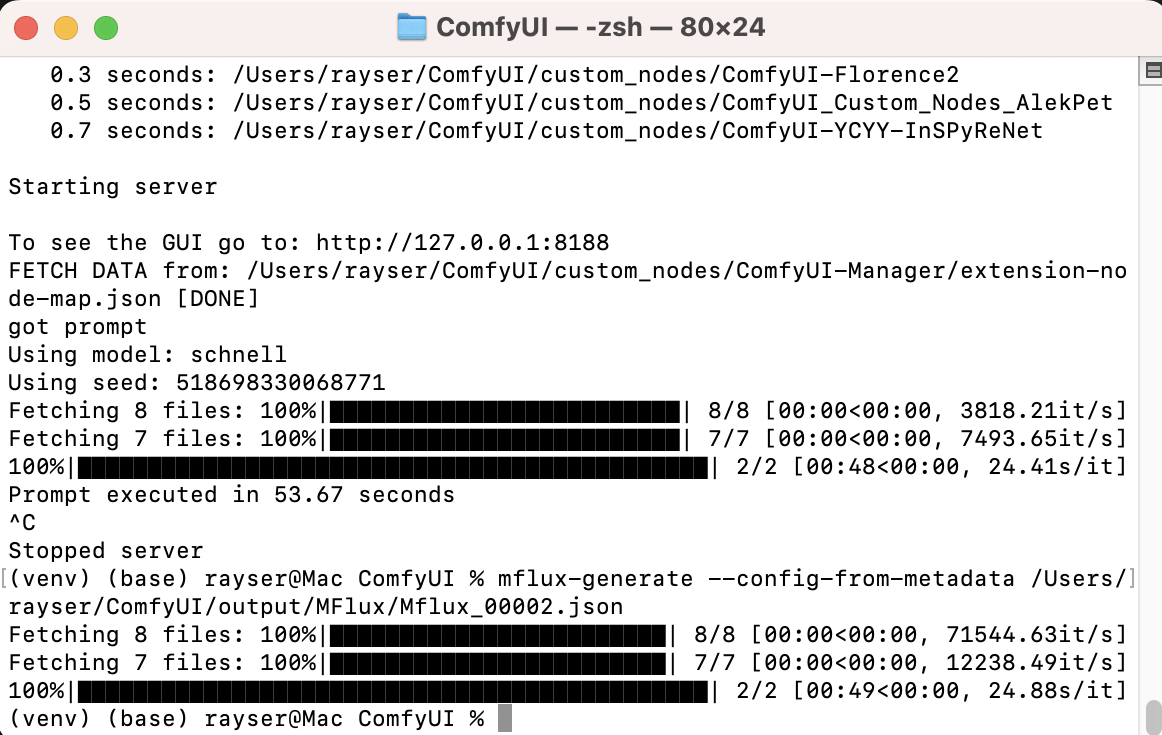
The advantage of the original version is its clean memory management: it automatically releases memory after each generation, as can be observed in the Activity Monitor.
If you'd like to experience the original mflux, this provides an additional option.
- Added progress bar and interruption functionality in ComfyUI. Click the built-in cancel button (the cross icon) to interrupt.
- Customizable file paths.
- Image-to-Image generation.
mflux has been updated to version 0.4.1. To experience image-to-image generation, please upgrade in ComfyUI with:
pip install --upgrade mflux
Usage Instructions
Right-click to create nodes:
Under MFlux/Air:
- Quick MFlux Generation
- MFlux Models Loader
- MFlux Models Downloader
- MFlux Custom Models
Under MFlux/Pro:
- Mflux Img2Img
- MFlux Loras Loader
- MFlux ControlNet Loader
Or double-click in the blank area of the canvas to bring up the node search box, and directly search for the node names by the keyword “Mflux.”
Basic Path Explanation
Quantized Models:
ComfyUI/models/Mflux
LoRA:
ComfyUI/models/loras
I usually create an Mflux folder under models/loras to manage the LoRAs compatible with Mflux, storing them uniformly. Therefore, in my example, the retrieved files should be Mflux/*******.safetensors.
Native Full Models & ControlNet:
Yourusername/.cache
Although the current node Mflux Models Downloader can automatically download, I would still like to share a few links to quantized models as a token of appreciation:
- madroid/flux.1-schnell-mflux-4bit
- madroid/flux.1-dev-mflux-4bit
- AITRADER/MFLUX.1-schnell-8-bit
- AITRADER/MFLUX.1-dev-8-bit
Of course, there are also the most important native full models from Black Forest:
Additionally, here is the FLUX.1-dev-Controlnet-Canny model from the InstantX team:
Workflow
Mflux Air:
text2img:
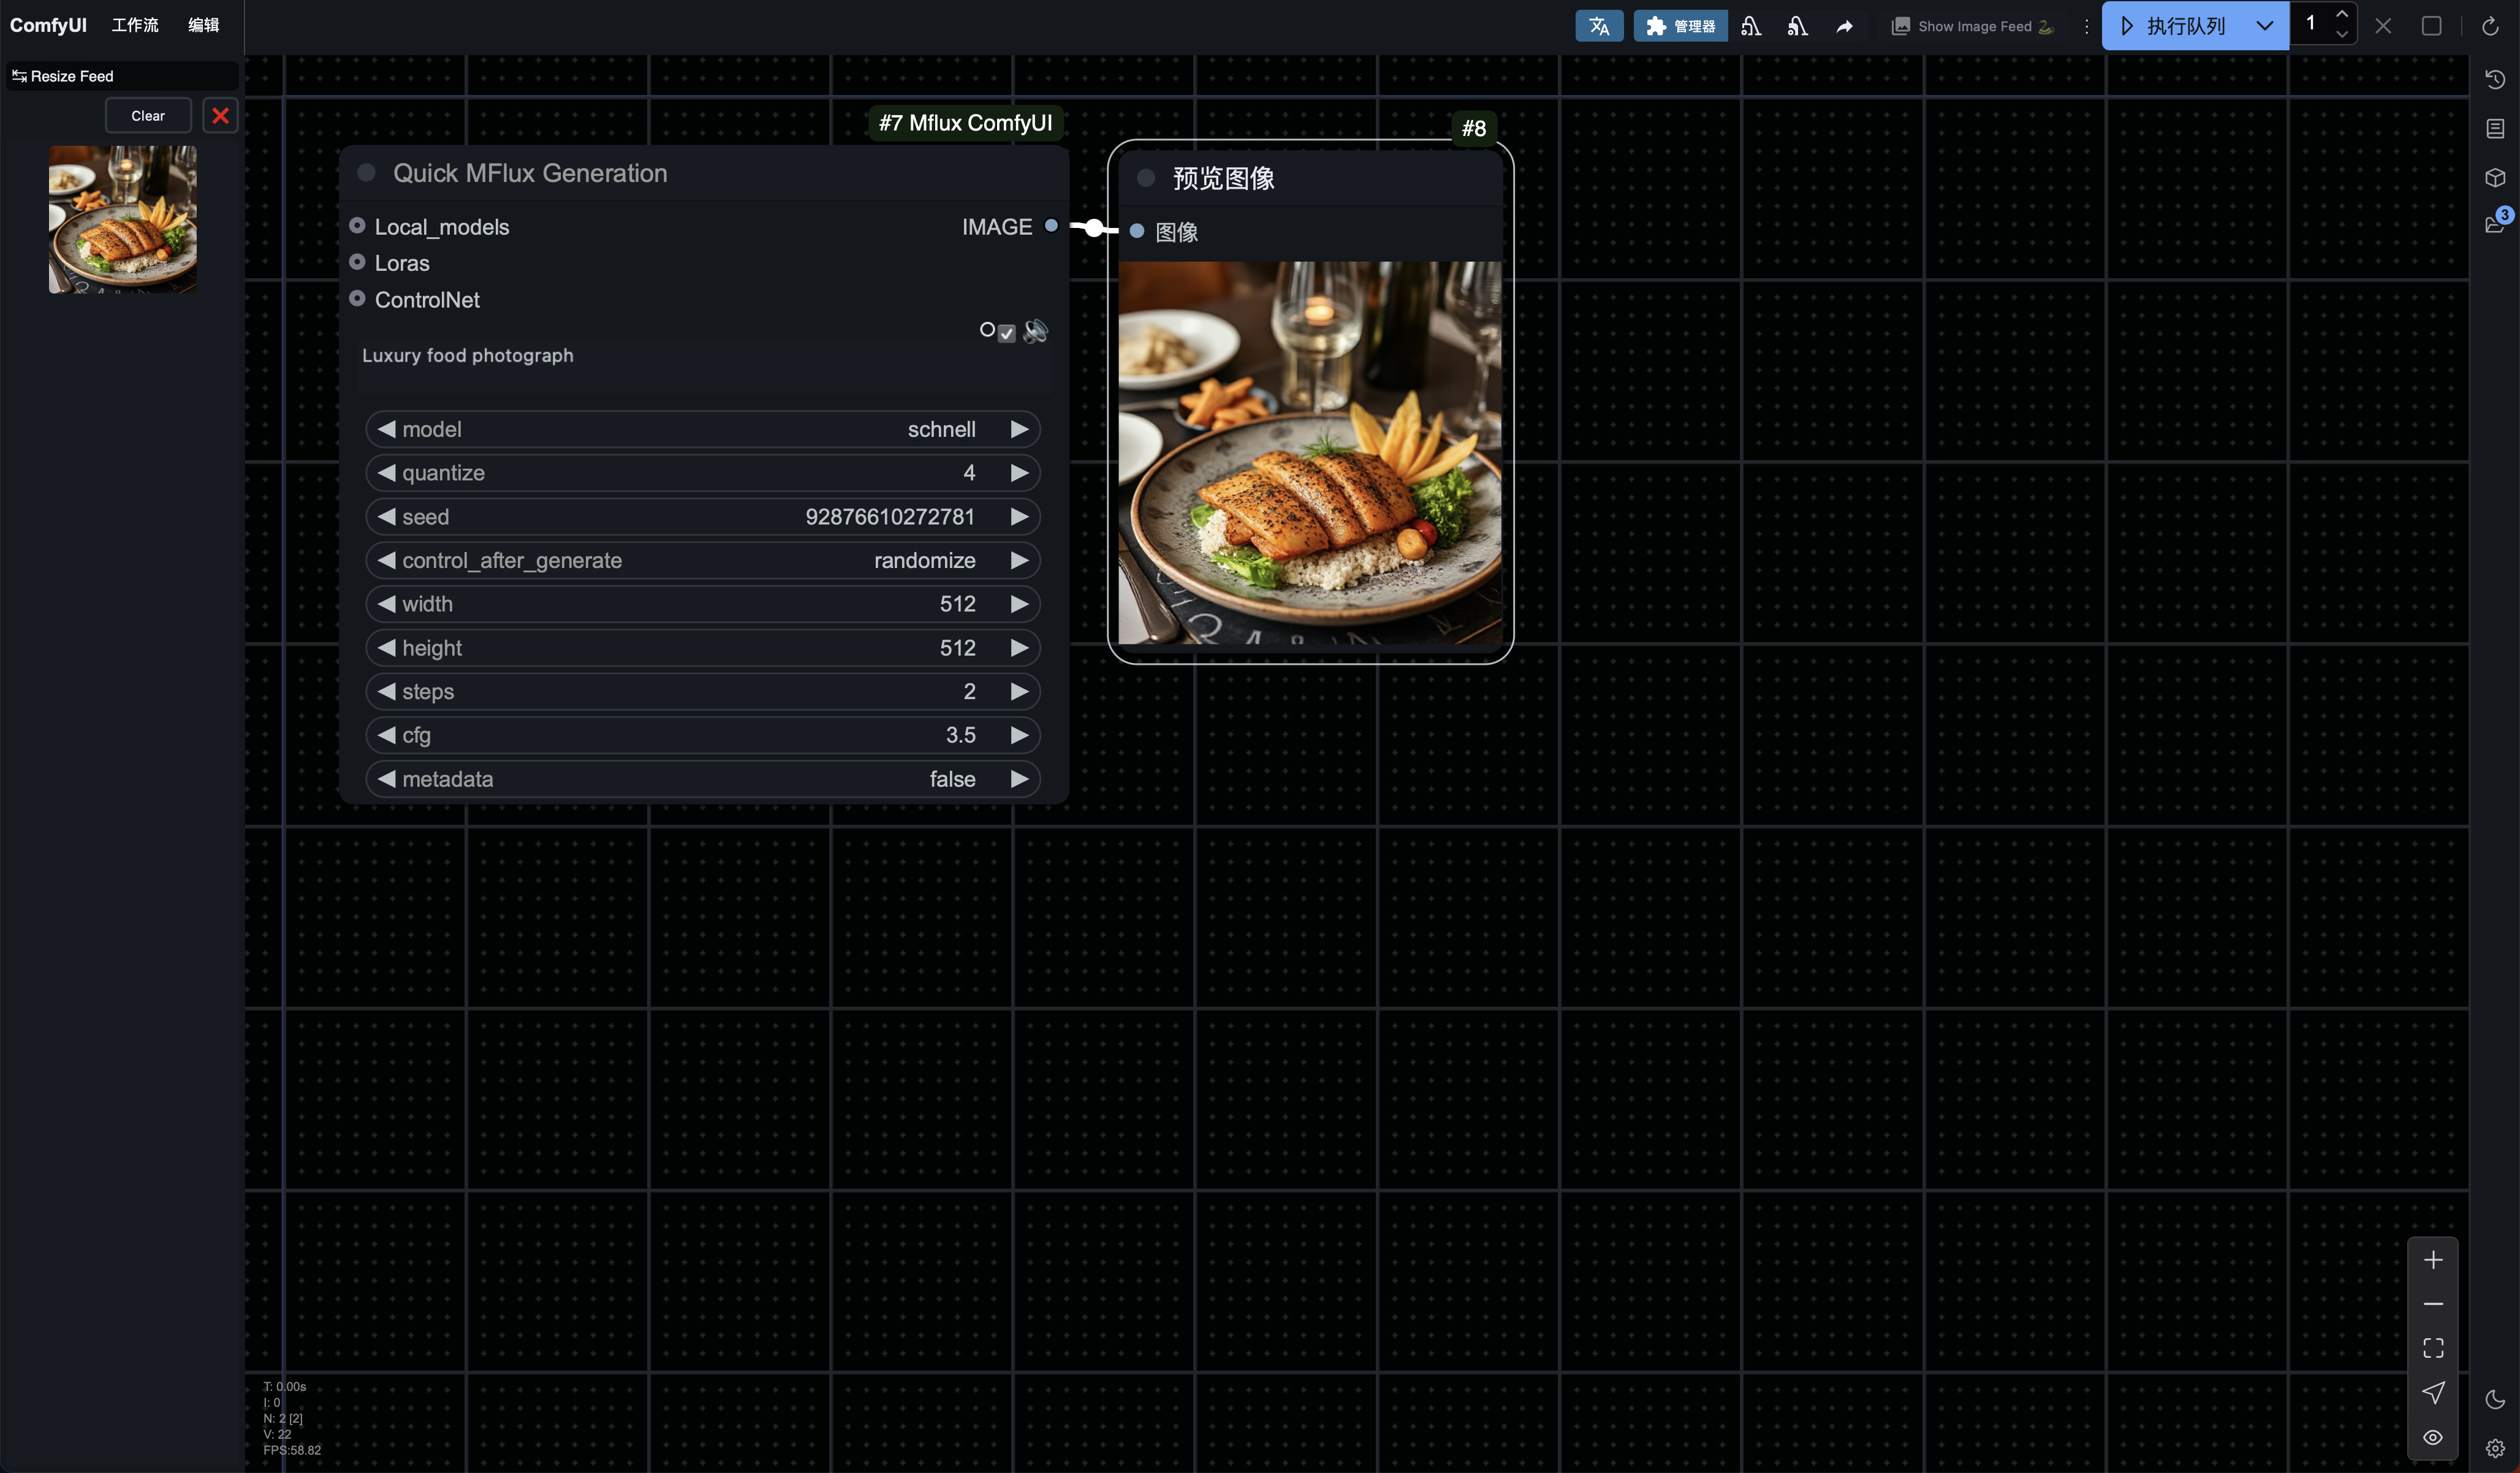
This basic workflow will download the full versions of dev or schnell to .cache from Hugging Face, both of which are over 33GB and may put a strain on hard drive space.
Of course, using quantized models will greatly save hard drive space. If you want to use quantized models, you can directly connect to the Mflux Models Downloader node to download quantized models from Hugging Face, such as:
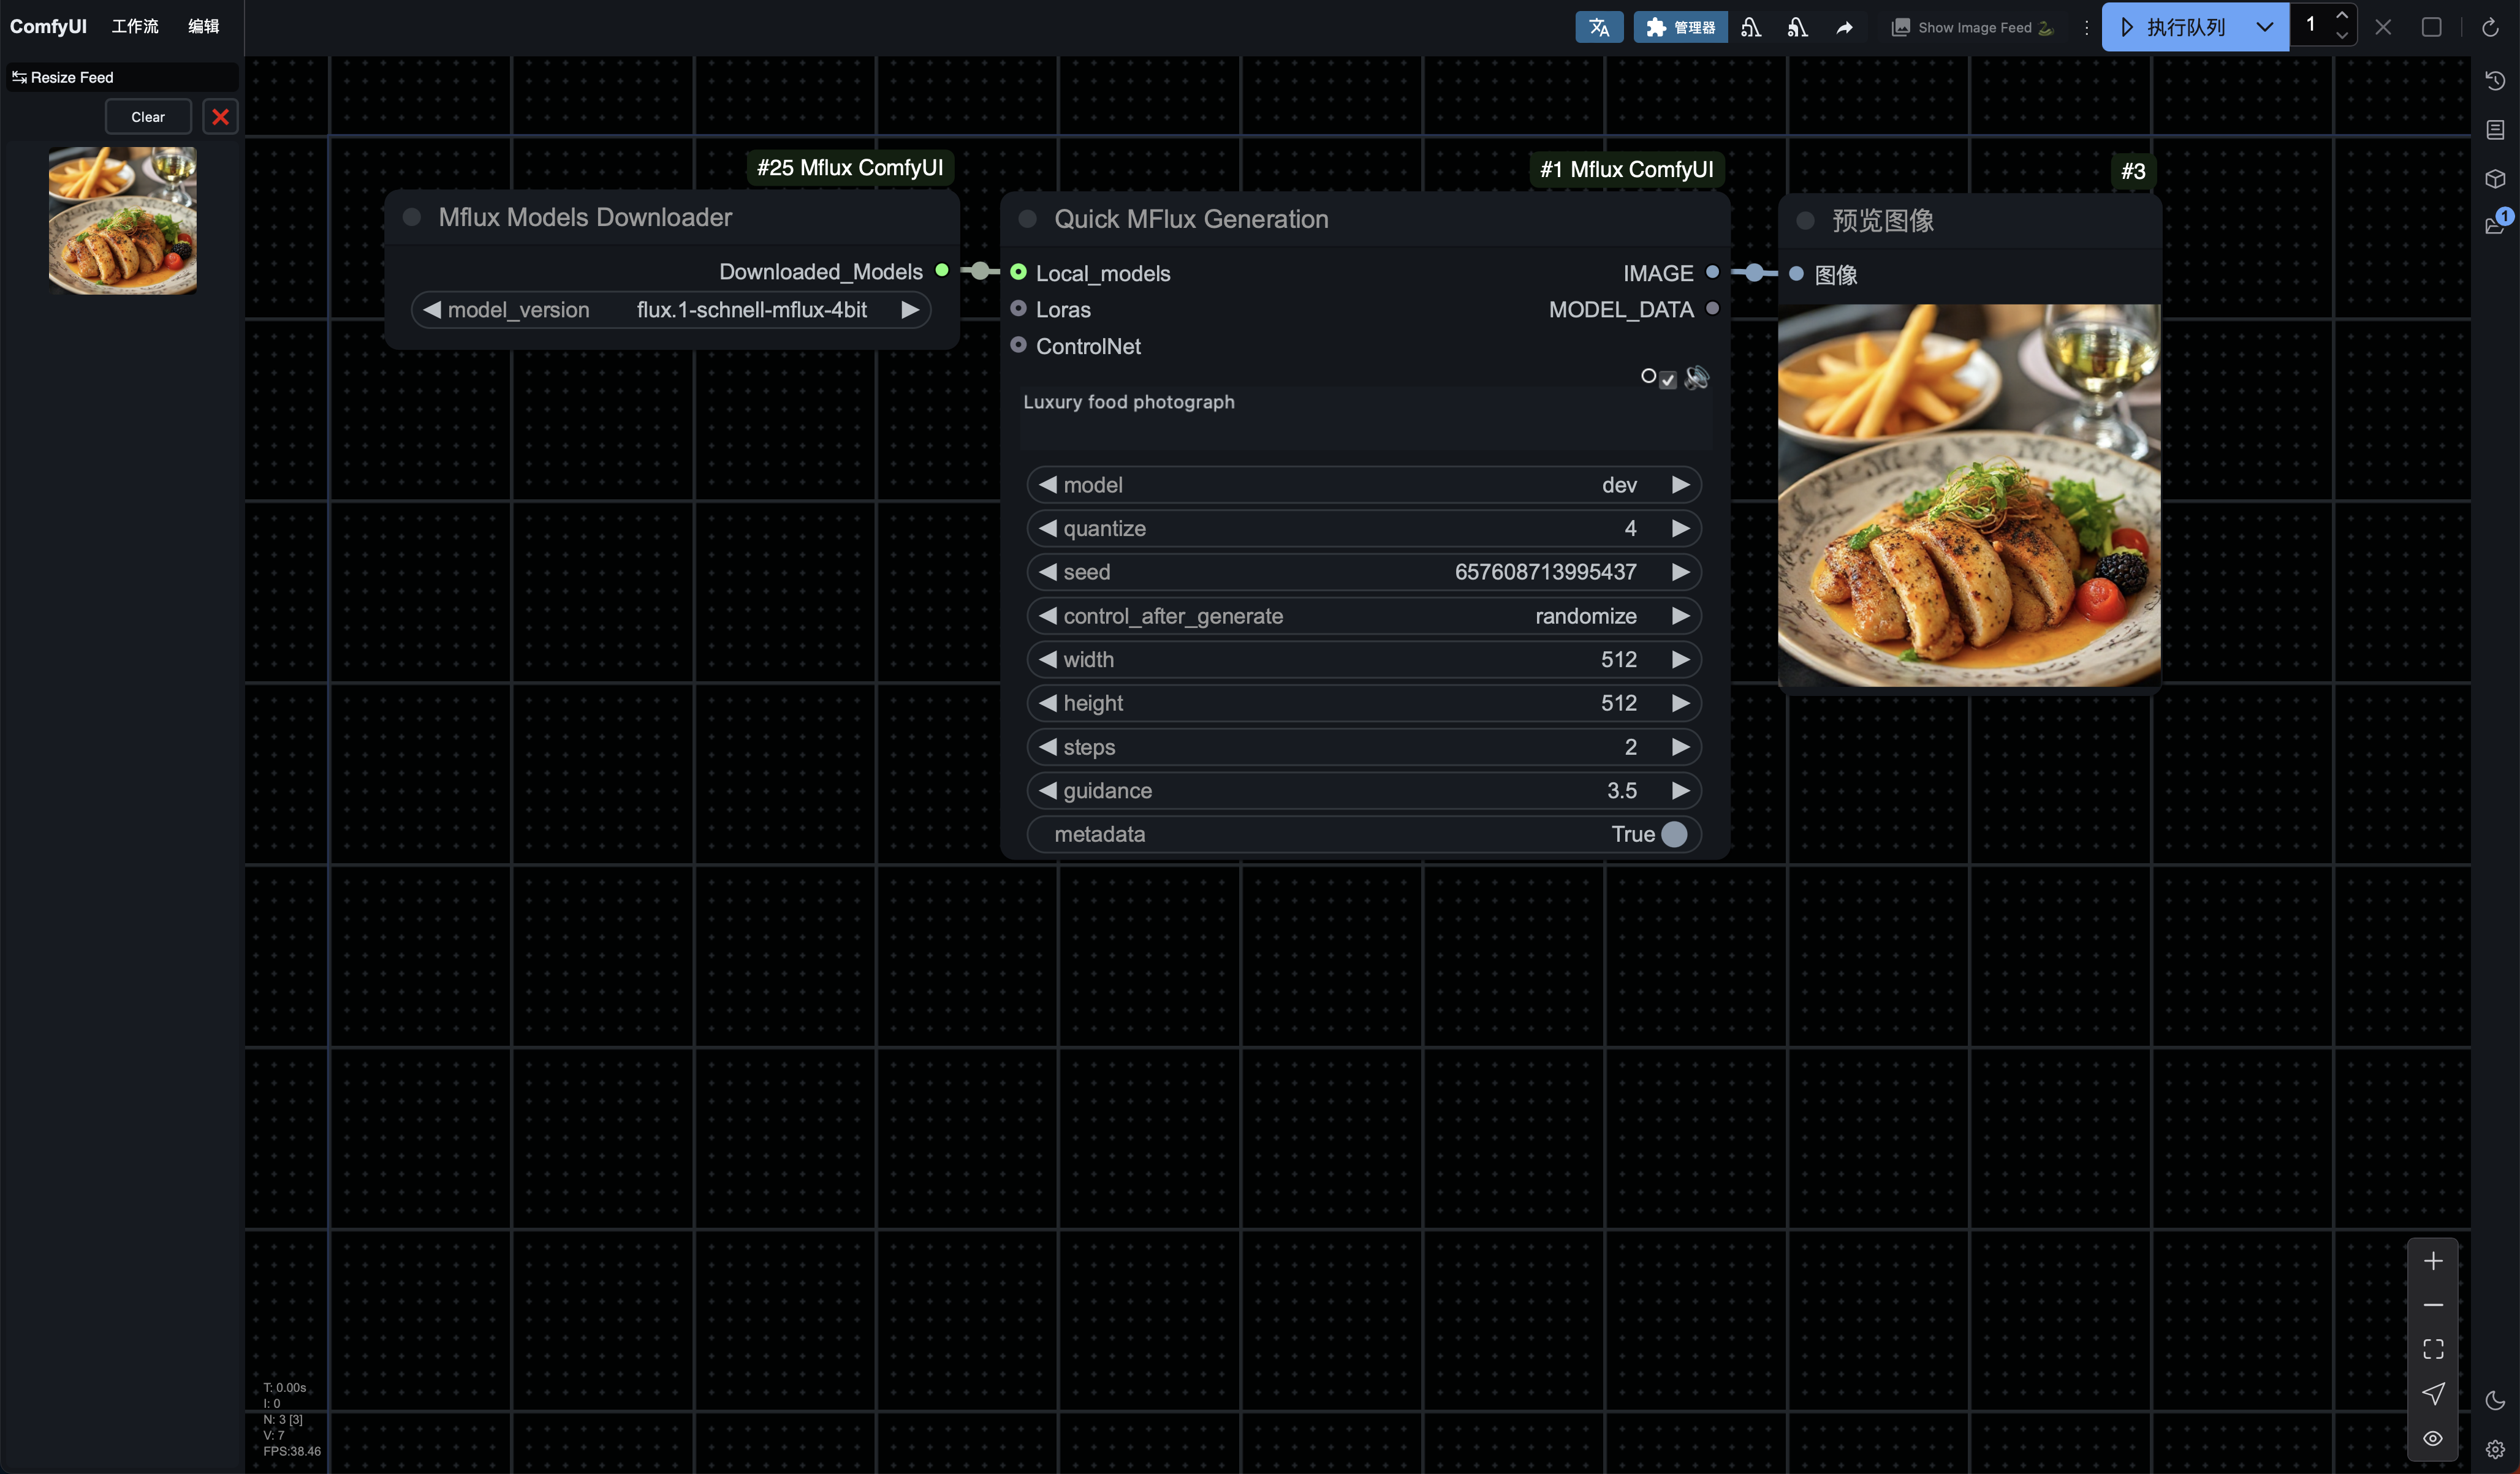
Alternatively, you can use the full version of the Black Forest model that is pre-existing in .cache to create your custom model through Mflux Custom Models:
For instance, the default quantized version, which is the same as the basic quantized model downloaded from Hugging Face:
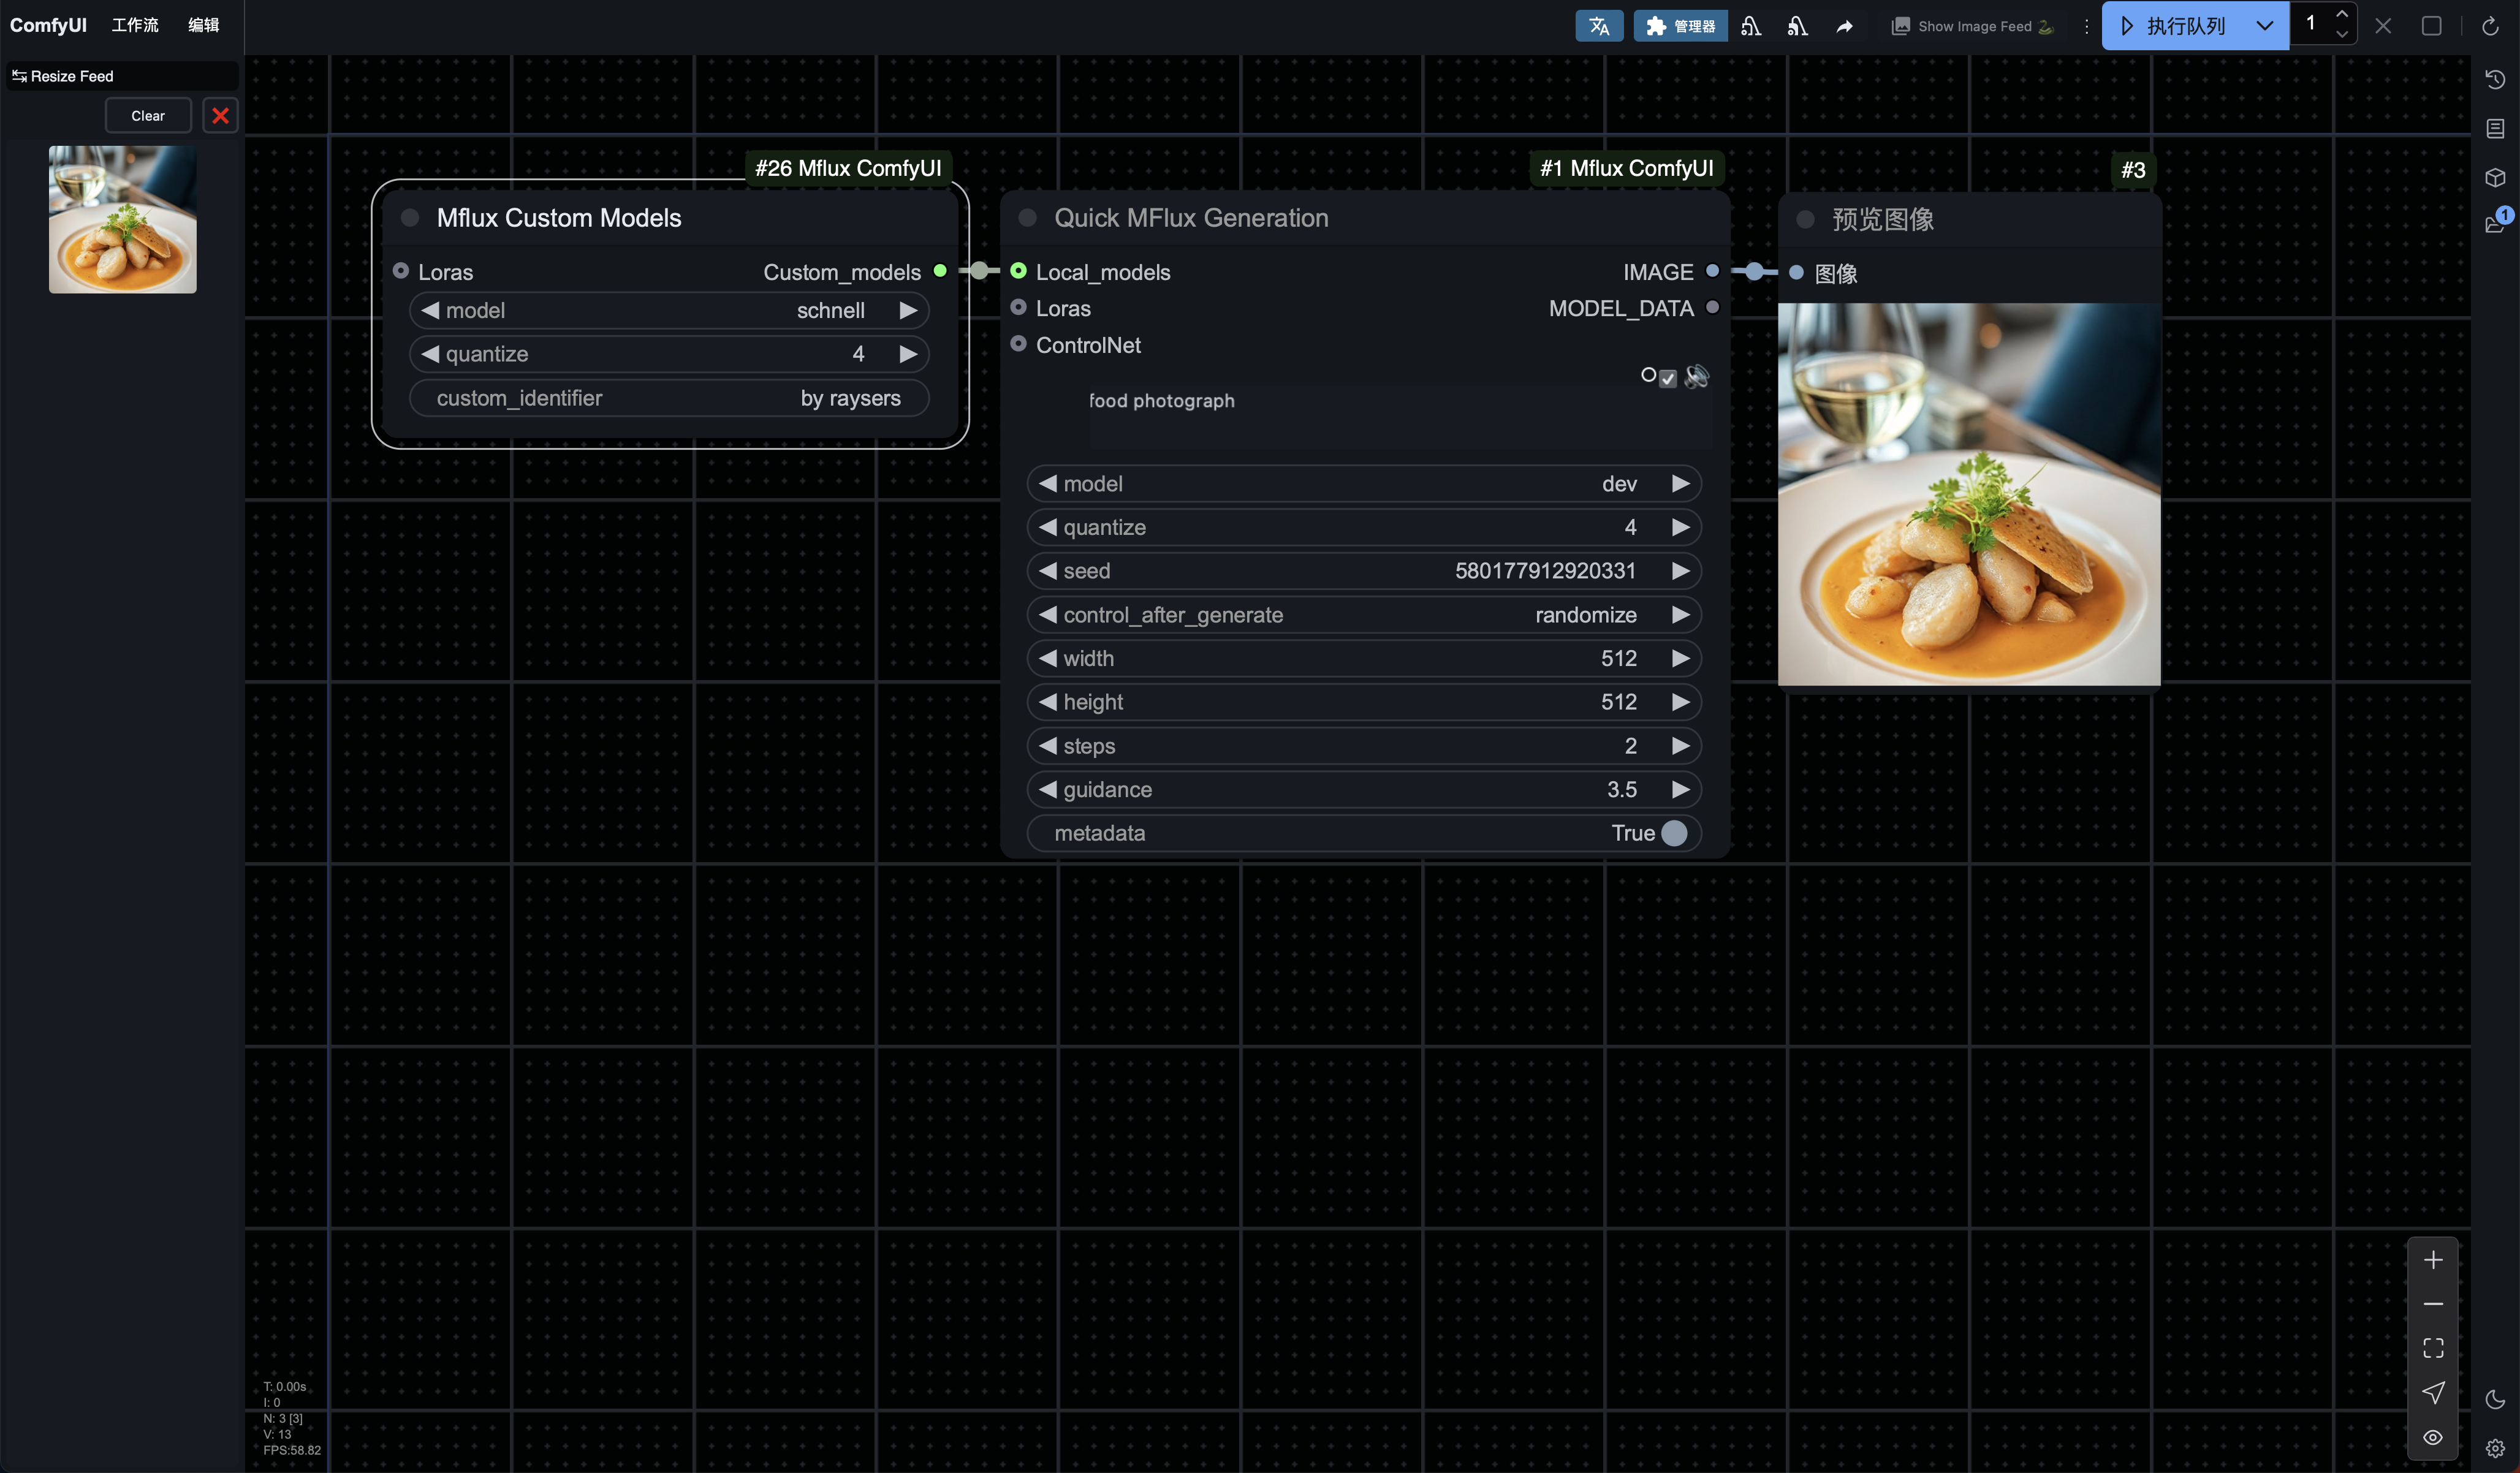
Or the LoRA stacked version, which allows for quantization after stacking LoRAs, thereby creating a unique model:
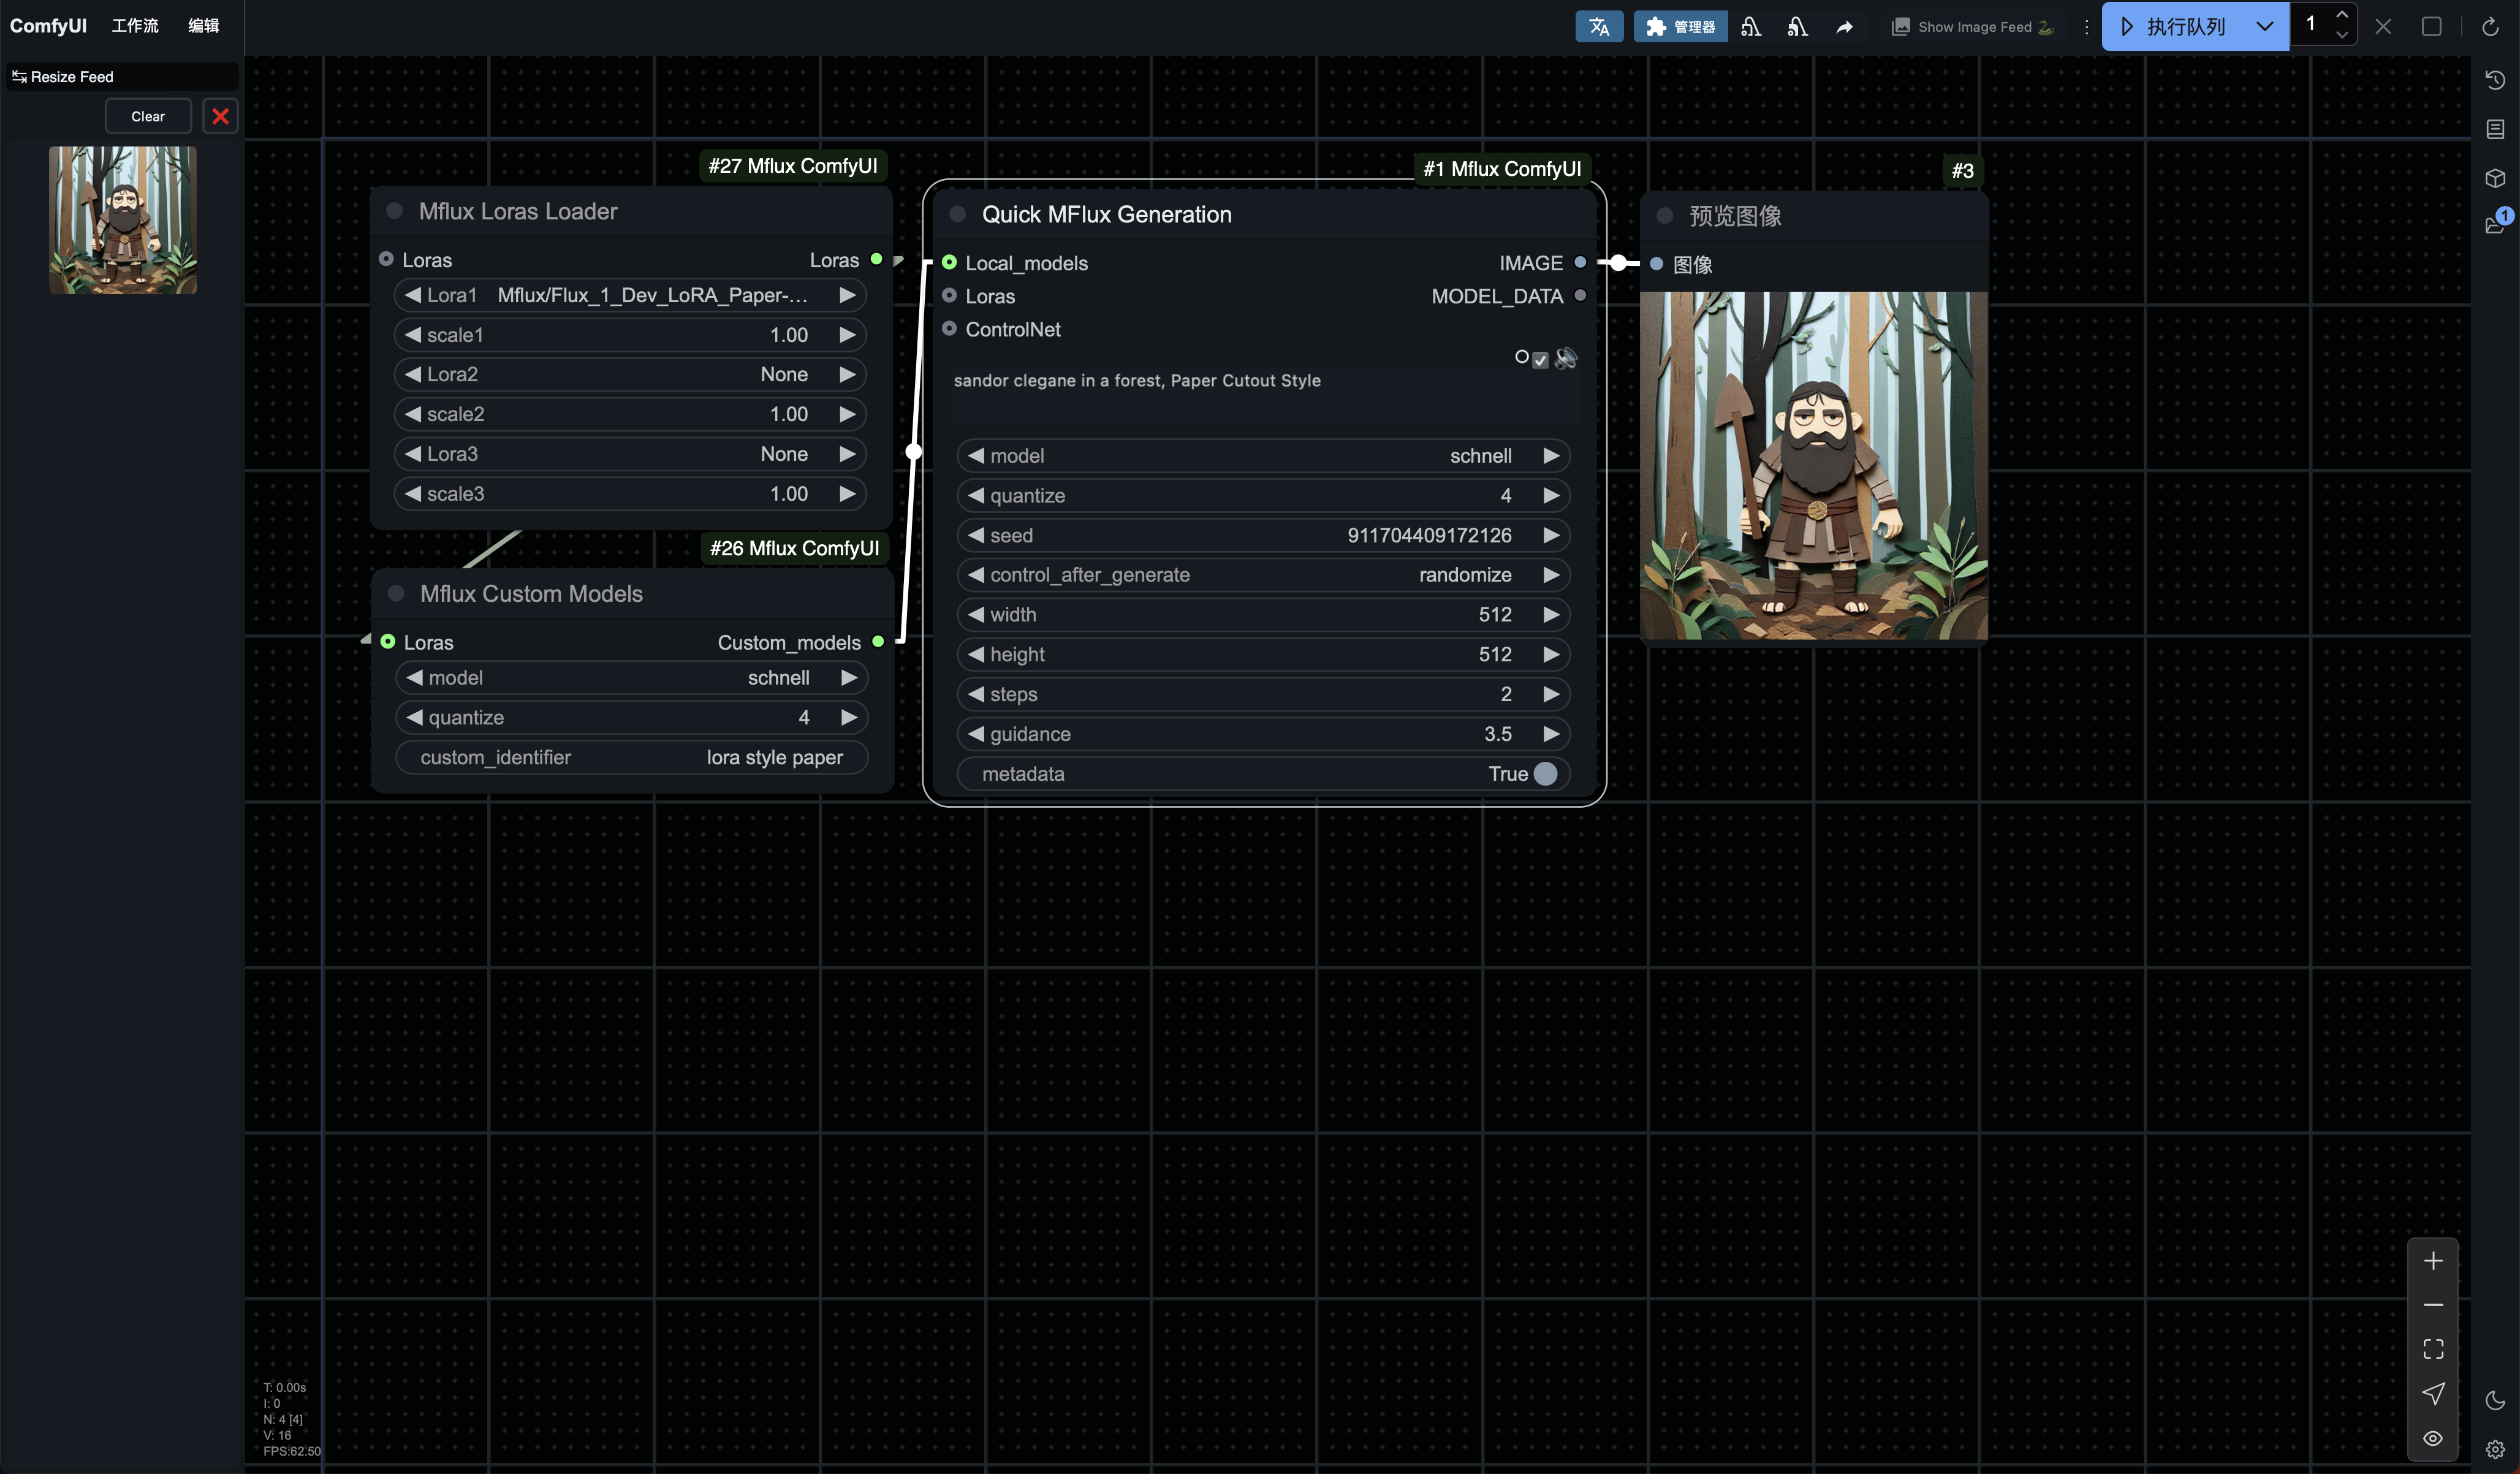
The drawback of this LoRA custom model is that it essentially remains a quantized model. If you try to stack LoRAs again in Quick MFlux Generation, it will result in an error.
Here, we can extract a mutual exclusion rule: LoRAs and quantized models cannot be used simultaneously; you can only choose one. To achieve the best of both worlds, you can only generate a LoRA custom model through this pre-quantization stacking.
However, if you want to quickly generate multiple images in the same LoRA style and your machine configuration is not very high (for example, mine has 16GB), using this method can serve as a compromise for achieving LoRA results. You can delete this unique model once the generation is complete.
Note that the custom_identifier in the Mflux Custom Models node is not a mandatory field. If you do not need a specific identifier for distinction, you can leave it empty.
Whether you are downloading models from Hugging Face or creating custom models, they only need to be run once. As long as you save the model, you can use the Mflux Models Loader node to retrieve them, such as:
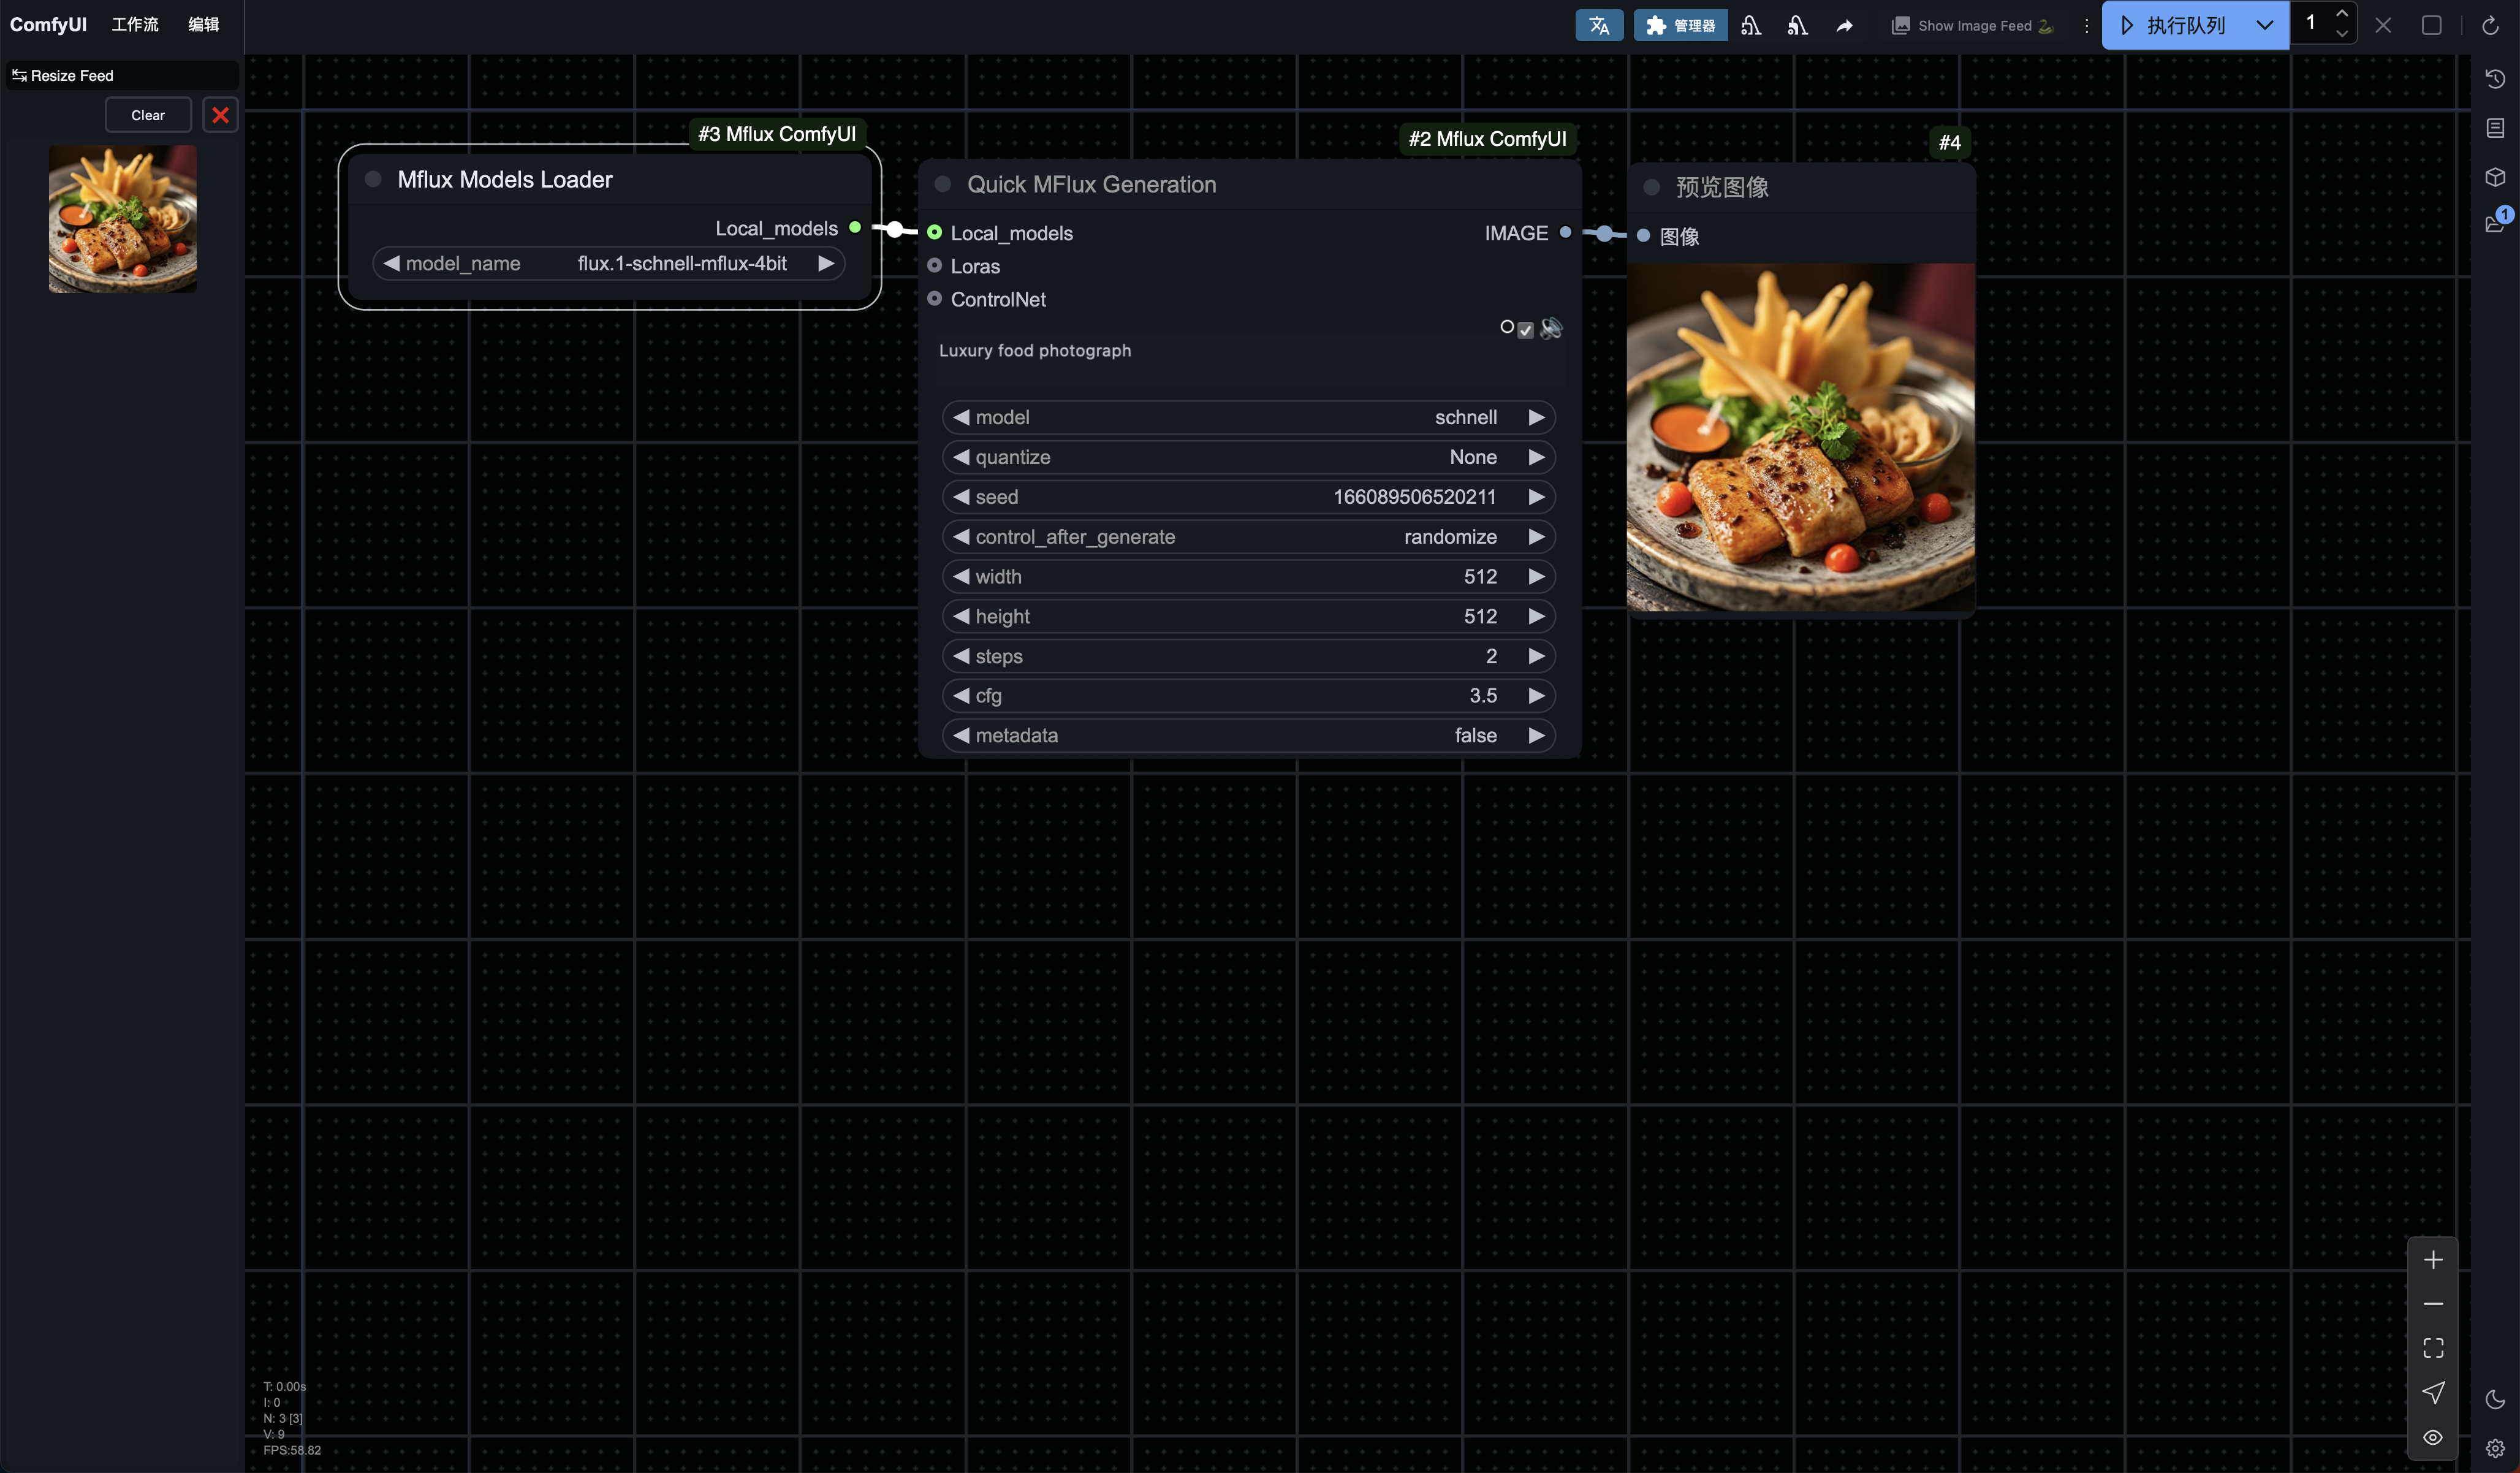
This update also adds the option to manually input paths. Alternatively, you can clear the models/Mflux folder, which will show "NONE" in the selection list, and then you can enter your own model path in free_path.
img2img:
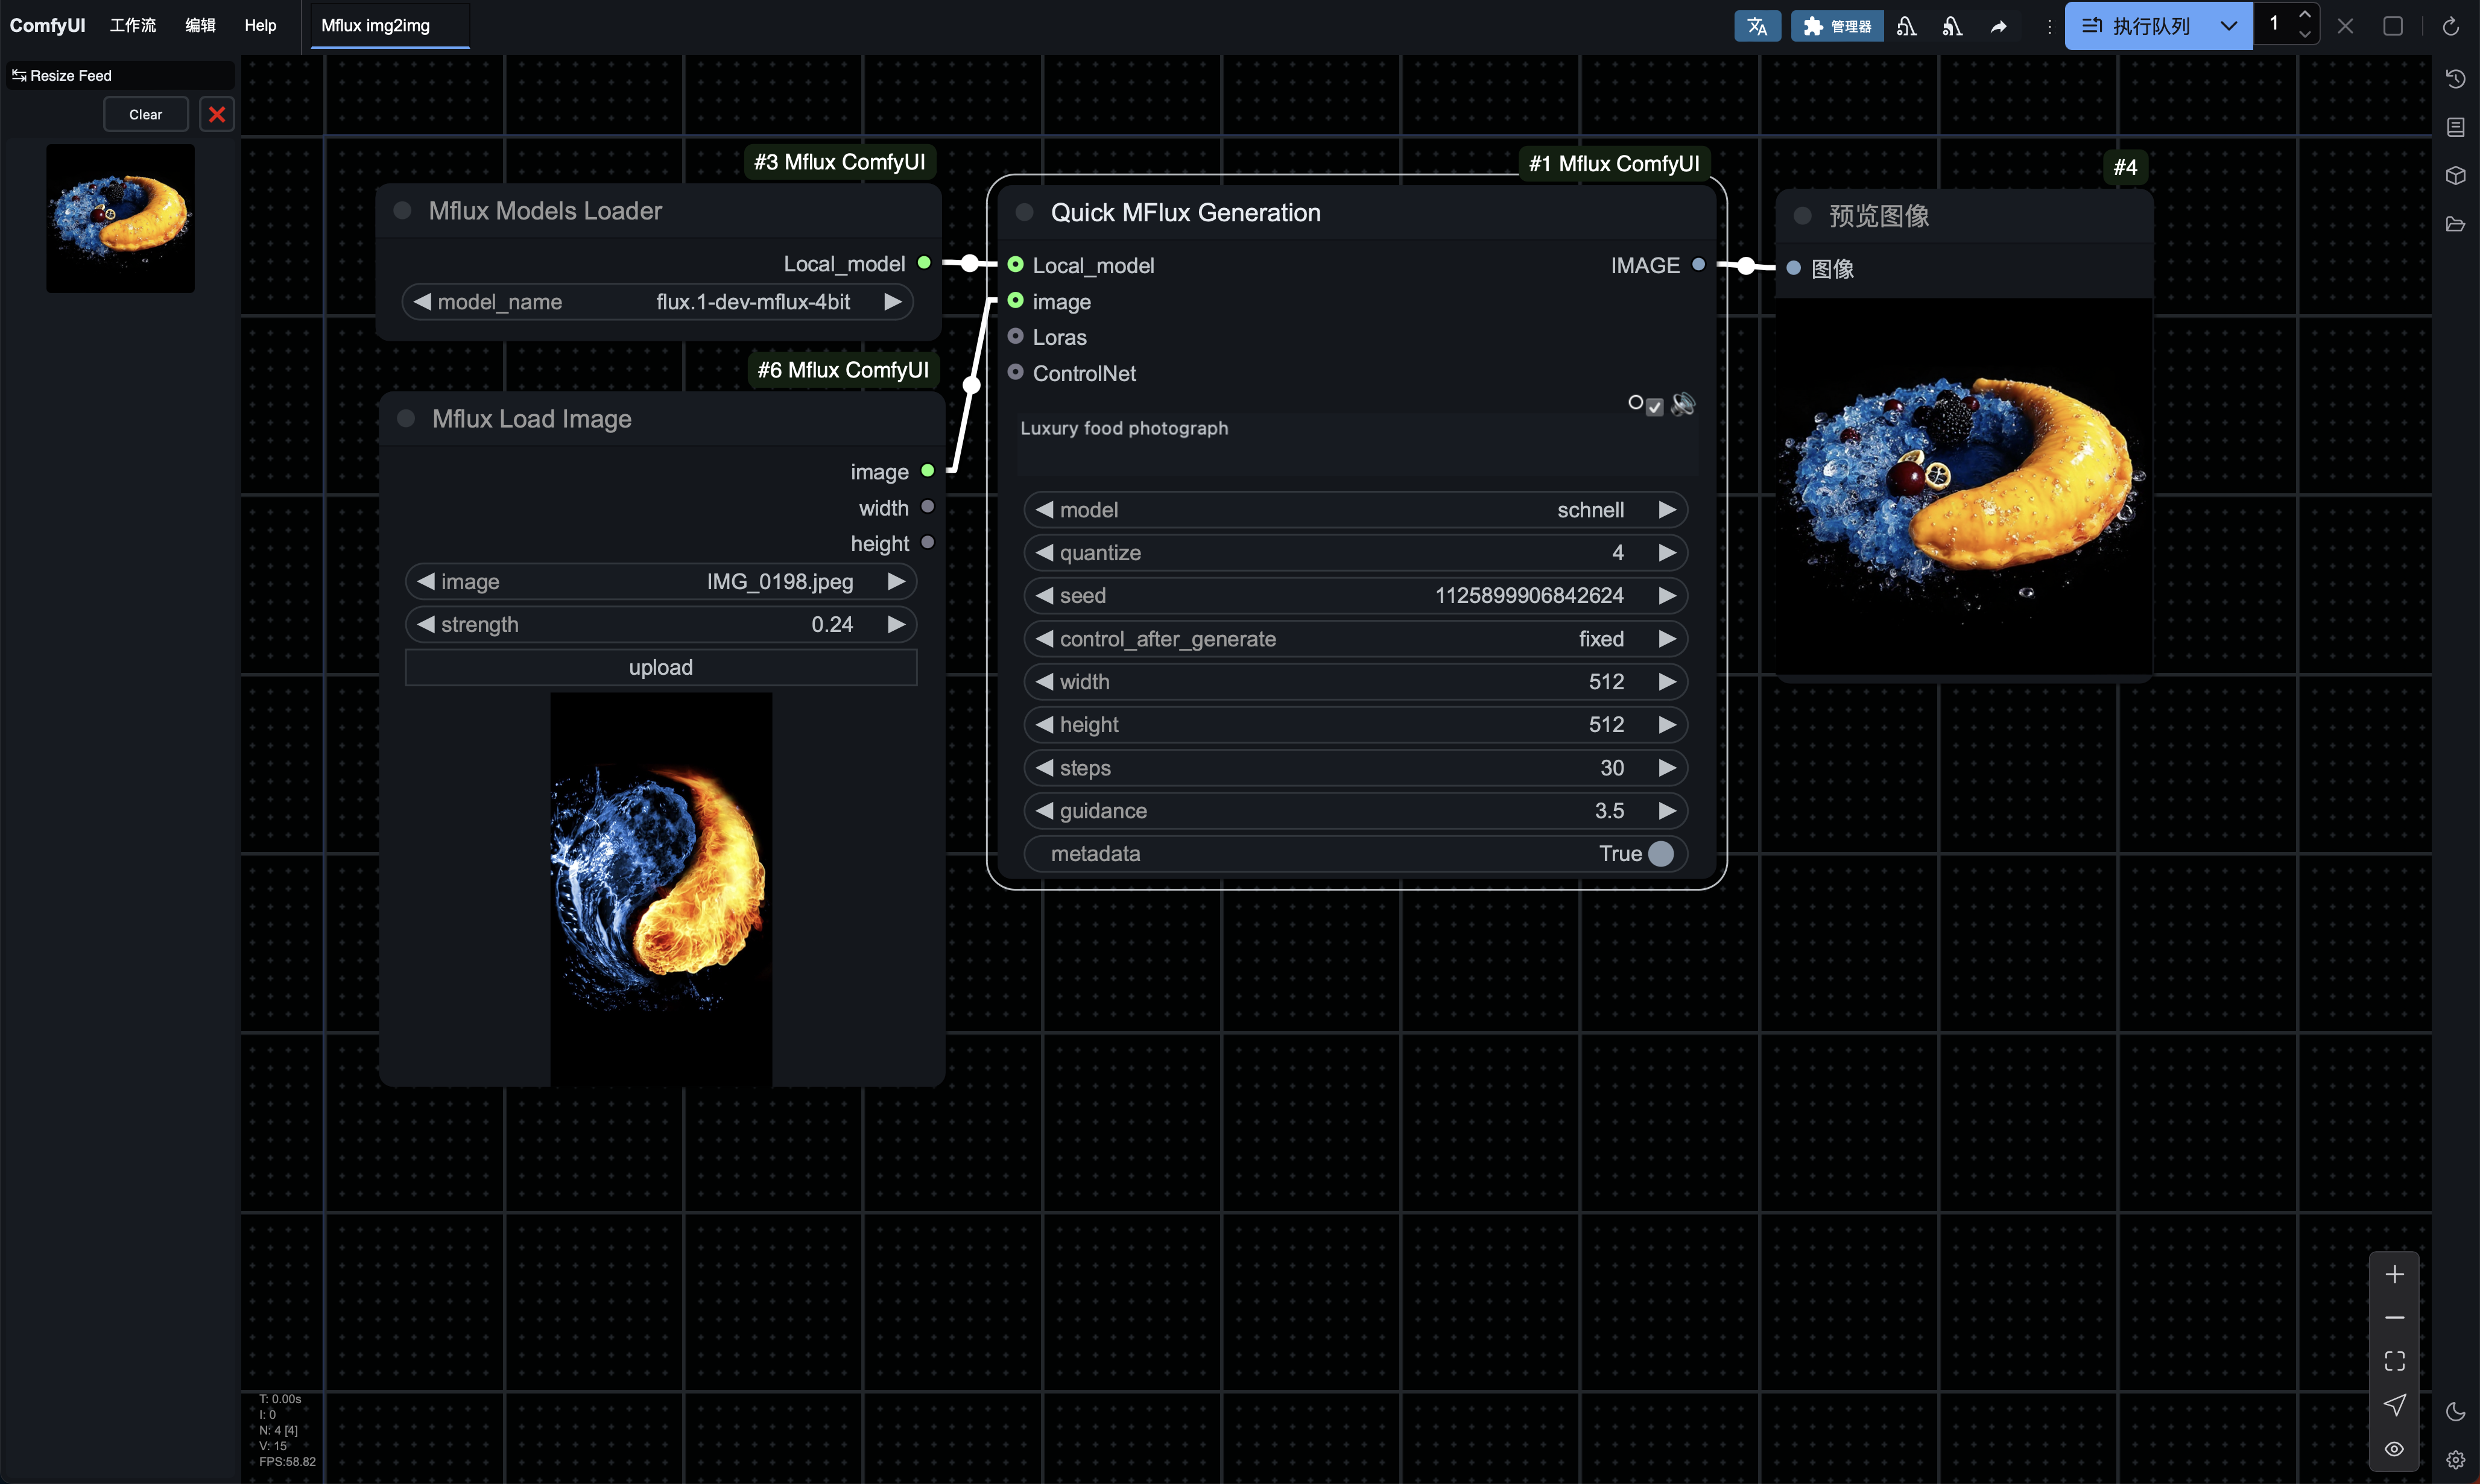
I am still exploring the specific usage methods. If you have experiences worth sharing, please feel free to start a discussion in the issues.
Mflux Pro:
Loras:
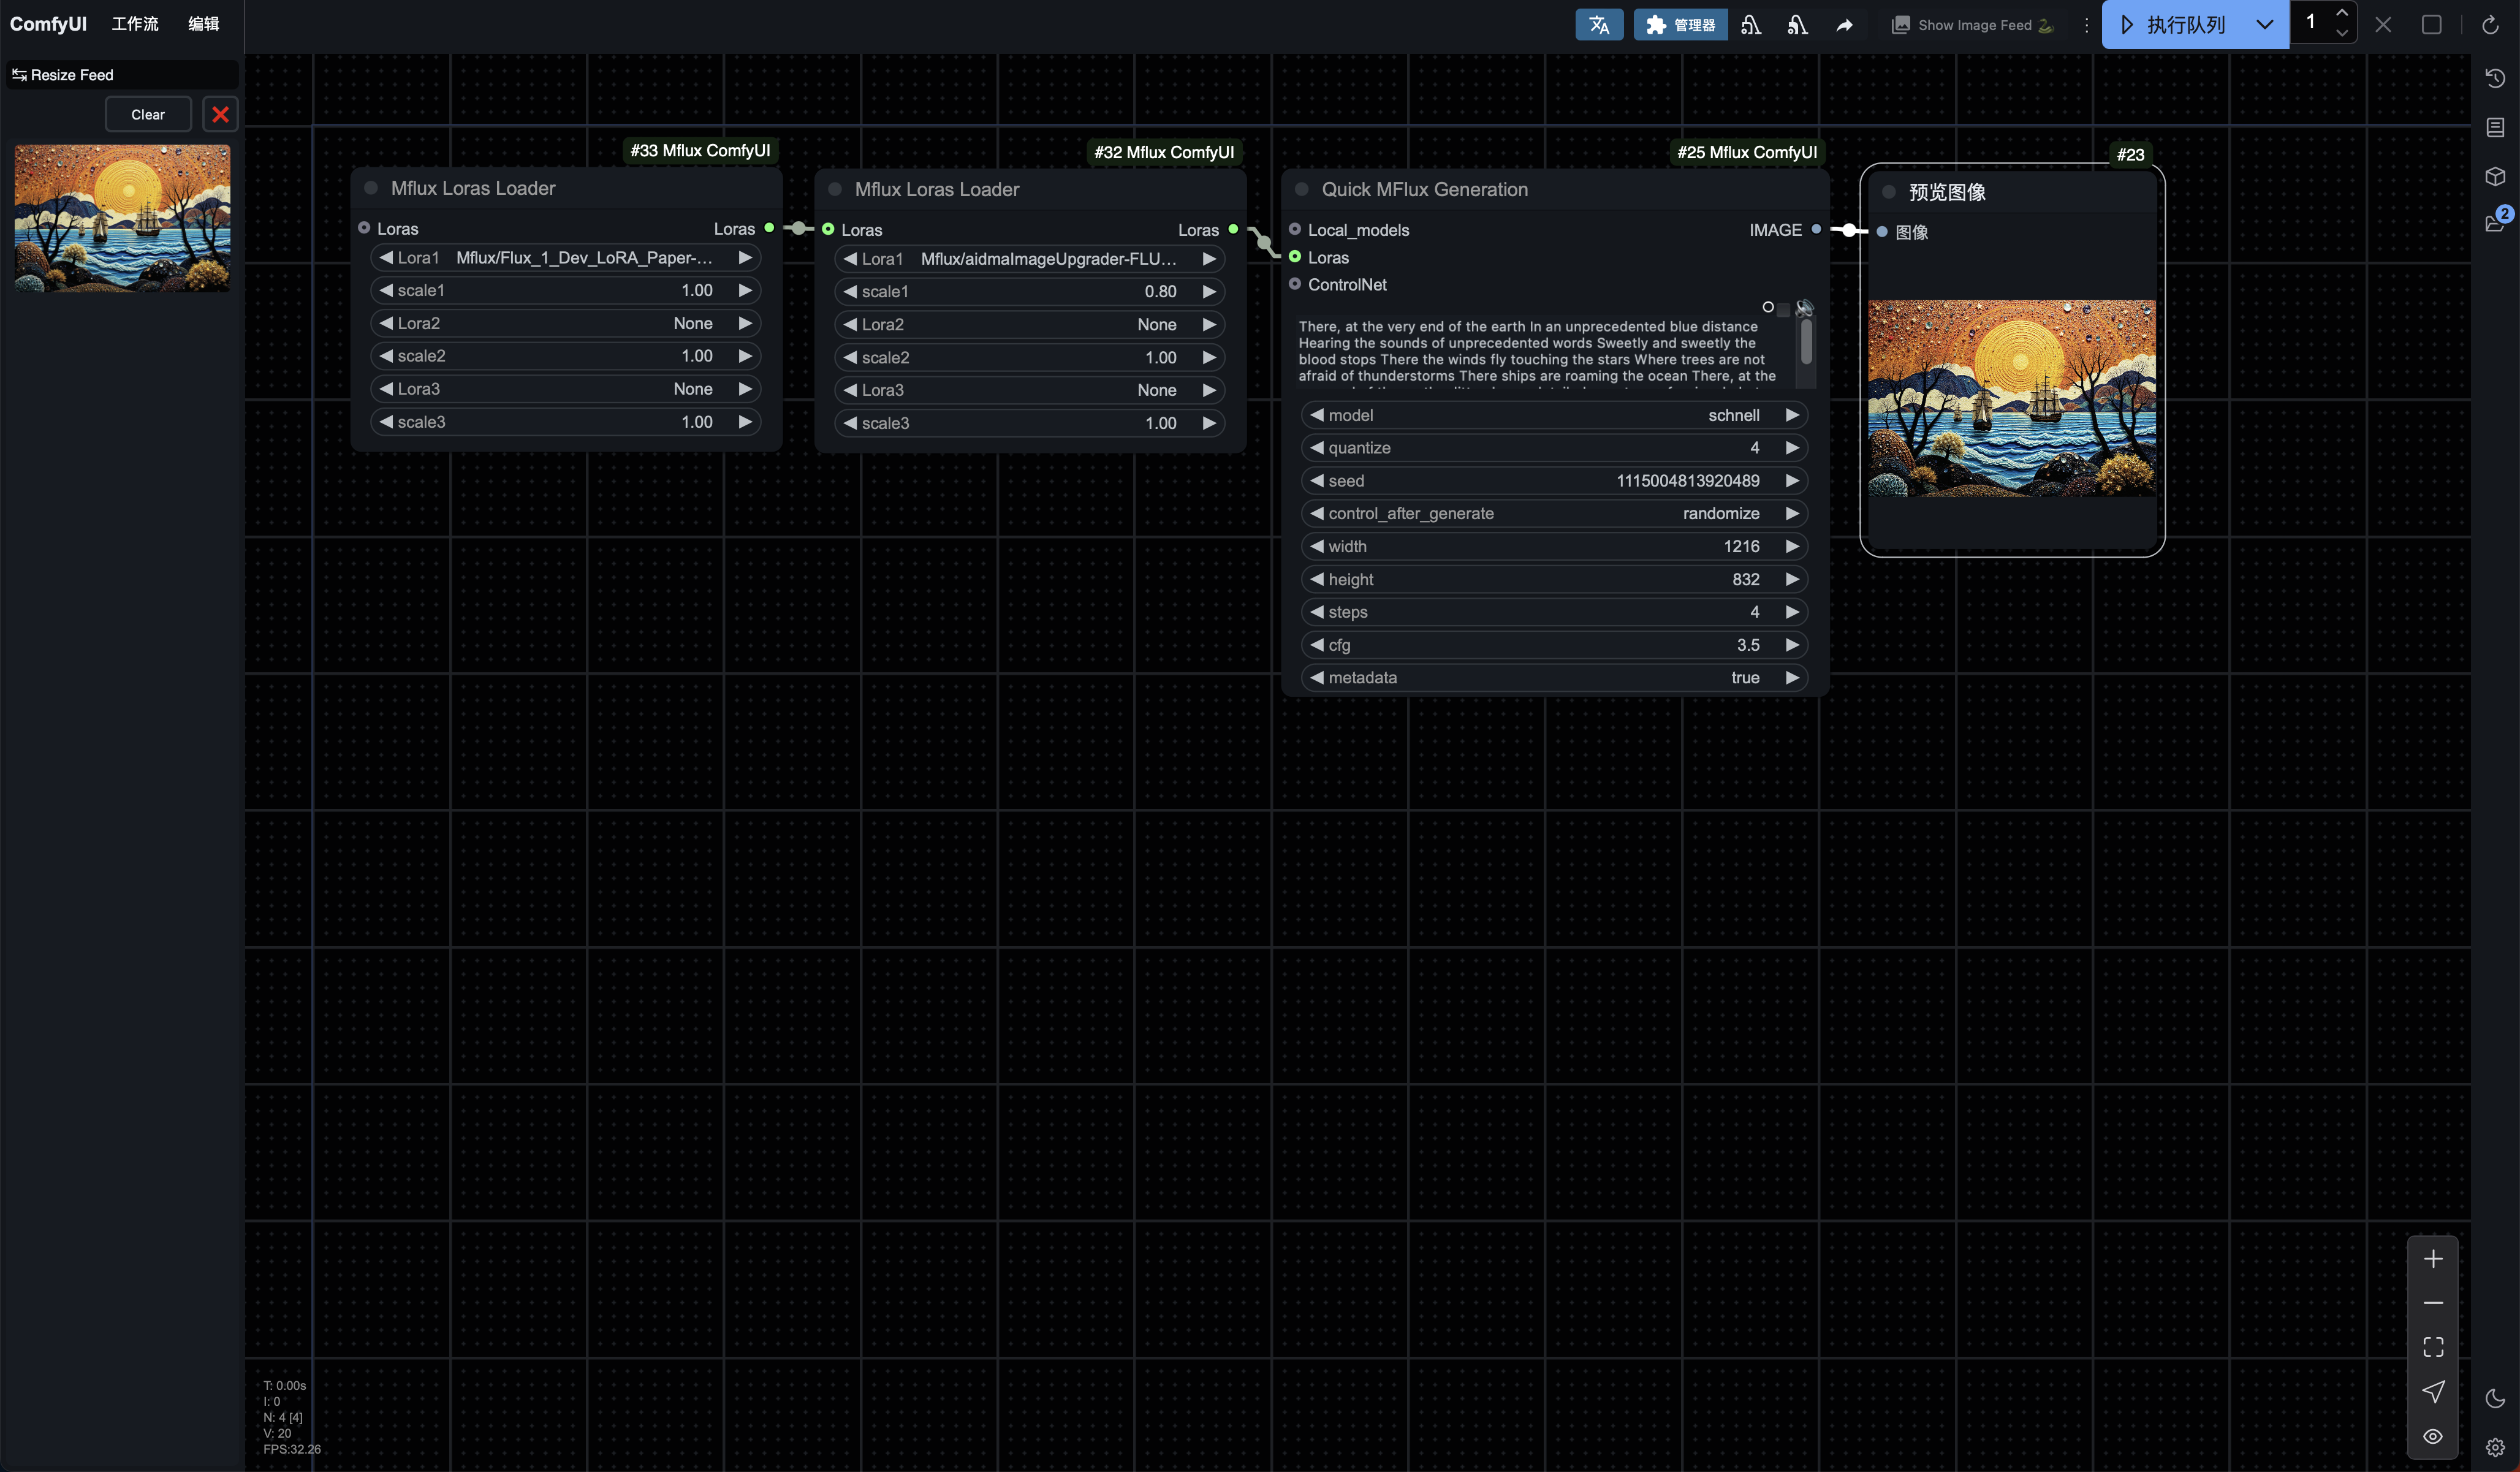
In the image, two Mflux Loras Loader nodes are used just to illustrate that they can be chained together, meaning you can theoretically load countless LoRAs...
Please note that you cannot use the Mflux Models Loader node to load quantized models when using LoRAs; doing so will result in an error. This further verifies the mutual exclusion rule mentioned above.
Perhaps one day the official team will resolve this error; let's wait patiently.
Note:
Not all LoRAs are compatible with Mflux. Please check the official homepage for specific compatible types:
https://github.com/filipstrand/mflux
Therefore, I typically create an Mflux folder under models/loras to store all LoRAs compatible with Mflux in one place.
ControlNet:
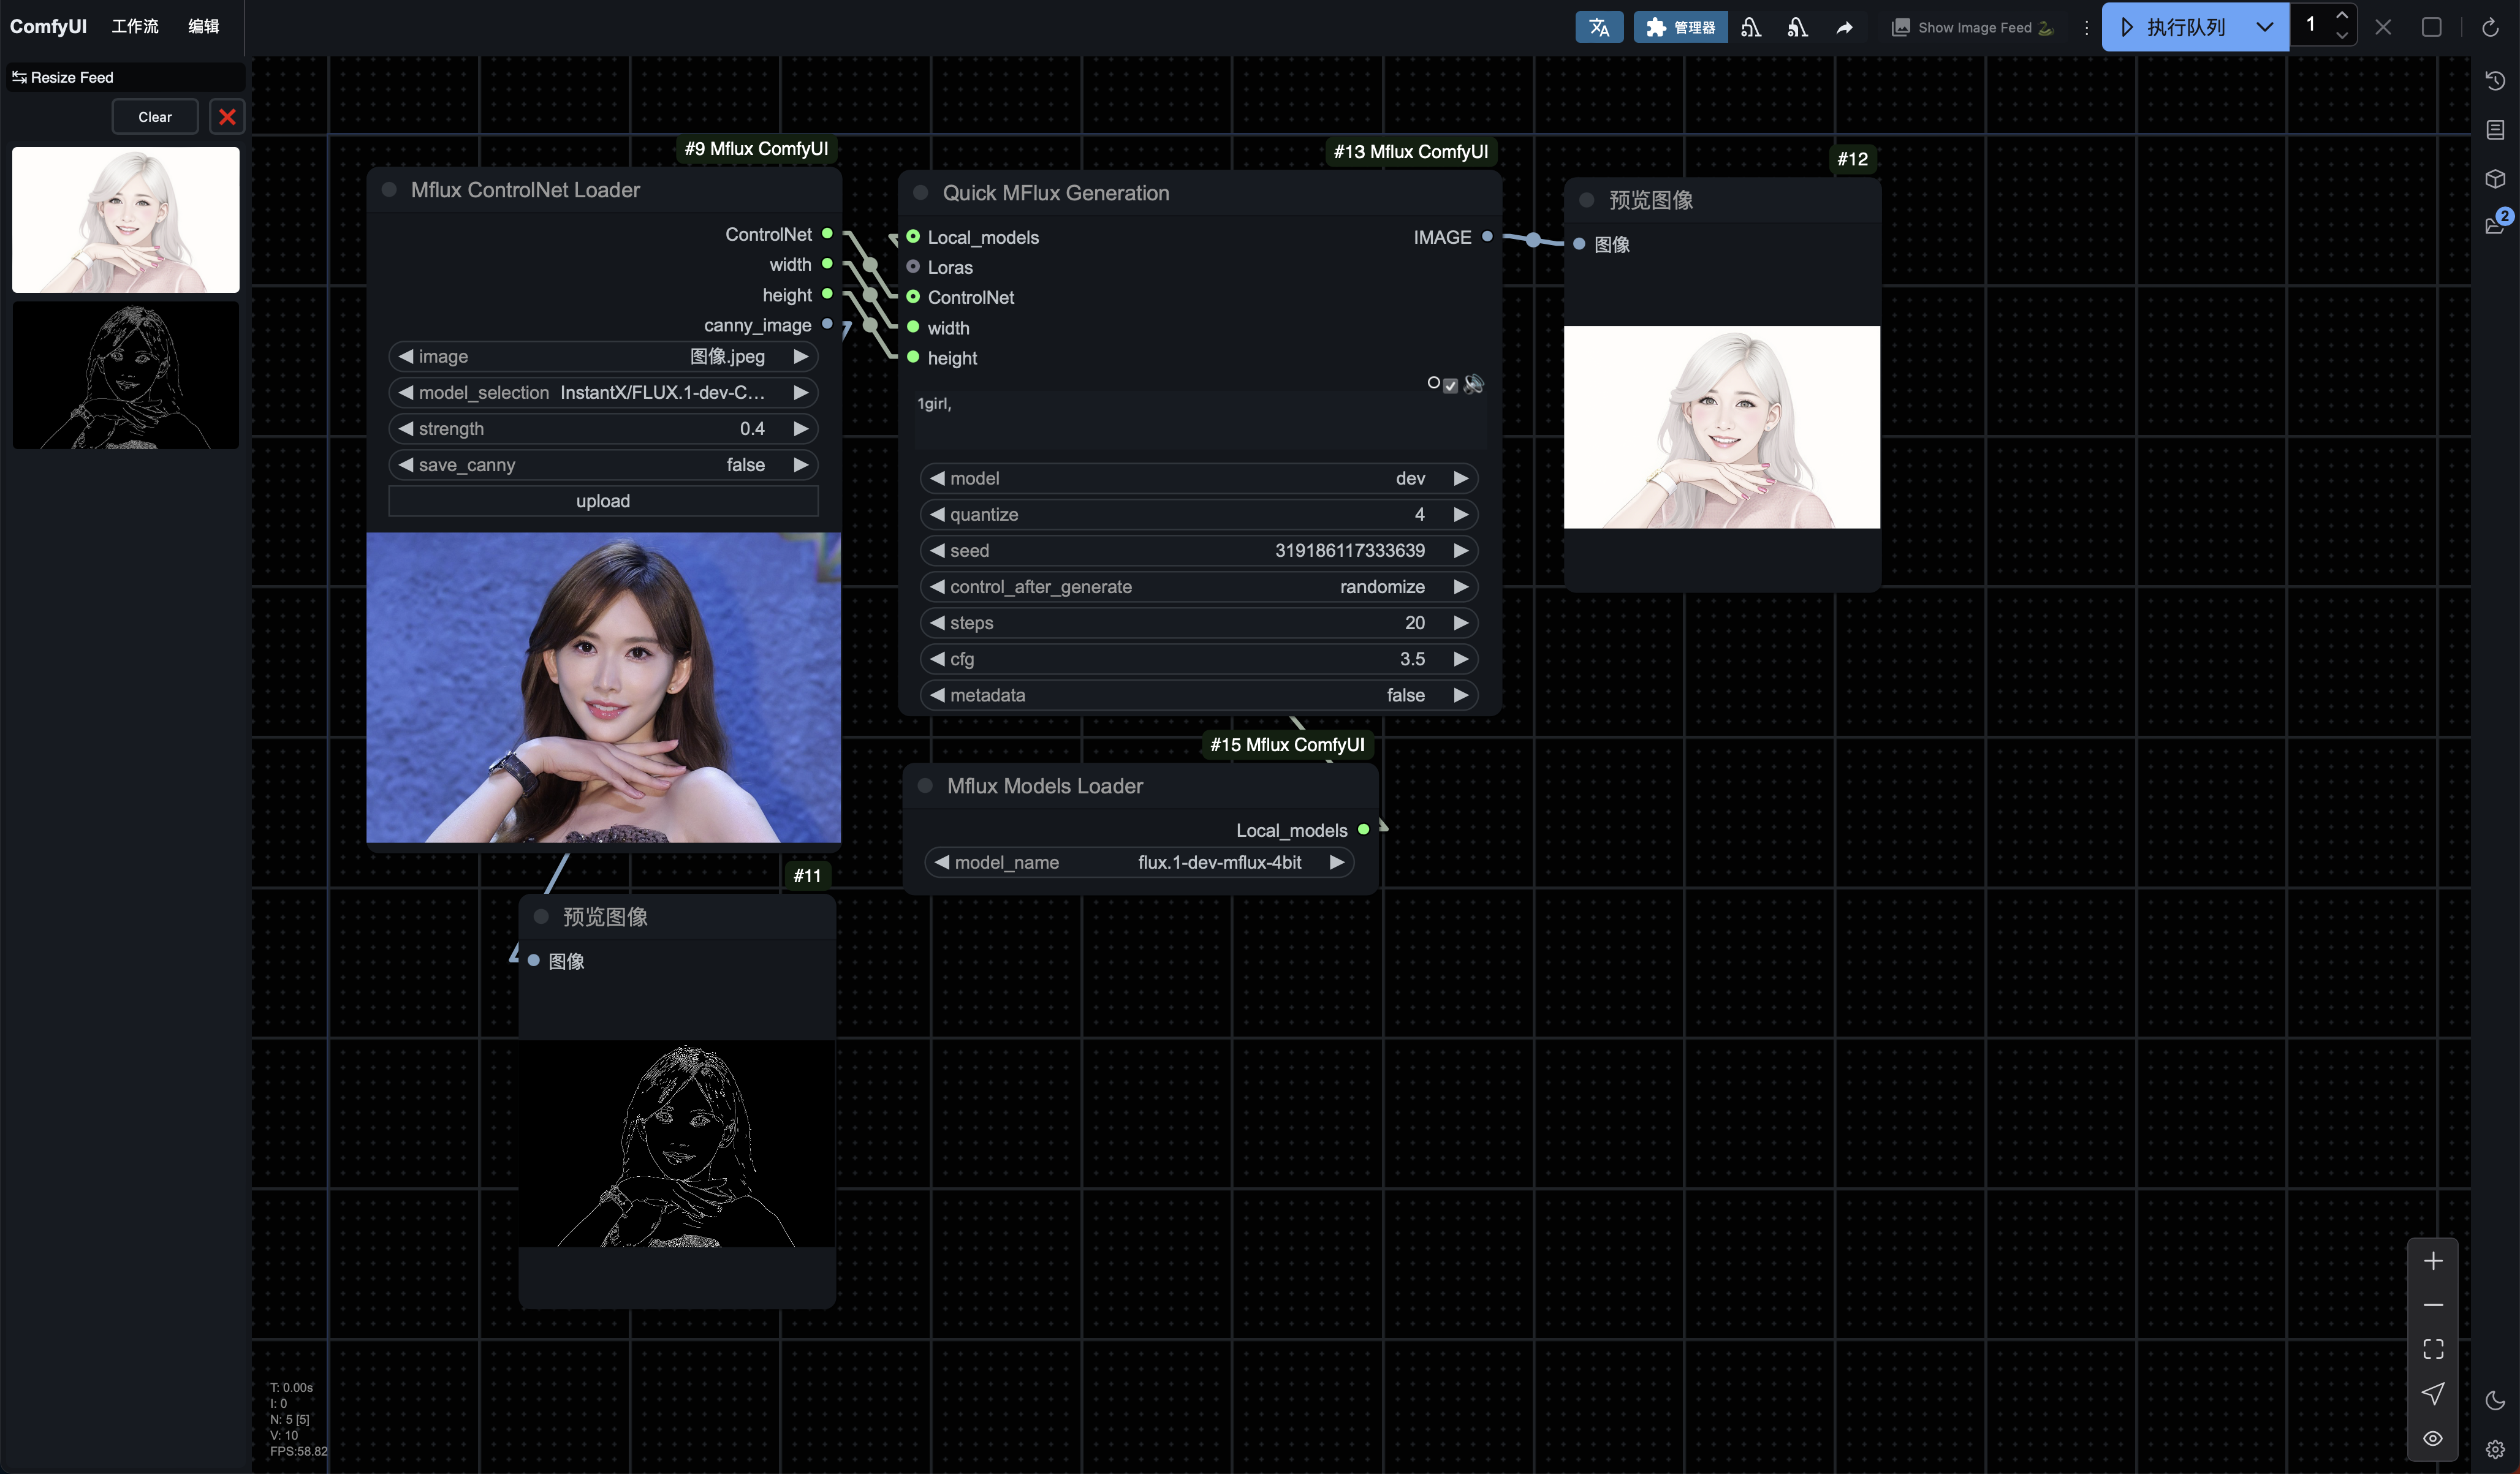
Mflux's ControlNet currently only supports Canny.
P.S. To quickly generate example images, I created a custom model using a 4-step LoRA from the dev model.
The advantage of this 4-step LoRA model is that it still belongs to the DEV model, so the Guidance parameter can be effective, and it can produce images in just four steps while retaining the advantages of schnell.
Mflux Plus:
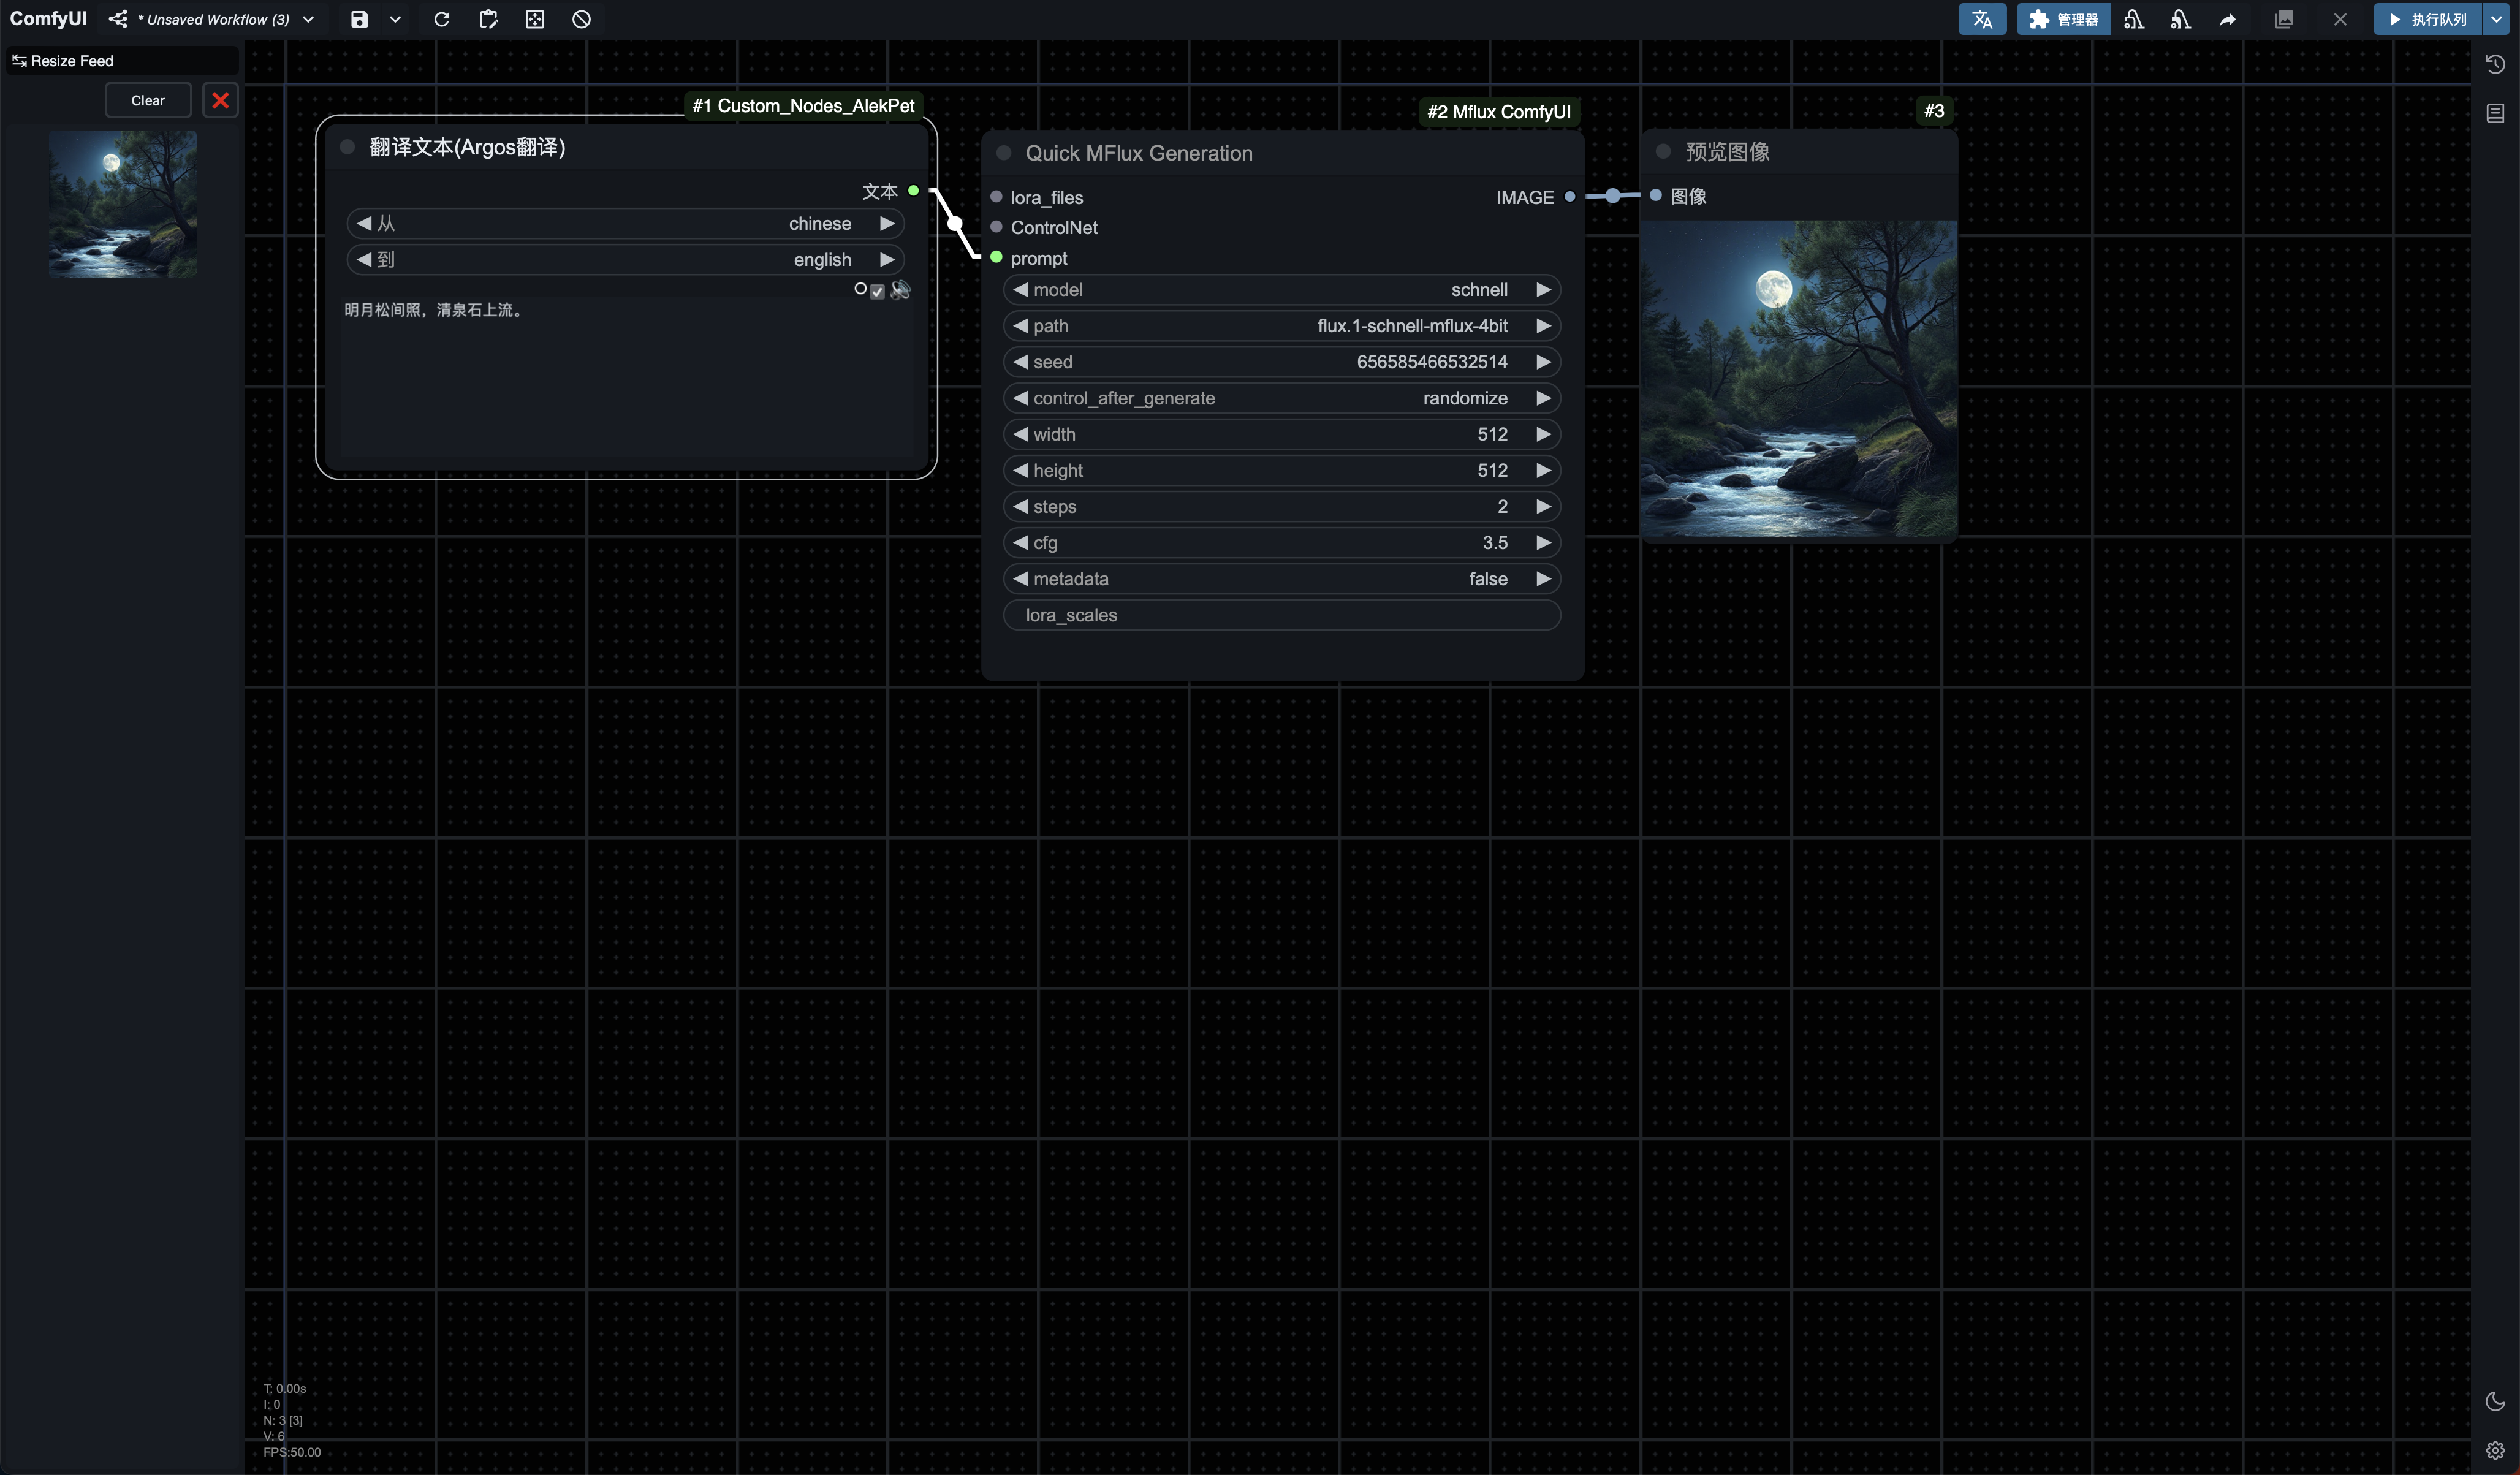
A must-have for English beginners.
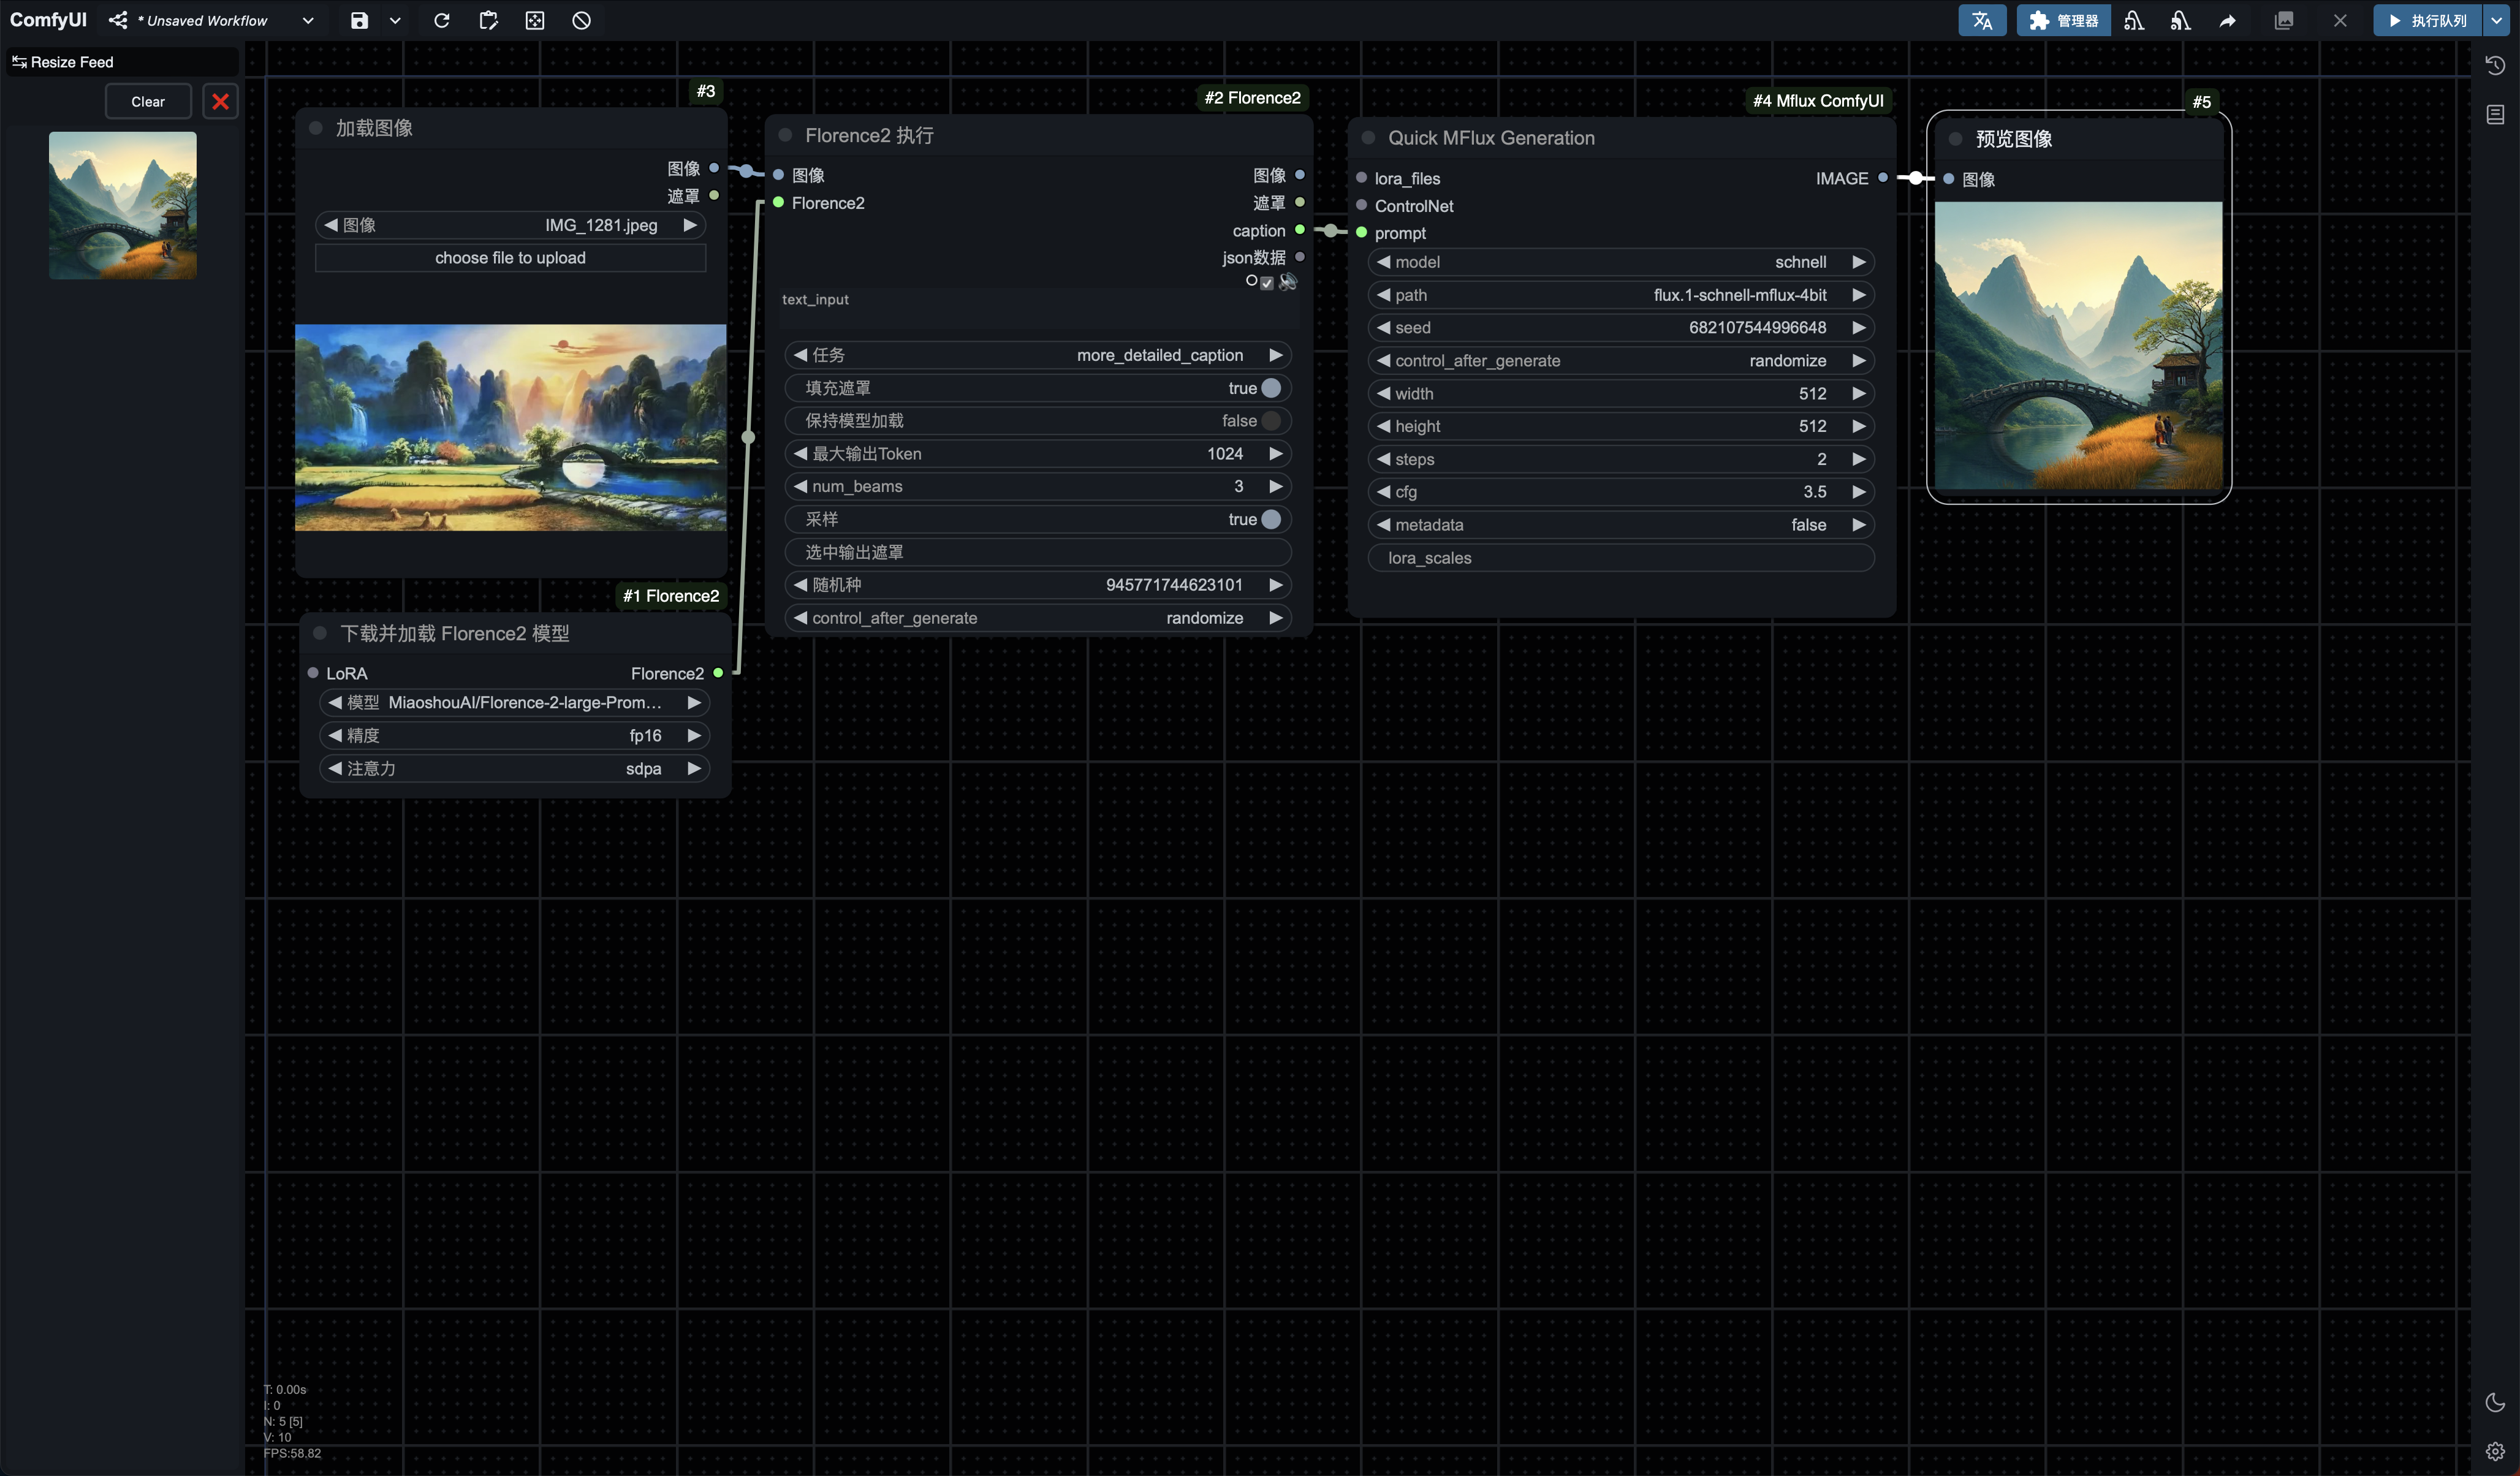
Image reverse generation, using the MiaoshouAI/Florence-2-large-PromptGen-v1.5 visual model here.
All these processes can be dragged directly into ComfyUI from the workflows folder.
!!! If nodes are highlighted in red, use ComfyUI-Manager's "One-click Install Missing Nodes." !!! Please note that all processes at the end use preview nodes, which do not automatically save. You need to manually save the generated images you are satisfied with or simply replace the preview nodes with save nodes.
Possible Explorations
Mflux MAX:
......
Mflux Ultra:
......
Here, I hope everyone shares their workflows more, fully promoting the spirit of sharing on the internet. Knowledge for payment? No, I advocate cooperation and sharing for mutual benefit.
Planning
Official Website Overview of Mflux 0.4.x Features:
- Img2Img Support: Introduced the ability to generate images based on an initial reference image.
- Image Generation from Metadata: Added support to generate images directly from provided metadata files.
- Progressive Step Output: Optionally output each step of the image generation process, allowing for real-time monitoring.
Previous updates have already completed the Img2Img functionality. Additionally, MFlux 0.4.x introduced a keyboard interruption feature, which was implemented in the last update using ComfyUI's cancel button.
This update focuses on completing the functionality to generate images from metadata.
The next step is to complete the implementation of the remaining features as much as possible.
Please pay attention to the official website:
https://github.com/filipstrand/mflux
Contribution
Interactive communication is all a contribution.
License
I would like to adopt the MIT License consistent with the Mflux project, contributing my part to the open-source community.