Nodes Browser
ComfyDeploy: How ComfyUI-PromptConverter works in ComfyUI?
What is ComfyUI-PromptConverter?
A ComfyUI custom node that converts prompts between different AI image generation models.
How to install it in ComfyDeploy?
Head over to the machine page
- Click on the "Create a new machine" button
- Select the
Editbuild steps - Add a new step -> Custom Node
- Search for
ComfyUI-PromptConverterand select it - Close the build step dialig and then click on the "Save" button to rebuild the machine
Prompt Converter

A ComfyUI custom node that converts prompts between different AI image generation models.
Supported Models
- NovelAI (NAI)
- PonyXL (e621 format)
- Animagine
- Illustrious
Features
Basic Features
- Converts tags between different formats
- Supports weight syntax conversion
- Auto quality tags for each model
- Rating tag support (safe/sensitive/questionable/explicit)
- Tag sorting based on each model's preferred order
- Duplicate tag removal option
Advanced Filtering (with Filter Node)
Filter tags by categories:
- General tags
- Style tags
- Genre tags
- Character tags
- Other tags
- Unknown tags
- Person/Count tags
- Score tags
- Quality tags
- Rating tags
- Generation tags
UI Extensions
- Related tag search
- Click the search button or use Alt + - shortcut
- Draggable popup window with category filters
- Shows tag post counts and categories
- Tag alias support
- Display alternative names for tags
- Convert Japanese aliases to English tags
- Multiple suggestions for partial matches
- Interactive UI
- Category-based color coding
- Hover effects for better UX
- Keyboard shortcuts
Installation
- Clone this repository to your ComfyUI custom_nodes folder:
cd ComfyUI/custom_nodes
git clone https://github.com/vkff5833/ComfyUI-PromptConverter
- Install required packages:
pip install -r requirements.txt
Usage
Basic Node
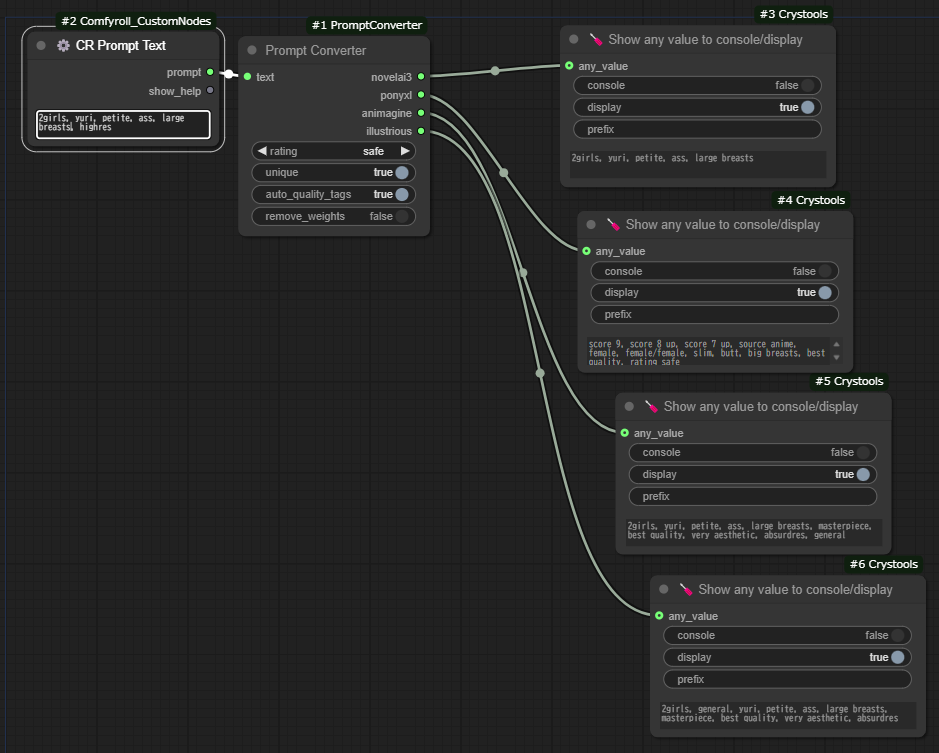
- Input your prompt text in any supported format
- Select desired rating (safe/sensitive/questionable/explicit)
- Configure basic options:
- Unique: Remove duplicate tags
- Auto quality tags: Add recommended quality tags
- Remove weights: Strip all tag weights
- Connect outputs to your workflow
Filter Node
Additional options for filtering specific tag types:
- Filter general/style/genre/character tags
- Filter person/count/score/quality tags
- Filter rating/generation tags
- View filtered tags in a separate output
UI Features
- Text Selection:
- Select text to see the search button
- Multiple replacement suggestions for Japanese tags
- Related Tags:
- Click the search button or use Alt + - shortcut
- Filter tags by category in the popup
- Click tags to add them to your prompt
- Settings:
- Search Related Tag: Enable/disable tag search feature
- Display Other Name: Show alternative names in search results
- Replace Other Name: Enable tag replacement suggestions
Version History
Current version: 1.2.1
- Added tag alias conversion feature
- Improved UI with multiple replacement suggestions
- Added settings for UI features
- Enhanced filtering capabilities
- Various bug fixes and improvements
License
MIT License
プロンプトコンバーター
異なるAI画像生成モデル間でプロンプトを変換するComfyUIカスタムノードです。
対応モデル
- NovelAI (NAI)
- PonyXL (e621形式)
- Animagine
- Illustrious
機能
基本機能
- 異なる形式間でのタグ変換
- 重み付け構文の変換
- モデルごとの自動品質タグ
- レーティングタグのサポート (safe/sensitive/questionable/explicit)
- モデルごとの推奨順序でのタグソート
- 重複タグの除去オプション
高度なフィルタリング(フィルターノード)
以下のカテゴリでタグをフィルタリング:
- 一般タグ
- 画風タグ
- ジャンルタグ
- キャラクタータグ
- その他タグ
- 不明タグ
- 人物・人数タグ
- スコアタグ
- クオリティタグ
- レーティングタグ
- 年代タグ
UI拡張機能
- 関連タグ検索
- 検索ボタンまたはAlt + -ショートカットで利用可能
- ドラッグ可能なポップアップウィンドウとカテゴリフィルター
- タグの投稿数とカテゴリを表示
- タグ別名サポート
- タグの別名を表示
- 日本語別名から英語タグへの変換
- 部分一致による複数の候補表示
- インタラクティブUI
- カテゴリ別の色分け
- ホバーエフェクト
- キーボードショートカット
インストール方法
- このリポジトリをComfyUIのcustom_nodesフォルダにクローンします:
cd ComfyUI/custom_nodes
git clone https://github.com/vkff5833/ComfyUI-PromptConverter
- 必要なパッケージをインストールします:
pip install -r requirements.txt
使用方法
基本ノード
- 対応形式のプロンプトテキストを入力
- レーティングを選択 (safe/sensitive/questionable/explicit)
- 基本オプションを設定:
- Unique: 重複タグを削除
- Auto quality tags: 推奨品質タグを追加
- Remove weights: すべてのタグの重み付けを削除
- ワークフローに出力を接続
フィルターノード
特定のタグタイプをフィルタリングする追加オプション:
- 一般/画風/ジャンル/キャラクタータグのフィルタリング
- 人物・人数/スコア/クオリティタグのフィルタリング
- レーティング/年代タグのフィルタリング
- フィルタリングされたタグを別出力で確認可能
UI機能
- テキスト選択:
- テキストを選択すると検索ボタンが表示
- 日本語タグに対する複数の置換候補を表示
- 関連タグ:
- 検索ボタンまたはAlt + -ショートカットで利用可能
- ポップアップでカテゴリ別にタグをフィルタリング
- タグをクリックしてプロンプトに追加
- 設定:
- Search Related Tag: タグ検索機能の有効/無効
- Display Other Name: 検索結果に別名を表示
- Replace Other Name: タグ置換候補の表示を有効化
バージョン履歴
現在のバージョン: 1.2.1
- タグ別名変換機能を追加
- 複数の置換候補を表示するUIの改善
- UI機能の設定を追加
- フィルタリング機能の強化
- 各種バグ修正と改善
ライセンス
MIT License